
Hey!
Welcome to this post. So, I reached the Gold League quite fast this season… and it was like hitting a wall. Reaching into Gold II, players use summoners level 6, and me… well, I had my rented level 4 summoners from Silver, which most of the times were no match to the monsters the other summoners could summon, so I decided to end my season sooner, once more, just like the last time.
The expenses to keep up with Gold players are greater than the DEC I get from winning; also I didn’t get very good rewards in Quest Chests this season, although I opened quite a bunch of them, so I’m done renting and playing for this season. Writing this posts is much more profitable and they are helping me build my deck little by little.
About the Nymph Wood
So…. I’ll be doing my Weekly Challenge with the Venari Bonesmith, instead of the Wood Nymph, but it would be unfair from me not dedicating a couple of words to her, after all, she has been my main healer for a long time, and has helped me win many battles, so I appreciate the card. However, my knowledge of cards and strategy grew and little by little she was displaced by monsters who adapt better to my game. Those would be, the Goblin Psychic who at level 4/5 is able to heal and inflict affliction, and the Khmer Princess, who at level 4 can also heal, and she only costs 2 mana.
About the cards used
For my Death deck I rented a level 2 Mimosa Nightshade. At this level she allowes me to summon Commons at level 5, Rares at level 4, Epics at level 3 and Legendaries at level 2 (max cap for Silver), and that is the level of the cards used. All of them are rented.
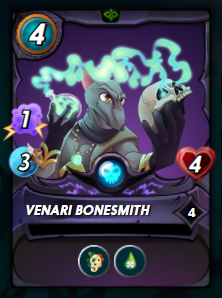
About the Venari Bonesmith
This card, since it came out in september, has been a recurring Monster in my death lineup. Although it doesn’t have a strong attack, I like it’s leech effect, which can turn him into back line tank if given time. For this season I rented a level 4 Venari Bonesmith; at this level he gets Poison and +1 Speed / +1 Health.
Battle #1
Ruleset
Holy Protection: All Monsters have the Divine Shield ability.
Even Stevens: Only Monsters with even Mana costs may be used in battles.
Only Fire, Life and Death Splinters allowed.
Mana cap: 48.
Lineup & Analysis
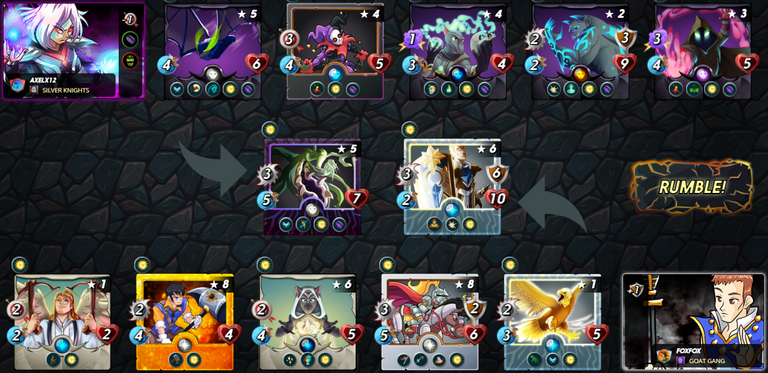
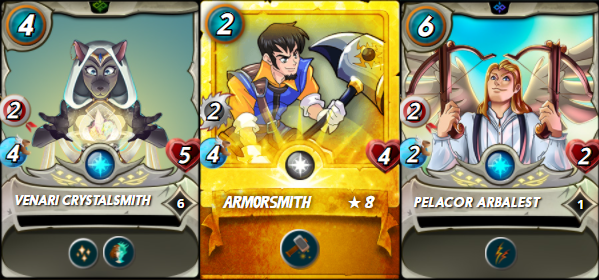
I expected my opponent to use the Life Splinter, thats why I put Harklaw as back line tank, however it was a waste of place, because my opponent didn’t use sneak attacks. Here, the cards that stand out are Mimosa; her debuffing effects were very useful, especially the one nullifying the Venari Crystalsmith healing effect.
Also, my first two tanks were great at whithstanding the front line, while my snipers took down the enemy’s back line.
Battle Link
Battle #2
Ruleset
Aim True: Melee and Ranged attacks always hit their target.
Equalizer: The Initial Health of all Monsters is equal to that of the Monster on either team with the highest base Health.
All Splinters allowed.
Mana cap: 25.
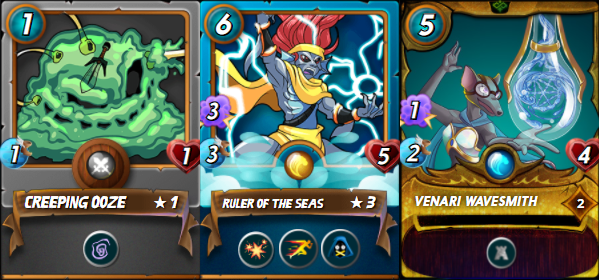
Lineup & Analysis

Here, although my summoner buffed my Monsters against magic, I also summoned the Death Elemental to reduce even more the potential magic damage… and it worked.
Here, the Poison effect from both the Spider and the Venari was critical to win. Also the Aim True rule played in my favour, otherwise my melee and ranged attack monsters wouldn’t have land a hit.
Battle Link
Bonus Track
Just a fight against a member of the Legendary Dragons guild. Spoiler: I lost. Battle Link
Thanks for stopping by!
Thumbnail Link
ESPAÑOL
¡Hola!
Bienvenido a este post. Llegué bastante rápido a la Liga de Oro esta temporada... y fue como chocar contra una pared. Llegando a Gold II, los jugadores usan invocadores de nivel 6, y yo... bueno, tenía mis invocadores de nivel 4 alquilados de Silver, que la mayoría de las veces no eran rival para los monstruos que los otros invocadores podían invocar, así que decidí terminar mi temporada. Antes de tiempo, una vez más, como la última vez.
Los gastos para mantenerse al día con los jugadores Gold son mayores que el DEC que obtengo al ganar; Además, no obtuve muy buenas recompensas en Cofres esta temporada, aunque abrí bastantes, así que terminé de alquilar y jugar por esta temporada. Escribir estos posts es mucho más rentable y me están ayudando a construir mi mazo poco a poco.
Sobre la Nymph Wood
Entonces…. Estaré haciendo mi Desafío Semanal con Venari Bonesmith, en lugar de Wood Nymph, pero sería injusto de mi parte no dedicarle un par de palabras, después de todo, ella ha sido mi sanadora principal durante mucho tiempo, y me ha ayudado a ganar muchas batallas, por eso le tengo aprecio a la carta. Sin embargo, mis conocimientos de cartas y estrategia crecieron y poco a poco fue desplazada por monstruos que se adaptan mejor a mi juego. Esos serían, el Goblin Psychic que en el nivel 4/5 es capaz de curar e infligir aflicción, y la Princesa Khmer, que en el nivel 4 también puede curar, y solo cuesta 2 maná.
Sobre las cartas utilizadas
Para mi mazo de Muerte alquilé una Mimosa Nightshade de nivel 2. En este nivel, me permite invocar Comunes en el nivel 5, Raros en el nivel 4, Épicos en el nivel 3 y Legendarios en el nivel 2 (límite máximo para Silver), y ese es el nivel de las cartas utilizadas. Todos ellas alquiladas.
Acerca del Venari Bonesmith
Esta carta, desde que salió en septiembre, ha sido un Monstruo recurrente en mi alineación de Muerte. Aunque no tiene un ataque fuerte, me gusta su efecto de Leech, que puede convertirlo en un tanque de línea trasera si se le da tiempo. Para esta temporada alquilé un Venari Bonesmith de nivel 4; en este nivel obtiene Veneno y +1 Velocidad / +1 Salud.
Batalla #1
Reglas
Protección Sagrada: Todos los Monstruos tienen la habilidad Escudo Divino.
Even Stevens: solo los monstruos con costos de maná pares pueden usarse en las batallas.
Solo se permiten Splinters de Fuego, Vida y Muerte.
Límite de maná: 48.
Alineación & Análisis
Esperaba que mi oponente usara el Splinter de Vida, es por eso que puse a Harklaw como tanque de línea trasera, sin embargo, fue un desperdicio de lugar, porque mi oponente no usó ataques furtivos. Aquí, las cartas que se destacan son Mimosa; sus efectos de debilitamiento fueron muy útiles, especialmente el que anuló el efecto curativo del Venari Crystalsmith.
Además, mis primeros dos tanques fueron excelentes para resistir la línea del frente, mientras que mis snipers derribaron la línea de fondo del enemigo.
Link Batalla
Batalla #2
Reglas
Aim True: los ataques cuerpo a cuerpo y a distancia siempre dan en el blanco.
Ecualizador: La Salud inicial de todos los Monstruos es igual a la del Monstruo de cualquier equipo con la Salud base más alta.
Todos los Splinters permitidos.
Límite de maná: 25.
Alineación & Análisis
Aquí, aunque mi invocador mejoró a mis Monstruos contra la magia, también invoqué al Death Elemental para reducir aún más el daño mágico potencial... y funcionó.
Aquí, el efecto Veneno tanto de la Araña como del Venari fue fundamental para ganar. Además, la regla Aim True jugó a mi favor, de lo contrario, mis monstruos de ataque cuerpo a cuerpo y a distancia no habrían dado un golpe.
Link Batalla
Bonus Track
Solo una pelea contra un miembro del gremio Legendary Dragons. Spoiler: perdí. Link Batalla
¡Gracias por pasar!
Thumbnail Link


Thanks for sharing! - @alokkumar121

Congratulations @axelx12! You have completed the following achievement on the Hive blockchain and have been rewarded with new badge(s):
Your next target is to reach 900 upvotes.
You can view your badges on your board and compare yourself to others in the Ranking
If you no longer want to receive notifications, reply to this comment with the word
STOPCheck out the last post from @hivebuzz: