Kobold Miner: Battle Strategy and Considerations / Strategia di Battaglia e Considerazioni (ENG/ITA)
 Card images owned by https://steemmonsters.com/ - Font used is Open Source - edit by @libertycrypto27

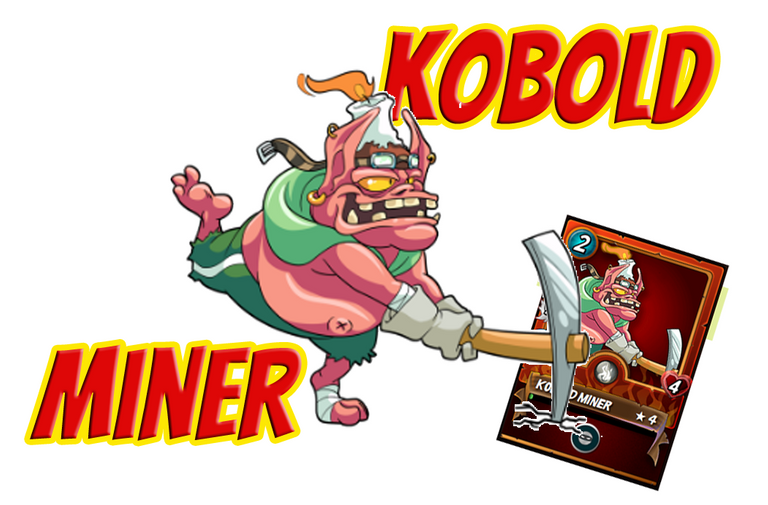
Kobold Miner: Battle Strategy and Considerations
Hello friends,
the protagonist of this post is the card Kobold Miner which is also the protagonist of of this week's "Share Your Battle" contest in Splinterlands.
The topics that I will cover in this post are the following:
Topics
- Card: Kobold Miner
- Description, Statistics and Abilities.
- Cost, Levels and Ratings
- Level Considerations
- A battle of mine with Kobold Miner
- My battle formation.
- Battle rounds
- Final Considerations
- Battle considerations
- Considerations about Kobold Miner
Card: Kobold Miner
Description, Statistics and Abilities
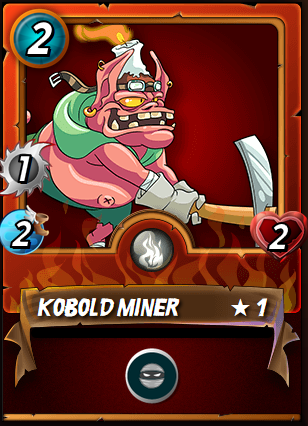
Kobold Miner is a card of the collections Alpha and Beta, is a Common card and is a card of the element Fire.
Kobold Miner level 1 has the following statistics:
- It has a low mana cost (2)
- Has 1 point of attack (Meele Attack)
- It has 2 life points and has no armor points.
- Has low speed (2)
- It has a ability: Sneak.

The cards that have the Sneak ability, attack the opponent's card in last position instead of the opponent's card in first position.
Cost, Levels and Evaluations

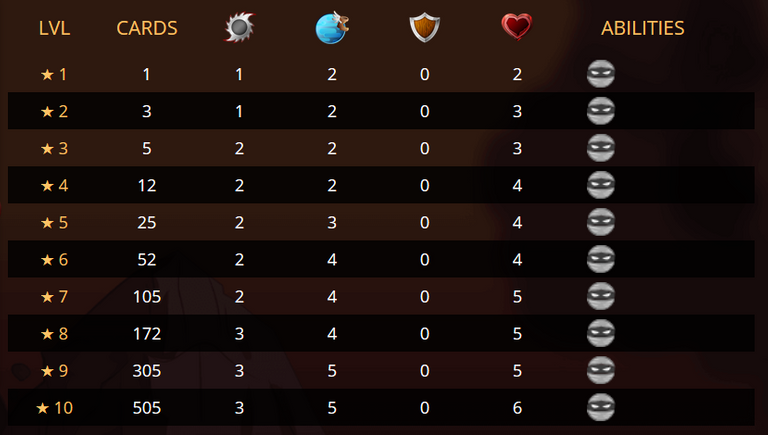
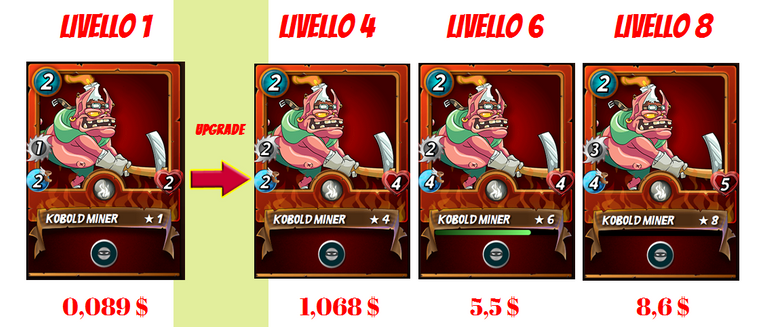
- Level 4: Compared to Level 1, it increases its attack points (1 --> 2) and increases its height points (2 --> 4).
- Level 6: Compared to Level 4 doubles the speed points (2 --> 4).
- Level 8: Compared to Level 6, it increases its height points (4 --> 5) and increases its attack points (2 --> 3).
Level considerations .
For those who play in the advanced leagues of Splinterlands the level that in my opinion has the best ratio benefits / price is the eighth level.
For new players who play in the initial leagues and who have few credits or few DEC I recommend to buy Kobold Miner (level 4).
I advise against buying Kobold Miner (Level 10).

Spending $10 more to take Kobold Miner from level 8 to the maximum level does not seem to me a convenient choice because it is too high a price to have only one more waist and one more speed point.

Now let's see how Kobold Miner behaves on the Battlefield.
A battle of mine with Kobold Miner
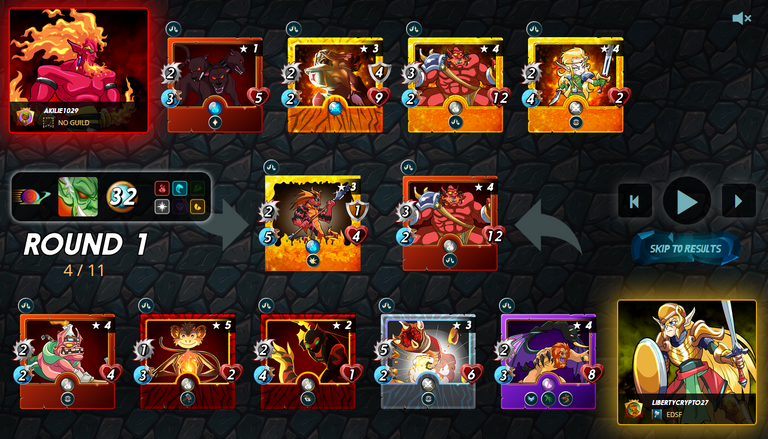
If you want to see the battle you can do it from this link: https://steemmonsters.com?p=battle&id=6468b465f273211930784cf33f1dce7d7f04b7f0&ref=libertycrypto27
- Reverse Speed: The speed of the cards is reversed.
- Up Close and Personal: Only cards with melee attack can be used in battle.
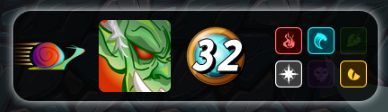
- Mana Cap: 32.
- Summoners: Death and Earth element summoners cannot be used in battle.
My battle formation
First position
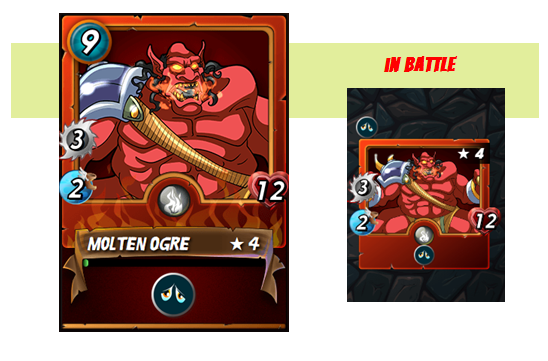
Why did I deploy Molten Ogre (Level 4) in first position?
When the battle rule is Reverse Speed my priority is to choose a low speed card to be deployed in first position.
Molten Ogre is a very good card in this particular circumstance because it has a speed of only two points and therefore has a very good chance to avoid one or more attacks.
It has other very good statistics:
- It has 12 life points.
- It has a good attack (3).
- He has a very good skill: Demoralize (decreases the life points of the opponent cards by one unit).
Second position
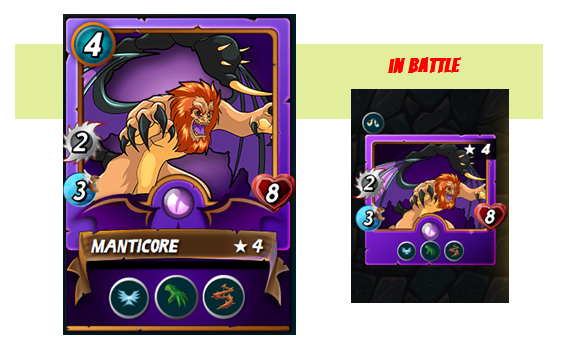
Why did I deploy Manticore (Level 4) in second position?
Manticore is a very strong card and its ideal position is the second position because the Reach ability allows it to attack from the second position.
It also has the Thorns ability which is very useful when the battle rule is Up Close and Personal.

Thanks to this ability, all opposing cards that attack Manticore will receive a counterattack from Manticore.
It also has very good statistics:
- It has a very low cost in mana (4)
- It has 8 life points which are many for a card that costs only 4 mana.
- It has two other excellent skills: Flying, Reach

Thanks to Manticore's Flying ability, Manticore is more likely to avoid melee and distance attacks.

Thanks to the ability Reach Manticore can attack from the second position instead of just the first.
Third position
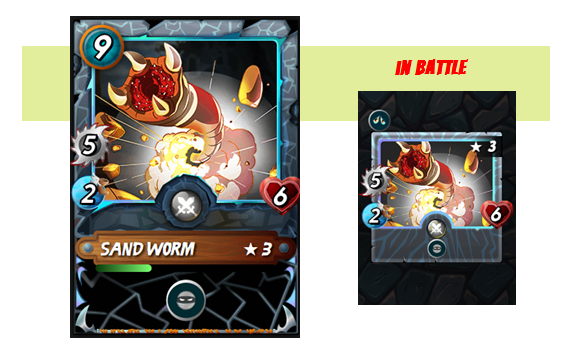
Why did I choose Sand Worm?
It has a low speed (2), has the same skill as Kobold Miner (Sneak) and has a powerful melee attack (5).
Excellent card according to the battle rules: Reverse Speed and Up Close & Personal.
Fourth position
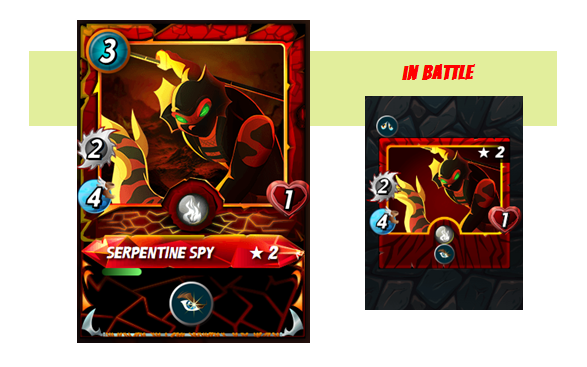
Why did I choose Serpentine Spy?
Serpentine Spy is perhaps the least suitable card for battle rules because it has a high speed and only one life point.
But It has a good attack and a very good skill: Opportunity.
Being the most fragile card I chose to place it in fourth position to protect it.
Fifth position
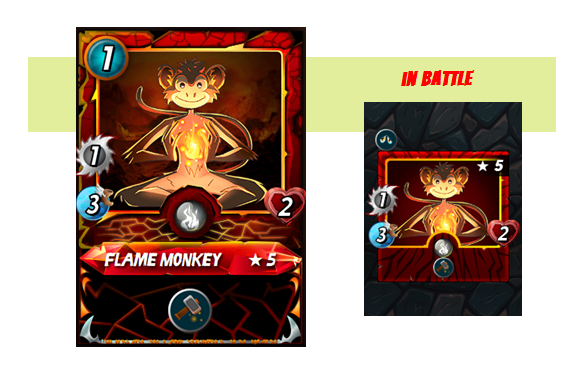
Why did I choose Flame Monkey?
Very useful paper in general but not in this battle.
I had one mana point available and Flame Monkey was the only card I could deploy.
It can only attack from the first position and its ability (Repair) in this battle does not bring any advantage because none of my cards have armor points.
Here I made a small positioning mistake because Flame Monkey should have been placed in the last position to protect Kobold Miner from a first attack.
Six position
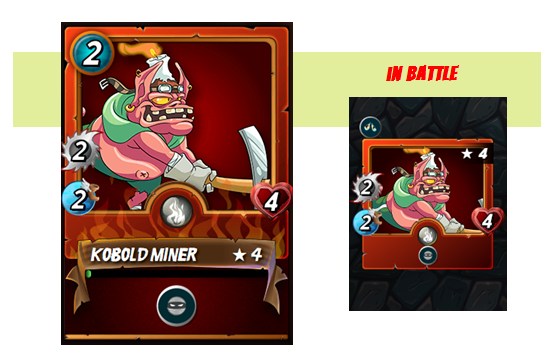
Why did I choose Kobold Miner?
Kobold Miner is really a very good card and is particularly suitable for this battle for the following reasons:
- it has a low speed (2)
- costs only two mana points.
I chose the sixth position because it has 4 mana points and has a better chance to resist an attack than Flame Monkey and Serpentine Spy.
Summoner
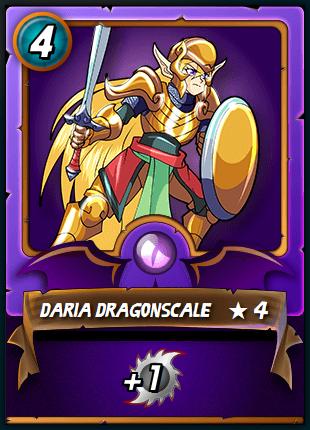
It is one of the summoners I use most particularly when the battle rule is Up Close and Personal.
It allows me to summon level 7 community cards, level 5 rare cards, level 4 epic cards and level 3 legendary cards.
Some time ago I wrote a post about Daria Dragonscale: https://peakd.com/hive-140217/@libertycrypto27/daria-dragonscale-vs-malric-inferno-considerations
Thanks to his ability all my melee attack cards get one more attack point which in the battle of this post is neutralized by the Demoralize ability of the opponent card Molten Ogre.
Battle Rounds
ROUND 2
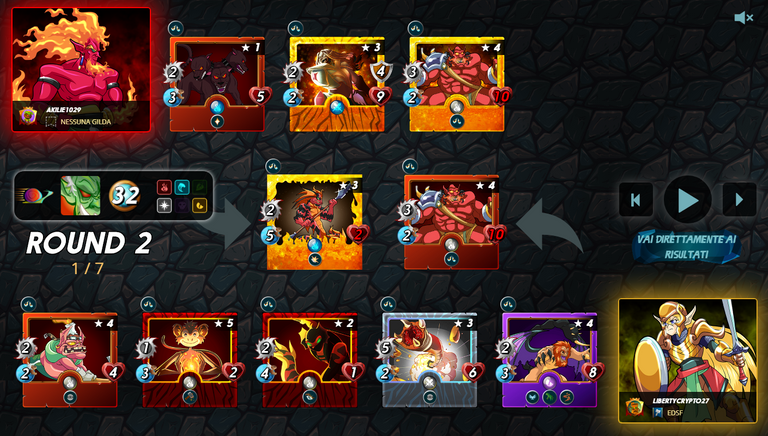
During the first round my opponent loses a card while I stay with all the cards in play. My statistical advantage in attack points increases.
In fact at the beginning of round 2 the difference between the total of attack points between me and my opponent is +6 in my favor.
ROUND 3
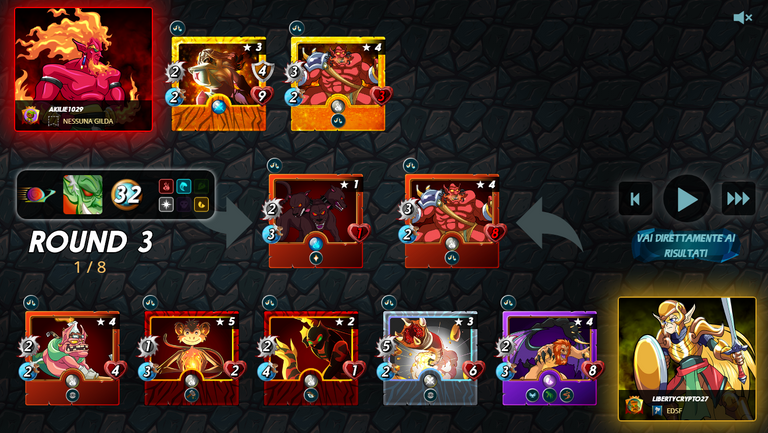
At the beginning of Round 3 all my cards are still in play while my opponent remains with only three cards.
The outcome of the battle is now taken for granted and in fact the battle ends at Round 4.
ROUND 4 (Final Round)
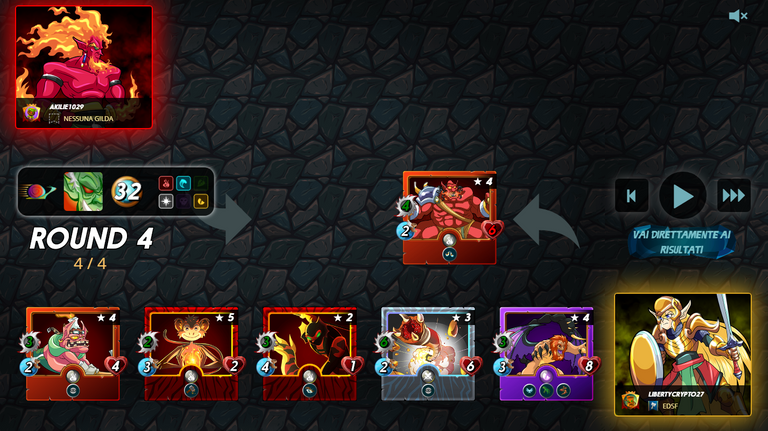
Final considerations
Considerations on the Battle
My opponent adopts a strategy that I hardly ever adopt.
He uses 4 cards out of 5 that have a good number of life points and a good attack but attack only from the first position.
My opponent's strategy is advantageous only when the battle rules are 2:
- Up Close and Personal
- Back to Basics
I won the battle because I lined up the cards paying close attention to the rules of battle.
I lined up 4 cards out of 6 able to attack from any position.
In each round my opponent has suffered 5 attacks while I have only one.
In fact Kobold Miner ends the battle with its life points intact.
Considerations on Kobold Miner
Kobold Miner is a card that I used a lot when I was in the initial leagues.
It's a cheap card that has a very low mana cost which makes it a very useful card especially when the battle has few mana available and when the battle rule is Little League.
Today that I play in Champion I/II leagues I continue to use it even if with less frequency.
I recommend the purchase of Kobold Miner to all players.
With this post I participate in the weekly Splinterlands contest entitled "Share Your Battle".
I really like to participate in this contest and if you are registered in Splinterlands you must absolutely participate too.
Haven't you registered on Splinterlands yet?
You are missing out on a more unique than rare opportunity to enjoy yourself and at the same time to earn tokens and cards.


Card images owned by https://steemmonsters.com/ - Font used is Open Source - edit by @libertycrypto27
Kobold Miner: Strategia di Battaglia e Considerazioni
Ciao amici,
la protagonista di questo post è la carta Kobold Miner che è anche la protagonista del contest di Splinterlands dal titolo "Share Your Battle" di questa settimana.
Gli argomenti che tratterò in questo post sono i seguenti:
Argomenti
- Carta: Kobold Miner
- Descrizione, Statistiche e Abilità.
- Costo, Livelli e Valutazioni
- Considerazioni sui livelli
- Una mia battaglia con Kobold Miner
- La mia formazione di battaglia.
- Svolgimento della battaglia
- Considerazioni Finali
- Considerazioni sulla battaglia
- Considerazioni su Kobold Miner
Carta: Kobold Miner
Descrizione, Statistiche e Abilità
Kobold Miner è una carta delle collezioni Alpha e Beta, è una carta Comune ed è una carta dell'elemento Fuoco.
Kobold Miner di livello 1 ha le seguenti statistiche:
- Ha un costo in mana basso (2)
- Ha 1 punto di attacco (Meele Attack)
- Ha 2 punti vita e non ha punti armatura.
- Ha una velocità bassa (2)
- Ha una abilità: Sneak.
Le carte che hanno l'abilità Sneak attaccano la carta avversaria in ultima posizione invece che la carta avversaria in prima posizione.
Costo, Livelli e Valutazioni
- Level 4: Rispetto al Livello 1 aumenta i suoi punti di attacco (1 --> 2) e aumenta i suoi punti vita (2 --> 4).
- Level 6: Rispetto al Livello 4 raddoppia i punti velocità (2 --> 4).
- Level 8: Rispetto al Livello 6 aumenta i suoi punti vita (4 --> 5) e aumenta i suoi punti di attacco (2 --> 3).
Considerazioni sui livelli
Per chi gioca nelle leghe avanzate di Splinterlands il livello che secondo me ha il miglior rapporto benefici / prezzo è l' ottavo livello.
Per i nuovi giocatori che giocano nelle leghe iniziali e che hanno pochi crediti o pochi DEC consiglio di acquistare Kobold Miner (livello 4).
Sconsiglio invece di acquistare Kobold Miner (Livello 10).
Spendere 10 $ in più per portare Kobold Miner dal livello 8 al livello massimo non mi sembra una scelta conveniente perchè è un prezzo troppo alto per avere soltanto un punto vita e un punto velocità in più.
Adesso vediamo come si comporta Kobold Miner sul campo di Battaglia.
Una mia battaglia con Kobold Miner
Se vuoi vedere la battaglia puoi farlo da questo link: https://steemmonsters.com?p=battle&id=6468b465f273211930784cf33f1dce7d7f04b7f0&ref=libertycrypto27
- Reverse Speed: La velocità delle carte è invertita.
- Up Close e Personal: Solo le carte con attacco da mischia possono essere utilizzate in battaglia.
- Mana Cap: 32.
- Evocatori utilizzabili: Gli evocatori dell'elemento Morte e gli evocatori dell'elemento Terra non possono essere utilizzati in battaglia.
La mia formazione di battaglia
Prima posizione
Perchè ho schierato Molten Ogre (Livello 4) in prima posizione?
Quando la regola di battaglia è Reverse Speed la mia priorità è scegliere una carta con velocità bassa da schierare in prima posizione.
Molten Ogre è un ottima carta in questa particolare circostanza perchè ha una velocità di soli due punti e quindi ha ottime possibilità di evitare uno o più attacchi.
Ha altre ottime statistiche:
- Ha 12 punti vita. che sono molti per una carta che costa solo 6 mana.
- Ha un buon attacco (3).
- Ha un'ottima abilità: Demoralize (diminuisce i punti vita delle carte avversarie di una unità).
Seconda posizione
Perchè ho schierato Manticore (Livello 4) in seconda posizione?
Manticore è una carta davvero forte e la sua posizione ideale è proprio la seconda posizione perchè l'abilità Reach le permette di attaccare anche dalla seconda posizione.
Ha inoltre l'abilità Thorns che è molto utile quando la regola di battaglia è Up Close e Personal.
Grazie a questa abilità tutte le carte avversarie che attaccheranno Manticore ricevereranno un controattacco da parte di Manticore.
Ha inoltre ottime statistiche:
- Ha un costo in mana davvero basso (4)
- Ha 8 punti vita che sono molti per una carta che costa solo 4 mana.
- Ha altre due ottime abilità: Volare, Raggiungere
Grazie all'abilità Volare Manticore ha una maggiore probabilità di evitare gli attacchi da mischia e dalla distanza.
Grazie all'abilità Raggiungere Manticore può attaccare dalla seconda posizione invece che soltanto dalla prima.
Terza posizione
Perchè ho scelto Sand Worm?
Ha una velocità bassa (2), ha la stessa abilità di Kobold Miner (Sneak) e ha un potente attacco da mischia (5).
Ottima carta in funzione delle regole di battaglia: Reverse Speed e Up Close & Personal.
Quarta posizione
Perchè ho scelto Serpentine Spy?
Serpentine Spy è forse la carta meno adatta alle regole di battaglia perchè ha una velocità alta e un solo punto vita.
Ha comunque un buon attacco e un ottima abilità: Opportunity.
Essendo la carta più fragile ho scelto di schierarla in quarta posizione per proteggerla.
Quinta posizione
Perchè ho scelto Flame Monkey?
Carta molto utile in generale ma non in questa battaglia.
Avevo un punto mana disponibile e Flame Monkey era l'unica carta che potevo schierare.
Può attaccare solo dalla prima posizione e la sua abilità (Repair) in questa battaglia non porta alcun vantaggio perchè nessuna delle mie carte ha punti armatura.
Qui ho fatto un piccolo errore di posizionamento perchè Flame Monkey avrei dovuto metterlo in ultima posizione per proteggere Kobold Miner da un primo attacco.
Sesta posizione
Perchè ho scelto Kobold Miner?
Kobold Miner è davvero un ottima carta ed è particolarmente adatta a questa battaglia per i seguenti motivi:
- ha una velocità bassa (2)
- costa solo due punti di mana.
Ho scelto la sesta posizione perchè ha 4 punti di mana e ha una maggiore posibilità di resistere ad un attacco rispetto a Flame Monkey e Serpentine Spy.
Evocatore
E' uno degli evocatori che uso di più in particolare quando la regola di battaglia è Up Close e Personal.
Mi permette di evocare carte comuni di livello 7, carte rare di livello 5, carte epiche di livello 4 e carte leggendarie di livello 3.
Tempo fa ho scritto un post di approfondimento su Daria Dragonscale: https://peakd.com/hive-140217/@libertycrypto27/daria-dragonscale-vs-malric-inferno-considerations
Grazie alla sua abilità tutte le mie carte con attacco da mischia ottengono un punto attacco in più che però nella battaglia di questo post è neutralizzata dall'abilità Demoralize della carta avversaria Molten Ogre.
Svolgimento della battaglia
ROUND 2
Durante il primo round il mio avversario perde una carta mentre io rimango con tutte le carte in gioco. Il mio vantaggio statistico relativo ai punti di attacco aumenta.
Infatti all'inizio del round 2 la differenza tra il totale dei punti di attacco tra me e il mio avversario è di +6 in mio favore.
ROUND 3
All'inizio del Round 3 tutte le mie carte sono ancora in gioco mentre il mio avversario rimane con solo tre carte.
L'esito della battaglia è ormai scontato e infatti la battaglia termina al round 4.
ROUND 4 (Final Round)
Considerazioni finali
Considerazioni sulla Battaglia
Il mio avversario adotta una strategia che io non adotto quasi mai.
Utilizza 4 carte su 5 che hanno un buon numero di punti vita e un buon attacco ma che attaccano solo dalla prima posizione.
La strategia del mio avversario è vantaggiosa solo quando la regole di battaglia sono 2:
- Up Close e Personal
- Back to Basics
Ho vinto la battaglia perchè ho schierato le carte prestando molta attenzione alle regole di battaglia.
Ho schierato 4 carte su 6 capaci di attaccare da ogni posizione.
Ad ogni round il mio avversario ha subito 5 attacchi mentre io solo uno.
Infatti Kobold Miner termina la battaglia con i punti vita intatti.
Considerazioni su Kobold Miner
Kobold Miner è una carta che ho utilizzato tanto quando ero nelle leghe iniziali.
E' una carta economica che ha un costo in termini di mana davvero basso che la rende una carta molto utile soprattutto quando la battaglia ha pochi mana disponibili e quando la regola di battaglia è Little League.
Oggi che gioco nelle leghe Champion I/II continuo ad utilizzarla anche se con meno frequenza.
Consiglio l'acquisto di Kobold Miner a tutti i giocatori.
Con questo post partecipo al contest settimanale di Splinterlands dal titolo "Share Your Battle".
Se sei un giocatore di Splinterlands ti consiglio vivamente di partecipare.
Non sei un giocatore di Splinterlands?
Se non sei un giocatore di Splinterlands stai perdendo un'occasione più unica che rara per divertirti e allo stesso tempo guadagnare carte e DEC (NFT di Splinterlands).
@tipu curate
Upvoted 👌 (Mana: 7/21)
Grazie mille eli :)
!BEER
View or trade
BEER.Hey @elikast, here is a little bit of
BEERfrom @libertycrypto27 for you. Enjoy it!Learn how to earn FREE BEER each day by staking your
BEER.#posh: https://twitter.com/libertycrypto27/status/1299024781510049792
Congratulations @libertycrypto27! You have completed the following achievement on the Hive blockchain and have been rewarded with new badge(s) :
You can view your badges on your board And compare to others on the Ranking
If you no longer want to receive notifications, reply to this comment with the word
STOPDo not miss the last post from @hivebuzz:
This is a fantastic Battle Challenge post. Really well done!
Thank you very much @monster-curator for your comment and for your support :)
!BEER
View or trade
BEER.Hey @monster-curator, here is a little bit of
BEERfrom @libertycrypto27 for you. Enjoy it!Learn how to earn FREE BEER each day by staking your
BEER.Thanks for sharing! - @mango-juice

wonderful post liberty. I really like your overall presentation friend. Kobold miner is an old dog and he is still ruling with his sneak ability. I have a level 8 alpha and I am thinking to make it max soon 🙂 I also loved your strategy, thou I generally don't place sneak monsters at the end, rather in middle. But in your case. it's more important to save the SERP right?
Keep playing splinterlands and post awesome content like this one.
Thank you very much @mango-juice for your comment.
Yes, I also generally put kobold miner in the middle but in this case I preferred to protect Serpentine (1 life point) and Sand Worm which has a devastating attack.
I wanted to put Flame Monkey in last position so I could use it as if it were Fourious Chicken, but I got distracted and time was pressing :)
Thanks again :)
!BEER
Posted via neoxian.city | The City of Neoxian
View or trade
BEER.Hey @libertycrypto27, here is a little bit of
BEERfrom @cloudblade for you. Enjoy it!Learn how to earn FREE BEER each day by staking your
BEER.