Splinterlands Ruleset Strategy Series - #7 - Melee Mayhem
As the name suggests... be prepared for Mayhem.
We're back, Splinterlands players, with issue #7 of the Ruleset Strategy Series. in which I take you casually through the 27 Splinterlands Rulesets and give you a little bit of advice on how to handle each of them.
Today the Ruleset that we're dealing with is a doozie for the Tank and the scrappers: I'm talking about Melee Mayhem. But don't let the name fool you. It's more complex than it seems. Even though Melee attackers are heavily favored and hog all the attention, a well-placed sniper or Magic attacker can clench a sneaky little victory for you before your enemy knows what hit them!
Melee Mayhem
Melee attack Monsters can attack from any position.
General Advice
First and foremost, this is just my opinion. I may create the vast majority of the lore for Splinterlands, but that just means I live in a fantasy world. It doesn't make me any better of a player. I can always give advice better than I can follow it myself, I have a heap of bad habits, and I'll be the first one to admit that I'm wrong when it comes to Splinterlands strategy. One thing I've learned with this game: The more I play, the less I know.
If you have some ideas for tips or some great cards that work great in this Ruleset, please share in the comments so everyone can benefit from your insight. Please don't assume that I'm leaving something out or that I missed something just because I don't talk about it in the post. As we all know, there are many layers and levels of play in Splinterlands.
First, the Summoner
Your Summoner selection is the first important decision you'll make in Melee Mayhem, perhaps even the most important. The impulse is of course to use either Malric Inferno or Daria Dragonscale, with their unique +1 Melee attack buff. Daria presents the extra opportunity of buffing colors other than red (I like to Melee buff my Water team most often), but she only works in battles with higher Mana caps.
While Daria and Malric are the 2 Summoners best to buff your Melee attacks, another great tactic is to use one of the Beta Epic Summoners with a Mana cost of only 3. They don't come with any buffs or abilities, but you may find that in Melee Mayhem you want to dedicate as much Mana as you can toward heavy attackers and defenders.
Heavy on the Tank
The best tanks for Melee Mayhem have either extremely high Health and Armor,attack-slowing abilities like Shield and Void, or even better yet: All of the above. OF course there are other ways to go, such as the Dodge method (Cocatrice, etc.), and the extreme Healing method, but it's honestly just the most fun to use your biggest, baddest monsters in Melee Mayhem.
If your tank can Retaliate, even better. If it gets Enraged, forget about it. Plus, if you use your strongest and toughest tank enhanced with some excellent support and Healing, you can absorb almost all the Melee Mayhem attacks of the enemy's team.
Be Clever with Abilities
When every Melee attacker is attacking from every position, you can make better use of some Abilities than normal rules allow. Poison is one that comes to mind. Usually monsters with Poison have lower Health because their main purpose is to land their dirty attack. Once they do this their work is usually done. When you are able to hide a Melee Poisoner safely in the back of your team you can sometimes poison 2 or 3 different enemy monsters.
Tank Heal may seem like an obvious choice, but think about it for a second. If your tank is taking that many more attacks, you need extra Tank Healing to keep it alive.
You can also favor Armor and Repair, because we're talking about Melee attacks. You cannot often know what your opponent is going to do in Splinterlands, but in Melee Mayhem you can be pretty sure they're going to go hard on Melee attackers. If you can manage a combination like Protect with double Repair, you'll almost certainly keep your tank alive (for long enough).
Use low-Health monsters that normally die after their first hit (like the Exploding Dwarf). In Melee Mayhem, you can even build an entire strategy around the Exploding Dwarf. Buff his attack and let his Blast ability do the work for you. If you place him wisely in the fortified middle of your team, he can usually be responsible for the destruction of the entire enemy line.
Don't Forget Magic
If you must forget something (which I do not recommend) forget the Range on this one. Magic is definitely still needed. If you get all set up for Melee attacks but you have neglected Magic defense, your team could go down so fast you'll think the game cheated. I recommend very high Health and strong Healing for the tank, followed by a Magic defense card with Void or Magic Reflect. That way even if your tank goes down, hope is not lost.
Some Melee Mayhem Cards I Like
Here are a few of the cards that I use most often in this Ruleset. I'm not saying they're the best. I just like them. Try them out; you may like them too.
Chain Golem

How can you not love this thing? It's got Shield, Void, and the kind of high Health that I'm looking for in a Melee Mayhem tank. On level 4, the Golem gets the added perk of sometimes being able to Stun the enemy's tank.
Goblin Mech
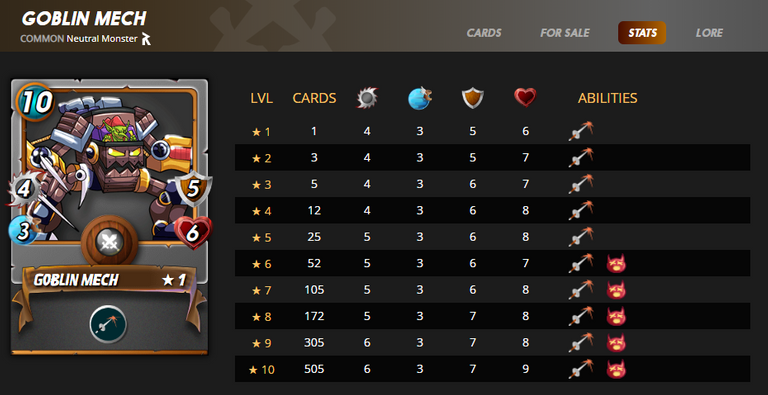
Here we are, back to one of my favorite cards, the Goblin Mech. The one complaint that I have about this card in normal play is that it sometimes dies too quickly at higher League play. This is never a problem in Melee Mayhem because the Goblin Mech can be far from the enemy's blows, third or even fourth from the front. With a single Melee attack buff, the Goblin Mech is swinging for 6 or 7, which is enough to take out even some of the biggest tanks in 2 hits.
Gelatinous Cube
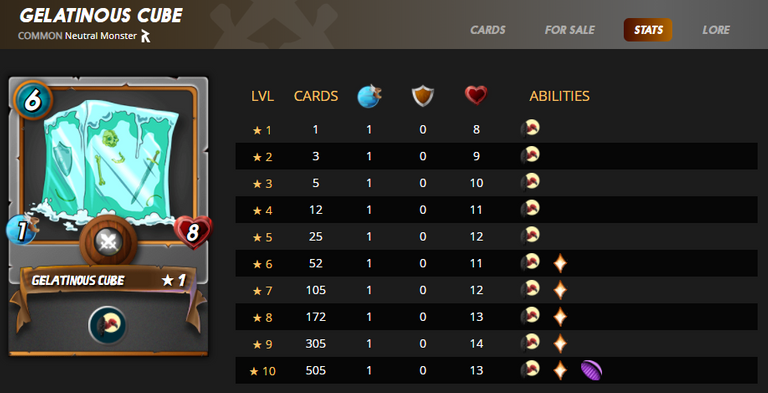
This is the moment you've been waiting for: The Cube's moment. Using this card correctly (considering is has both Healing and Scavenger) is about distracting from it for long enough for it to go up in Health. If you place it carefully near the back with enough mayhem happening in front, it will eventually reach the front, and here's what will happen. There may be a few enemy attackers left, but chances are they won't be able to do enough damage without the help of their heavy hitters. The Cube will Heal, your enemy will cry, and you will dance on the graves of their monsters.
Exploding Dwarf
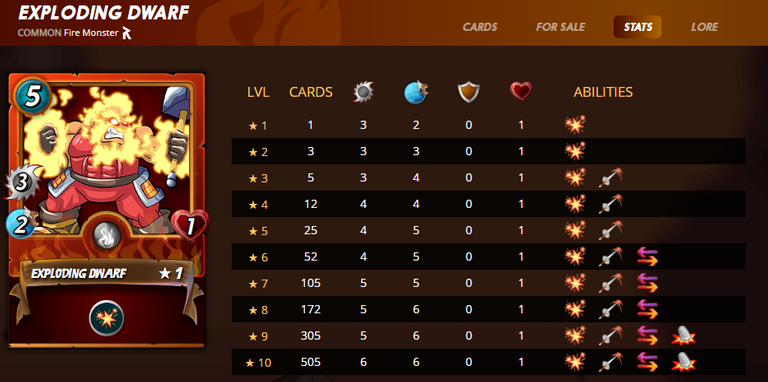
Like I said before, Melee Mayhem presents a rare opportunity to get an exciting battle (instead of a frustrating one) out of the Exploding Dwarf. Instead of wondering whether he'll get a single attack off before being destroyed, you can be confident that he will explode through your enemy's line by placing him in the back middle.
Naga Warrior

In Melee Mayhem, my favorite tank of all time becomes one of the strongest cards for the very back of the team. Without substantial armor, she simply can't be the tank I need in this Ruleset. Still, almost every opponent you face in Melee Mayhem will try to be clever by throwing in a Sneak attacker or two. The Naga Warrior will take care of those guys without breaking a sweat. If you're really lucky she'll get enraged from their sneak attacks, and remember, it's Melee Mayhem, so she never stops attacking.
The Kraken
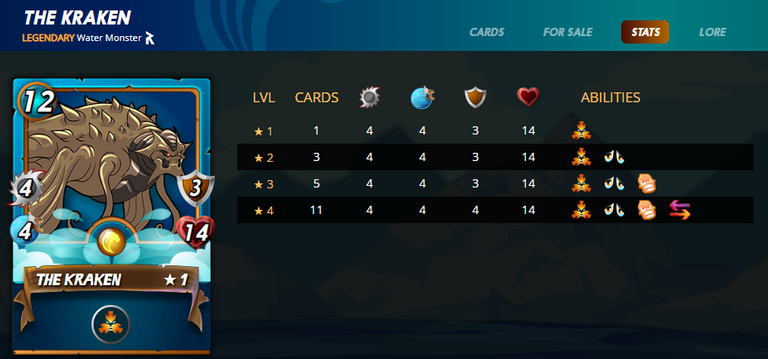
I have to throw in the Kraken, the biggest monster in the game (so far). This beast brings the Taunt ability to the table, which upsets the entire balance of Melee Mayhem, often throwing off your enemy's plan. Instead of taking all the damage to your tank, you can pull the damage away to the Kraken and use some other kind of stinger in front to do the real damage.
I hope this strategy guide has been helpful for you, and that you've learned a little something about how to deal with Melee Mayhem.
I could go on and on suggesting monsters to use, but if you apply some of the advice I gave you above, the correct monsters (in your collection) will reveal themselves to you. In Splinterlands, there are infinite right answers (and wrong ones).
If you have suggestions of your own, please share them in the comments, and if you're reading this for advice, don't forget to check the comments for great tips from other players!
Previous Editions of the RuleSet Strategy Series
Splinterlands on Twitter
Splinterlore on Twitter
Splinterlands on Publish0x
Spliterlands Discord Community
Splinterlands Telegram Community
Fantastic post in a fantastic series. No surprise from the Master of Lore!