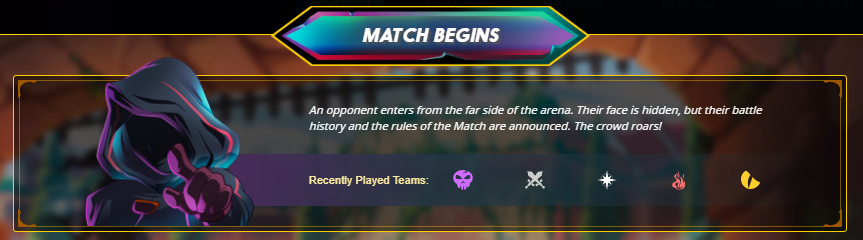
A CLOSE SHAVE AGAINST ILTHAIN IN GONG THE DISTANCE RULESET!
Summoner Focus

In this week's Social Media Challenge, I want to highlight one of the Summoners from the Life Splinter: ILTHAIN! This Summoner frequently appears in battles featuring the Going The Distance ruleset, where only Monsters with the Ranged attack are permitted on the battlefield!
The Going The Distance ruleset is a relatively recent addition, introduced sometime last year. It certainly amplified the effectiveness of the ILTHAIN Summoner from the Chaos Legion Edition. Unfortunately, I don't have this Summoner in my collection, so I can only admire those who can deploy him during the Going The Distance ruleset!

Ability Focus


Monsters with Return Fire will return reduced damage back to their attacker

The Battle
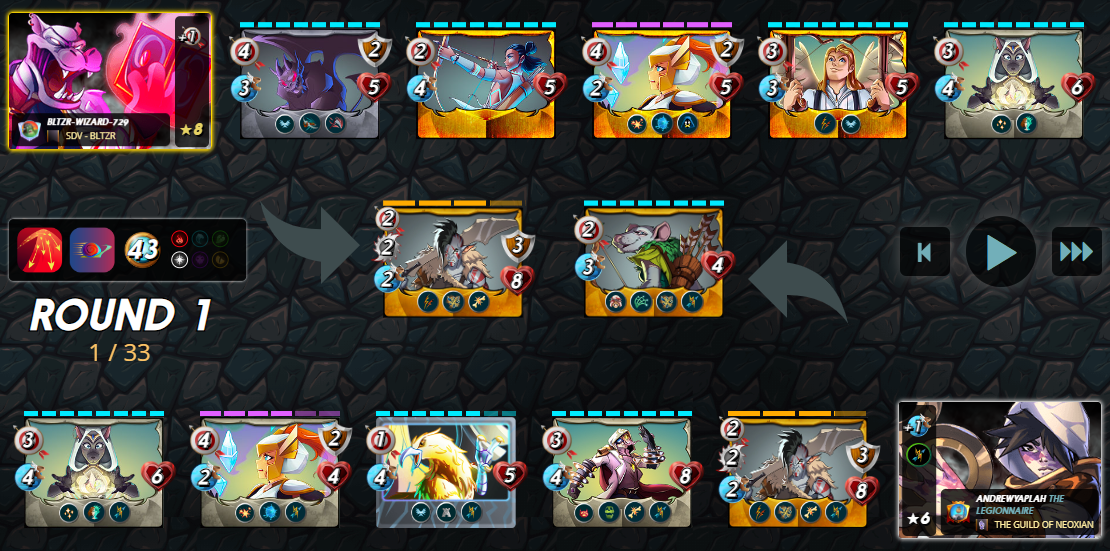
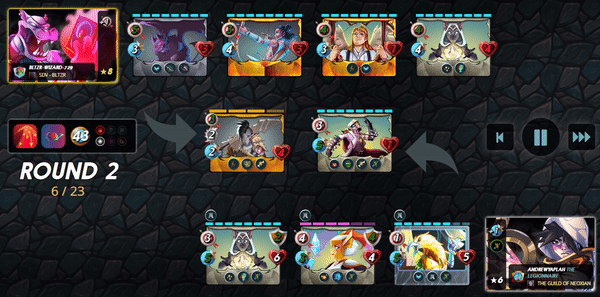
While fulfilling my responsibilities in the Splinterlands scholarship account I have with Balthazar, bltzr-wizard-729, I was able engage in a battle against Summoner ILTHAIN especially in the Going The Distance ruleset. To get right into the action, the battle link can be found here. Otherwise, do read on as I go into more detail regarding the lineup and fight.

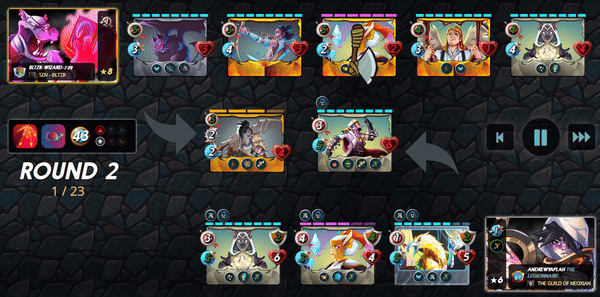
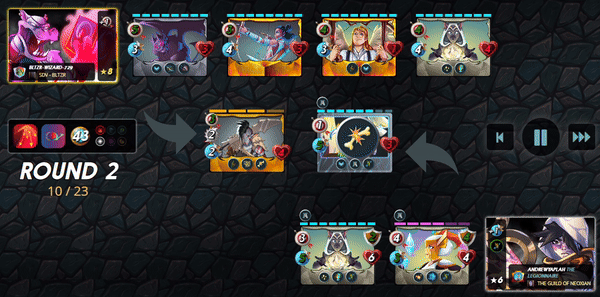
Let's start by examining the rules that govern this battle. It's a fairly simple match with just two rulesets in play. Firstly, we have the Going The Distance ruleset, which permits only units with Ranged attacks. Secondly, there's the Reverse Speed ruleset, which essentially flips the order of Speed, making the Monster with the lowest Speed attack first and have the greatest chance of dodging attacks. This matchup imposes a mana cap of 43 and restricts the use of only the Fire and Life Splinters.

Summoner, General Sloan
Given the restriction to only the Fire and Life Splinters, I chose the Life Splinter due to its stronger synergy with the Going The Distance ruleset, which permits only units with Ranged attacks on the battlefield. However, since I lack the ability to deploy ILTHAIN, I had to settle for General Sloan in this instance. The Summoner provides a +1 Range buff, offering potentially valuable tactical advantages in this battle 😄

First Position, Drybone Raider
The Drybone Raider holds a special place as one of my favored Soulbound Reward cards, and I was fortunate to acquire a Gold Foil version in one of my End Of Season Reward Chests! This versatile Monster can execute both Melee and Ranged attacks, making it eligible for battles governed by the Going The Distance ruleset. Placing it in the first position restricts the use of its Range attack, yet I can still leverage its Melee capabilities, especially enhanced by the Double Strike ability 💪
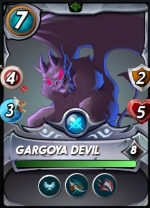
Second Position, Gargoya Devil
The Gargoya Devil was positioned in the second slot due to its Close Range ability, enabling it to utilize its Ranged attack effectively even from the first position when required. Additionally, this Monster possesses the Flying ability, further enhancing its evasion rate by 25%. With a mana cost of 7, the Gargoya Devil boasts impressive stats: a 4 Range attack, 3 Speed, 2 Armor, and 5 Health, making it a well-rounded unit in the lineup! 😝
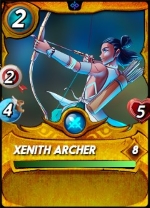
Third Position, Xenith Archer
Moving on to the third position, we introduce the Xenith Archer, representing the Neutral Splinter. This Monster serves as an invaluable utility unit, as it can be chosen irrespective of Splinter restrictions, costing the team setup only 2 mana. I must say, for its cost of 2 mana, this unit offers commendable stats: a 2 Range attack, 4 Speed, and 5 Health! 😜


Fourth Position, Prismologist
Fifth Position, Pelacor Arbalest
Following that, we have the primary attackers in the lineup: the Prismologist and the Pelcaor Arbalest! These two Monsters wield immense destructive power in their attacks. The Prismologist boasts the Blast ability, dealing additional damage to adjacent units of the target, while the Pelacor Arbalest possesses the Double Strike ability, enabling it to inflict 6 Range damages in a single round! 🤝

Last Position, Venari Crystalsmith
In this battle, the Venari Crystalsmith emerges as the standout performer, playing a pivotal role in shaping the outcome with its invaluable support ability. The Venari Crystalsmith employs its Tank Heal ability to prolong the lifespan of my tank, the Drybone Raider, a critical element in this encounter, as I'll elaborate on in the following section when we dive deeper into the battle analaysis! 😊
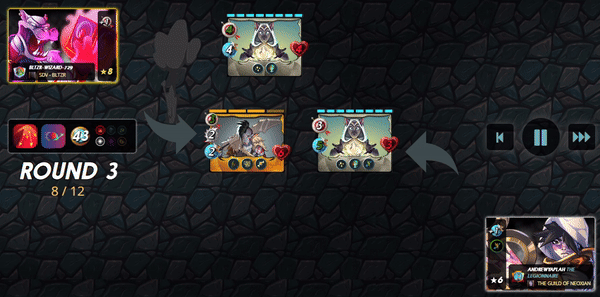
The Analysis
Upon encountering the Going The Distance ruleset specified for this battle, I swiftly examined my opponent's previous battle history prior to our matchup. It immediately became apparent that I was in for a tough challenge upon discovering that my opponent had utilized the ILTHAIN Summoner in one of their last five battles 😖
Facing a team led by the ILTHAIN always signifies trouble, particularly in the Going The Distance ruleset, where the Summoner bestows the entire lineup with the Return Fire ability. With this ability in play, attackers effectively sustain damage with every Ranged attack dealt, turning each turn into a potential suicide mission! 😩
Emerging victorious against an ILTHAIN appears insurmountable, especially within the confines of the Going The Distance ruleset. However, hope was not lost, as another ruleset governing this battle intervened to my advantage! The Reverse Speed ruleset, which effectively reverses all Speed-related mechanics, came to my aid. With ILTHAIN'S +1 Speed buff for the lineup, it inadvertently inflicted more harm upon the opponent's team than providing a beneficial boost!
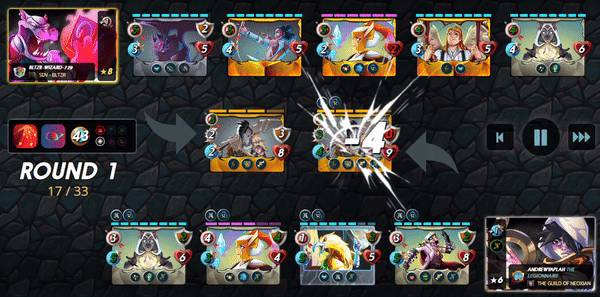
On the other hand, my Drybone Raider managed to evade the adverse effects of the Return Fire bestowed by ILTHAIN by solely employing Melee attacks from its placement in the first position. Right from the outset of the battle, I recognized that this would be my sole saving grace upon realizing that the opponent would undoubtedly deploy the Summoner ILTHAIN for this encounter!
Recognizing that the Drybone Raider is my sole hope for a slim chance of victory in this battle, the support of Venari Crystalsmith's Tank Heal to sustain the tanker's lifespan became increasingly crucial!
What do you guys think about this? Was luck on my side? Do share your comments below 😎

If you made it this far, I sincerely appreciate your time and value your encouragement. Please feel free to leave any comments or suggestions so that we can discuss about other strategies. Thinking about giving Splinterlands a try but haven't signed up yet? Feel free to use my referral link: https://splinterlands.com?ref=ak08, and be sure to reach out to me if you have any questions!
Are you interested in reading some of my future writings? Don't forget to follow me! In the meantime, here are some of my most recent blogs if you'd like to view them:
 |  |
 |  |
All banners, dividers card and battle images used in this article are open source and obtained from the Splinterlands team or made by flauwy. Do check out his link for other amazing designs!
Nice battle! Good share.
!PGM
BUY AND STAKE THE PGM TO SEND A LOT OF TOKENS!
The tokens that the command sends are: 0.1 PGM-0.1 LVL-0.1 THGAMING-0.05 DEC-15 SBT-1 STARBITS-[0.00000001 BTC (SWAP.BTC) only if you have 2500 PGM in stake or more ]
5000 PGM IN STAKE = 2x rewards!
Discord
Support the curation account @ pgm-curator with a delegation 10 HP - 50 HP - 100 HP - 500 HP - 1000 HP
Get potential votes from @ pgm-curator by paying in PGM, here is a guide
I'm a bot, if you want a hand ask @ zottone444
Thank you bro! 😎
Checkout our BDVoter Daily Hive Showcase & Participate into our Daily giveaway to win various prize.
Thanks for sharing! - @yonilkar

Thank you for taking time to curate my post @yonilkar!
Appreciate it! 😁
Thanks for taking your time to share about your game jorney,
Glad to be able to do it! 😊