LET US AVOID REGRETFUL FIRE AT ONE ANOTHER!
Ruleset Focus

This week in Battle Mage Secrets, we will dive into examining the unique ruleset called FIRE & REGRET! In this ruleset, each unit is endowed with the RETURN FIRE ability right from the start of the battle. Monsters possessing this ability retaliate against Ranged attackers by inflicting damage equal to half of the attackers' inflicted damage, rounded up. Consequently, in battles governed by this ruleset, the utilization of Ranged Monsters dwindled considerably due to the notable disadvantage they encountered 😵

Abilities Focus
FIRE & REGRET ruleset. When assembling your team, be sure to watch out for Monsters with these abilities, as they can significantly boost your chances of winning ✌️

RETURN FIRE, and Thorns damage to all enemy monsters by 1RETURN FIRE damages

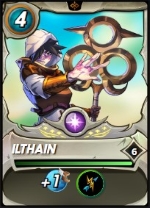
Summoners, Lir Deepswimmer & Ilthain
When the RETURN FIRE ability is mentioned, Summoners such as Lir Deepswimmer and Ilthain are frequently linked to it, as they offer a comparable advantage to your team similar to what's observed in the FIRE & REGRET ruleset. These two Summoners hold significant value and are commonly selected in battles regulated by the Going the Distance ruleset! 😁

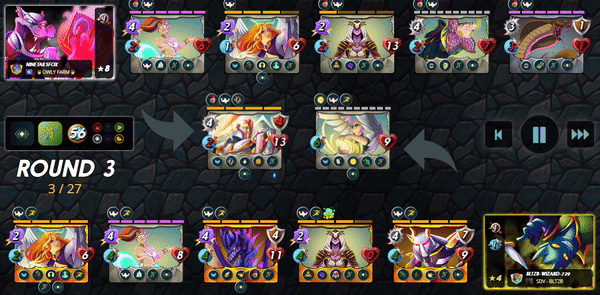
The Battle
While fulfilling my responsibilities in the Splinterlands scholarship account I have with Balthazar, bltzr-wizard-729, I was able to engage in a battle that involves the FIRE & REGRET ruleset. To get right into the action, the battle link can be found here. Otherwise, do read on as I go into more detail regarding the lineup and fight.

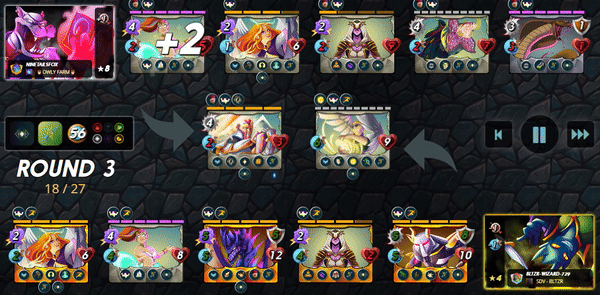
Let's start by examining the ruleset implemented in this battle. This is a rather straightforward battle with only 2 rulesets. The first one being the Up To Eleven ruleset where all units gain the Amplify ability. Next, we have the main highlight of this week's challenge, the FIRE & REGRET ruleset which we have already discussed extensively in the above sections. The battle enforces a mana restriction of 56 and ban the use of the Water and Death Splinters.
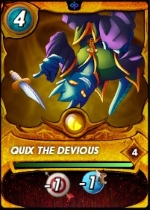
Summoner, Quix The Devious
Given the ample mana available in this battle, my decision to opt for the Dragon Splinter and appoint Quix The Devious as my Summoner primarily revolves around deploying Dragon Monsters, especially the Chaos Dragon. The bountiful mana cap in this battle benefits the Dragon Summoner, allowing for the inclusion of high-mana-costing Dragon Monsters alongside another Splinter if desired. Additionally, the Summoner's debuffs of -1 Speed confer valuable tactical advantages during battles 😄

First Position, Pelacor Conjurer
Pelacor Conjurer stands out as a cost-effective tank. With a mere mana cost of 2, it boasts impressive Speed and Health attributes. What distinguishes this Monster are its valuable abilities, including Fly, Phase, and Divine Shield. These combined attributes elevate Pelacor Conjurer to a formidable adversary, capable of withstanding the attacks of opposing Monsters. Considering the FIRE & REGRET ruleset in play, its Magic Reflect ability would also come in handy! 😁
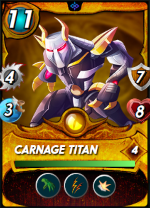
Second Position, Carnage Titan
The Carnage Titan emerges as an unmatched powerhouse on the battlefield, displaying impressive statistics and formidable abilities. Despite being categorized as Melee, it maintains its offensive prowess while positioned in the second slot, courtesy of the Reach ability. Moreover, its Double Strike capability enables the Carnage Titan to unleash devastating blows on its enemies. With the Shield ability further enhancing its resilience, the Carnage Titan can endure reduced Melee damage when under attack! 😝
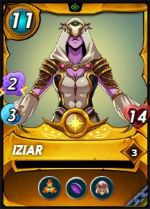
Third Position, Iziar
Iziar serves as the linchpin of my lineup, playing a crucial role in the success of my strategy. To fully exploit its potential, reaching Level 3 is important (luckily, I managed to obtain 2 copies of Gold Foil), as it unlocks the Martyr ability. Its Taunt ability enables me to strategically place it between the Monsters I wish to bolster upon Iziar's demise. Furthermore, its impressive durability, owing to its high Health and Void ability, renders it a resilient force on the battlefield 😎
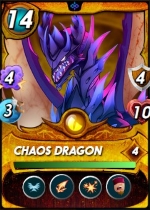
Fourth Position, Chaos Dragon
Despite its substantial mana cost, the Chaos Dragon unquestionably demonstrates its value with each mana point spent, solidifying its status as an unstoppable presence on the battlefield. While the Scattershot ability brings an element of unpredictability that doesn't always align with my preferred tactics, the Chaos Dragon consistently inflicts significant damage on the enemy's forces, especially when combined with its Blast ability! Additionally, the Blind ability increases the chances of enemies missing their target with both Melee and Ranged attacks! 😜
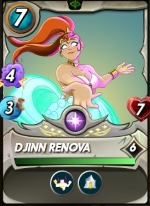
Fifth Position, Djinn Renova
Whenever I opt for the Life Splinter, Djinn Renova consistently ranks among my preferred cards to incorporate into the lineup. Its notable Magic damage, coupled with respectable Health and Speed statistics, renders it a dependable choice. What distinguishes Djinn Renova is its Triage ability, which proves invaluable particularly when I position Iziar (refer to Third Position) in the rear lines. This arrangement enables Djinn Renova to adeptly Heal my team, ensuring their sustained health and heightened effectiveness in battle! 👍
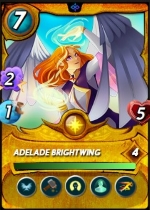
Last Position, Adelade Brightwing
Choosing Adelade Brightwing is crucial for the success of my strategy. The Resurrect ability possessed by this Monster synergizes effectively with the Martyr ability. This tactic has the potential to provide my lineup with a double stats boost through the Martyr ability if Iziar is the Resurrected unit. Furthermore, the Repair ability could assist in restoring some of the Armor stats on the Carnage Titan when it's positioned as the tank in the first position, thereby enhancing my team's survivability during the battle! 😤
The Analysis

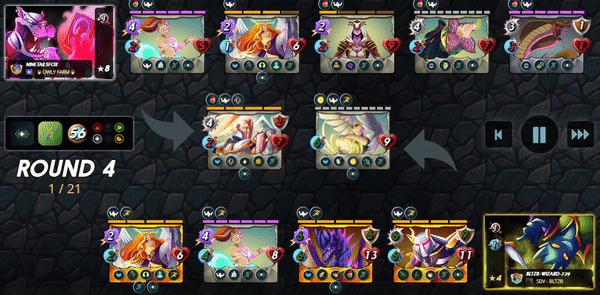
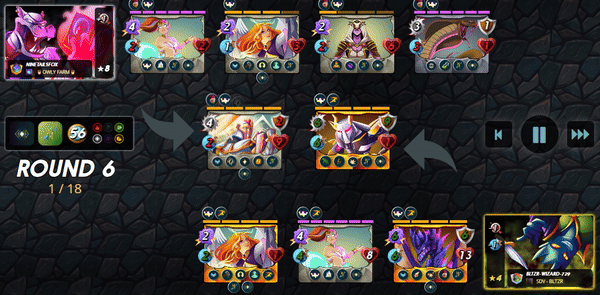
With the Up To Eleven and FIRE & REGRET rulesets in effect for this battle, it's unsurprising that there were no Ranged attacking Monsters present on the battlefield. Choosing them could prove detrimental to the lineup, as each attack would result in the attacker receiving damage as backlash due to the RETURN FIRE ability 😖
Similar to my approach, the opponent also chose to have Iziar absorb all damage through the Taunt ability. However, their strategy didn't unfold as intended since I have the Chaos Dragon in my setup. The Chaos Dragon, equipped with the Scattershot ability, can randomly strike a target within the battlefield and is not affected by Iziar's Taunt ability! 🤗
Do you guys have any better recommendations for setting up the team in this particular ruleset? Do share them with me in the below comments 😜

If you made it this far, I sincerely appreciate your time and value your encouragement. Please feel free to leave any comments or suggestions so that we can discuss about other strategies. Thinking about giving Splinterlands a try but haven't signed up yet? Feel free to use my referral link: https://splinterlands.com?ref=ak08, and be sure to reach out to me if you have any questions!
Are you interested in reading some of my future writings? Don't forget to follow me! In the meantime, here are some of my most recent blogs if you'd like to view them:
 |  |
 |  |
All banners, dividers card and battle images used in this article are open source and obtained from the Splinterlands team or made by flauwy. Do check out his link for other amazing designs.
your opponent weird leh he should use quix haha. what a troller. he also didn't play any range units seems weird
well not everyone have full set of cards to play with 😒
lol but this one like relaly should have mah this is core CL Leh
well not everyone is as hardcore
haha ok la fair enough
i probably wouldn't have if I didn't play with a scholar account.
oh true also but u might play wild if no scholar leh i heard its easier
Nice sharing of your strategy bro.
Thank you for the support bro! 😁
This post has been manually curated by @alokkumar121 from Indiaunited community. Join us on our Discord Server.
Do you know that you can earn a passive income by delegating to @indiaunited. We share more than 100 % of the curation rewards with the delegators in the form of IUC tokens. HP delegators and IUC token holders also get upto 20% additional vote weight.
Here are some handy links for delegations: 100HP, 250HP, 500HP, 1000HP.
100% of the rewards from this comment goes to the curator for their manual curation efforts. Please encourage the curator @alokkumar121 by upvoting this comment and support the community by voting the posts made by @indiaunited.
Thank you @indiaunited and @alokkumar121 for the support!
Really appreciate this 🙏
cheers!! 🥂
Checkout our BDVoter Daily Hive Showcase & Participate into our Daily giveaway to win various prize.
Thank you for the support!
Appreciate it 😊
Your line-up was original
I like the strategies with magic and the melee combo strikes
Have you made a purchase on the reward shop?
!PIZZA
!CTP
Regards
Hi there @oadissin! Thank you again for your support!
I have yet to make any purchase with my glints, still saving them up for now and strategize on what to get starting next season! How about you? 😇
I am buying Master Draw
Merits look interesting, but Master Draw are my target.
Yeah still collecting those SB Reward Cards, so I will probably save them up for Master Draw too! 😁
$PIZZA slices delivered:
@oadissin(9/15) tipped @ak08
Thanks for sharing! - @mango-juice

Thank you @mango-juice for curating my post!
Appreciate it ☺️
Welcome AK ❤️