Heavy Hitters - Remarkable Splinterlands Battles!
This week's Social Media challenge features what is always an enjoyable task - share your most remarkable Splinterlands moment! And while pinpointing the MOST remarkable moment is rather difficult, one of my favorite things to see in Splinterlands is a battle where there are BIG things. Big monsters, big damage, and large amounts of carnage!
The primary enablers of the battle we are about to take a look at are the Equalizer and Equal Opportunity rulesets. Both of these rules tend to lead to seeing larger numbers on the battlefield. Equalizer is a fairly straightforward one - instead of each monster having its usual amount of health, it gets whichever amount the biggest monsters in the battle has. That means all of your low health monsters get a nice boost. Equal Opportunity doesn't do anything to monster stats, but it does give every monster Opportunity. This means that you can use more melee monsters, which tend to have more stats for their cost - who doesn't like more bang for your buck? With these two rulesets in today's battle, the stage is set to see some fireworks!
If you wanted to jump right to the action, the Battle Link is right here. Want to hear some more about the lineup? Read on further!

Here are the rules for our battle. We have Born Again, which means that every monster has the Rebirth ability. We also have Equal Opportunity, which grants all monsters Opportunity. And finally, we have Equalizer, which sets every monster's health to be whatever the highest base amount is on either team. The combination of Equal Opportunity and Equalizer is a bit of a funny one - since it evens out all monster health, it tends to result in somewhat linear battles which progress from front to back. To go along with the ruleset, we have a fairly large amount of mana with a cap of 48, and 3 splinters to choose from.
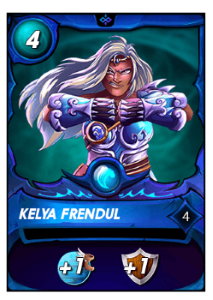
For my summoner I decided to go with Kelya Frendul. Kelya is an excellent all-around summoner, with buffs to armor and speed which are helpful in the vast majority of battles. Kelya is particularly good for this fight since Water has plenty of high mana monsters, and those armor and speed buffs tend to work well in Equalizer battles - that additional health gives speed more of a chance to make an impact.
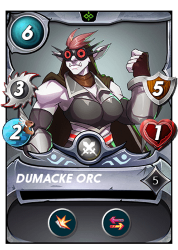

I started off my lineup with Dumacke Orc and Diemonshark. Dumacke Orc is amazing in Equalizer battles, since that stat line of 1 health is often a liability, but is completely negated by the ruleset. Instead, Dumacke Orc gets to sit back and take advantage of its Shield and Retaliate abilities while enjoying just as much health as every other monster. Diemonshark was my second monster in the lineup, and another great one in the ruleset. With Equal Opportunity in play it can attack even when it isn't in the front position, and with 6 health it has some extra bulk to help keep it in the fight for as long as possible.
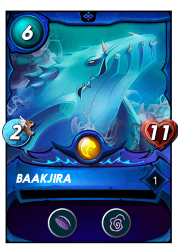
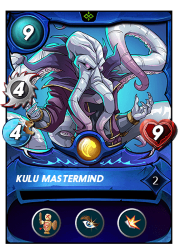
For the next portion of the lineup we'll go with a strategy that is extremely powerful in Equal Opportunity - a Weapons Training combination. Kulu Mastermind uses Weapons Training to grant melee attacks to adjacent monster with no attack. This is a decent ability under normal circumstances, but with Equal Opportunity it becomes straight up bonkers - thanks to Kulu Mastermind both Baakjira and my next monster (we'll get there in a second!) get to attack for 4 melee damage per turn regardless of whether they are at the front or not. Oh, and let us not forget that Baakjira also brings Slow and Void along.
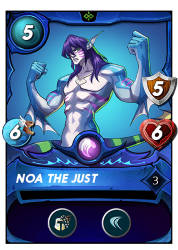

We'll close out our team with Noa the Just and Coastal Sentry. Noa the Just has no base attack, but that just means that we get to take advantage of Kulu Mastermind's Weapons training. Rust is a nice added bonus that could effectively lower the enemy team's bulk. Finally, we have Coastal Sentry. Coastal Sentry is another great Equal Opportunity and Equalizer monster, since it is normally a slightly lower bulk monster, but not it has extra health AND can attack out of the back. With Double Strike, this also contributes a whooping 8 melee damage per turn to our damage output.

With the lineup set, it's off into battle! When I see the selected teams I feel pretty good about my chances. My opponent has gone with a lineup that is heavy on magic damage and anti-magic monsters. While this would have absolutely demolished a lineup with magic attackers, my selected team just so happens to be all melee damage. While the opposing monsters look like they will be hitting awfully hard, I think my lineup has the damage output to match it.
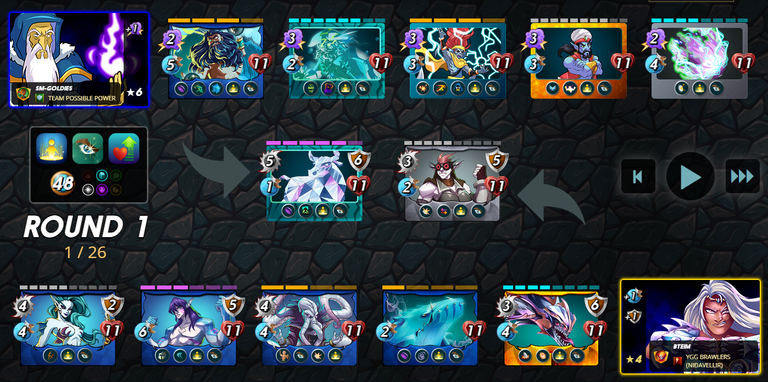
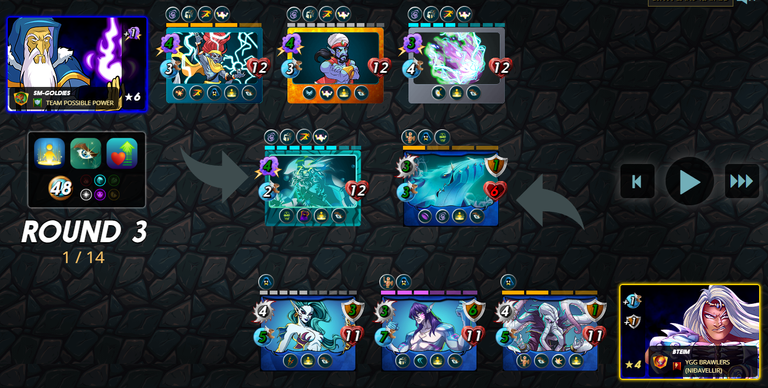
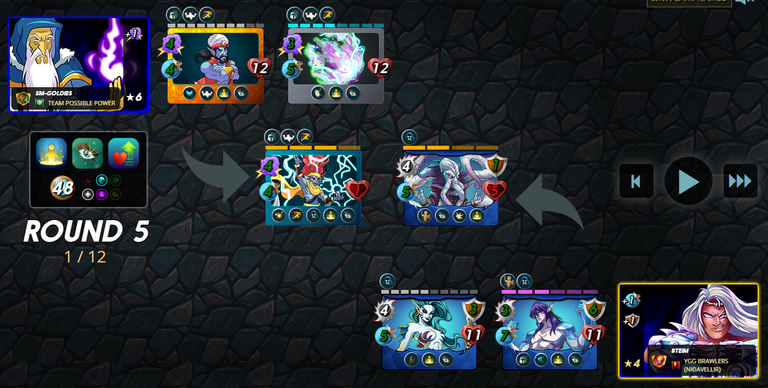
Thanks to Equalizer, there is plenty of bulk on the battlefield and the fight takes a while to develop. But by the beginning of round 3 we are beginning to make some progress - both teams have lose their front 2 monsters, and while the enemy Captain's Ghost has a small health advantage on my Baakjira, Baakjira also has Void, particularly useful against an all-magic team.
By round 5 the battlefield is beginning to clear. And while both sides are taking heavy damage, my team has eked out a small advantage - mostly due to Coastal Sentry's sky-high damage output.
One more round and my team was poised for the victory - thanks to a significant speed advantage, all of my monsters get to attack first and will finish off the enemy team before their turns even come around. All in all, a somewhat close fight but a clear victory in the end. And again, if you wanted to see the whole battle for yourself, you can see it right here.
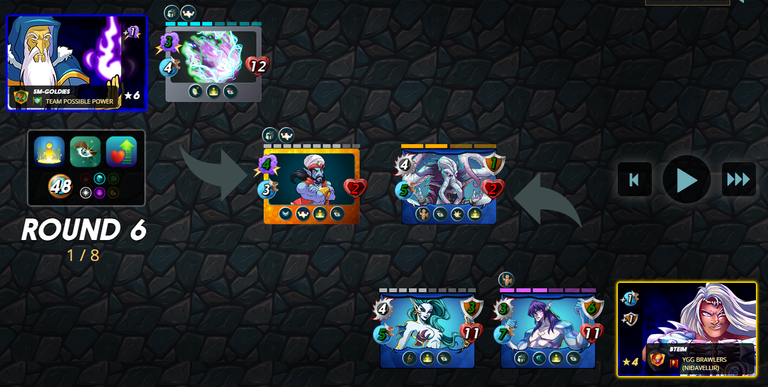
My strategy for this battle worked out perfectly. While my opponent brought along a selection of powerful magic attackers, my collection of monsters tailored to the Equal Opportunity and Equalizer rules were able to take advantage of the battle conditions and win the day.

Thank you so much for reading all the way to the end. Interested in seeing some more of my writing in the future? Be sure to give me a follow! In the meantime, if you'd like to see some of my recent posts:
An Even-tful Fight - Tournament Battling in Splinterlands! - A Splinterlands battle analysis, featuring some high stakes tournament play!
Splinterlands Economics: Causation - A look at causation, and how we can apply it to Splinterlands!
Splinterlands Economics: Ceteris Paribus - An introduction to the concept of Ceteris Paribus, and how we can apply it to Splinterlands!
Thinking about giving Splinterlands a try but haven't signed up yet? Feel free to use my referral link: https://splinterlands.com?ref=bteim, and be sure to reach out to me if you have any questions!
All images used in this article are open source and obtained from Pixabay or Unsplash. Thumbnails borrowed with permission from the Splinterlands team or made in Canva.
!PIZZA
$PIZZA slices delivered:
@speedtuning(7/10) tipped @bteim
Checkout our BDVoter Daily Hive Showcase & Participate into our Daily giveaway to win various prize.
Thanks for sharing! - @marianaemilia

Good battle! Thanks for sharing!