I Will Survive - Battling with What Doesn't Kill You!
In the spirit of the new weekly Battle Mage Secrets challenges, I would like to take a look at a Splinterlands battle with a particular focus on a ruleset. Our ruleset today is one that is one that you may enjoy if you enjoy a good old fashioned slugfest, or if you like to get a little angry. Today, we'll be looking at a battle with the What Doesn't Kill You ruleset!
In battles with What Doesn't Kill You, all monsters receive the Enrage ability. This means that if a monster has taken damage, then it will have additional melee attack and speed (it is a 50% boost, if you're counting). The main monsters that benefit from this are the bulky monsters that can take a hit - after all, you want them to be able to stick around to take advantage of those boosted stats after getting damaged, instead of being instantly killed. Melee monsters also get to double dip with Enrage, since they benefit from both additional speed AND attack - other monsters will merely get the extra speed.
There is also the tricky case of monsters with Cripple - while they don't benefit themselves from What Doesn't Kill You, they CAN help to deny an Enrage bonus from an enemy monster since a monster which is damaged and then later has its health reduced is still considered "undamaged" if its current health is equal to its maximum.
If you wanted to jump right to the action, the Battle Link is right here. Want to hear some more about the lineup? Read on further!

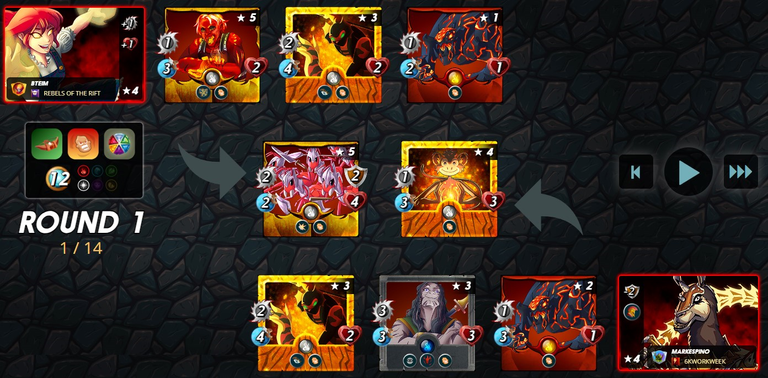
Here are the rules for our battle. We have What Doesn't Kill You, which we discussed above, and gives every monster Enrage. We also have Close Range and Taking Sides, which allows ranged monsters to attack from the front position and makes neutral monsters ineligible for this battle. Notably, we have a very low mana cap of just 12 to work with, and two splinters to choose from - Fire or Life.

While Fire and Life are both great for low mana battles, on account of the What Doesn't Kill You ruleset I have a slight preference for melee monsters this battle. Fire is great in this situation because Tarsa is the perfect melee summoner, giving monsters buffs to both health AND melee damage.


I started my team with my tank and secondary tank. Antoid Platoon isn't particularly bulky in most situations, but in a 12 mana battle a monster with 2 armor, 4 health, and Shield actually looks pretty durable. Remember - everything is relative! I backed up Antoid Platoon with Radiated Scorcher. I wasn't expecting Radiated Scorcher to do much, but he gives my other monsters a buffer for just a single point of mana.

I stuck in Serpentine Spy as my main source of damage. While Serpentine Spy hits for just two, or three with Tarsa's buff, the Opportunity ability means that Serpentine Spy can target whichever enemy monster looks the weakest. My plan for this battle was for Antoid Platoon and Radiated Scorcher to buy time for my Serpentine Spy to knock the important enemy monsters out of the fight.

I was all out of mana at this point, but not out of cards. I finished off my lineup with Scorch Fiend. As a "free" card it isn't terribly impactful, but it could soak up a Sneak attack and be a shield for Serpentine Spy.

With the lineup set, it's off into battle! When I see the selected teams I am concerned - my opponent has brought even more indirect damage to the fight than I did, with both a Sneak and an Opportunity attacker. To top that off, one of those attackers is a gladiator monster with Bloodlust, which makes my Scorch Fiend at the back a bit of a liability. The one thing I have going for me is that most of the enemy monsters are not particularly bulky, and my Antoid Platoon is well positioned to take advantage of Enrage.
The first round of battle goes poorly. My backline monsters get knocked out of the fight immediately, giving the enemy Orella Abadon a Bloodlust buff along the way. There WAS a cause for hope though - in a lucky coincidence, my Antoid Platoon is set up to become Enraged and be able to take out the opposing Orella in a single hit!
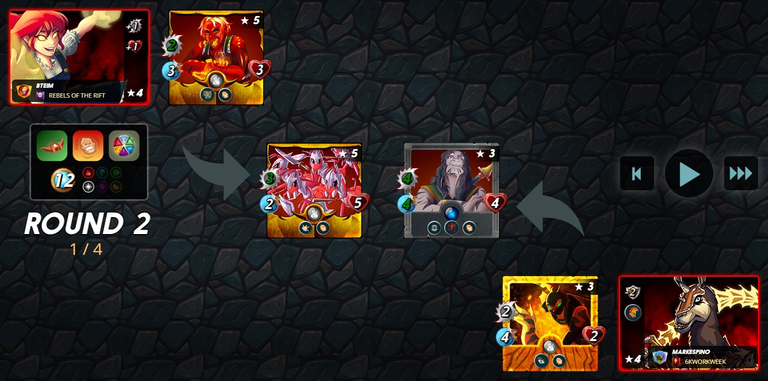
In a pivotal second round, my Enraged Antoid Platoon finishes off Orella. At the start of round 3 things are looking great for my team - Serpentine Spy gets the first attack but thanks to Shield it won't be able to kill my Antoid Platoon, which then gets the chance to close out the battle. Luckily for me Antoid Platoon didn't miss, sealing my victory! And again, if you wanted to see the whole battle for yourself, you can see it right here.
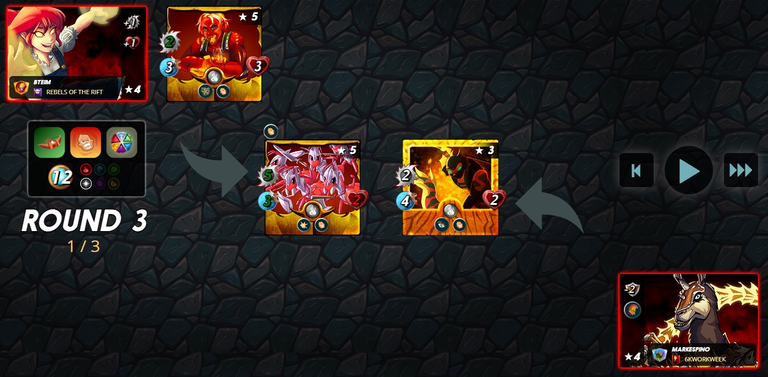
This battle did not quite go according to plan - in fact, when I saw the selected teams at the beginning I was fairly certain that I had lost. But luckily, that turned out to not be the case. This fight showcased just how powerful Enrage can be on a bulky monster - I selected a solid tank that could take advantage of Enrage, and it was able to sweep through the opposing monsters for the win.

Thank you so much for reading all the way to the end. Interested in seeing some more of my writing in the future? Be sure to give me a follow! In the meantime, if you'd like to see some of my recent posts:
Mistakes Were Made - Battling with Reverse Speed! - A Splinterlands battle analysis, featuring Reverse Speed!
Splinterlands Economics: Causation - A look at causation, and how we can apply it to Splinterlands!
Splinterlands Economics: Ceteris Paribus - An introduction to the concept of Ceteris Paribus, and how we can apply it to Splinterlands!
Thinking about giving Splinterlands a try but haven't signed up yet? Feel free to use my referral link: https://splinterlands.com?ref=bteim, and be sure to reach out to me if you have any questions!
All images used in this article are open source and obtained from Pixabay or Unsplash. Thumbnails borrowed with permission from the Splinterlands team or made in Canva.
What an incredible battle in the "What Doesn't Kill You" ruleset!
It's truly inspiring to see how you skillfully adapted to the challenging conditions of low mana and still managed to secure a victory. Congratulations on this impressive win, and thank you for sharing this exciting battle with the community.
Thank you! Glad that I am providing some entertainment 😁
It's alright and you sure does.
Thanks for sharing! - @mango-juice
