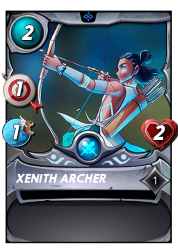
Value at Its Zenith - Using Xenith Archer in Battle!
This week's Share Your Battle challenge features Xenith Archer! Xenith Archer is one of those cards that can find its way into many of your lineups. It cheap cost and moderate usefulness mean that you can often fit it onto your team. Like many other cheap cards, it isn't going to singlehandedly win you the game (at least, in most scenarios), but it provides solid value and the versatility of it being a neutral splinter card means that more often than not, it will be eligible for the fight.
As I mentioned right at the start, Xenith Archer is cheap - it costs just 2 mana to bring into battle! For 2 mana you can't expect all that much, but at level 1 you do get a single point of damage and speed, on a 2 health body. Notably, it is ranged damage (it's an archer, duh), so if Xenith Archer can sit safely in the middle of your lineup it can do a great job of boosting your damage. The battle I choose to share today showcases Xenith Archer's typical use scenario - a battle where I was able to keep it safe, and where it was able to provide solid, if unremarkable, value.
If you wanted to jump right to the action, the Battle Link is right here. Want to hear some more about the lineup? Read on further!


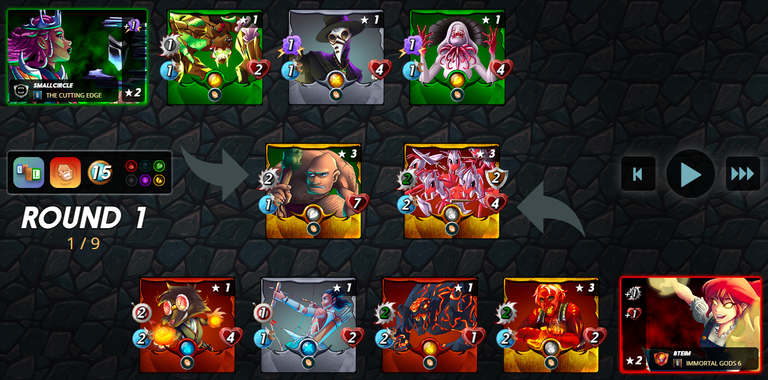
First up: the ruleset. This was exactly the kind of ruleset where I would look to deploy Xenith Archer. The mana cap is a relatively low 15, which means that we want every monster we bring to be as cost efficient as possible. The Back to Basics ruleset is very helpful here as well, because that means we can position our Xenith Archer without having to worry about it getting picked off by and Snipe or Opportunity attacks.
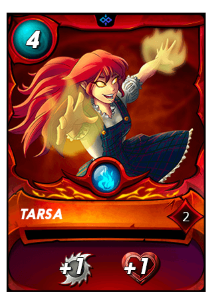
Tarsa may seem like an unusual pick for a battle where we are trying to use Xenith Archer. But Life (i.e., General Sloan) was not available to pick, and in low mana cost battles, melee damage is slightly more valuable than it is in medium to high cost battles. Tarsa's health bonus will also be a welcome buff on all of the monsters in my lineup.
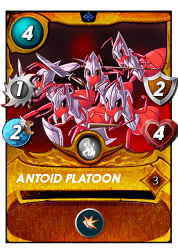
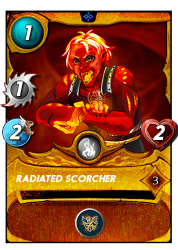
As usual, I started off my lineup with a couple of tanks. Antoid Platoon and Radiated Scorcher are both tanks which have relatively good stats for their mana cost. They do lose their abilities thanks to Back to Basics and Antoid Platoon in particular really misses having its Barrier, but they both get dual bonuses from Tarsa and will hopefully be able to buy some time for my monsters at the back while also dealing out a bit of damage to the enemy lineup.
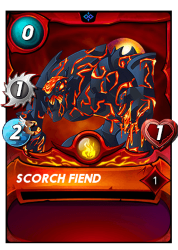
Okay, no beating around the bush here...Scorch Fiend is here purely as a meat shield. The fiends (or chicken, if you have one) are great to have in low mana cost battles, because you are more likely to have an open slot in your lineup, and they are literally free to add in. I put my fiend in the middle for this battle because I knew that all of the damage would be coming from the front, thanks to Back to Basics, and I wanted to give my back line monsters some additional protection.

Finally comes the most important part of my lineup - the ranged damage. In Back to Basics, the only way to increase your damage output beyond the front melee monster is to add in ranged or magic damage. I choose Xenith Archer and Scavo Firebolt for this battle because both of them are super cost efficient - at 2 and 4 mana for 1 and 2 ranged damage respectively, they each have a cost of just 2 mana per point of ranged damage. My plan was for these two to provide enough of a punch to be able to knock out my opponent's whole team before they could take mine out.

With the lineup set, it's off into battle! When I see the selected teams I am slightly concerned - my opponent has brought Obsidian and two magic attackers - that means my Antoid Platoon isn't going to last very long. On the other hand, I do appear to have great tanking capability with my team, especially with the extra health from Tarsa. We'll have to see how it goes!
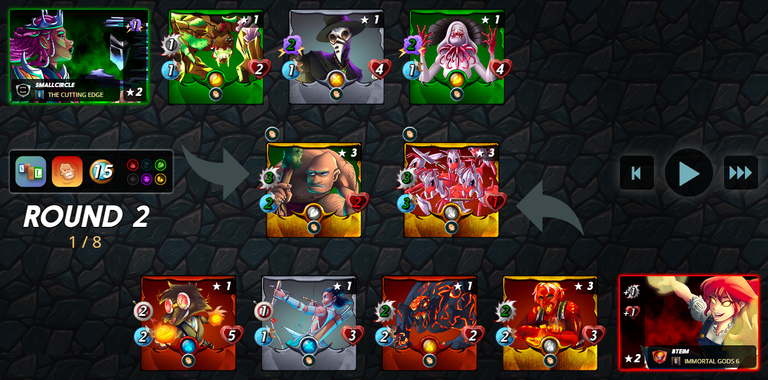
As predicted, in the first round of battle my Antoid Platoon takes heavy damage. That +1 health from Tarsa really paid off, as it was able to just barely make it through that first exchange of attacks. That is particularly useful in this battle, because the Spready Fury ruleset means that my Antoid Platoon will hi harder and faster while it still lives. My ranged attackers at the back (let's go, Xenith Archer!) are doing a great job of piling on the damage, and my opponent's Hill Giant is also about to go down.
One more round and we're nearly done. Tarsa's +1 health comes up big again, this time saving my Radiated Scorcher and letting it get in an extra (and boosted!) attack. The combination of my front line tanks living a tiny bit longer than they should and my back line monsters raining down ranged damage on the enemy lineup is too much for them to take. Victory! And again, if you wanted to see the whole battle for yourself, you can see it right here.
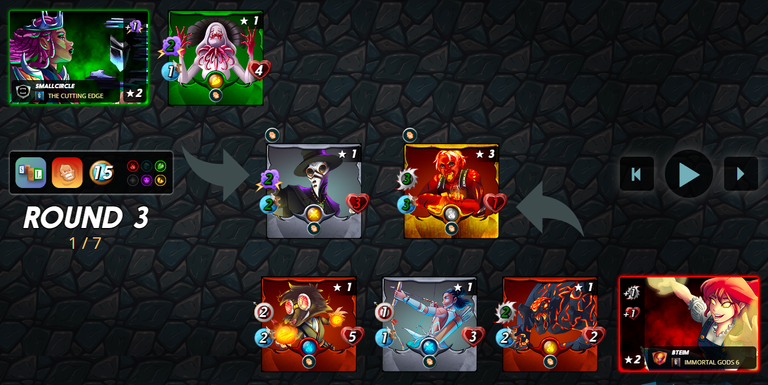
This battle went just as planned - my melee monsters were able to stand up to my opponent's magic damage long enough for my combination of ranged and melee damage to knock out the opposing lineup. I am a fan of Xenith Archer, and battles like this show exactly why - if you can be cost effective with your damage output, then that gives you more mana that you can spend on either better tanks or even more damage. Do this with a few cards in the battle and you are well on your way to a quick win!

Thank you so much for reading all the way to the end. Interested in seeing some more of my writing in the future? Be sure to give me a follow! In the meantime, if you'd like to see some of my recent posts:
Splinterlands Economics: Signaling - An overview of the concept of signaling, and how we can apply it to Splinterlands.
Quite the Talon-ted Summoner - Using Dragons in battle! - Last week's battle challenge, featuring the Dragon splinter!
Splinterlands Economics: Inflation - An overview of the concept of inflation, and how we can apply it to Splinterlands.
Thinking about giving Splinterlands a try but haven't signed up yet? Feel free to use my referral link: https://splinterlands.com?ref=bteim, and be sure to reach out to me if you have any questions!
All images used in this article are open source and obtained from Pixabay or Unsplash. Thumbnails borrowed with permission from the Splinterlands team or made in Canva.
Good battle
!PGM
BUY AND STAKE THE PGM TO SEND A LOT OF TOKENS!
The tokens that the command sends are: 0.1 PGM-0.1 LVL-2.5 BUDS-0.01 MOTA-0.05 DEC-15 SBT-1 STARBITS-[0.00000001 BTC (SWAP.BTC) only if you have 2500 PGM in stake or more ]
5000 PGM IN STAKE = 2x rewards!
Discord
Support the curation account @ pgm-curator with a delegation 10 HP - 50 HP - 100 HP - 500 HP - 1000 HP
Get potential votes from @ pgm-curator by paying in PGM, here is a guide
I'm a bot, if you want a hand ask @ zottone444
Thank you! 😊
Thanks for sharing! - Legalizabrazil#3575

Good battle, thanks for sharing!
Although it is a beautiful post, nothing confirms that this card was not well thought out, to better monsters with mana cost, or even less...
Xenith Archer was the subject of the challenge for this week and I thought one of its strengths was its efficiency, which is what I choose to showcase. There are a multitude of ways to gauge value though, from damage to stats to monetary cost - if you have a more preferred 2 mana monster then more power to you! 😀
Join Our Discord
Your Splinterlands post has been manually curated on behalf of @SBTOfficial by @sgt-dan. Check out our partners' projects to find more play2earn opportunites!