(PT-EN) Splinterlands Challenge #2
We are all #hive and #hivebr!
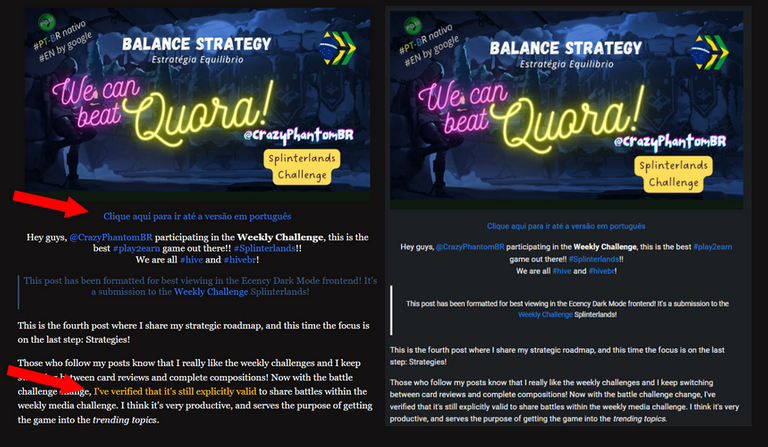
This post has been formatted for best viewing in the Ecency Dark Mode frontend! It's a submission to the Weekly Challenge Splinterlands!
I invite you to use the frontend Eceny Dark Mode!
Compare the images below:
Differences:
| Ecency | Others | |
|---|---|---|
| Dark Mode | Dark | Gray |
| Anchor Links | Yes! | no! |
| Colors | Yes! | no! |
Those who follow my posts know that I really like the weekly challenges and I keep switching between card reviews and complete compositions! Now with the battle challenge change, I've verified that it's still explicitly valid to share battles within the weekly media challenge. I think it's very productive, and serves the purpose of getting the game into the trending topics.
Come with me, because today the post is about Team Analysis!
CRAZY'S STRATEGIC ROADMAP
I'm tweaking this little four-step guide that's intended to help you improve your Splinterlands performance.
1. BATTLE HISTORY ANALYSIS
In every battle, I suggest as the first point to be analyzed the opponent's history of previous battles. That's basic strategy for Splinterlands lovers, I dare say it's a mandatory step to success.
In old posts, I took screenshots while playing. Very few battles turned into a post.
Now, I stopped capturing the screen while I was playing, so as not to waste time or lose focus. So, after deciding to post with a certain battle, I look for the opponent's match history, looking at their profile.
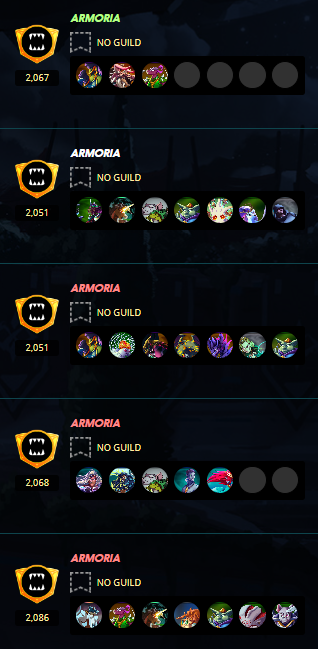
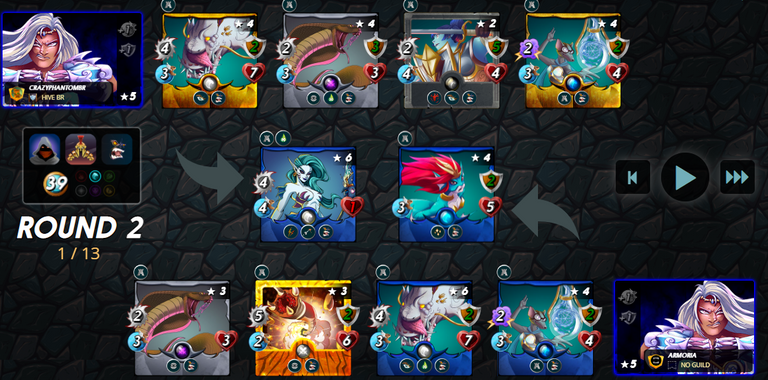
For this specific battle my opponent was @ ARMORIA, who presented himself with a history of battles with various summoners. This situation is not very productive because it shows that the opponent is willing to fight with any splinter that is available, without preferences.
Noteworthy is the use of the neutral card Venari Marksrat that appears in two different compositions. It may be an indication that the opponent uses the Sacrifice Strategy. We'll see!
Analyzing your opponent's battle history is essential if you play Splinterlands! This and other little things can help you win the match! Come with me!
2. RULESET ANALYSIS
The second point I suggest you analyze is regarding RuleSet. This will vary from game to game and there is no easy recipe, you'll just learn by doing.

I recreate this image containing the initial information that is passed in the pre-game. First, we need to look at the three pieces of information in isolation:
Mana: Enough! I usually consider that the amount of mana above 36 already allows me a wide variety of team options. In this case, it is not a limiter.
Splinters: With enough Mana, when looking at the available splinters you should consider that you can use the most costly summoners, by sacrificing cards or even running the risk of not filling out all the options!
Additional rules: Additional rules today can be up to three. Here we have an example of a battle without interference from summoners. The difference is that a gladiator card will be allowed. When we have three rules, we must observe how they interact with each other.
3. SUMMON AVAILABILITY
The third step in my strategy is to look at what summoners you have available. My main invokers are:
Kelya Frendul level 5, my own.
My main investment in the game so far.Thaddius Brood level 5, rented.
My favorite, because this element is what I've dedicated the most to since launch.Obsidian level 3, located.
It's been enough to sustain the Earth element battles, considering that it's not my goal to acquire cards from this element at the moment.Bortus level 3, located.
A differential to be able to exploit careless opponents who insist on using Kelya in situations that exploit magicThe.Possibilus the Wiselevel 2, leased.
First season I trade my Brighton Bloom location for another summoner. I've been enjoying the possibilities of using this card!
Lease cancelled! I'm in despair!Eternan Brune level 3, my own.
Thanks to my luck in seasonal chests.Pembrook Nymph GoldFoil level 3, my own.
My other available summoners are at level 2, being unsuitable for use in the Gold League. Since I only play in Modern mode, keep in mind that some summoners and cards are not available.
The ruleset analysis is linked to the availability of invokers. Both in the sense of what the opponent will use, as in what I have available.
Possibilus the Wise has been my favorite Water summoner, but due to an oversight I had the lease cancelled. Now I'm without that option, I'll have to battle with Kelya or Bortus. By the level of each one, I decide for Kelya Frendul because it will make it possible to use the most evolved cards.
4. YOUR STRATEGIES
The fourth point I recommend looking at is exploring your game strategies. Do you have any?
I have several strategies that I have been learning while playing.
I like to name them so I can remember them more easily. I like to classify into different subtypes.
For this battle, taking into account the previous three points of analysis, I am forced to apply the Balance Strategy, which is the main category of strategies you take into battle a diversity of attack types and abilities that make it impossible for the opponent to fully counter. (he can still partially counter).
COMPOSING THE TIME
Strategy: Balance
Source: The art of Guerra, by CrazyPhantomBR
The summoner chosen was Kelya Frendul level 5, aiming to enable my best cards.

Choosing the appropriate card to occupy the top position wasn't difficult, being chosen Coastal Sentry due to its combo abilities Double Strike and Piercing. It will guarantee damage regardless of whether the opponent includes shields!
The phenomenal Water Caller comes next, with its ability to stun the opponent. Your five life points guarantee you this position, as we want to prevent the opponent from reaching our best cards as much as possible!
Deeplurker comes next, due to its importance in performing an Opportunity attack. Next to him we have Uraeus with his intoxicating poison.
Now we have Isgald Vorst whose main role is to hunt monsters with low hitpoints and thus activate his BloodLust!
The essential Venari Wavesmith completes the team, who resumes his role as protector of the Water team, a role he already had before the release of the Chaos Legion set.
Supply Runner rounds out the team by adding speed, which is essential as we try to get Coastal Sentry acting among the first moves of battle.
Anyway, the decision was made. Let's go to battle!
ADVERSARY TEAM

The opponent chose the summoner Kelya Frendul level 5, which indicates that evolved cards must enter the field!
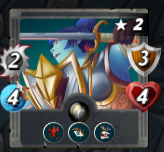
On the front line Djinn Osshanus at level 2, followed by Merdaali Guardian level 4, Venari Wave Smith level 4, Deeplurker level 6 with its additional poisons, Sand Worm level 3 and finally Uraeus level 3.
The opponent's strategy was basically to bet on the double-sneak combo.
BATTLE
This match took place in the previous season and can be watched through the link:
R O U N D
1

The image above shows the opening of Round 1, after the buffs of the cards.
The opposing team remembered to replace the shields that the summoner did not grant, pHowever, he discarded the speed point reset. This could have been a fatal mistake, depending on my evasion rate.
Three cards have the same 5 speed, but the one who starts is Djinn Oshanus, who would be eliminated soon after due to my team's sequence of accurate attacks.
The position of the Coastal Sentry is essential for this elimination, and it guaranteed the opponent's defeat, because once its main tank was lost, there was nothing left for its healing card to mitigate the damage.
R O U N D
2
In this round I still don't have eliminations by Isgald Vorst, something that will only happen in the next round.
R O U N D
3
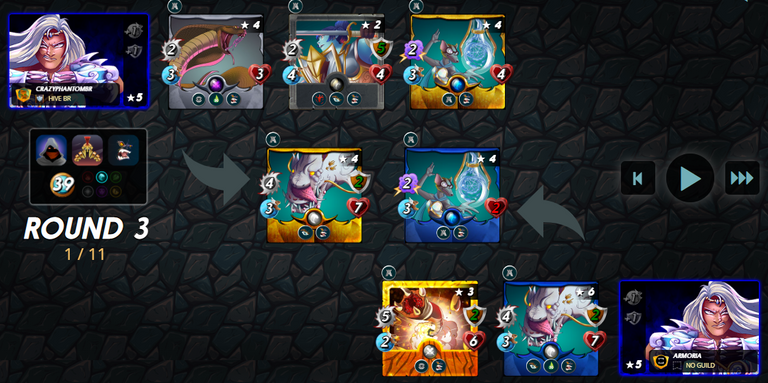
With the greatest speed, Isgald Vorst attacks and performs his first elimination, activating BloodLust!.
The game ends in Round 4 with the last attack being made by Uraeus.
POSTER ANALYSIS
I see no mistakes in the opponent's strategy. But I see merits in my strategy!
My main differential was the extra speed granted by Supply Runner, making my team perform a sequence of attacks that culminated in the elimination of the opposing tank. He didn't count on that, and so his strategy succumbed.
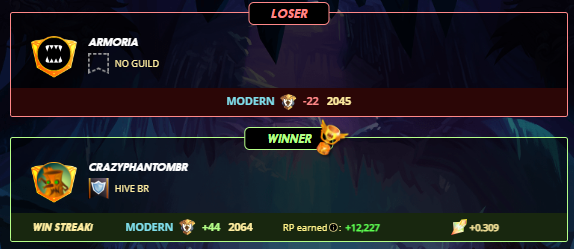
So I conclude that my counter-strategy has outperformed the opponent, and I recommend that you invest more time analyzing the ruleset to get results similar to mine!
In this way I was victorious in this application of the Balance Strategy!
Follow me to follow my reviews.

CrazyPhantomBR supports the PGM project
1% of funds raised from this post go to @pgm-curator
The divider and logo / image above belong to the PGM project.

CrazyPhantomBR supports the Brazilian curators
@Hive-BR and @Brazilians
@Hive-BR and @Brazilians
1% of funds raised from this post go to @Hive-br
1% of the funds raised from this post go to @Brazilians
CrazyPhantomBR plays #Splinterlands!
If you still don't play Splinterlands come join the community!!! If you want, use my recommendation link:
https://splinterlands.com?ref=crazyphantombr
Thank you all so much and see you next time!!!

Somos todos #hive e #hivebr!
Esta postagem foi formatada para melhor visualização no frontend Ecency Dark Mode! É uma submissão ao Desafio Semanal Splinterlands!
Te convido a utilizar o frontend Eceny Dark Mode!
Compare as imagens abaixo:
Diferenças:
| Ecency | Outros | |
|---|---|---|
| Dark Mode | Dark | Gray |
| Links de ancoragem | Sim! | não! |
| Cores | Sim! | não! |
Quem acompanha minhas postagens sabe que eu gosto muito dos desafios semanais e fico alternando entre análises de cards e de composições completas! Agora com a mudança do desafio de batalhas, verifiquei que explicitamente ainda é válido compartilhar batalhas dentro do desafio de mídia semanal. Eu acredito que é bem produtivo, e serve ao propósito de colocar o game nos trending topics.
Vem comigo, porque hoje o post é de Análise de Equipes!
ROTEIRO ESTRATÉGICO DO CRAZY
Eu estou aprimorando este pequeno guia de quatro passos que pretende ajudar você a melhorar seu desempenho no Splinterlands.
1. ANÁLISE DO HISTÓRICO DE BATALHAS
Em toda batalha sugiro como primeiro ponto a ser analisado o histórico de batalhas anteriores do adversário. Isso é estratégia básica para amantes de Splinterlands, ouso a afirmar que é um passo obrigatório para o sucesso.
Em posts antigos, eu realizava a captura da tela enquanto jogava. Pouquíssimas batalhas viravam uma postagem.
Agora, eu deixei de capturar a tela enquanto eu jogava, para não perder tempo nem perder o foco. Então, após decidir realizar a postagem com determinada batalha, eu busco o histórico de partidas do adversário, olhando seu perfil.
Para esta batalha em específico meu adversário foi @ ARMORIA, que se apresentou com um histórico de batalhas com invocadores variados. Essa situação é pouco produtiva pois mostra que o adversário esta disposto a batalhar com qualquer splinter que estiver disponível, sem preferências.
Chama atenção o uso do card neutro Venari Marksrat que aparece em duas composições distintas. Pode ser um indicativo que o adversário se utiliza da Estratégia Sacrifício. Veremos!
A análise do histórico de batalhas do adversário é essencial se você joga Splinterlands! Essa e outras pequenas coisas podem te ajudar a vencer a partida! Vem comigo!
2. ANÁLISE DO RULESET
O segundo ponto cuja análise sugiro que você faça é quanto ao RuleSet. Isso vai variar em cada partida e não tem uma receita fácil, você só vai aprender fazendo mesmo.
Eu recrio essa imagem contendo as informações iniciais que são passadas no pré-jogo. Primeiro, precisamos olhar para as três informações isoladamente:
Mana: Suficiente! Eu costumo considerar que a quantidade de mana acima de 36 já me permite uma grande variedade de opções de equipes. Neste caso, não é um limitador.
Splinters: Com Mana suficiente, ao olhar para os splinters disponíveis você deve considerar que poderá utilizar os invocadores mais custosos, mediante sacrifício de cards ou mesmo correndo risco de não preencher todas as opções!
Regras adicionais: As regras adicionais hoje podem ser em até três. Aqui temos um exemplo de batalha sem interferência dos invocadores. O diferencial é que será permitida um card gladiador. Quando temos três regras, devemos observar como elas interagem uma com as outras.
3. DISPONIBILIDADE DE INVOCADORES
A terceira etapa da minha estratégia consiste em observar o que você tem disponível em invocadores. Meus principais invocadores são:
Kelya Frendul level 5, meu próprio.
Meu principal investimento no jogo até o momento.Thaddius Brood level 5, alugado.
Meu preferido, pois este elemento é o que mais me dediquei desde o lançamento.Obsidian level 3, locado.
Tem sido suficiente para sustentar as batalhas do elemento Earth, tendo em vista que não é meu objetivo adquirir cards deste elemento no momento.Bortus level 3, locado.
Um diferencial para poder explorar adversários descuidados que insistem em utilizar a Kelya em situações que exploram magia.Possibilus the Wiselevel 2, locado.
Primeira temporada que troco minha locação do Brighton Bloom por outro invocador. Tenho gostado das possibilidades de uso deste card!
Locação cancelada! Estou em desespero!Eternan Brune level 3, meu próprio.
Graças a minha sorte em baús de temporada.Pembrook Nymph GoldFoil level 3, meu próprio.
Meus demais invocadores disponíveis estão em level 2, sendo inadequados para o uso na Liga Gold. Como eu jogo apenas no modo Modern, lembre-se que alguns invocadores e cards não estão disponíveis.
A análise do ruleset é ligada a disponibilidade dos invocadores. Tanto no sentido do que o adversário vai utilizar, como no que eu tenho a disposição.
Possibilus the Wise tem sido meu invocador Water favorito, porém por um descuido eu tive a locação cancelada. Agora estou sem essa opção, terei de batalhar com Kelya ou Bortus. Pelo level de cada um, decido pela Kelya Frendul pois possibilitará utilizar os cards mais evoluídos.
4. SUAS ESTRATÉGIAS
O quarto ponto ponto que eu recomendo analisar é explorar as suas estratégias de jogo. Você tem alguma?
Eu tenho várias estratégias que tenho aprendido enquanto estou jogando.
Gosto de dar nome para elas, para me lembrar mais facilmente. Gosto de classificar em diferentes subtipos.
Para esta batalha, levando em conta os três pontos de análise anteriores, sou forçado a aplicar a Estratégia Equilíbrio, que é a categoria principal das estratégias onde você leva para batalha uma diversidade de tipos de ataque e habilidades que toram impossível ao adversário counterar totalmente. (ele ainda pode counterar parcialmente).
COMPONDO O TIME
Estratégia: Equilíbrio
Fonte: A arte da Guerra, por CrazyPhantomBR
O invocador escolhido foi Kelya Frendul level 5, visando habilitar os meus melhores cards.
A escolha do card apropriado para ocupar a primeira posição não foi difícil, sendo eleita Coastal Sentry devido ao seu combo de habilidades Double Strike e Piercing. Será uma garantia de dano independente do adversário incluir escudos!
A fenomenal Water Caller vem em seguida, com sua possibilidade de atordoar o adversário. Seus cinco pontos de vida lhe garantem essa posição, pois queremos evitar ao máximo que o adversário chegue até nossos melhores cards!
Deeplurker vem em seguida, pela sua importância em realizar ataque Opportunity. Junto dele temos Uraeus com seu veneno inebriante.
Agora temos Isgald Vorst cujo papel principal é caçar monstros com poucos pontos de vida e assim ativer seu BloodLust!
Completa a equipe o essencial Venari Wavesmith, que retoma seu papel como protetor da equipe Water, função que ele já tinha antes do lançamento da coleção Chaos Legion.
Supply Runner completa a equipe adicionando velocidade, que é essencial para tentarmos colocar Coastal Sentry agindo entre os primeiros movimentos da batalha.
De qualquer forma, a decisão foi tomada. Vamos à batalha!
EQUIPE ADVERSÁRIA
O adversário escolheu o invocador Kelya Frendul level 5, o que indica que cards evoluídos devem entrar em campo!
Na linha de frente Djinn Osshanus em level 2, seguido do Merdaali Guardian level 4, Venari Wave Smith level 4, Deeplurker level 6 com seus venenos adicionais, Sand Worm level 3 e finalmente Uraeus level 3.
A estratégia do adversário foi basicamente apostar no combo double-sneak.
BATALHA
Esta partida ocorreu na temporada anterior e pode ser assistida através do link:
R O U N D
1
A imagem acima mostra a abertura do Round 1, após os buffs dos cards.
A equipe adversária lembrou de repor os escudos que a invocadora não concedeu, porém descartou a reposição do ponto de velocidade. Isso pode ter sido um erro fatal, a depender da minha taxa de evasão.
Três cards tem a mesma velocidade 5, porém quem inicia é Djinn Oshanus, que viria a ser eliminado logo em seguida devido a sequência de ataques certeiros da minha equipe.
A posição da Coastal Sentry é fundamental para esta eliminação, e garantiu a derrota do adversário, pois uma vez perdido seu tank principal não restou nada para que seu card de cura pudesse amenizar os danos.
R O U N D
2
Neste round ainda não tenho eliminações por parte da Isgald Vorst, coisa que só irá acontecer no próximo round.
R O U N D
3
Com a maior velocidade, Isgald Vorst ataca e realiza a sua primeira eliminação, ativando BloodLust!.
O jogo acaba no Round 4 com o último ataque sendo feito por Uraeus.
ANÁLISE POSTERIOR
Não vejo erros na estratégia adversária. Mas vejo méritos na minha estratégia!
Meu principal diferencial foi a velocidade extra concedida por Supply Runner, fazendo com que minha equipe realizasse uma sequência de ataques que culminou com a eliminação do tanque adversário. Com isso ele não contava, e assim sua estratégia sucumbiu.
Então concluo que minha contra-estratégia superou o adversário, e recomendo a você que invista mais tempo analisando o ruleset para obter resultados semelhantes aos meus!
Desta forma fui vitorioso nesta aplicação da Estratégia Equilíbrio!
Me siga para acompanhar minhas análises.
CrazyPhantomBR apoia o projeto PGM
1% dos fundos obtidos nesta postagem estão destinados ao @pgm-curator
O divisor e logotipo / imagem acima pertencem ao projeto PGM.
CrazyPhantomBR apoia as curadorias brasileiras
@Hive-BR e @Brazilians
@Hive-BR e @Brazilians
1% dos fundos obtidos nesta postagem estão destinados a @Hive-br
1% dos fundos obtidos nesta postagem estão destinados a @Brazilians
CrazyPhantomBR joga #Splinterlands!
Se você ainda não joga Splinterlands venha fazer parte da comunidade!!! Se quiser, utilize meu link de recomendação:
https://splinterlands.com?ref=crazyphantombr
Muito obrigado a todos e até a próxima!!!
Obrigado por promover a comunidade Hive-BR em suas postagens.
Vamos seguir fortalecendo a Hive
Your post was manually curated by @Shiftrox.
Delegate your HP to the hive-br.voter account and earn Hive daily!
🔹 Follow our Curation Trail and don't miss voting! 🔹
!1UP Good work!
!PGM !PIZZA
You have received a 1UP from @underlock!
@monster-curator, @oneup-curator, @leo-curator, @bee-curator, @thg-curator, @vyb-curator, @pob-curator
And they will bring !PIZZA 🍕.
Learn more about our delegation service to earn daily rewards. Join the Cartel on Discord.
Congratulations @crazyphantombr! You have completed the following achievement on the Hive blockchain And have been rewarded with New badge(s)
Your next target is to reach 7250 replies.
You can view your badges on your board and compare yourself to others in the Ranking
If you no longer want to receive notifications, reply to this comment with the word
STOPThanks for sharing! - @mango-juice
