Genesis League Goals (MLS Soccer NFT Game): Gameplay Mechanics, Insights and Tips for Success!
Genesis League Goals (MLS Soccer NFT Game): Gameplay Mechanics, Insights and Tips for Success!


NOTE THE GAME META HAS BEEN UPDATED
As the game changes, these mechanics have been tweaked. Here are some resources on new updates:
- Release Note: https://support-goals.genesisleaguesports.com/hc/en-us/sections/20704787106580-Release-Notes
- Game Updates: https://support-goals.genesisleaguesports.com/hc/en-us/categories/20698485848852-Genesis-League-Goals-GLG-
- Balance updated to Stamina, Morale, Synergy, Shooting, and Dynamic Stats: https://support-goals.genesisleaguesports.com/hc/en-us/articles/21915107096724-Release-notes-12-18-2023
- Update to Passing per the DEV team:
So passing has 2 parts that were not included in the release notes:
Previously passing was:
Passer PA stat vs defender BL stat
AND
Passer PA stat vs interceptor IN stat
Where blocker is the opposing player in front of passer, and interceptor is opposing player in front of receiver. Also, no blocks on switches, only interceptions
This was updated to:
Passer PA stat vs defender BL stat
AND
(Passer PA stat 80% + receiver DR stat 20%) / 2 vs defender IN stat
So if your passer has 10 PA, and makes a forward pass to a receiver with 8 DR, against a defender with 6 BL and an interceptor with 10 IN you have a 10v6 (80%/20%) and a 9v10 (80%/20%) that needs to succeed. And chances aren't entirely linear, they're logistic, so smaller differences more the needle a bit quicker than larger differences.
If you want to check out gameplay, here is what a match looks like in action!
All of the information contained in this post was gathered through the general GLS chat, townhalls, office hours, and discussions with the GLS team. It is our best estimate of the current state of gameplay, and is subject to be changed, adjusted, and modified as the game develops.
Thank you for the contributions of the GLS development team, @Knotenbart who shared with me tons of gameplay insights, the Genesis United players, the Hunters Tournament Players, @PokerMaria our tournament guru, @ikeee, @jjbinx, @TomatheLlama who helped gather information, edit the document, organize matches, and contribute to the success of this project.
Staking Reward Chart
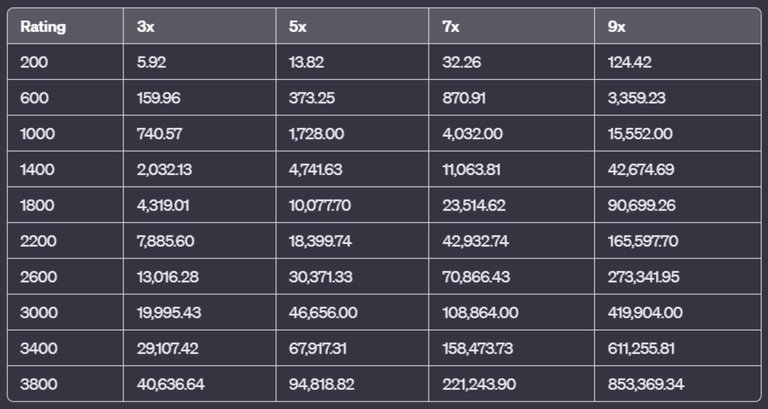
Things we know about ranked play, rating, XP, and rewards.
- XP will be awarded for all games independent of the result. Win award more XP than draws & draws award more than loss. Wins get 4 times more XP than losses. Also, it depends on your rating and tier. Each higher tier will give 100% additive boost on XP earned on average but is also dependent on what's the rating of your opponent. Wins will award more XP than Draws, & Draws will award more than Loss. As teams gain rating, they will earn more XP. Draw will result in loss/gain of rating as per the rating system & similar effect on fans. If you draw against a high rated player, rating & fans will be gained & vice versa. Winstreak will have bonuses for both fans and XP, but rating will have no bonus to make sure there is no rating inflation.
- GF / RF Cards: GF will give you 5x fans compared to RFs. That's what we know for sure. Plus you can reach higher XP levels with less combined GFs. The ratio or multiplier of Gf earning to rf, just depends there are so many things fans, XP, GLX rewards, pass points, GLX staking requirements.
- Card Combining: Cards can be combined regardless of their XP level, but XP level will be capped by star (combine) level. Cards won’t be able to earn XP once they hit the max limit based on star level. So you can combine cards to max star level, but XP of the card will be either zero or based on how much XP each card had when combining, and will need to be earned by playing games.

Game Play Basics
NOTE that all in-game actions depend upon Stamina (orange Bar on player) and Morale (blue bar under coach) These factor into the success % of any action.
UPDATED Game Info on Dynamic Stats (Health, Stamina & Morale)
Health: (Green Bar) Health is the amount of matches a player can play in a day. Each player has a health bar that decreases as they play matches. Health is similar to their energy capture rate; once their health is 0 it is as if they are injured and they cannot play. The team noted that health will fully recharge over the course of 24 hours in small increments, but it will take longer to recharge if you run it down to 0. Every player loses 10% of their health each half of play (.5 health per action in the game), and 20% over the course of a match. Coach Ben Powers reduces this loss. This allows players 5 matches per 24 hours. If a team played subs, reserves, and rotated players, the entire team could play approximately 15 matches per team each day (Gene allows more). Only players active on field lose health! And health decreases for everyone on the field even if they do not touch the ball.
Stamina (Orange Bar): Stamina is the amount of in-game energy each player has within the match. A player taking an action now always loses stamina regardless of success or failure, and every player on the defending team loses stamina as well. A bit of randomness has been added to stamina loss to make it feel more dynamic. The impact of stamina on success is now calculated by comparing the stamina of the player taking an action vs the average stamina of the defending team to further provide some variability. Stamina will reset each match. The more actions a player takes, the more they drain their Stamina. Dribbling tends to take more stamina when compared to passing and shooting. Be warned that if you take your player's stamina to 0 in a match there will be a penalty on recharging.
Morale: Team morale is the blue bar underneath your player name. It goes up and down as the game progresses. When you are leading or making successful moves, morale increases. When you are struggling or losing, the morale goes down. The higher your morale, the more likely you are to have success in your in-game actions. Per the team, “Morale is based on actions in the game & not the end result of the game. Players gain morale when they do a successful action and lose on unsuccessful actions. In ranked, morale will persist on cards. Right now it resets to 50% after each game. So a high morale player boosts the whole team and a low morale player debuffs the whole team. boost to morale with each success.” The amount of morale gained or lost on success or failure respectively has some randomness to it to further incentivize possession play.
Synergy: is not live yet in the game; it will be rewarded to keeping your team together and using the same cards and players over time (the season).
Passing: Passes have always two rolls, which are the Passing chance and the Receiving chance. In the case of a side pass (or pass between GK and DF), the first roll is always 100% since there is no blocker, and the second roll is against the intercept of the player across from the receiver. For passing down the field, the player in front of the passer is the blocker and the player in front of the receiver is the interceptor. So the pass stat is rolled against the block stat for the player in front of them, then the intercept stat for the receiving player. If the GK passes to the DF, then it is just an intercept roll for the FW. If the GK passes to the MF, then the FW can block and the MF can intercept. The same works for a MF passing to a FW. The opposing MF can block and the opposing DF can intercept. Also there is a boost to the pass success after a successful switch of the ball (pass across the field, ex. DF to DF, MF to MF, FW to FW).
Dribble: Dribbling is a roll against the tackle of the player in front of the dribbling player. Also there is a boost to dribble success after a successful switch of the ball (pass across the field, ex. DF to DF, MF to MF, FW to FW).
Shooting: Shooting (no dribble) is a roll against the full block of the players downfield on the same side as the shooter and the goalkeeper. So a MF shot (no dribble) is a block roll against the MF, DF and GK. A FW shot (no dribble) is a block roll against the DF and the GK. When you have dribbled to the middle of the field, the shot roll is against half of the block for each player the shot will pass, and then the full block of the GK. Therefore you have a better chance to make a shot if you dribble as you are rolling against half of the defender's block. If you dribble past the DF and are in front of the GK, you roll the player's shot against the GK block stat. The team noted that when a player dribbles and then shoots, the GK block is reduced based on how far the shooter is. The team said the exact reduction is a secret for now and that they may adjust/remove the reduction in future updates. Also, there is a penalty to shot success after a blocked shot. This is to disincentivize player's lobbying shots back and forth.
Shot blocking: Players blocking a shot will now step into the path of the ball. So players that block a shot will have the ball in the middle of the field.

Strategy & Gameplay Thoughts (based on my experience in 3 tournaments before ranked play)
- In the past 3 tournaments, teams with stronger defense stats have on average had more wins. So in the current meta, defensive stats are very important.
- Gene and Ivy have been the strongest coaches since they mediate loss in stamina. This will be mediated once ranked play starts, since teams will need to use subs and reserves.
- Teams that use subs have had more success against Gene and Ivy, and also because those players have more stamina and therefore higher chances of success in play.
- Once ranked play starts teams will need to balance subs and reserves which will mean you need to use more players as you play.
- There are 40 moves in a game, which means you will have approximately 20 moves. Use your moves wisely.
- Quick scores move the morale bar and offer higher chances of success for the team in the lead.
- Once a team gets 2-3 goals ahead, it is very hard to catch up and re-take the lead.
Game Play Examples
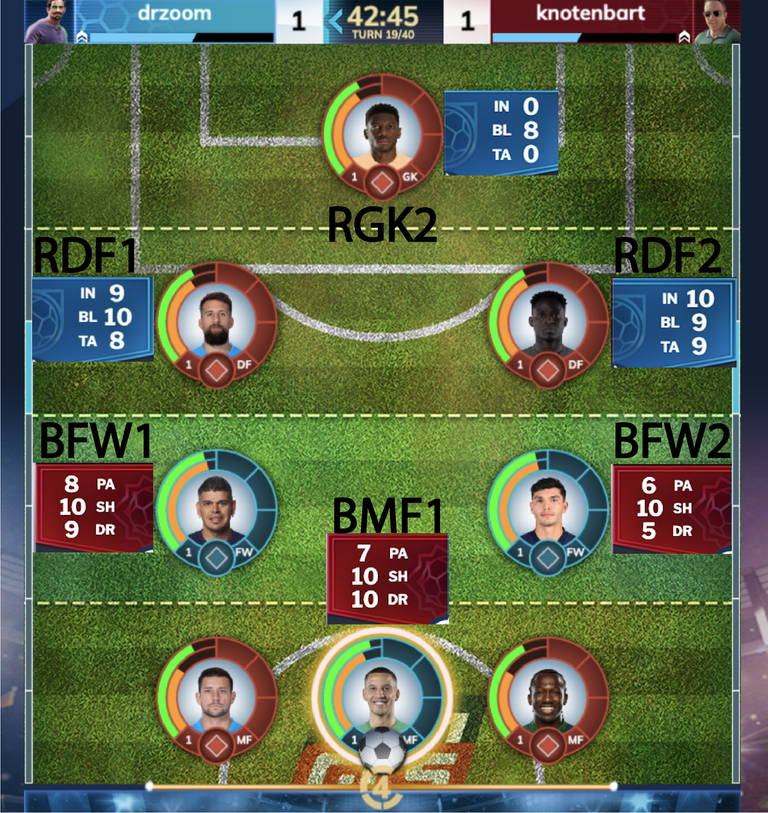
Blue Midfielder (BMF1) This player has just dribbled into the middle of the field. He can now choose between the 2 options listed below.
Pass to BFW1 or BFW2. The RNG success roll for this move is:
- Only Roll = BMF1 Pass (7) vs RDF1 Intercept (9) or BMF1 Pass (7) vs RDF2 Intercept (9)
- If SUCCESS BFW1 would gain possession of the ball
- If FAIL RDF1 would have possession of the ball
- Only Roll = BMF1 Pass (7) vs RDF1 Intercept (9) or BMF1 Pass (7) vs RDF2 Intercept (9)
Shoot a Goal. The RNG success roll for this move is:
- First Roll = BMF1 Shoot (10) vs ½ of the RDF1 Block (5)
- If SUCCESS there would be a second roll for the RDF2 to block the shot
- If FAIL RDF1 would have possession of the ball in the middle of the field
- Second Roll = BMF1 Shoot (10) vs ½ of the RDF2 Block (4.5)
- If SUCCESS there would be a third roll for the GK to block the shot
- If FAIL RDF2 would have possession of the ball in the middle of the field
- Third Roll = BMF1 Shoot (10) vs RGK1 Block (8)
- If SUCCESS BFW1 scores a goal!
- If FAIL RGK1 would have possession of the ball
More Examples
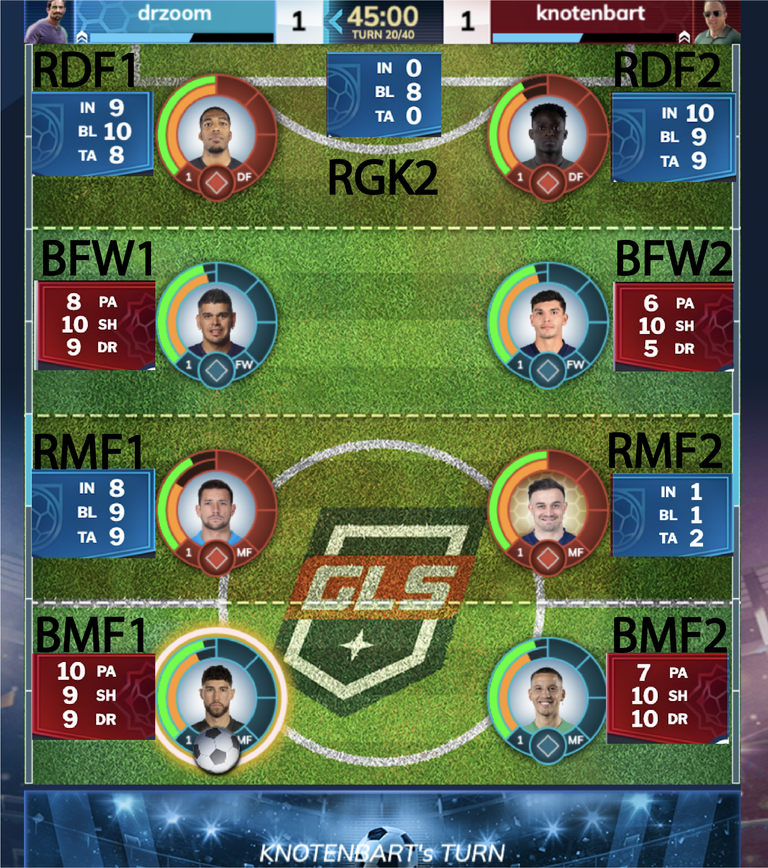
Blue Midfielder (BMF1) This player has the ball. He can now:
Dribble to the middle of the field. The RNG success roll for this move is:
- Only Roll = BMF1 Dribble (9) vs RMF1 Tackle (9)
- If SUCCESS BFW1 would have possession of the ball in the middle of the field
- If FAIL RMF1 would have possession of the ball
- Only Roll = BMF1 Dribble (9) vs RMF1 Tackle (9)
Pass to BMF2. The RNG success roll for this move is:
- Only Roll = BMF1 Pass (10) vs RMF2 Intercept (1)
- If SUCCESS BMF2 would gain possession of the ball
- If FAIL RMF2 would have possession of the ball
- Only Roll = BMF1 Pass (10) vs RMF2 Intercept (1)
Pass to BFW1. The RNG success roll for this move is:
- First Roll = BMF1 Pass (10) vs RMF1 Block (9)
- If SUCCESS there is a second roll for RDF1 to intercept the ball
- If FAIL RMF1 would have possession of the ball
- Second Roll = BMF1 Pass (10) vs RDF1 Intercept (9)
- If SUCCESS BFW1 would gain possession of the ball
- If FAIL RDF1 would have possession of the ball
- First Roll = BMF1 Pass (10) vs RMF1 Block (9)
Pass to BFW2. The RNG success roll for this move is:
- First Roll = BMF1 Pass (10) vs RMF1 Block (9)
- If SUCCESS there is a second roll for RDF2 to intercept the ball
- If FAIL RMF1 would have possession of the ball
- Second Roll = BMF1 Pass (10) vs RDF2 Intercept (10)
- If SUCCESS BFW2 would gain possession of the ball
- If FAIL RDF2 would have possession of the ball
- First Roll = BMF1 Pass (10) vs RMF1 Block (9)
Shoot a Goal. The RNG success roll for this move is:
- First Roll = BMF1 Shoot (9) vs RMF1 Block (9)
- If SUCCESS there would be a second roll for the DFs to block the shot
- If FAIL RMF1 would have possession of the ball in the middle of the field
- Second Roll = BMF1 Shoot (9) vs RDF1 Block (10)
- If SUCCESS there would be a third roll for the GK to block the shot
- If FAIL RDF1 would have possession of the ball in the middle of the field
- Third Roll = BMF1 Shoot (9) vs RGK1 Block (8)
- If SUCCESS BFW1 scores a goal!
- If FAIL RGK1 would have possession of the ball
- First Roll = BMF1 Shoot (9) vs RMF1 Block (9)
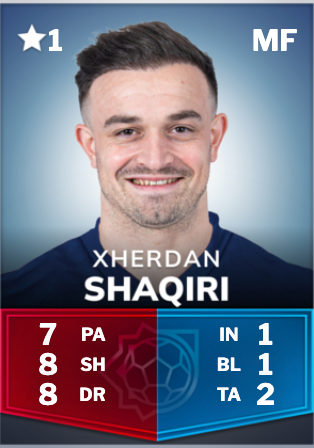
The Teams USED in this simulation
DRZOOM TEAM
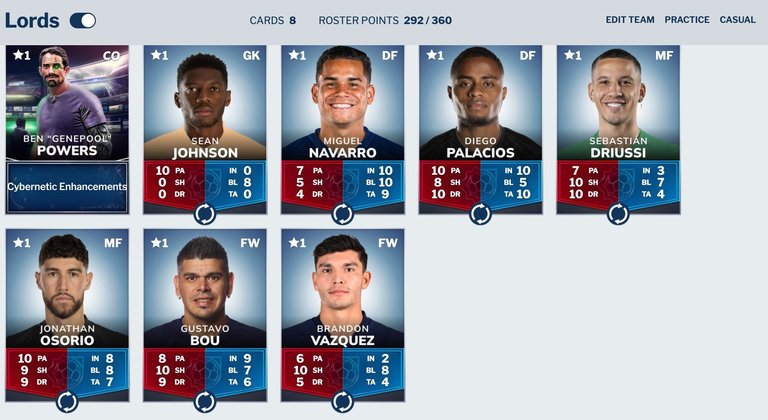
KNOTENBART TEAM
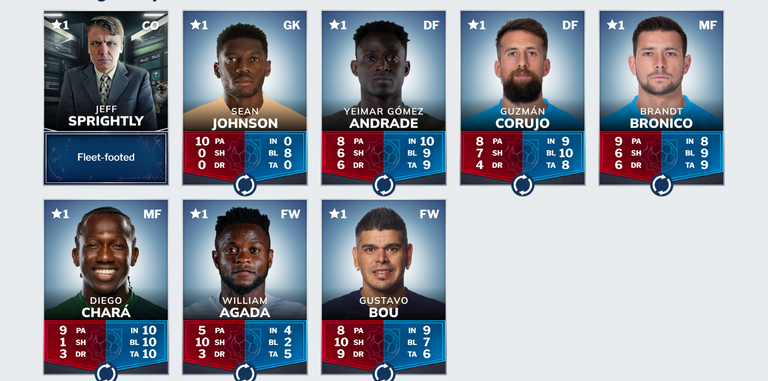
KNOTENBARD SUB
Useful Links:
- Genesis League Goals (Soccer Game): https://goals.genesisleaguesports.com/
- Support and Info on How to Play: https://support-goals.genesisleaguesports.com/hc/en-us
- Coaches: https://peakd.com/hive-13323/@gls.goals/coach-abilities-genesis-league-goals
- Card Leveling and Combining: https://peakd.com/gls/@gls.goals/genesis-league-goals-card-leveling-and-combining
- Skills and Slots: https://peakd.com/hive-13323/@gls.goals/genesis-league-goals-skills-slots-and-charges
- Updated Skills Post: https://peakd.com/gls/@gls.goals/genesis-league-goals-skills
- Moenke Stats and Rich List: https://moenke.org/gls.html
- Genesis League Sports Whitepaper: https://whitepaper.genesisleaguesports.com/

See you on the pitch!

Photo credits to Genesis League Sports

Feel free to DM me any errors, additional or insights!
Very good post! Also excited to have @aggroed dedicated to Invennium! Future is bright!
Post manually reviewed. 😊
Yay! 🤗
Your content has been boosted with Ecency Points, by @pokermaria.
Use Ecency daily to boost your growth on platform!
Support Ecency
Vote for new Proposal
Delegate HP and earn more
Congratulations @drzoom! You have completed the following achievement on the Hive blockchain And have been rewarded with New badge(s)
Your next target is to reach 800 upvotes.
You can view your badges on your board and compare yourself to others in the Ranking
If you no longer want to receive notifications, reply to this comment with the word
STOPThis may have been the most complete post on #GenesisLeagueGoals I've come across this month. Congratulations on your dedication to posting this.
Thank you; we worked hard to get the info and post it so that everyone knows and it able to maximize play! I appreciate the comment.
Nice and useful post about glg!
!PGM
!PIZZA
!ALIVE
BUY AND STAKE THE PGM TO SEND A LOT OF TOKENS!
The tokens that the command sends are: 0.1 PGM-0.1 LVL-0.1 THGAMING-0.05 DEC-15 SBT-1 STARBITS-[0.00000001 BTC (SWAP.BTC) only if you have 2500 PGM in stake or more ]
5000 PGM IN STAKE = 2x rewards!
Discord
Support the curation account @ pgm-curator with a delegation 10 HP - 50 HP - 100 HP - 500 HP - 1000 HP
Get potential votes from @ pgm-curator by paying in PGM, here is a guide
I'm a bot, if you want a hand ask @ zottone444
@drzoom! You Are Alive so I just staked 0.1 $ALIVE to your account on behalf of @ libertycrypto27. (1/10)
The tip has been paid for by the We Are Alive Tribe through the earnings on @alive.chat, feel free to swing by our daily chat any time you want, plus you can win Hive Power (2x 50 HP) and Alive Power (2x 500 AP) delegations (4 weeks), and Ecency Points (4x 50 EP), in our chat every day.

$PIZZA slices delivered:
@libertycrypto27(2/15) tipped @drzoom