SHARE YOUR BATTLE Weekly Challenge! HILL GIANT
[🇺🇸 - EN & 🇧🇷 - PT/BR]
Hello, everyone! 😄
I wasn't really excited to know that the share your battle of this week was Hill Giant since I don't use so often. However, I don't think it is a bad card, on the contrary: in the certain rule sets he works very well and I will mention them below!
🇧🇷
Olá pessoal! 😄
Não fiquei muito empolgado em saber que o compartilhe sua batalha desta semana é o Gigante da Colina, já que não o uso com tanta frequência. No entanto, não acho que seja uma carta ruim, muito pelo contrário: em algumas regras ele funciona muito bem e irei citá-las mais para frente.


In the Chaos Legion Set every Splinter (Except Fire) received a melee card with 3 Mana Cost: Crypt Beetle ☠️, Cruel Sethropod 🌊, Stitch Leech 🌟 and Hill Giant 🌿. Among these cards I think the best ones are Cruel Sethropod = Stitch Leech > Hill Giant = Crypt Beetle.
Hill Giant acquires an ability (Stun) only in Gold League+ at level 6 which is a great ability to combine with Knockout monsters and also a good counter against monsters with Heal since they will miss a round stunned.
Strengths: Good amount of HP 💚 and decent attack since Bronze League (2 attack power at level 3).
Weakness: lack of Armor and low Speed, but good in Reverse Speed ruleset.
Na coleção Legião do Caos cada Splinter (exceto Fogo) recebeu uma carta corpo a corpo com 3 de custo de mana: Crypt Beetle ☠️, Cruel Sethropod 🌊, Stitch Leech 🌟 e Hill Giant 🌿. Entre essas cartas eu acho que as melhores são Cruel Sethropod = Stitch Leech > Hill Giant = Crypt Beetle.
Gigante da Colina adquire uma habilidade (Atordoar) apenas na Liga Ouro+ no nível 6, que é uma ótima habilidade para combinar com monstros Knockout e também uma boa defesa contra monstros com Cura, pois eles perderão uma rodada atordoados sem poder se curar.
Forças: Boa quantidade de HP 💚 e ataque decente desde Bronze League (2 poder de ataque no nível 3).
Fraqueza: Falta de armadura e baixa velocidade, mas bom na regra de velocidade reversa.
STRATEGY
Best Summoners: Wizard of Eastwood and Mylor would be the best ones, but Obsidian with mages to support is also great! That said, he doesn't rely much on the summoner support.
Best Position: 1st position, I don't like using him in the 2nd position, because an idle monster hurts your lineup/strategy.
Best rule sets: Little League, Up Close & Personal, Back to Basics, Equal Opportunity/Super Sneak, Melee Mayhem, Unprotected, Spreading Fury, Heavy Hitters and in low mana battles!
Melhores Invocadores: Wizard of Eastwood e Mylor seriam os melhores, mas Obsidian com magos de suporte também é ótimo! Dito isso, ele não depende muito do suporte do invocador.
Melhor Posição: 1ª posição, não gosto de usar ele na 2ª posição, pois um monstro ocioso prejudica sua formação/estratégia.
Melhores conjuntos de regras: Liga Pequena, De Perto e Pessoal, De volta aos básicos, Oportunidade Igual/Super Furtivo, Melee Mayhem, Desprotegido, Espalhando Fúria, Pesos Pesados e em batalhas de baixa mana!


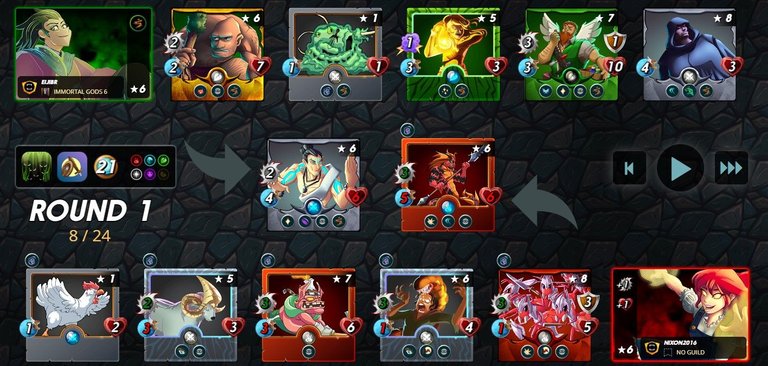
As you can see below, these rule sets (Super Sneak and Rise of the commons) was the perfect situation to use Mylor Crowling since it was very likely that my opponent would use many melee monsters.
Como vocês podem ver na imagem abaixo, esses conjuntos de regras (Super Sneak e ascensão dos comuns) eram a situação para escolher Mylor Crowling visto que é muito possível que meu adversário escolhesse diversos monstros de ataque corpo a corpo.

1st Position - Xenith Monk: In case the opponent choose some magic strategy, Xenith has Void ability+Heal.
2nd Position - Hill Giant: For 3 Mana Cost, it is a great choice with a decent damage.
3rd Position - Creeeping Ooze: it very important to strike first and also not miss, so slow ability would be of a great help.
4th Position - Pelacor Mercenary: similar logic as the Xenith Monk, since it is super sneak, Pelacor has good chances to dodge attacks and also heal himself, turning him very hard to kill especially if the enemy is attacking with melee monsters against Mylor thorns.
5th position - Khmer Princess: an extra heal, just to turn Xenith Monk even harder to kill.
6th Position - Chaos Agent: a card that become hard to hit with Creeping ooze slow and his Evade ability.
1ª Posição - Monge Xenith: Caso o oponente escolha alguma estratégia mágica, Xenith possui habilidade Void+Heal.
2ª Posição - Gigante da Colina: Por 3 Mana Cost, é uma ótima escolha com um dano decente.
3ª Posição - Creeeping Ooze: é muito importante atacar primeiro e também não errar, então a habilidade lenta seria de grande ajuda.
4ª Posição - Pelacor Mercenary: lógica semelhante ao Monge Xenith, já que é super furtivo, Pelacor tem boas chances de se esquivar de ataques e também se curar, tornando-o muito difícil de matar principalmente se o inimigo estiver atacando com monstros corpo a corpo contra os espinhos de Mylor.
5ª posição - Khmer Princess: uma cura extra, apenas para tornar o Xenith Monk ainda mais difícil de matar.
6ª Posição - Agente do Caos: uma carta que se torna difícil de acertar com Gosma Rastejante lenta e sua habilidade Esquiva


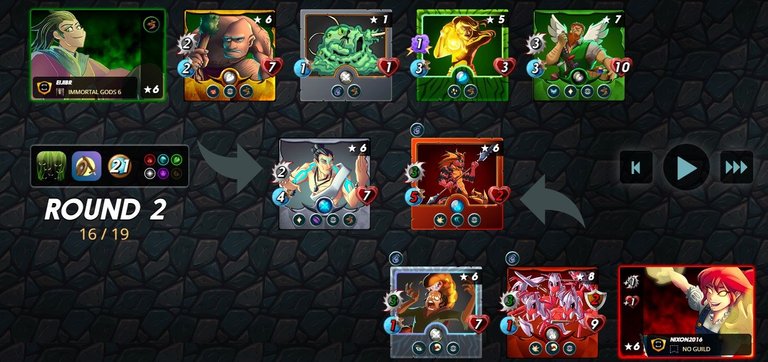
Right in the beginning I was very confident that I would win since my opponent picked only Melee Monsters against Mylor Crowling! 🤣 😈
Logo no começo eu estava muito confiante de que venceria, já que meu oponente escolheu apenas Monstros Corpo a Corpo contra Mylor Crowling! 🤣 😈
Highlights/Destaques
My opponent picked 2 monsters with Scavenger and Shield ability which was a wise decision!
Pelacor Mercenary did dodge most of the attacks as planned.
In the end of round 2 things were already settled since my monsters wouldn't die due to Heal ability.
Meu oponente escolheu 2 monstros com habilidade Scavenger e Shield, o que foi uma decisão sábia!
Pelacor Mercenary evitou a maioria dos ataques como planejado.
No final do round 2 as coisas já estavam resolvidas já que meus monstros não morreriam devido a habilidade de Cura.
That's it for today! You can watch the full battle by clicking here!
If you want to start playing Splinterlands, please use my referral link by clicking here!
Thanks for reading!
Por hoje é só, se quiser ver a batalha na íntegra clique aqui!
Se quiser começar a jogar Splinterlands, por favor use meu link de referência clicando aqui!!
Obrigado por ler!

Obrigado por promover a comunidade Hive-BR em suas postagens.
Vamos seguir fortalecendo a Hive
!1UP Gosto bastante do Hill Giant pois ele consegue fazer muito custando pouco, principalmente se você der sorte do Stun ativar no seu primeiro ataque. Ótima batalha e explicações bem estruturadas, parabéns!

Click this banner to join "The Cartel" discord server to know more.
You have received a 1UP from @underlock!
@monster-curator, @oneup-curator, @ccc-curator, @vyb-curator, @pob-curator
And they will bring !PIZZA 🍕.
Learn more about our delegation service to earn daily rewards. Join the Cartel on Discord.
Thanks for sharing! - @marianaemilia

Very nice! Congrats