Battle analysis: Life Leech + Heal EN-US/PT-BR
Introduction
When I started in the game I always found the Life Leech skill interesting, but I didn't understand its little use in matches. With a little more experience I realized that these monsters usually have low HP at the beginning of the match, so they end up needing a while to grow in the game.
But even doing everything to keep them alive as many rounds as possible, we know that a lot of HP most of the time is just a delay to a possible kill, especially if the monster is alone against more opponents.
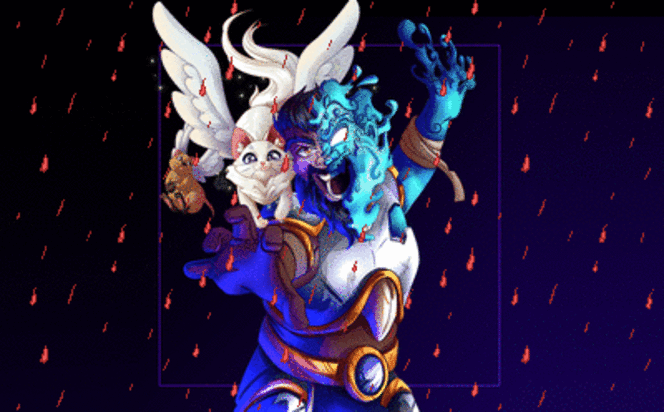
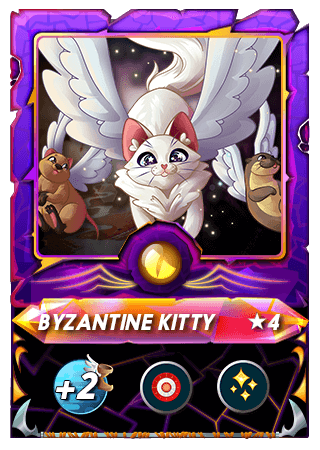
Healing skills regenerate 1/3 of the monster's maximum health, which is a way to take advantage of this pile of HP. However, these monsters usually end up alone on the battlefield, without an ally to heal them. To resolve this impasse, we can use the Byzantine Kitty Dragon Splinter Summoner, which has this ability:
The following will be a battle where I combined this Summoner with a monster with Life Leech, the Life Sapper:
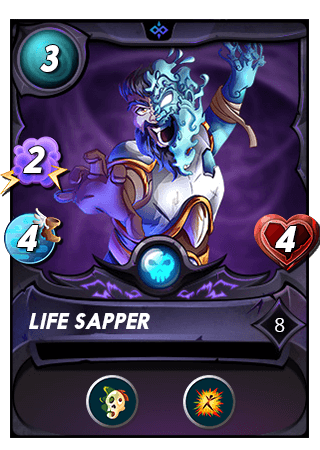
Life Leech: Increases the user's maximum health by half the damage on the opponent, rounded down (when the damage is 01, it increases 01 HP).
Redemption: When eliminated, it hits all enemies with a physical attack of 01 damage.
The strategy before the battle
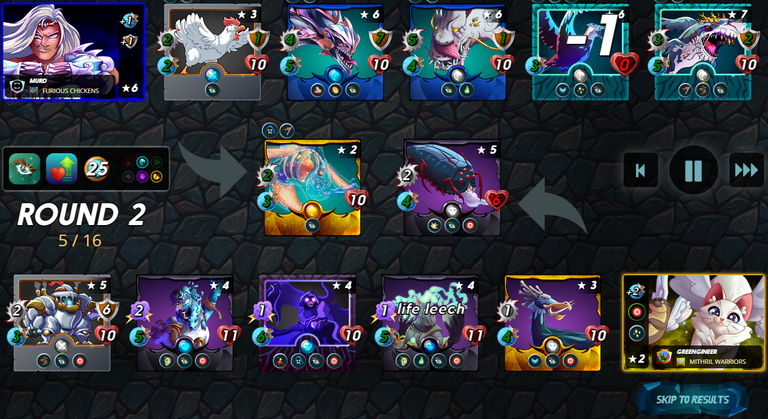
The battle had the Equal Opportunity and Equalizer rules active, 25 MP available, and only Water, Death, and Dragon Splinters were available. Analyzing my opponent's history, I couldn't see a defect in his plays, so I focused on taking advantage of the active rules.
With Equalizer active I tend to avoid selecting monsters with a lot of HP, because while it can favor my allies, it can do the same for my opponents. Monsters with Life Leech often benefit from this rule, as their low starting HP is equal to that of the monster with the highest HP in the game. So I tried to combine Byzantine Kitty with at least one monster with this skill, and in Death Splinter I had 02, Life Sapper and Venari Bonesmith.
As a tank I put the Crypt Beetle, which has the Shield ability. In third position I put Venari Bonesmith with Life Leech and Poison. In fourth position I put Death Elemental with Snipe and Silence. In fifth position I put Life Sapper with Life Leech and in last position I put Enchanted Defender. To use the remaining 01 MP I put the Carrion Shade in second position.
With Equal Opportunity active it meant that all monsters would be able to attack regardless of position. As Equalizer was also active the monsters would attack from the tank to the last position, unless Snipe or Sneak skills were used to decrease the HP of monsters from other positions. To prevent this I put the Enchanted Defender in the last position. I wouldn't have to worry about the monsters with Life Leech before they got to the first position, as by gaining HP per round they wouldn't be the target of the enemy Opportunity.
Once assembled the team was hoping that my opponent didn't come with Magic Reflect or Void that could break my strategy.

The battle
My opponent came with Summoner Kelya Frendul. As a tank he used the Torrent Fiend, in the second position was Furious Chicken, in the third position he placed Diemonshark with Trample and Enrage, in the fourth position was Deeplurker with Poison, in the fifth position he selected the Albatross with Tank Heal and in the last position position he placed the Demented Shark with Thorns and Inspire.
My opponent was hoping I would attack from the first to the last monster to make better use of Albatross's Tank Heal. To prevent attacks from the rear he put the Dementend Shark with Thorns, but he forgot to protect the Albatross from the Snipe ability.
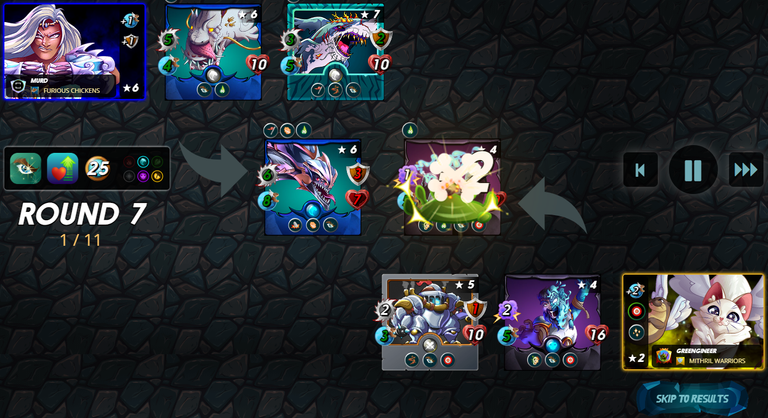
During the first round all monsters remained in the game. Due to my Death Elemental's Snipe attack, the rest of my team's attacks focused on Albatross, taking him out of the match in the second round.
Still in the second round I lost my Crypt Beetle with Deeplurker's attack.
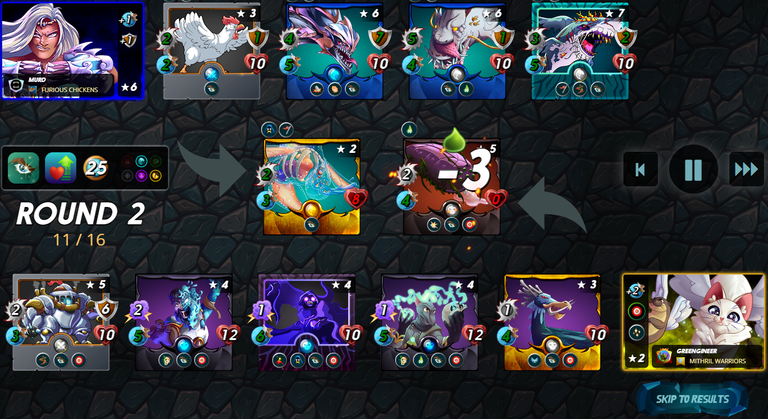
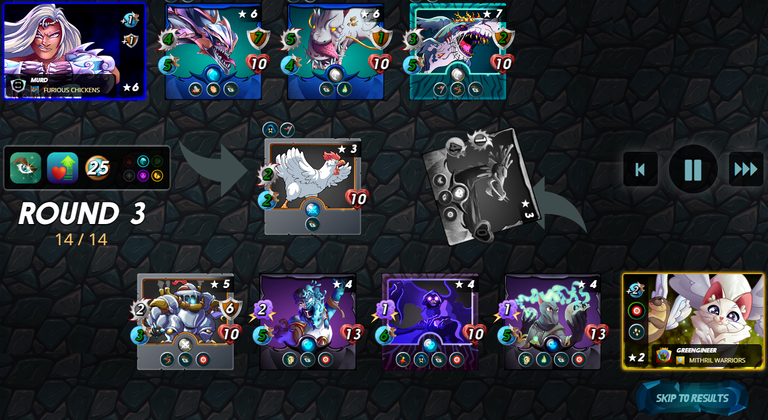
In the third round the Torrent Fiend left the match with the Carrion Shade attack.
Then, still in the third round, Carrion Shade was eliminated by Furious Chicken.
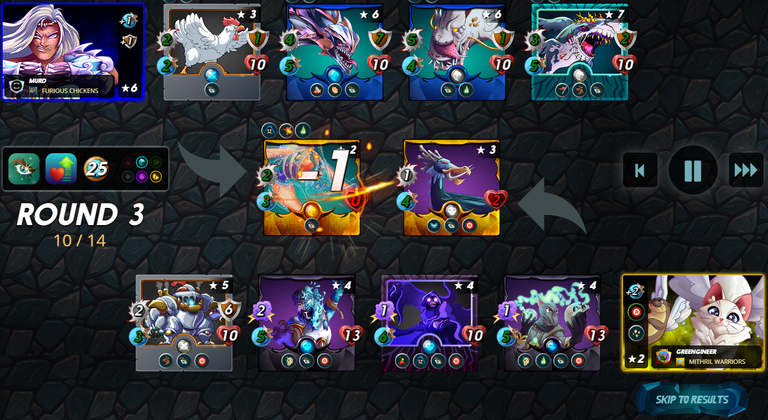
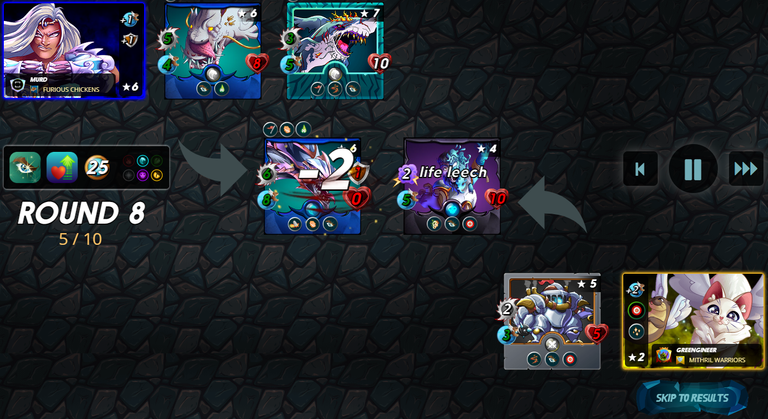
In the fifth round, Furious Chicken was eliminated by Life Sapper's attack. Even though Venari Bonesmith was in the first position, my enemies turned their attack to Death Elemental, which managed to dodge some attacks due to its high speed.
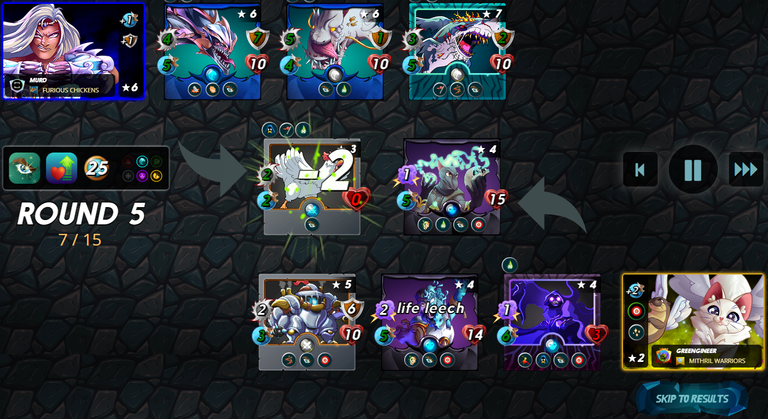
But still in the fifth round, Death Elemental ended up leaving the match. The sum of the enemy team's attack power was much higher than mine.

At the beginning of the seventh round my Venari Bonesmith went down due to poisoning. The match seemed lost with the amount of enemy alive, especially considering that the Enchanted Defender would not be able to decrease Diemonshark's health.
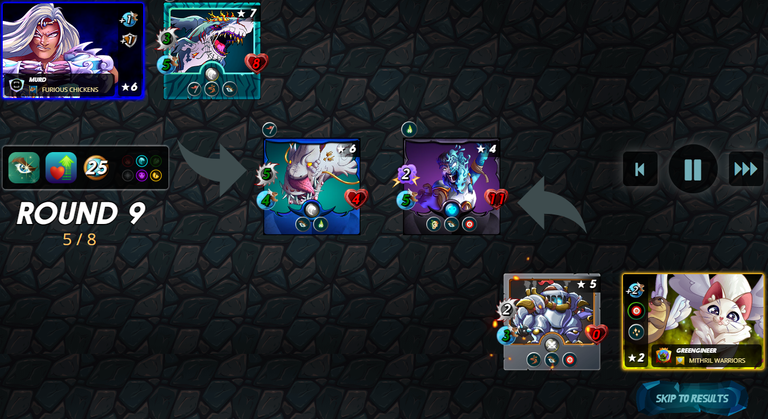
In the eighth round, Diemonshark left the game and the other enemies were wasting time with the Enchanted Defender.
In the ninth round my Enchanted Defender fell, leaving only my Life Sapper against 02 enemies 😬.
In the eleventh round the Deeplurker left the match, leaving only the Demented Shark on the enemy side.
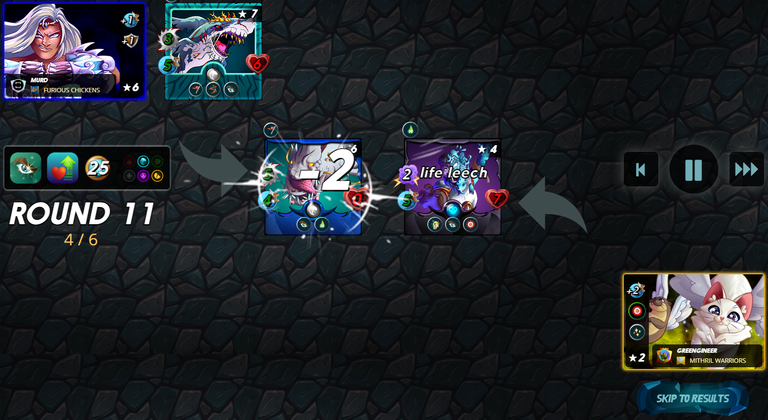
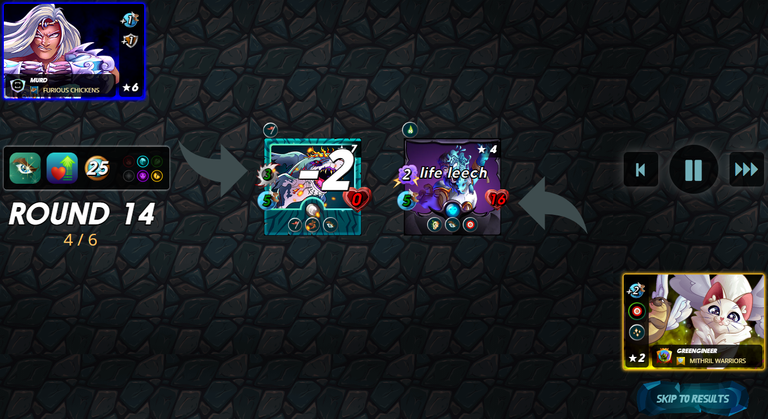
In the fourteenth round my Life Sapper delivered the final blow to the Demented Shark, securing my victory.
The healing provided by Byzantine Kitty was instrumental in keeping the Life Sapper alive until the end of the match. If my opponent had come with at least one monster with Affliction, the match could have had a completely different outcome.
I hope you enjoyed the game, to follow it in detail, just click on Greengineer (2022).
PS: Sorry if there is any error in the above writing, as English is not my mother language.
References:
@greengineer (2022, June 02). Battle Link. Splinterlands - Collect, Trade, Battle!. https://splinterlands.com/?p=battle&id=sl_92ae04c7baba0e84a698ab642b0e0cd8&ref=greengineer
--------PT/BR--------
Introdução
Quando iniciei no jogo sempre achei interessante a habilidade Life Leech, mas não entendia seu pouco uso. Com um pouco mais de experiência percebi que normalmente estes monstros possuem pouco HP no início da partida, então eles acabam precisando de um tempo até conseguir crescer no jogo.
Porém mesmo fazendo de tudo para mantê-los vivos o maior número de rounds possíveis, sabemos que um monte de HP a maioria das vezes só é um atraso a um possível abate, principalmente se o monstro ficar sozinho contra mais oponentes.
As habilidades de cura regeneram 1/3 da vida máxima do monstro, sendo uma forma de tirar proveito deste monte de HP. Porém normalmente estes monstros acabam restando sozinhos no campo de batalha, sem um aliado para curá-los. Para resolver este impasse podemos utilizar o Summoner do Splinter do Dragão Byzantine Kitty, que possui esta habilidade:
A seguir será apresentada uma batalha onde combinei este Summoner com um monstro com Life Leech, o Life Sapper:
Life Leech: Aumenta a vida máxima do usuário na metade do dano no oponente, arredondado para baixo (quando o dano é 01 aumenta 01 de HP).
Redemption: Ao ser eliminado atinge todos os inimigos com ataque físico de 01 de dano.
A estratégia antes da batalha
A batalha possuía as regras Equal Opportunity e Equalizer ativas, 25 de MP disponíveis e apenas os Splinter da Água, da Morte e do Dragão estavam disponíveis. Analisando o histórico de meu oponente não dava para perceber um vício nas suas jogadas, por tanto foquei em me aproveitar das regras ativas.
Com Equalizer ativo costumo evitar selecionar monstros com bastante HP, pois ao mesmo tempo que pode favorecer meus aliados, pode fazer o mesmo pelos meus oponentes. Monstros com Life Leech costumam ser beneficiados por esta regra, pois seu baixo HP inicial é igualado ao do monstro com maior HP da partida. Por tanto busquei combinar o Byzantine Kitty com ao menos um monstro com esta habilidade, e no Splinter da Morte eu tinha 02, o Life Sapper e o Venari Bonesmith.
Como tanque coloquei o Crypt Beetle, que possuí a habilidade Shield. Na terceira posição coloquei o Venari Bonesmith com Life Leech e Poison. Na quarta posição coloquei o Death Elemental com Snipe e Silence. Na quinta posição coloquei o Life Sapper com Life Leech e na última posição coloquei o Enchanted Defender. Para utilizar o 01 de MP restante coloquei o Carrion Shade na segunda posição.
Com Equal Opportunity ativo significava que todos os monstros conseguiriam atacar independente da posição. Como Equalizer também estava ativo os monstros atacariam do tanque para a última posição, a não ser que habilidades Snipe ou Sneak fossem utilizadas para diminuir o HP de monstros de outras posições. Para me prevenir disto coloquei o Enchanted Defender na última posição. Eu não precisaria me preocupar com os monstros com Life Leech antes que eles chegassem na primeira posição, pois ao ganhar HP por round eles não seriam o alvo do Opportunity inimigo.
Uma vez montado o time era torcer que meu oponente não viesse com Magic Reflect ou Void que poderia quebrar minha estratégia.
A batalha
Meu oponente veio com a Summoner Kelya Frendul. Como tanque ele utilizou o Torrent Fiend, na segunda posição estava a Furious Chicken, na terceira posição ele colocou o Diemonshark com Trample e Enrage, na quarta posição estava o Deeplurker com Poison, na quinta posição ele selecionou o Albatross com Tank Heal e na última posição ele colocou o Demented Shark com Thorns e Inspire.
Meu oponente torcia que eu atacasse do primeiro ao último monstro para fazer um melhor uso do Tank Heal do Albatross. Para prevenir ataques pela retaguarda ele colocou o Dementend Shark com Thorns, mas ele esqueceu de proteger o Albatross da habilidade Snipe.
Durante o primeiro round todos os monstros permaneciam na partida. Devido ao ataque Snipe de meu Death Elemental, os ataque do restante de minha equipe focaram o Albatross, tirando-o da partida no segundo round.
Ainda no segundo round perdi meu Crypt Beetle com o ataque do Deeplurker.
No terceiro round o Torrent Fiend saiu da partida com o ataque do Carrion Shade.
Em seguida, ainda no terceiro round, o Carrion Shade foi eliminado pela Furious Chicken.
No quinto round a Furious Chicken foi eliminada pelo ataque do Life Sapper. Mesmo o Venari Bonesmith estando na primeira posição, meus inimigos voltaram seu ataque para o Death Elemental, que conseguiu desviar de alguns ataques devido à sua alta velocidade.
Mas ainda no quinto round o Death Elemental acabou saindo da partida. A soma do poder de ataque da equipe inimiga era bem superior ao da minha.
No início do sétimo round meu Venari Bonesmith caiu devido ao envenenamento. A partida parecia perdida com a quantidade de inimigo viva, ainda mais se contar que o Enchanted Defender não conseguiria diminuir a vida do Diemonshark.
No oitavo round o Diemonshark saiu da partida e os demais inimigos estavam perdendo tempo com o Enchanted Defender.
No nono round meu Enchanted Defender caiu, restando apenas meu Life Sapper contra 02 inimigos 😬.
No décimo primeiro round o Deeplurker saiu da partida, restando apenas o Demented Shark do lado inimigo.
No décimo quarto round meu Life Sapper desferiu o golpe final no Demented Shark, garantindo a minha vitória.
A cura fornecida pelo Byzantine Kitty foi fundamental para manter o Life Sapper vivo até o final da partida. Se meu oponente tivesse vindo com ao menos um monstro com Affliction a partida poderia ter um desfecho totalmente diferente.
Espero que tenham gostado da partida, para acompanhá-la em detalhes é só clicar em Greengineer (2022).
Referências:
@greengineer (2022, 02 de Junho). Link de Batalha. Splinterlands - Collect, Trade, Battle!. https://splinterlands.com/?p=battle&id=sl_92ae04c7baba0e84a698ab642b0e0cd8&ref=greengineer
https://twitter.com/leona_dog/status/1536359336573865986
The rewards earned on this comment will go directly to the people(@greengineer) sharing the post on Twitter as long as they are registered with @poshtoken. Sign up at https://hiveposh.com.
!1UP good work!
You have received a 1UP from @marianaemilia!
@monster-curator, @oneup-curator, @vyb-curator, @pob-curatorAnd they will bring !PIZZA 🍕
Learn more about our delegation service to earn daily rewards. Join the family on Discord.
Congratulations @greengineer! You have completed the following achievement on the Hive blockchain and have been rewarded with new badge(s):
Your next target is to reach 15000 upvotes.
You can view your badges on your board and compare yourself to others in the Ranking
If you no longer want to receive notifications, reply to this comment with the word
STOPCheck out the last post from @hivebuzz:
Support the HiveBuzz project. Vote for our proposal!
You got one 100000+ oneup token backed 100% upvote from the gaming token curation account from @dailygiveaways (your page for daily free giveaways). !BBH
Posted using 1UP - Play2Earn & NFTs
Because this is such an awesome post, here is a BBH Tip for you. . Keep up the fantastic work
Thanks for sharing! - @alokkumar121

Avoid sharing so many screenshots rather share more about the battle.