Battle analysis: Llama vs Death Splinter EN-US/PT-BR

Introduction
Llama + Kron combo users usually leave clues in their history when they tend to abuse it. I recently faced an opponent with a history full of battles using this combo and I had the Death Splinter as the quest's Focus. I usually use Sneak monsters to eliminate Kron before Last Stand activates, but with Death Splinter I was not guaranteed that my tank would last long enough for this feat.
The strategy before the battle
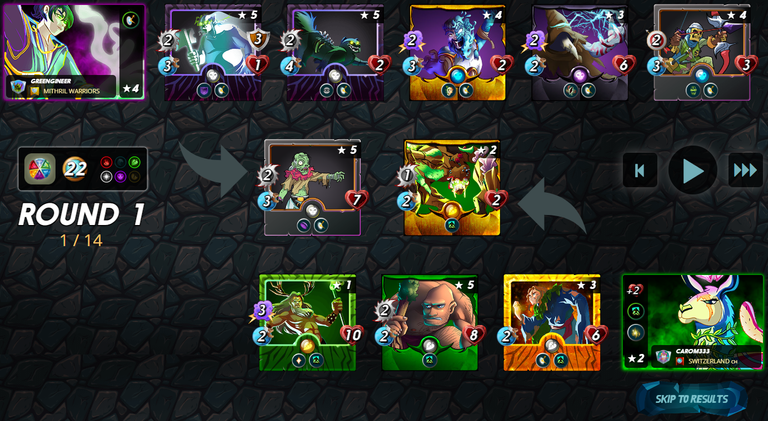
The battle had the Taking Sides rule active, 22 MP available, and only the Water and Dragon Splinters were disabled. As mentioned before my opponent had a history full of Llama + Kron combo and the MP was favorable for this. As there was little mana available I couldn't count on my tank lasting as long as it took to eliminate Kron with a team focused on Sneak, so I tried to put together a strategy to try to eliminate Kron even if he activated Last Stand.
For it I used Summoner Owster Rotwell, which would provide Magic Reflect to all my monsters so that Kron would receive part of its monstrous damage back. As a tank I chose Animated Corpse with Void and in second position I put Marrow's Ghost with Void Armor to protect my backline. In fifth position I put Insidious Warlock, with Recharge. This skill is often interesting when used against monsters that rely on Heal and Tank Heal skills, as the triple attack can put them in a situation where the rest of the team can eliminate them before they heal. In the other positions I put monsters with the maximum damage in relation to the summoning MP, which were the Undead Badger in the third position, the Life Sapper in the fourth position and the Undead Archer in the last position.
Once assembled the team was hoping that the sequence of my attacks was accurate to eliminate Kron before I lost my 02 tanks.
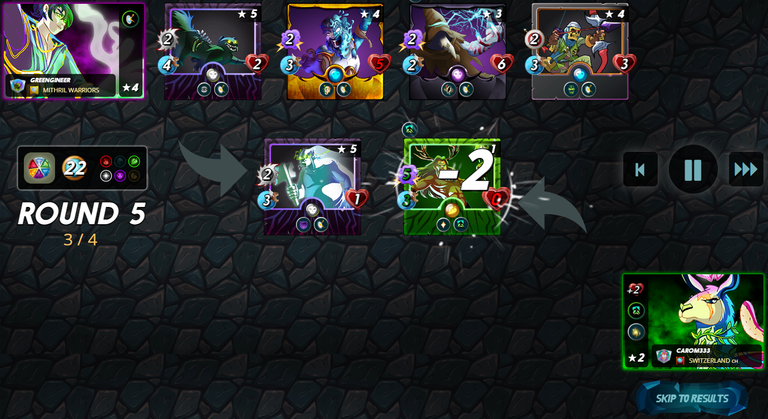
The battle
My opponent came with Llama as expected and Kron was in last position. To utilize the remaining available MP he placed the Failed Summoner in second position and the Hill Giant in third position. To occupy one of the free slots he put the Fungus Fiend as a tank.
In the first round my opponent lost his Fungus Fiend.
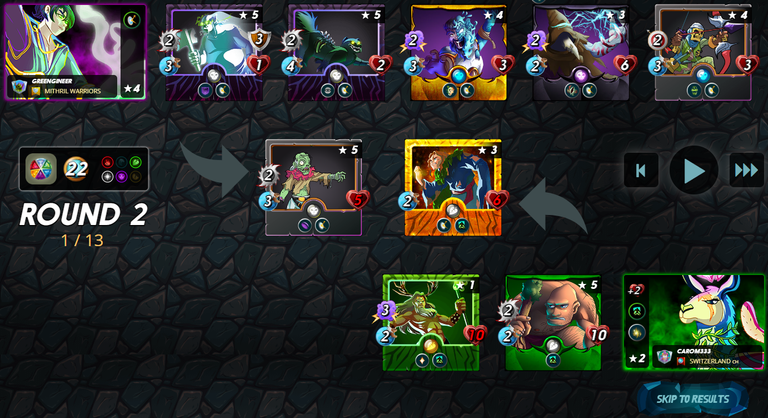
In the second round, it was the turn of the Failed Summoner to fall.
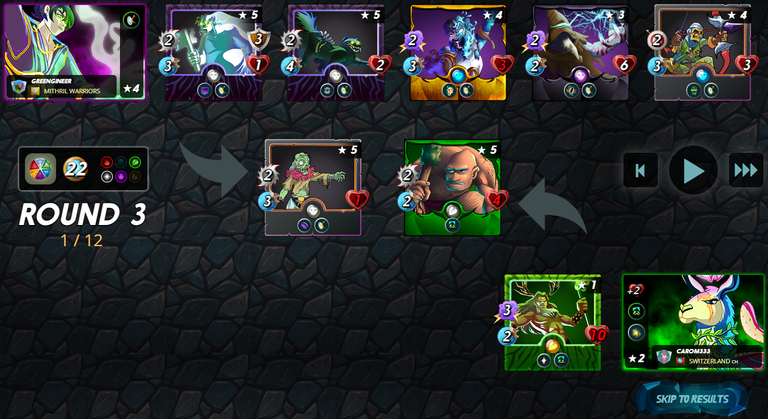
In the third round Hill Giant left the match and Kron activated the Last Stand. Then the Animated Corpse was eliminated by Kron, but Kron received damage back from Reflect.
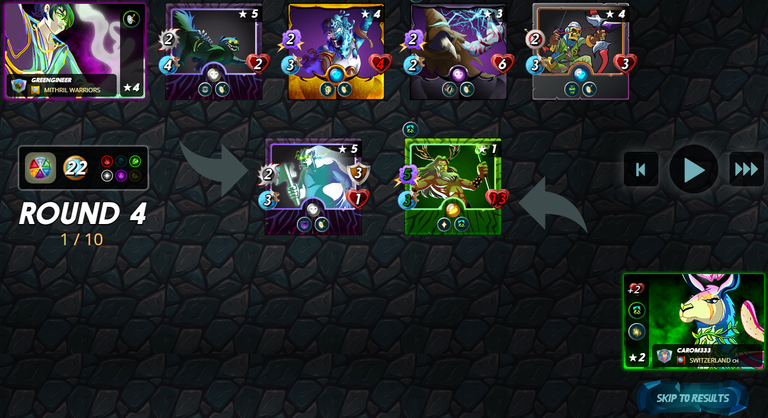
In the fourth round Kron recovered almost all his health and launched an attack eliminating the shield of Marrow's Ghost. Then my entire team landed attacks on Kron, including the Insidious Warlock's charged attack, leaving Kron on the brink of death.

Thanks to the Undead Badger's high speed he dealt the final blow to Kron before he healed, ensuring my victory.
I hope you enjoyed the game, to follow it in detail, just click on Greengineer (2022).
PS: Sorry if there is any error in the above writing, as English is not my mother language.
References:
@greengineer (2022, June 08). Battle Link. Splinterlands - Collect, Trade, Battle!. https://splinterlands.com/?p=battle&id=sl_f860ee085f80973d36c8b963bd2b89a5&ref=greengineer
--------PT/BR--------
Introdução
Usuários de Llama + Kron costumam deixar pistas em seu histórico quando possuem a tendência de abusar deste combo. Recentemente enfrentei um oponente com o histórico repleto de batalhas utilizando este combo e eu estava com o Splinter da Morte como Focus da quest. Normalmente utilizo monstros com Sneak para eliminar o Kron antes da ativação do Last Stand, mas com o Splinter da Morte eu não tinha a garantia de que o meu tanque duraria o tempo necessário para este feito.
A estratégia antes da batalha
A batalha tinha a regra Taking Sides ativa, 22 de MP disponíveis e apenas os Splinters da Água e do Dragão estavam desabilitados. Como mencionado anteriormente meu oponente estava com o histórico repleto de Llama + Kron e o MP era favorável para isto. Como havia pouca mana disponível eu não poderia contar que o meu tanque duraria o tempo necessário para eliminar o Kron com um time focado em Sneak, logo busquei montar uma estratégia para tentar eliminar o Kron mesmo se ele ativasse o Last Stand.
Para isto utilizei o Summoner Owster Rotwell, que forneceria Magic Reflect para todos os meus monstros de forma que o Kron recebesse parte de seu dano monstruoso de volta. Como tanque escolhi o Animated Corpse com Void e na segunda posição coloquei o Marrow's Ghost com Void Armor para proteger minha backline. Na quinta posição coloquei o Insidious Warlock, com Recharge. Esta habilidade costuma ser interessante quando empregada contra monstros que dependem das habilidades Heal e Tank Heal, pois o ataque triplicado podem colocá-los em uma situação em que o restante da equipe consiga eliminá-los antes que se curem. Nas demais posições coloquei monstros com o máximo de dano em relação ao MP de invocação, que foram o Undead Badger na terceira posição, o Life Sapper na quarta posição e o Undead Archer na última posição.
Uma vez montado o time era torcer que a sequência de meus ataques fosse precisa para eliminar o Kron antes que eu perdesse meus 02 tanques.
A batalha
Meu oponente veio com a Llama como esperado e o Kron estava na última posição. Para utilizar o restante do MP disponível ele alocou o Failed Summoner na segunda posição e o Hill Giant na terceira posição. Para ocupar um dos slots livres ele colocou o Fungus Fiend como tanque.
No primeiro round meu oponente perdeu seu Fungus Fiend.
No segundo round foi a vez do Failed Summoner cair.
No terceiro round o Hill Giant saiu da partida e o Kron ativou o Last Stand. Em seguida o Animated Corpse foi eliminado pelo Kron, mas esse receber dano de volta do Reflect.
No quarto round o Kron recuperou quase toda a sua vida e desferiu um ataque eliminando o escudo do Marrow's Ghost. Em seguida toda a minha equipe acertou os ataques no Kron, incluindo o ataque carregado do Insidious Warlock, deixando o Kron à beira da morte.
Graças a alta velocidade do Undead Badger ele desferiu o golpe final no Kron antes que ele se curasse, garantindo a minha vitória.
Espero que tenham gostado da partida, para acompanhá-la em detalhes é só clicar em Greengineer (2022).
Referências:
@greengineer (2022, 08 de Junho). Link de Batalha. Splinterlands - Collect, Trade, Battle!. https://splinterlands.com/?p=battle&id=sl_f860ee085f80973d36c8b963bd2b89a5&ref=greengineer
https://twitter.com/leona_dog/status/1546153999417499648
The rewards earned on this comment will go directly to the people( @greengineer ) sharing the post on Twitter as long as they are registered with @poshtoken. Sign up at https://hiveposh.com.
Obrigado por promover a Língua Portuguesa em suas postagens.
Vamos seguir fortalecendo a comunidade lusófona dentro da Hive.
!1UP good work!
You have received a 1UP from @marianaemilia!
@monster-curator, @oneup-curator, @vyb-curator, @pob-curator
And they will bring !PIZZA 🍕.
Learn more about our delegation service to earn daily rewards. Join the Cartel on Discord.
Congratulations @greengineer! You have completed the following achievement on the Hive blockchain and have been rewarded with new badge(s):
Your next target is to reach 60 posts.
You can view your badges on your board and compare yourself to others in the Ranking
If you no longer want to receive notifications, reply to this comment with the word
STOPTo support your work, I also upvoted your post!
Check out the last post from @hivebuzz:
Support the HiveBuzz project. Vote for our proposal!
Thanks for sharing! - @marianaemilia

good work!
Dear @greengineer, sorry to jump in a bit off topic but may I ask you to support the HiveBuzz proposal?
It recently lost its funding, is struggling to get back above the HBD stabilizer proposal, and is in dire need of help.
You can support it on Peakd, Ecency, Hive.blog or using HiveSigner.
On behalf of The HiveBuzz team, thank you!