SHARE YOUR BATTLE Weekly Challenge! REVERSE SPEED (EN-ES)

REVERSE SPEED

Hello friends, this week the Splinterlands team as usual offer us a new challenge. This time it's the turn to talk about the battle condition Reverse Speed. I'm sure many of you are familiar with this condition so today I'm going to tell you about it, how to take advantage of it in a battle and finally I'll share a battle with it in action.
Hola amigos, esta semana el equipo de Splinterlands como es habitual nos ofrecen un nuevo desafío. En esta ocasión es el turno de hablar de la condición de batalla Reverse Speed. Seguro que muchos de vosotros estaréis familiarizados con esta condición así que el día de hoy voy a hablaros de que consiste, la forma de sacar ventaja en un combate y finalmente compartiré un combate con ella en acción.
Are you ready to learn the secrets of a new battle condition?
¿Estáis preparados para aprender los secretos de una nueva condición de batalla?
Let's start by talking about what the Reverse Speed condition consists of.
Empecemos hablando en que consiste la condición Reverse Speed.
What is the "REVERSE SPEED" condition?
When this condition is active the monsters with the slowest speed will attack first and will have a higher chance of avoiding attacks.
Cuando esta condición está activa los monstruos con la velocidad más baja atacará primero y tendrán mayor probabilidad de evitar los ataques.
How to get advantage
By following these simple tips we will be able to have some advantage in the combats with this condition active:
- Mi primer consejo es usar cartas que tengan tan solo 1 punto de velocidad porque atacarán primero y tendrán más posibilidades de evadir ataques cuerpo a cuerpo y a distancia.
- Contra rivales con cartas de mayor nivel que las nuestras, esta condición nos beneficia ya que cuanto mayor nivel en las cartas, más velocidad tienen y eso puede ser una desventaja para el enemigo que debemos aprovechar.
- Cuidado con cartas que tengan habilidades como Enrage y Last Stand, estas habilidades aumentan la velocidad cuando se activan.
- Esta condición es perfecta para usarla con carta que tengan la habilidad Bloodlust ya que al activarse ganaremos un -1 en velocidad.
- Es recomendable no usar invocadores que nos den +1 a la velocidad como pueden ser Kelya Frendul, Pyre o Ilthain.
- Además debemos evitar usar cartas con habilidades como pueden ser Swiftness ya que nos veremos perjudicados al ganar velocidad o Slow porque beneficiaremos a nuestro rival.
- Also if we have cards with low speed and Dodge skill it is time to use them. The dodge percentage is very high (as we will see in the shared combat).
Cómo obtener ventaja Siguiendo estos sencillos consejos podremos tener algo de ventaja en los combates con esta condición activa:
- Mi primer consejo es usar cartas que tengan tan solo 1 punto de velocidad porque atacarán primero y tendrán más posibilidades de evadir ataques cuerpo a cuerpo y a distancia.
- Contra rivales con cartas de mayor nivel que las nuestras, esta condición nos beneficia ya que cuanto mayor nivel en las cartas, más velocidad tienen y eso puede ser una desventaja para el enemigo que debemos aprovechar.
- Cuidado con cartas que tengan habilidades como Enrage y Last Stand, estas habilidades aumentan la velocidad cuando se activan.
- Esta condición es perfecta para usarla con carta que tengan la habilidad Bloodlust ya que al activarse ganaremos un -1 en velocidad.
- Es recomendable no usar invocadores que nos den +1 a la velocidad como pueden ser Kelya Frendul, Pyre o Ilthain.
- Además debemos evitar usar cartas con habilidades como pueden ser Swiftness ya que nos veremos perjudicados al ganar velocidad o Slow porque beneficiaremos a nuestro rival.
- Además si tenemos cartas con baja velocidad y habilidad Dodge es momento de usarlas. El porcentaje de esquiva es muy elevado (como veremos en el combate compartido).
A Battle with "REVERSE SPEED" condition

Mana Cap: 23 # Rules: Reverse Speed - Odd Ones Out - What Doesn't Kill YouThe selected combat is a clear example in which having all conditions to lose it, luck in Splinterlands is a very important factor in the game.
El combate seleccionado es un claro ejemplo en el que teniendo todas condiciones para perderlo, la suerte en Splinterlands es un factor muy importante del juego.
Let's take a look at the selected cards:
Veamos las cartas seleccionadas:
Line Up
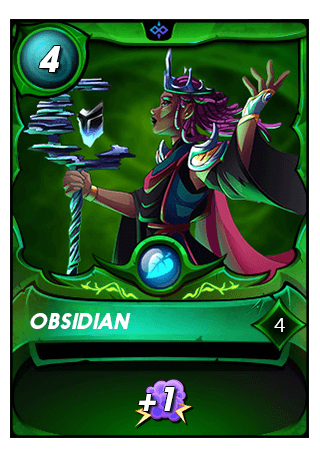 | My summoner for this fight will be Obsidian.Mi invocadora para este combate será Obsidian. | |
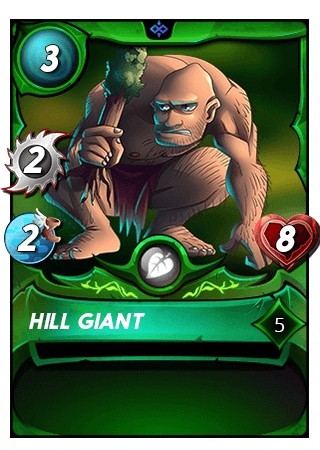 | In first position I will use Hill Giant who has low speed and high vitality.En primera posición usaré a Hill Giant que tiene poca velocidad y una gran vitalidad. | |
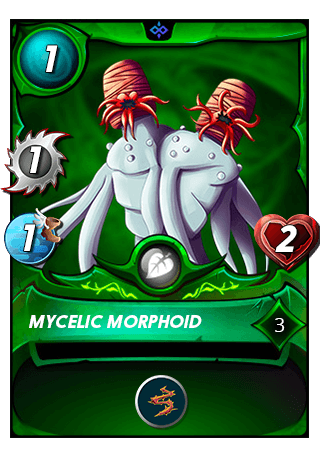 | Second position for Mycelic Morphoid also of low speed.Segunda posición para Mycelic Morphoid también de escasa velocidad. | |
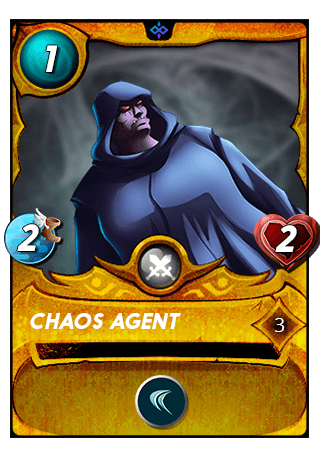 | In third position I will use Chaos Agent who has little speed and his Dodge ability can help me to dodge several hits.En tercera posición usaré a Chaos Agent que dispone de poca velocidad y su habilidad Dodge puede ayudarme a esquivar varios golpes. | |
 | Fourth position for Regal Peryton which is not the most recommended card to use in this match I have nothing better to use.Cuarta posición para Regal Peryton que no es la carta más recomendable para usar en este combate no tengo nada mejor que usar. | |
 | Fifth position for Djinn Biljka, who is perfect because of his speed for this kind of fights.Quinta posición para Djinn Biljka, que es perfecto por su velocidad para este tipo de combates. | |
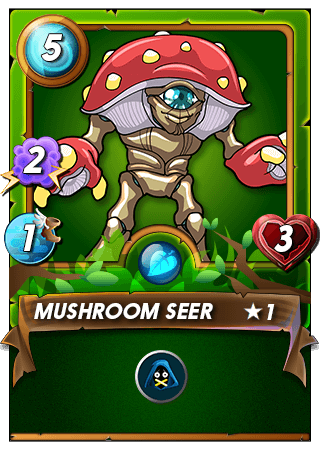 | And finally, Mushroom Seer, also perfect if the enemy plays with magic.Y por último, Mushroom Seer, también perfecto si el enemigo juega con magia. |
Round 1
The strategy I had planned to use goes down the drain when I see that my enemy plays with the Fire element, besides the victory percentage offered by the Splintertools addon is not exactly very encouraging. Even so, I get strength from weakness and I hope to be able to offer resistance until the end.
La estrategia que tenía pensada usar se va al traste al ver que mi enemigo juega con el elemento Fuego, además el porcentaje de victoria que me ofrece el addon Splintertools no es precisamente muy alentador. Aún así saco fuerza de flaqueza y espero poder ofrecer resistencia hasta el final.
The combat will be complicated since my enemy uses several cards with the Sneak ability. In the first turn I hit Forgotten One several times and leave him seriously wounded. On the other hand, although Mushroom Seer dodges an attack due to the Reverse Speed condition, the second hit is critical and ends my creature's life.
El combate será complicado ya que mi enemigo utiliza varias cartas con la habilidad Sneak. En el primer turno golpeo varias veces a Forgotten One y lo dejo gravemente herido. Por el contrario, aunque Mushroom Seer esquiva un ataque debido a la condición Reverse Speed, el segundo golpe es crítico y termina con la vida de mi criatura.
Round 2
On the second turn, Hill Giant continues to dodge enemy hits and hit hard. I manage to destroy Forgotten One but I easily lose Regal Peryton. The fight becomes very close and everything is going to be decided in small details.
En el segundo turno, Hill Giant sigue esquivando golpes enemigos y golpeando con fuerza. Consigo destruir a Forgotten One pero pierdo fácilmente a Regal Peryton. El combate se vuelve muy igualado y todo se va a decidir en pequeños detalles.
Round 3
Third turn, I destroy Radiated Scorcher, my Hill Giant withstands the onslaught of Tenyii Striker and begin to see the effects of the Chaos Agent card that dodges the attack of Uraeus.
Tercer turno, destruyo a Radiated Scorcher, mi Hill Giant aguanta la embestida de Tenyii Striker y empiezan a ver los efectos de la carta Chaos Agent que esquiva el ataque de Uraeus.
Round 4
On the fourth turn I lose Hill Giant, I keep hitting Tenyii Striker but he is a very tough opponent. Chaos Agent dodges Uraeus again and my opponent is losing patience. Also the advantage I have is that Djinn Biljka can't be hit and his 3 magic attack points are helping me in this fearsome battle. Having a card like this 1 point speed card with the Reverse Speed battle condition is crucial.
En el cuarto turno pierdo a Hill Giant, sigo golpeando a Tenyii Striker pero es un oponente muy duro. Chaos Agent vuelva a esquivar el golpe de Uraeus y mi rival está perdiendo la paciencia. Además la ventaja que tengo es que Djinn Biljka no puede ser golpeado y sus 3 puntos de ataque mágico me están ayudando en esta temible batalla. El contar con una carta como esta de 1 punto de velocidad con la condición de batalla Reverse Speed es crucial.
Round 5
Fifth turn and finally I destroy Tenyii Striker, now I only have Uraeus in front of me to win. This time Uraeus hits Mycelic Morphoid and destroys him, but before dying he manages to remove his shield thanks to his Thorns ability.
Quinto turno y por fin destruyo a Tenyii Striker, ya únicamente tengo por delante a Uraeus para alzarme con la victoria. Esta vez Uraeus golpea a Mycelic Morphoid y lo destruye aunque antes de morir consigue quitarle el escudo gracias a su habilidad Thorns.
Round 6
Djinn Biljka hits Uraeus hard and to my opponent's despair, his creature again misses the attack against Chaos Agent.
Djinn Biljka golpea con dureza a Uraeus y para desesperación de mi rival, su criatura vuelve a fallar el ataque frente Chaos Agent.
Round 7
Finally on the seventh turn, Djinn Biljka strikes one last time to destroy Uraeus and give me a victory I wasn't counting on.
Ya por último en el séptimo turno, Djinn Biljka golpea por última vez para destruir a Uraeus y darme una victoria con la que no contaba.
My opinion
The combat I have shared is an example of how when the battle condition is Reverse Speed we can make use of creatures with low speed and Dodge ability. The probabilities of dodging attacks are very high as we have seen. It is essential to take into account all these factors when making our battle strategy.
El combate que he compartido es un ejemplo de como cuando la condición de batalla es Reverse Speed podemos hacer uso de criaturas con poca velocidad y habilidad Dodge. Las probabilidades de que esquivemos los ataques son muy altos como hemos visto. Es imprescindible tener en cuenta todos estos factores a la hora de confeccionar nuestra estrategia de batalla.

Thanks for sharing! - @yonilkar
