Estas son algunas combinaciones para “Defenderse” contra “Melee Mayhem” [ES-EN]
Cover created in Canva

En mis publicaciones sobre “Jugabilidad” en Splinterlands, la mayoría de las veces hablo acerca de la “Ofensiva”, de como jugar a favor de cierta regla para aumentar las probabilidades de ganar, sin embargo, la realidad es que, no todo gira en torno al ataque, el tener una buena defensa también gana importantes batallas, esto resalta o se deja ver mucho más, cuando tenemos en frente una regla netamente de ataque, como por ejemplo, “Melee Mayhem”, por lo que, el post que les compartiré hoy, tendrá un enfoque diferente al que los tengo acostumbrados.
Es por eso que, en esta oportunidad, explicare en detalle cual es la mejor forma de “Defender” ante un ataque inminente de “Melee Mayhem”, o en su defecto, otro tipo de ataque que concentre su mira en nuestra “Línea Frontal”, por lo que, les enseñare una de las mejores formas para realizar esto, específicamente la que a mi me ha funcionado todo este tiempo cuando quiero engañar a mi rival y no ir directo por una “Ofensiva” como tal.
Entonces, tomando en cuenta lo comentado anteriormente, en este post abarcare un tema muy interesante que trata sobre la “Defensa” en una batalla, la cual, es tan importante como la ”Ofensiva”, sin embargo, observaran el porque en este tipo de condiciones, jugar a la “Defensiva” no es tan malo como se ve, así que, para abarcar este tema, explicare lo siguientes puntos:
1. Combinación eficiente para “Defender” contra “Melee Mayhem”

 2. Ejemplo de Batalla + Formación “Defensiva/Ofensiva”

 3. Consideraciones Finales

Combinación eficiente para “Defender” contra “Melee Mayhem”
Para jugar a la “Defensiva” se deben tener en cuenta ciertos aspectos muy importantes antes de alienar a nuestros monstruos en el campo de batalla, estos aspectos son como “Normas” especificas que se deben cumplir para tener altas probabilidades de éxito en nuestra “Defensa”, ya que, no solo se trata de defender, también debemos atacar, pero, enfocando nuestra formación mas a la “Resistencia” y conservación de los puntos de vida de nuestras cartas en el campo, este es el objetivo final, para ello, los aspectos a tomar en cuenta son los siguientes:

Aspectos a tomar en cuenta
- Doble Defensa en “Línea Frontal”: Cuando hablo de tener “Doble Defensa” en la línea frontal, me refiero a que, no solo debemos colocar un “Tanque” de batalla, en su lugar, 2 cartas deben jugarse en las 2 primeras pociones para que pueda funcionar la alienación “Defensiva”, ademas, estas cartas obligatoriamente deben tener puntos de “Escudo” o debemos otorgárselo, ya que, contra “Melee Mayhem” es lo primordial que necesitaremos para aumentar nuestra “Resistencia” en el campo.

- Tener habilidades “Defensivas”: No basta con solo colocar 2 “Tanques” con escudo en la primera línea, ya que, si nuestro adversario viene con un poderoso poder de ataque, sea con “Cuerpo a Cuerpo o Rango”, lo mas seguro es que nuestras cartas terminen cayendo primero y no podamos derrotar a sus cartas luego, para ello, debemos considerar jugar con cartas que, ademas de los puntos de “Escudo”, también cuenten con habilidades como (Shield, Thorns, Flying, Return Fire, Backfire y Retaliate), estas habilidades aseguraran tener una muy buena defensa y causar algo de daño de vuelta si es posible.

- Apoyo en la “Línea Final”: Por lo general, cuando “Melee Mayhem” se hace presente en las condiciones de la batalla, nuestros oponentes descuidan la “Línea de Fondo o como también lo llamo “Línea Final”, los ataques son concentrados en el tanque, así que, es el momento perfecto para aprovechar esto, y colocar catas de “Apoyo”, estas cartas de apoyo deben enfocarse en restaurar los puntos de “Escudo” dañados de nuestras cartas, por lo que, los monstruos de apoyo que elijamos deben poseer la habilidad llamada “Repair”, si nuestro mana es lo suficientemente abultado, podemos colocar también “Tank Heal”, pero, lo primordial es “Repair”.

Explicación: Quiero que tomen en cuenta algo muy importante, las alienaciones y las cartas que suelo utilizar para explicarles, no son obligatorias en las “Estrategias”, son una guía de lo que deberían jugar para ese momento, es por eso que hago énfasis en habilidades generales, por otro lado, hay muchas formas de “Defender”, o mejor dicho de como plantear la “Defensiva”, pero, lo importante aquí, es que no olvidemos el “Orden” en el que tenemos que jugar nuestras cartas, sin importar si juegan distintas a las que yo explicare mas adelante en el ejemplo de batalla. La idea es que puedan entender y/o comprender lo que se necesita, ademas, las cartas a jugar dependerán única y exclusivamente de la cantidad de mana disponible para ese momento.
Combinación eficiente
Aquí lo que hare, es mostrarles un par de ejemplos de como es una combinación “Eficiente” contra “Melee Mayhem” enfocada en la “Defensa”:
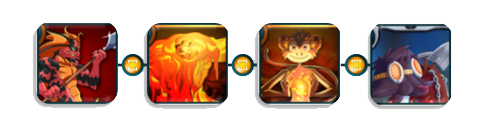
- Splinter de Fuego: Para este “Equipo”, podemos utilizar 2 cartas excelentes que cumplen estas características que mencione anteriormente, primero tenemos a la carta (Serpentine Soldier) y sus habilidades “Shield, Dodge y Thorns”, también un candidato perfecto es (Living Lava), teniendo en su haber habilidades como “Shield, Rust y Thorns”, haciéndolas perfectas para la “Doble Defensa”, a este equipo le podemos agregar a (Flame Monkey) o quizás a (Scavo Hireling).
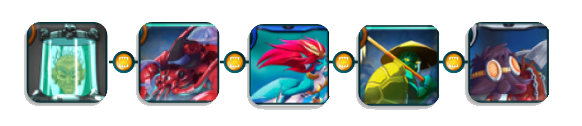
- Splinter de Agua: Para este “Equipo” en específico, tenemos algunas inconvenientes en encontrar cartas que cumplan con los aspectos explicados anteriormente, sin embargo, si las haya, por ejemplo, podemos jugar con el (Lord Arianthus), una estupenda carta que posee las habilidades “Shield, Thorns, Void y Magic Reflect”, por otro lado, una carta que cumple perfectamente todo lo anterior, es (Lobstradamus), el cual, tiene a “Shield, Magic Reflect y Thorns”. Ahora bien, como “Healer”, tenemos a varios, pero, los mejores para mí son: (Merdaali Guardian, Tortisian Fighter y Scavo Hireling).

Ejemplo de Batalla + Formación “Defensiva/Ofensiva”
Con la intención de que puedan comprender mucho mejor, explicare primero las “Reglas” que me tocaron en esta especifica batalla para que observen de que forma las analice y de que forma actúe en consecuencia de estas:
Condiciones de Batalla
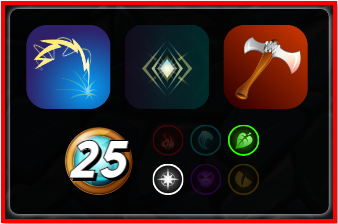
Weak Magic: Esta regla de batalla no es que sea muy relevante, pero si que cambia el tipo de ataque que mi oponente y yo podemos usar en la batalla, ya que, al tener esta regla activa en el campo, aquellos ataques mágicos que coloquemos, primero golpearan los puntos de “Escudo” de ambos, por lo que, en este sentido, lo mejor es jugar con los otros 2 y evitar la magia.
Up to Eleven: Este es otra razón para evitar la mágica, incluso si rompemos el escudo de las cartas facilmente, ya que, básicamente es regla le da a todas las cartas la habilidad llamada “Amplify”, por lo que, este puede aplicar el dalo que se regresa, por lo que, debemos evitar jugar con cartas de ataque magico, para evitar mayor daño al atacar o que nos tomen por sorpresa en ese sentido.
Melee Mayhem Esta es la regla que básicamente predomina el tipo de ataque que podemos utilizar, por lo general, se juegan con cartas de ataque “Cuerpo a Cuerpo”, pero, también pueden jugarse los otros 2 tipos para buscar sorprender al oponente.
Ejemplo de batalla "Real"

Como pueden ver en la imagen, me enfrente a uno de los invocadores legendarios más poderosos del juego, el gran “Prince Rennyn”, pero, viendo en concreto mi alienación, lo que hice fue otorgarle a todas mis cartas pintos de “Escudo” con mi invocador, por otro lado, jugué con la “Doble Defensa”, en este caso, con “Pelacor Conjurer y Silvershield Paladin”, luego busque disminuir el dalo con “Djinn Renova”, ademas de aprovechar su gran poder de ataque magico, por último, mi ”Silvershield Knight” dándole mas puntos de ataque a todas mis cartas con ataque “Cuerpo a Cuerpo”, y ala pieza final mi “Armorsmith” y su habilidad de “Repair”, para proteger a la carta con el escudo más dañado del campo.
Por otro lado, mi oponente quiso engañarme con una gran alineación enfocada en el ataque de “Rango”, algo que sinceramente no me esperaba, sin embargo, este solo se centro en la “Ofensiva” sin preocuparse por “Defender”, en pocas palabras, totalmente lo contrario a lo que yo hice, esto permitio que atacara las aberturas que tenía, puesto que, sus cartas de primera línea eran muy débiles, fue por esa razón que perdió, ya que, si fuera seguido el formato que deje en la sección anterior, muy probablemente fuera ganado.
Consideraciones Finales

Espero que este post los haya ayudado a conocer la forma correcta de “Defender” ante la regla de batalla “Melee Mayhem”, aunque, este tipo de alineaciones suelen ser algo generales, ya que, muchas veces podemos defendernos de la misma forma en contra de otro tipo de reglas, pero, la idea es que lo vayan practicando y adaptando los análisis que he explicado en este y otros posts, para que puedan avanzar en la jugabilidad, ademas, las combinaciones que he dejado solo fueron con 2 “Splinters”, me gustaría que me dejaran en los comentarios que otro tipo de combinaciones de este tipo “Defensivas” podrían funcionar para esta y otras reglas.
No olviden consultar mi perfil y ver mis ultimas publicaciones, quizás puedan encontrar información de interés que te ayude a mejorar con respecto a “Splinterlands” en general.
Enlace directo a mi Perfil

In my posts about "Gameplay" in Splinterlands, most of the time I talk about the "Offense", how to play in favor of a certain rule to increase the chances of winning, however, the reality is that not everything revolves around the attack, having a good defense also wins important battles, this stands out or is seen much more, when we have in front of a purely attack rule, such as "Melee Mayhem", so the post that I will share today, will have a different approach to which I am accustomed to.
That is why, in this opportunity, I will explain in detail what is the best way to "Defend" against an imminent attack of "Melee Mayhem", or failing that, another type of attack that focuses its aim on our "Front Line", so I will show you one of the best ways to do this, specifically the one that has worked for me all this time when I want to deceive my opponent and not go straight for an "Offensive" as such.
So, taking into account the above, in this post I will cover a very interesting topic that deals with the "Defense" in a battle, which is as important as the "Offensive", however, you will see why in this type of conditions, playing "Defensive" is not as bad as it looks, so, to cover this topic, I will explain the following points:
1. Efficient combination for "Defender" against "Melee Mayhem".

 2. Example of Battle + "Defensive/Offensive" Formation

 3. Final Considerations
Efficient combination for "Defender" against "Melee Mayhem".
To play "Defensive" we must take into account certain very important aspects before alienating our monsters on the battlefield, these aspects are like specific "Rules" that must be met to have high chances of success in our "Defense", since it is not only about defending, we must also attack, but, focusing our training more to the "Resistance" and conservation of the life points of our cards in the field, this is the ultimate goal, for this, the aspects to take into account are as follows:
Aspects to take into account
- Double "Front Line" Defense: When I talk about having "Double Defense" in the front line, I mean that, not only we must place a battle "Tank", instead, 2 cards must be played in the first 2 potions so that the "Defensive" alliance can work, in addition, these cards must have "Shield" points or we must give it to them, since, against "Melee Mayhem" is the main thing we will need to increase our "Resistance" in the field.
- Have "Defensive" abilities: It is not enough just to place 2 "Tanks" with shield in the first line, since, if our opponent comes with a powerful attack power, either with "Melee or Range", it is most likely that our cards will end up falling first and we will not be able to defeat his cards later, for this, we should consider playing with cards that, in addition to the "Shield" points, also have abilities such as (Shield, Thorns, Flying, Return Fire, Backfire and Retaliate), these abilities will ensure a very good defense and cause some damage back if possible.
- Support at the "Finish Line".: Usually, when "Melee Mayhem" becomes present in the battle conditions, our opponents neglect the "Backline or as I also call it "Endline", the attacks are concentrated on the tank, so, it is the perfect time to take advantage of this, and place "Support" cards, these support cards should focus on restoring the damaged "Shield" points of our cards, so, the support monsters we choose should possess the ability called "Repair", if our mana is sufficiently bulky, we can also place "Tank Heal", but, the main thing is "Repair".
Explanation: I want you to take into account something very important, the alienations and cards that I usually use to explain to you, are not mandatory in the "Strategies", they are a guide of what you should play for that moment, that is why I emphasize general skills, on the other hand, there are many ways to "Defend", or rather how to raise the "Defensive", but, the important thing here, is that we do not forget the "Order" in which we have to play our cards, no matter if they play different from those that I will explain later in the battle example. The idea is that you can understand and/or comprehend what is needed, also, the cards to play will depend only and exclusively on the amount of mana available for that moment.
Efficient combination
What I will do here is show you a couple of examples of what an "Efficient" vs. "Melee Mayhem" combination focused on "Defense" looks like:
- Fire Splinter: For this "Team", we can use 2 excellent cards that meet these characteristics I mentioned above, first we have the card (Serpentine Soldier) and its skills "Shield, Dodge and Thorns", also a perfect candidate is (Living Lava), having in its possession skills such as "Shield, Rust and Thorns", making them perfect for the "Double Defense", to this team we can add (Flame Monkey) or perhaps (Scavo Hireling).
- Water Splinter: For this specific "Team", we have some problems in finding cards that meet the aspects explained above, however, if there are, for example, we can play with (Lord Arianthus), a great card that has the skills "Shield, Thorns, Void and Magic Reflect", on the other hand, a card that perfectly meets all of the above, is (Lobstradamus), which has "Shield, Magic Reflect and Thorns". Now, as "Healer", we have several, but the best for me are: (Merdaali Guardian, Tortisian Fighter and Scavo Hireling).
Example of Battle + "Defensive/Offensive" Formation
With the intention that you can understand much better, I will first explain the "Rules" that touched me in this specific battle so that you can observe how I analyzed them and how I acted in consequence of them:
Battle Conditions
Weak Magic: This battle rule is not very relevant, but it does change the type of attack that my opponent and I can use in the battle, since, by having this rule active on the field, those magical attacks that we place, will first hit the "Shield" points of both, so, in this sense, it is best to play with the other 2 and avoid magic.
Up to Eleven: This is another reason to avoid magic, even if we break the shield of the cards easily, since, basically this rule gives all the cards the ability called "Amplify", so, this can apply the dalo that is returned, so, we should avoid playing with magic attack cards, to avoid more damage when attacking or being taken by surprise in that sense.
Melee Mayhem This is the rule that basically predominates the type of attack that we can use, usually played with "Melee" attack cards, but the other 2 types can also be played to surprise the opponent.
Example of a "Real" battle
As you can see in the picture, I faced one of the most powerful legendary summoners of the game, the great "Prince Rennyn", but, looking at my alignment in particular, what I did was to give all my cards "Shield" paints with my summoner, on the other hand, I played with the "Double Defense", in this case, with "Pelacor Conjurer and Silvershield Paladin", then I tried to decrease the damage with "Djinn Renova", besides taking advantage of its great magic attack power, finally, my "Silvershield Knight" giving more attack points to all my cards with "Melee" attack, and the final piece my "Armorsmith" and its "Repair" ability, to protect the card with the most damaged shield of the field.
On the other hand, my opponent wanted to fool me with a great lineup focused on the "Range" attack, something that I honestly did not expect, however, he only focused on the "Offense" without worrying about "Defend", in short, totally the opposite of what I did, this allowed him to attack the openings he had, since his front line cards were very weak, it was for that reason that he lost, since, if he followed the format that I left in the previous section, he would probably have won.
Final Considerations
I hope this post has helped you to know the correct way to "Defend" against the "Melee Mayhem" battle rule, although, this type of alignments are usually somewhat general, since, many times we can defend ourselves in the same way against other types of rules, but, the idea is that they go practicing and adapting the analysis that I have explained in this and other posts, so that they can advance in the gameplay, also, the combinations that I have left were only with 2 "Splinters", I would like you to leave me in the comments that other combinations of this type "Defensive" could work for this and other rules.
Don't forget to check my profile and see my latest publications, maybe you can find interesting information that will help you to improve with respect to "Splinterlands" in general.
Direct link to my profile


If you are new, I invite you to register in this LINK
![]()
Proud Member of "Shield of Glory".
!1UP Good work!
!PGM !PIZZA
You have received a 1UP from @underlock!
@monster-curator, @oneup-curator, @ctp-curator, @thg-curator, @neoxag-curator, @fun-curator
And they will bring !PIZZA 🍕.
Learn more about our delegation service to earn daily rewards. Join the Cartel on Discord.
The Hive.Pizza team manually curated this post.
$PIZZA slices delivered:
curation-cartel tipped lenonmc21
You can now send $PIZZA tips in Discord via tip.cc!
Congratulations @lenonmc21! You have completed the following achievement on the Hive blockchain And have been rewarded with New badge(s)
Your next target is to reach 65000 upvotes.
You can view your badges on your board and compare yourself to others in the Ranking
If you no longer want to receive notifications, reply to this comment with the word
STOPCheck out our last posts:
Saludos
@tipu curate 8
Upvoted 👌 (Mana: 0/68) Liquid rewards.