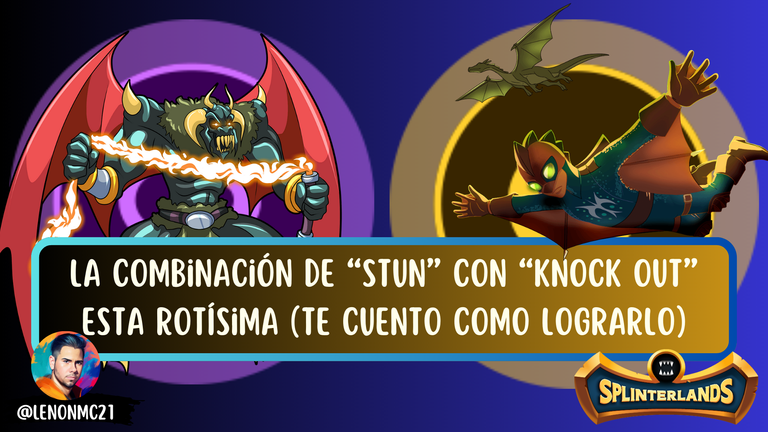
He logrado combinar la habilidad de “Stun” con “Knock Out” y esta rotísima (Te cuento como lograrlo) [ES-EN]
Cover created in Canva

A lo largo de la temporada pasada tuve muchas batallas increíbles y aunque mis cofres de recompensa fueron de oro, pude llegar a lo más alto de las ligas con el objetivo de mejorar mu juego y enfrentarme a jugadores más fuertes, pero, esto es otro tema que abarcare en mi post de análisis de recompensas, lo que quiero que sepan, es que, jugué batallas que nunca creí ganar, jugué contra oponentes realmente buenos, pero, tanta practica y saber exactamente lo que estoy haciendo definitivamente ha dado sus frutos, así que, sabiendo las reglas de la batalla, en esta ocasión he logrado realizar una de las combinaciones de habilidades más complicadas de todo “Splinterlands”, pero, sigue leyendo.
Para esta batalla que estoy a punto de detallarles, he logrado combinar las habilidades llamadas “Stun y Knock Out”, algo que, como ya dije, es realmente complicado, hacer coincidir todas las condiciones es aún más frustrante, ya que, desde que se conocen estas habilidades, realmente no he visto una sola vez que alguien lo haya logrado, al menos no contra mí, probablemente este conjunto de habilidades salió del “Meta” del juego por esa razón, es complicado, sin embargo, una vez comprendes como y en donde usarla, créeme que es una combinación letal, inclusive para cualquier tipo de defensa, pero, ya lo verán mientras les explico la estrategia y/o “Estructura de juego” que utilice.
En tal sentido, si quieren saber cómo aplicar esta combinación correctamente sin rendirse en el intento, quédense hasta el final, aprenderán como usarla, incluiré condiciones y este tipo de detalles para que no se cansen buscándola, ya que esta ha sido la única en la que he probado la misma, claro, si consigo otra lo hare saber, pero, funciona perfecto aquí.
1. ¿En qué condiciones es mejor jugar con la combinación de “Stun y Knock Out”?
2. Estructura de juego completa para aplicar la combinación

¿En qué condiciones es mejor jugar con la combinación de “Stun y Knock Out”?

Para poder jugar con esta combinación específicamente, lamentablemente no podemos hacerla cuando queramos, ya que, activar simultáneamente ambas habilidades están complicado que, seguramente probando en cualquier tipo de regla de batalla, perderán sin ninguna duda, es por eso que, antes de explicar lo que es la “Estructura de Juego” y la estrategia en sí que utilice, lo mejor es explicar y/o aclarar cuales son las mejores reglas de batalla para lograr activar la combinación, y hacer un gran daño a mi oponente en un solo ataque, así que, presten mucha atención y sin más dilación, vamos por ello:

Estas son las mejores reglas de batalla para activar la combinación

Heavy Hitters: Por supuesto, la primera regla que debemos tener dentro de lo que son las condiciones de batalla para poder activar la combinación es “Heavy Hitters”, ya que, esta les otorga a todas las unidades en el campo de batalla la habilidad de “Knock Out”, la cual, es primordial para lograr activar una de las condiciones que necesitamos para lograrlo, en tal sentido, cualquier combinación de reglas que no tenga esta, las probabilidades de activarla son sumamente bajas.
Super Sneak: En la batalla que les explicare más adelante, la regla con la que se combinó "Heavy Hitters” fue “Super Sneak”, y siendo sincero es una de las mejores para lograrlo, pero, no es la única, sin embargo, la razón para pensar que “Super Sneak” es la mejor para esto, es porque los ataques “Cuerpo a Cuerpo” se concentran en su mayoría en un solo punto, en este caso en la última carta de cada alineación de batalla, ya que todas las unidades ganan la habilidad de “Sneak”.
Melee Mayhem: Esta es otra de las reglas en donde presumo que funcionara perfectamente la combinación, ya que, todos los monstruos con el tipo de ataque “Cuerpo a Cuerpo”, se enfocan en atacar a la primera carta de cada formación, en pocas palabras al “Tanque” de batalla, esto quiere decir que, si se combinan la mayoría de los ataques en un punto, hay una mayor probabilidad de activar ambas habilidades, pero, lo entenderán en la práctica, aunque, lo explicare en breve para todo aquel que todavía tiene dudas de cómo hacerlo.
¿Como activar la combinación?
A pesar de que es bastante complicado lograr que se active, en la teoría es bastante sencillo de entender, así que, lo explicare de manera muy clara para que lo comprendan, tomando en cuenta aquellos nuevos usuarios que aún no tienen tanta experiencia en el juego:
Lo primero que se debe lograr es “Aturdir” a una carta, esto se logra con la habilidad de “Stun”, así que, para completar el 50% de la activación que necesitamos, lo primero a tomar en cuenta es que, la carta objetivo de ataque debe estar afectada por esta habilidad, si logramos esto, el 50% está completo.
Para completar la activación, las cartas en el campo deben de tener la habilidad de “Knock Out”, la cual, al reconocer que la carta se encuentra afectada por la habilidad de “Stun”, esta causar el doble del daño de su ataque original, en pocas palabras, si la carta con “Knock Out” tiene 4 puntos de ataque, esta causara un total de –8 puntos a los puntos de vida de la carta del oponente, o si tenemos poca fortuna, a su escudo.
Por último, si queremos hacer el suficiente daño, debemos tener en cuenta colocar varias cartas con dichas habilidades, pero, de eso se encarga la regla, por otro lado, si tienen escudo, jugar cartas con la habilidad de “Piercing”, puede ser muy beneficioso para traspasar el escudo, aunque realmente hay muchas formas actuales de remover el escudo enemigo, así que, tenemos es que ser creativos.
Estructura de juego completa para aplicar la combinación

Aplicar la “Estructura de juego” una vez ya sabemos cómo activar las condiciones para usar ambas habilidades, no es tan complicado, en mi caso, al tener “Super Sneak” en el campo como una de las reglas disponibles además de “Heavy Hitters”, pues la estructura puede ser la siguiente:
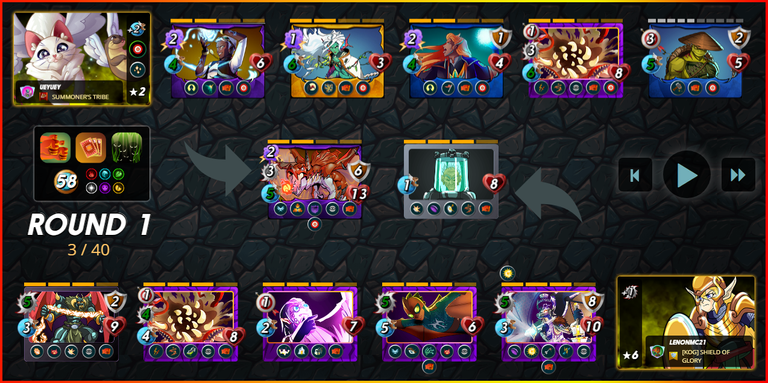
Click Aquí para ver la batalla
Como pueden ver, mi “Estructura de Juego” se enfocó básicamente en tener una fuerte “Ofensiva” con unidades bajo el tipo de ataque “Cuerpo a Cuerpo”, aunque, esto no quiso decir que me olvidaría de la “Defensiva”, ya que, equilibrar las cosas cuando se trata de “Ataque y Defensa”, es lo mejor para aumentar nuestras probabilidades de ganar, así que, debido a esto jugué de la siguiente forma:
Daria Dragonscale: Uno de los mejores invocadores épicos de todos, me ayuda aumentar el tipo de ataque “Cuerpo a Cuerpo”, ya que, fue en este en el que enfoque mi ofensiva.
Lord Arianthus: Mi tanque elegido, el cual tiene todo lo necesario para poder aguantar algunas rondas si es que mi oponente se concentra en atacar por este lado a pesar de tener en el campo “Super Sneak”.
Robo-Dragon Knight: Esta es una super carta, de los tanques más completos y poderosos del juego, su poder de ataque y combinación de habilidades lo convierte en un excelente candidato para tomar el lugar del “Lord Arianthus”, pero, se enfocará en atacar a la última posición.
Dragon Jumper: Esta es una mis cartas favoritas para utilizar en el “Splinter de Dragon”, ya que es una carta muy poderosa en términos de ataque “Cuerpo a Cuerpo” y adicional una muy rápida, pero, adicional a todo esto, es la carta que tiene la habilidad de “Stun”, por lo que, activar la combinación depende única y exclusivamente de esta carta.
Scale Doctor: Una increíble carta de “Soporte” colocada justo en el medio para evitar que sea dañada, mi intención al jugarla era curar a las cartas que sufran el mayor daño por parte de mi oponente, pero, también quitar -2 de los puntos de escudo de todas las unidades de mi oponente.
The Vigilator: Una de mis cartas favoritas, me encanta su diseño, pero, para este tipo de reglas es genial, ya que ataca 2 veces en una misma ronda, sin mencionar que tiene 2 tipos de ataque, así que, hace el doble del daño esperado, sin mencionar que, cuando hay mucho escudo lo reduce.
Lord Of Darkness: Esta es una gran carta, además de que es una muy resistente gracias a su habilidad de “Shield”, posee un ataque muy poderoso y fue la carta que logro completar el 50% necesario para activar la combinación, además de que era la ideal para lograrlo, ya que una de las habilidades que tiene es “Enrage”, lo que hace que su poder de ataque y velocidad aumenten, lo que se traduce en mayor daño.

Con todos estos datos y/o condiciones, espero que hayan entendido como activar esta poderosa combinación de habilidades, trate de ser lo más detallista posible en la explicación para que no quedara ninguna duda, si ven bien, todo lo que explique en la teoría se nota muy bien en la batalla, por supuesto, puede aumentar aún más las probabilidades de lograrlo si fuera colocado una carta más con la habilidad de “Stun”, pero, supuse que con la velocidad del “Dragon Jumper”, era más que suficiente para acertar un ataque y activar la habilidad, lo que funciono perfecto. Cualquier duda, déjenla en los comentarios, estaré encantado de responderles.

Throughout last season I had many amazing battles and even though my reward chests were gold, I was able to get to the top of the leagues with the goal of improving my game and facing stronger players, but, this is another topic I will cover in my reward analysis post, what I want you to know, is that, I played battles that I never thought I would win, I played against really good opponents, but, so much practice and knowing exactly what I am doing has definitely paid off, so, knowing the rules of battle, this time I have managed to perform one of the most complicated skill combinations in all of "Splinterlands", but, read on.
For this battle I'm about to detail you, I've managed to combine the skills called "Stun and Knock Out", something that, as I said, is really complicated, matching all the conditions is even more frustrating, since, since these skills are known, I really haven't seen a single time that someone has managed it, at least not against me, probably this set of skills came out of the "Meta" of the game for that reason, it is complicated, however, once you understand how and where to use it, believe me it is a lethal combination, even for any kind of defense, but, you will see as I explain the strategy and/or "Game Structure" I use.
In that sense, if you want to know how to apply this combination correctly without giving up in the attempt, stay until the end, you will learn how to use it, I will include conditions and this type of details so that you do not get tired looking for it, since this has been the only one in which I have tested it, of course, if I get another one I will let you know, but, it works perfect here.
1. Under what conditions is it best to play with the "Stun and Knock Out" combination?
2. Complete game structure to apply the combination
Under what conditions is it best to play with the "Stun and Knock Out" combination?
To be able to play with this combination specifically, unfortunately we can not do it whenever we want, since, simultaneously activate both skills are complicated that, surely testing in any type of battle rule, will lose without any doubt, that is why, before explaining what is the "Game Structure" and the strategy itself that I use, it is best to explain and/or clarify what are the best rules of battle to achieve activate the combination, and do great damage to my opponent in a single attack, so, pay close attention and without further delay, let's go for it:
These are the best battle rules for activating the combination
Heavy Hitters: Of course, the first rule that we must have within the battle conditions to be able to activate the combination is "Heavy Hitters", since this gives all units on the battlefield the ability to "Knock Out", which is essential to activate one of the conditions we need to achieve it, in that sense, any combination of rules that does not have this, the chances of activating it are extremely low.
Super Sneak: In the battle that I will explain below, the rule that "Heavy Hitters" was combined with was "Super Sneak", and being honest it is one of the best to achieve this, but, it is not the only one, however, the reason to think that "Super Sneak" is the best for this, is because the "Melee" attacks are mostly concentrated in a single point, in this case in the last card of each battle lineup, since all units gain the ability to "Sneak".
Melee Mayhem: This is another rule where I presume that the combination will work perfectly, since all monsters with the "Melee" attack type, focus on attacking the first card of each formation, in short the "Tank" of battle, this means that if you combine most of the attacks at one point, there is a greater chance of activating both skills, but, you will understand in practice, although, I will explain it shortly for anyone who still has doubts about how to do it.
How to activate the combination?
Although it is quite complicated to activate it, in theory it is quite simple to understand, so I will explain it very clearly for you to understand it, taking into account those new users who still do not have much experience in the game:
The first thing to achieve is to "Stun" a card, this is achieved with the "Stun" ability, so, to complete the 50% of activation we need, the first thing to take into account is that, the target card of attack must be affected by this ability, if we achieve this, the 50% is complete.
To complete the activation, the cards in the field must have the "Knock Out" ability, which, recognizing that the card is affected by the "Stun" ability, will cause double the damage of its original attack, in short, if the card with "Knock Out" has 4 attack points, it will cause a total of -8 points to the opponent's card's life points, or if we are unlucky, to its shield.
Finally, if we want to do enough damage, we must take into account placing several cards with such skills, but, that's what the rule takes care of, on the other hand, if you have shield, playing cards with the ability of "Piercing", can be very beneficial to pierce the shield, although there are actually many current ways to remove the enemy shield, so, we have to be creative.
Complete game structure to apply the combination
Applying the "Game Structure" once we already know how to activate the conditions to use both abilities, is not so complicated, in my case, having "Super Sneak" in the field as one of the available rules in addition to "Heavy Hitters", the structure can be the following:
As you can see, my "Game Structure" was basically focused on having a strong "Offensive" with units under the "Melee" attack type, although, this did not mean that I would forget about the "Defensive", since, balancing things when it comes to "Attack and Defense", is the best thing to increase our chances of winning, so, because of this I played as follows:
Daria Dragonscale: One of the best epic summoners of all, it helps me to increase the "Melee" type of attack, since this is where I focus my offensive.
Lord Arianthus: My tank of choice, which has everything I need to be able to withstand a few rounds if my opponent concentrates on attacking on this side despite having "Super Sneak" on the field.
Robo-Dragon Knight: This is a super card, one of the most complete and powerful tanks in the game, his attack power and combination of skills makes him an excellent candidate to take the place of "Lord Arianthus", but, he will focus on attacking the last position.
Dragon Jumper: This is one of my favorite cards to use in the "Dragon Splinter", as it is a very powerful card in terms of "Melee" attack and additionally a very fast one, but, in addition to all this, it is the card that has the ability to "Stun", so, activating the combination depends solely and exclusively on this card.
Scale Doctor: An amazing "Support" card placed right in the middle to prevent it from being damaged, my intention in playing it was to heal the cards that suffer the most damage from my opponent, but, also to remove -2 from the shield points of all my opponent's units.
The Vigilator: One of my favorite cards, I love its design, but, for this type of rules it is great, since it attacks 2 times in the same round, not to mention that it has 2 types of attack, so, it does double the expected damage, not to mention that, when there is a lot of shield it reduces it.
Lord Of Darkness: This is a great card, besides being a very resistant card thanks to its "Shield" ability, it has a very powerful attack and was the card that managed to complete the 50% needed to activate the combination, plus it was the ideal one to achieve it, since one of the skills it has is "Enrage", which makes its attack power and speed increase, which translates into more damage.
With all these data and/or conditions, I hope you have understood how to activate this powerful combination of skills, I tried to be as detailed as possible in the explanation so that there was no doubt, if you see well, everything I explained in the theory is very well noticed in battle, of course, you can further increase the chances of achieving it if it was placed one more card with the ability of "Stun", but, I assumed that with the speed of the "Dragon Jumper", it was more than enough to hit an attack and activate the ability, which worked perfectly. If you have any questions, leave them in the comments, I will be happy to answer them.

Here is the direct link to my latest posts and the link to my Profile
Visit my website
 |  |
|---|---|
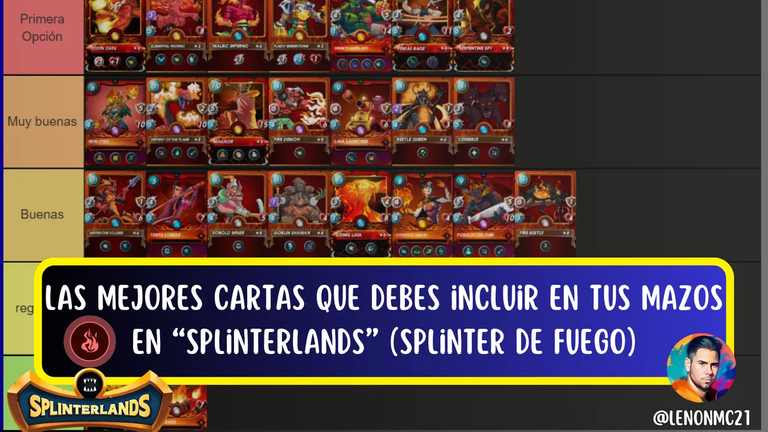
| Mi opinión sobre el nuevo sistema de recompensas (Tienda + Token GLINT) [ES-EN] | Estas son algunas de las mejores cartas que debes incluir en tus mazos en “Splinterlands” (Splinter de Fuego) [ES-EN] |


Posted Using InLeo Alpha
Delegate Tokens and HP to Fallen Angels to earn weekly rewards!
Delegate | Join to the guild
Checkout our BDVoter Daily Hive Showcase & Participate into our Daily giveaway to win various prize.