Coding Tutorial 2: Building a Real-Time Chat App with Socket.io and ReactJS : Part 1

made with canva
Good day, devs! Today let's have a walkthrough on how chat apps are created with socket.io. The technologies I will be using in this tutorial are ReactJS and NodeJS. In order not to make it boring with a very long post, I will split the tutorial into three posts, and each post will be a walkthrough towards creating a simple chat app with Socket.io. Even if you are not a developer, this series will be useful for you to know how things are created behind the scenes. Now let's get started.
The first step towards creating our chap app involves creating folders for both the client and server sides of our application. The client side is basically the frontend, where the user is seeing and interacting with it. This is where the ReactJS code will be written. The server side on the other hand handles the logic of our chat app; the user cannot see what occurs in the backend. This is where the Node.js code will be written.
We will create the two folders under a main folder called chatApp and open them in VS code as seen below:
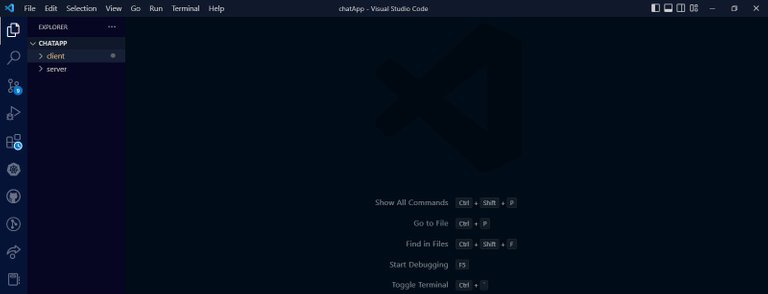
The main folders for the project in VS code

Starting with the server side
Now, let's navigate to the server side by opening the terminal, entering vscode, and typing cd server. After navigating to the server folder, we will install the necessary packages for our project, which include express, nodemon socket.io, and cors. These are the packages that are required on the backend of our chat app. They are demonstrated below.


Navigating to server folder and installing packages
After installing the packages, you will see a folder namednode_modules in the server folder and two additional files, namely package.json and package-lock.json. The next step is to create a JS file in the server folder. Here, I named the file index.js. This is where the backend codes of our chat app will be written. It serves as the main server for the chat app.
Let's open the index.js file and start writing some codes! In the first place, we import all the packages we installed earlier into the index.js file to initialize the project. HTTP was not installed because it's already contained in Node.js and we only need to import it.

importing Inside index.js file
After importing various packages, we can then start our server and initialize Cors to communicate with the frontend. CORS stands for cross-origin resource sharing. It basically permits the sharing of resources between the server and the client. In our case, the resources will be the users and the messages they share. The server and cors are initialized, as seen below:
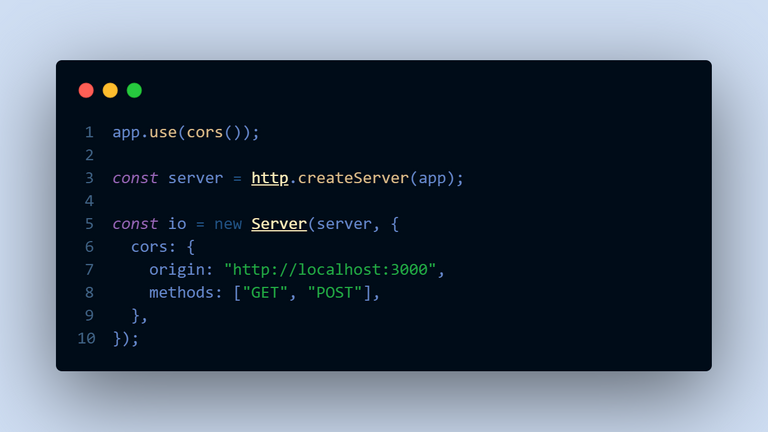
setting up socket.io with cors
In socket.io, events that are triggered to perform an action. For instance, in order to start a connection, we trigger the connection event. In the code below, when a user connects to the server, it triggers a callback function that prints User Connected with the ID of the user. The ID is automatically generated when a user connects to the server. The next event we trigger is the disconnect event. It is triggered when the user exits the server. For instance, closing the tab or the browser, we print User disconnected in the console when the user disconnects.

socket.io events
Technically, our backend is up and running. We have initiated socket.io by calling some events. Let's now start with the frontend.
Creating a frontend with Reactjs
The most common way to initialize a React project is through create-react-app. To do this, we navigate to our client folder and run npx create-react-app . . This will bring all the underlying pieces together to get started with ReactJS seamlessly.
To use socket.io on the client side, let's install a package that will allow us to connect to our backend. The package is called socket.io-client. Make sure you are installing this in the client folder.

installing socket.io client
Now, just like we did in the backend, let's import io from the socket.io-client package that we just installed. It is going to be used to establish a socket.io connection. We establish a connection after importing IO by triggering the connection event. This will make our frontend communicate with our backend, but we need to include the source of the backend. The code is shown below.
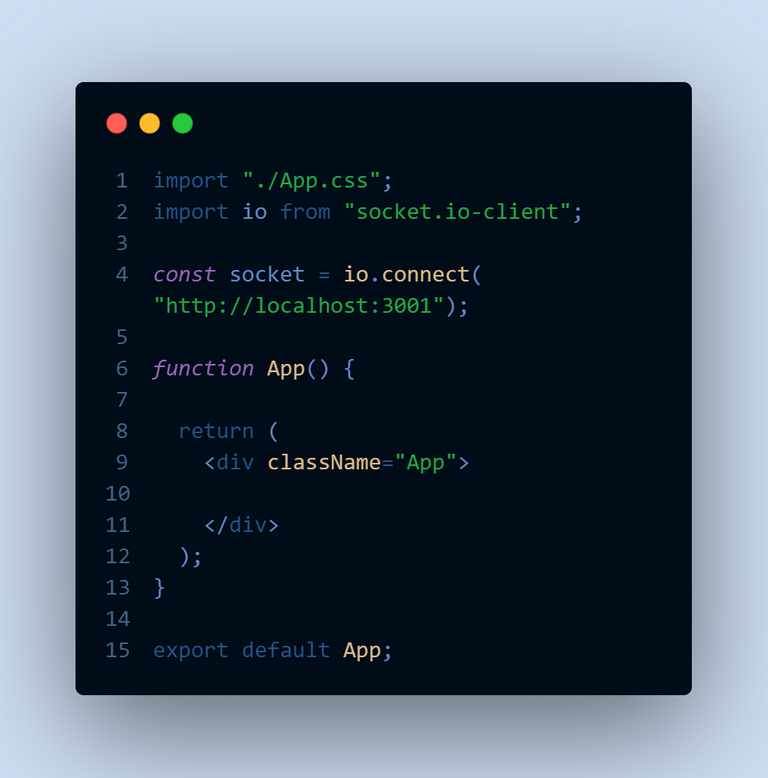
inside App.js in client side
From here, we now have a successful connection between the frontend and backend. By running the frontend, it should log to the console that a user has been connected and indicate disconnection when we close the tab.
We start both the client and the server side by navigating to both folders and running npm start. This will start our chat app and it will log to the console that, a user is connected. As seen below.

We continue building our chat app in my subsequent tutorials. This was an interesting adventure. We first of all installed the necessary npm packages in the backend and started our backend with socket.io. We then started our frontend and connected it to the backend. Thank you for following along all that time.
All screenshots in this post are from my computer

I hope you found this useful. I am Abdul-Salam Issahaku, from Ghana. I am a student web developer and a blockchain enthusiast. I blog about technology, life and investments. You can follow me to be part of my Hive family. Thank you for your time.
Thanks for your contribution to the STEMsocial community. Feel free to join us on discord to get to know the rest of us!
Please consider delegating to the @stemsocial account (85% of the curation rewards are returned).
You may also include @stemsocial as a beneficiary of the rewards of this post to get a stronger support.
Congratulations @lifeof.abdul! You have completed the following achievement on the Hive blockchain And have been rewarded with New badge(s)
Your next target is to reach 6000 upvotes.
You can view your badges on your board and compare yourself to others in the Ranking
If you no longer want to receive notifications, reply to this comment with the word
STOPCheck out our last posts: