Cool Battle - Martyr Skill Efficiency [PT/EN]
[PT]
Read this post in English by clicking here
Olá Splintermaníacos, bem vindos de volta!
Em cada batalha precisamos nos adaptar as condições impostas pela regra e também pela quantidade de mana disponível, lidar com essas adversidades é sempre um desafio para vencer nossas batalhas. Ter monstros variados ao nosso alcance, vai nos ajudar compor um time que possa se sobressair, mas às vezes o simples funciona muito bem.
Uma das maiores dificuldades são partidas em que temos pouca mana para trabalhar, pois precisamos identificar os monstros certo para as ocasiões e quando conseguimos fazer isso de forma eficaz conseguimos ter êxito ao final.
Hoje eu vou mostrar uma batalha do qual as limitações eram muitas, além de lidar com a pouca mana disponível, somente monstros de custo ímpar poderiam ser escalados. Com tanta limitação, eu consigo escolher um time vitorioso! Venha ver com foi isso!

Antes de mais nada, clique aqui e assista a batalha!


Perceba todas as limitações que temos nessa batalha: apenas 13 de mana, somente monstros de custo ímpares e mesmo podendo usar monstro de ataque ranged, eles não seriam uma boa opção já que levariam dano ao atacar. Diante dessas impossibilidades, cada monstro deveria ser escolhido com cuidado.
Quando vi essas dificuldades impostas, meu primeiro pensamento foi de usar um time focado em monstros Sneak assim como meu adversário usou, pois essa características eu tinha com abundância como opção. Mas imaginei que isso seria muito previsível e decidi arriscar outra estratégia.
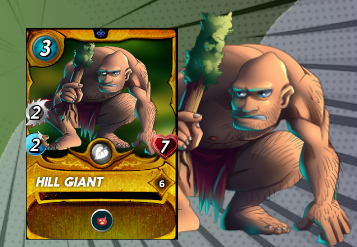
Minha primeira opção deveria ser um tank, um que tivesse bastante vida a pouco custo. Hill Giant é uma opção perfeita aqui nessa ocasião:
Como nessas ocasiões um bom tank é uma peça fundamental e esse problema estava resolvido, a mana restante era o que eu tinha para escolher os monstros que ia compor a linha de trás.
Me restaram apenas 6 de mana e dois monstros d custo 3 foram escolhidos:

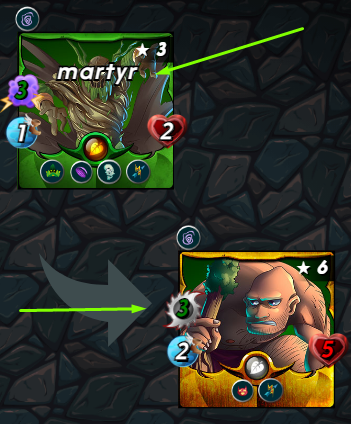
Com Djinn Biljka e Fungus Flinger eu montei uns dos combos mais interessantes do momento, que é a união de Camouflage com Martyr.
Esse é uma boa combinação pois consigo colocar Fungus Flinger bem no meio de meus dois monstros e quando ele fosse derrotado, daria reforço de status para os outros dois monstros pela habilidade Martyr.
Esse reforço extra durante a partida fez muita diferença, principalmente se levar em consideração em que nessa batalha temos poucos recursos e cada ganho é de suma importância.

Por fim, essa estratégia desiquilibrou a partida e eu venci. Porém essa foi uma estratégia em que eu confiava que me adversário iria desferir ataques na linha de trás, se isso não acontecesse, eu não conseguiria ter tanto êxito como tive.
Essa foi a batalha de hoje, obrigado por ler até aqui e passar um pouco do seu tempo comigo!

Hello Splintermaniacs, welcome back!
In each battle we need to adapt to the conditions imposed by the rule and also by the amount of mana available, dealing with these adversities is always a challenge to win our battles. Having varied monsters at our fingertips will help us to compose a team that can stand out, but sometimes the simple thing works very well.
One of the biggest difficulties are games where we have little mana to work with, as we need to identify the right monsters for the occasions and when we manage to do this effectively we succeed in the end.
Today I'm going to show you a battle whose limitations were many, in addition to dealing with the little mana available, only odd cost monsters could be scaled. With so much limitation, I can pick a winning team! Come see how it was!
First of all, click here and watch the battle!
Realize all the limitations we have in this battle: only 13 mana, only odd cost monsters and even being able to use ranged attack monsters, they would not be a good option since they would take damage when attacking. Given these impossibilities, each monster had to be chosen carefully.
When I saw these imposed difficulties, my first thought was to use a team focused on Sneak monsters just like my opponent used, because I had these characteristics in abundance as an option. But I figured that would be too predictable and decided to risk another strategy.
My first choice should be a tank, one that has a lot of health at little cost. Hill Giant is a perfect option here for this occasion:
As on these occasions a good tank is a fundamental piece and that problem was solved, the remaining mana was what I had to choose the monsters that would make up the back line.
I had only 6 mana left and two 3-cost monsters were chosen:
With Djinn Biljka and Fungus Flinger I put together some of the most interesting combos of the moment, which is the union of Camouflage and Martyr.
This is a good combination because I can put Fungus Flinger right in the middle of my two monsters and when he is defeated, it would give the other two monsters a stat boost by the Martyr ability.
That extra reinforcement during the match made a lot of difference, especially if you take into account that in this battle we have few resources and each gain is of paramount importance.
Ultimately, this strategy unbalanced the match and I won. However, this was a strategy where I trusted my opponent to launch attacks in the back line, if that did not happen, I would not be able to be as successful as I was.
That was today's battle, thanks for reading this far and spending some of your time with me!
Credits:
Thumbnail background image: Source
Image editor: Canva
Screenshots taken from the game Splinterlands
Click on the image and use my referral link!


Obrigado por promover a comunidade Hive-BR em suas postagens.
Vamos seguir fortalecendo a Hive
Your post was manually curated by @michupa.
Delegate your HP to the hive-br.voter account and earn Hive daily!
🔹 Follow our Curation Trail and don't miss voting! 🔹
Yay! 🤗
Your content has been boosted with Ecency Points, by @michupa.
Use Ecency daily to boost your growth on platform!
Support Ecency
Vote for new Proposal
Delegate HP and earn more
!1UP Good work!
!PGM !PIZZA
You have received a 1UP from @underlock!
@monster-curator, @oneup-curator, @leo-curator, @bee-curator, @pimp-curator, @thg-curator, @vyb-curator, @pob-curator, @neoxag-curator
And they will bring !PIZZA 🍕.
Learn more about our delegation service to earn daily rewards. Join the Cartel on Discord.
$PIZZA slices delivered:
@curation-cartel(3/20) tipped @michupa
Congratulations, @michupa Your Post Received a 100% BEE Boost.
@michupa Burnt 5.135 HELIOS & We Followed That Lead.
Contact Us : HELIOS Token Discord Channel
Congratulations, @michupa Your Post Got 100% Boost.
@michupa Burnt 35.192 HELIOS & We Followed That Lead.
Contact Us : HELIOS Token Discord Channel
Congratulations, @michupa Your Post Got 100% Boost.
@michupa Burnt 22.628 UPME & We Followed That Lead.
Contact Us : CORE / VAULT Token Discord Channel