Make your BUYING and SELLING experience A LOT better with PeakMonsters

It is often challenging and time-consuming to use the Splinterlands in-game market when dealing with multiple card transactions. In this post, we will be taking a closer look at an excellent tool for buying and selling multiple Splinterlands cards. We will also be discussing all the amazing features that the PeakMonsters Market interface have, and how we can properly utilize these to make our buying and selling experience a lot better.

Buying Cards
In this section, we will first look at the different view modes in Buy tab, and the advantages of each view. This will then be followed by a step by step actual purchase. Feel free to follow along and increase your card collection as well.

To start, simply login to your account and click on the Buy tab in the upper left corner of the platform. After that, you will see the Market interface, which by default is in Grid view. You can easily switch in between views by clicking on Grid, List, or Compare in the upper right corner.
View modes: Grid, List, Compare
Grid View
In Grid View, you will be able to see more cards in your screen compared to List View, but you have to click on the cards to see the corresponding stats.
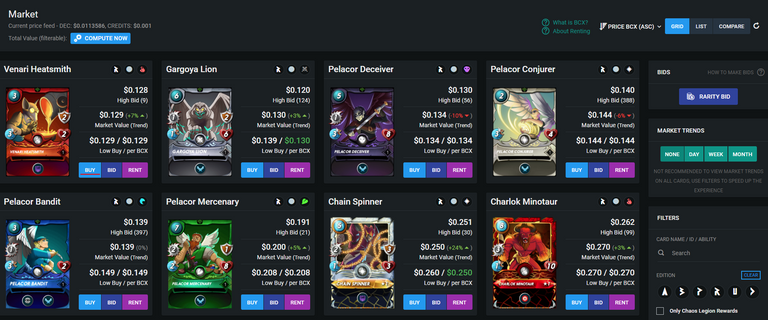
As shown in the image above, you can see the card information (edition, rarity, and element), and the relevant market data in Grid View. You can also look at the stats and listings by clicking on any of the action buttons (Buy, Bid, and Rent) on the bottom part of each card block.
After clicking on the Buy button for Venari Heatsmith, our screen will now look like this:
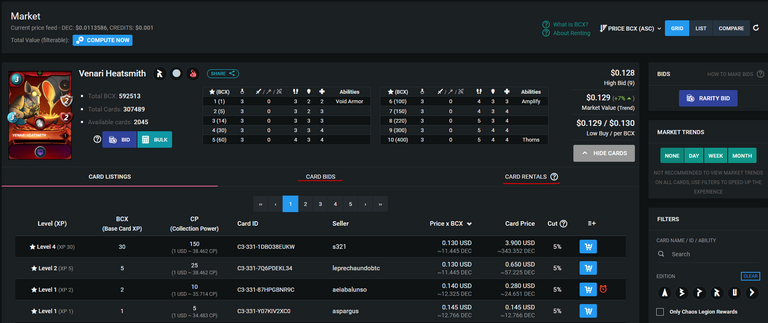
We can now view the market data and card stats for Venari Heatsmith. We can also check the Card Bids and Card Rentals by clicking on the tabs beside "Card Listings".
List View
Next, we have List View. In List View, you can see the card stats, Total BCX, Total Cards, and Available Cards without having to click on the card. However, the trade-off is you will see less cards in your screen at a time, compared to Grid and Compare view.
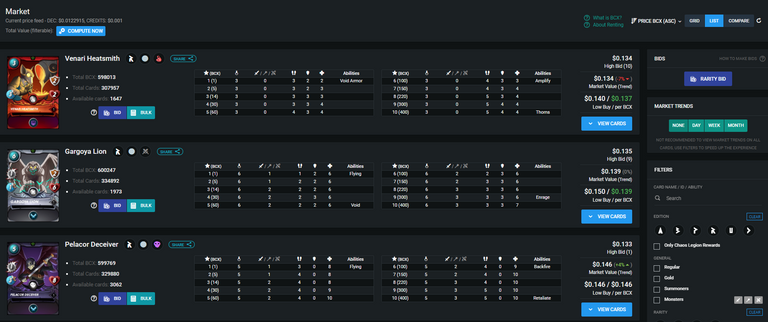
As you can see, we now have more detailed information about Gargoya Lion, Veneari Heatsmith, and Pelacor Deceiver without having to click on the card. If you want to see the card listings, simply click on the light blue View Cards button.
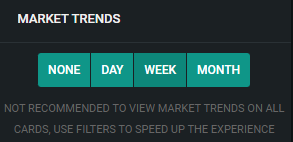
Additional feature for List View: Market Trends.

With Market Trends, you can see the historical price, quantity sold, and trading volume of the card.
Compare View
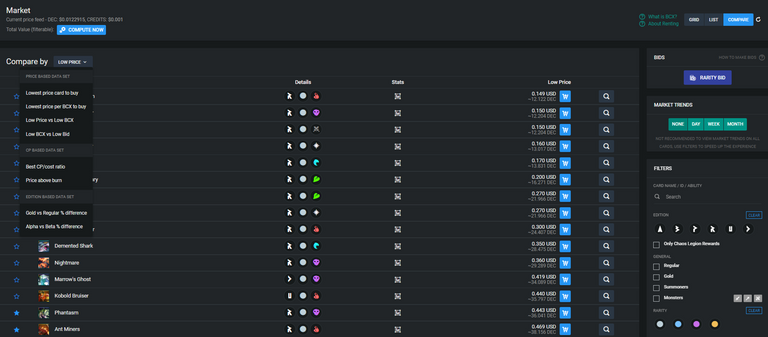
Lastly, we have Compare View. In Compare view, you have eight comparison options to choose from. These options are based on three types of dataset: Price, Collection power, and Edition. Since the description for each option is pretty straightforward, we won't go into much detail for each of these.
If you like a more in-depth discussion on how to use the CP based Compare by option, you might want to check out this post about collection power.
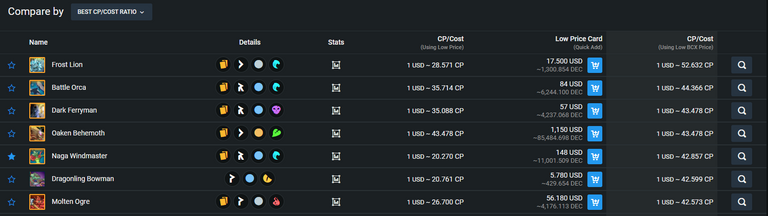
Among these options, my most used option is the Best CP/Cost ratio. I mainly use it to look for good deals when I want to increase my collection power by buying cards. Based on the image above, the cards that are worth looking at for the sole purpose of increasing my CP are: Frost Lion, Battle Orca, and Dark Ferryman.
Tip: You can easily see the listings for each card by clicking on the magnifying glass icon on the right-most part of each row.
Buying time! Step-by-step tutorial on buying cards
Now that we are familiar with all the awesome viewing modes in PeakMonsters, it is time to buy our card!
For this illustration, we will be buying a regular foil Demented Shark.
Step 1: Search the card that you want to buy
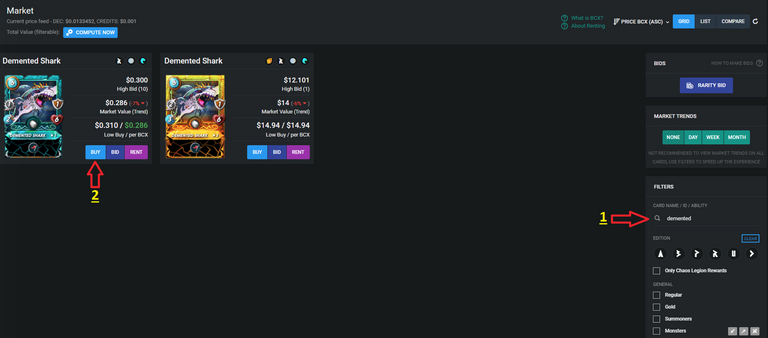
To easily find Demented Shark, I typed "demented" in the search bar and it gave us two results: Regular foil and Gold foil Demented Shark. We will be buying a regular foil Demented Shark, so let us proceed by clicking Buy on the left card.
Tip: When navigating in the PeakMonsters market or Renter's board, I highly recommend using filters. It will save you a lot of time and trouble in the process.
Step 2: Add to cart and proceed to checkout
We can now see the card listings for Demented Shark. Let us choose the cheapest 1 BCX card.
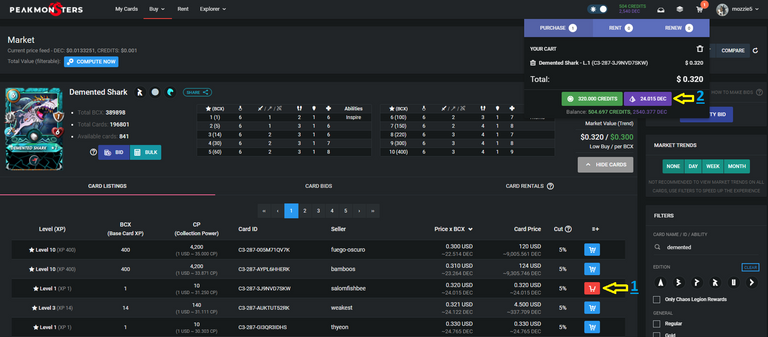
From the card listings, the card on the third row is the cheapest 1 BCX Demented Shark. Click on the Add to Cart symbol in that row. After that, you will see that there is now a number in the cart icon in the upper right corner.
Click on the Cart icon, then click on your desired payment method as shown (#2) in the image.
Step 3: Confirm if your purchase was successful
Lastly, we must confirm if our transaction pushed through. To check, click on the dropdown button in your profile (upper right corner), and click on My Explorer.
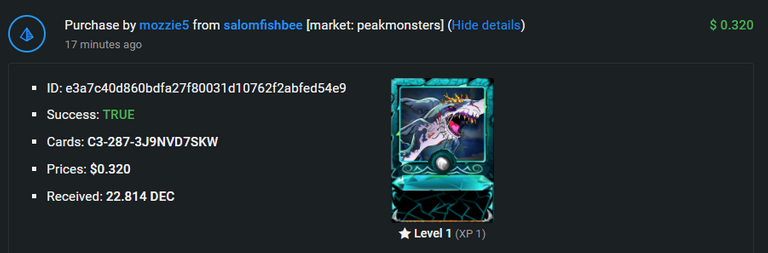
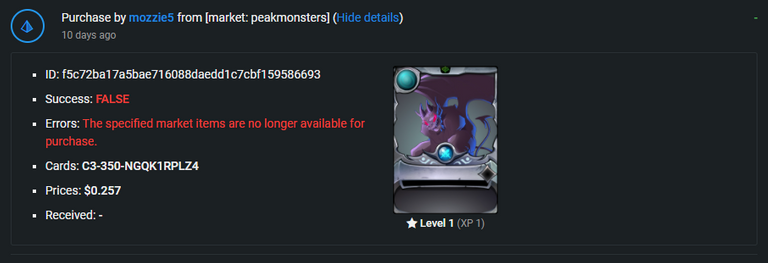
In My Explorer, you will be able to see all your recent transactions. If your purchase is successful, you should be able to see a log similar to the one above. If the transaction did not push through, a log similar to the one below will show.
There you have it! You can now increase your collections easily with PeakMonsters' Buy features.
Note: Another option for buying cards in PeakMonsters is by using bids. For a detailed explanation on how to use the bids feature, I highly recommend checking out this post.
Additional feature: Buying Sets
Aside from being able to buy individual cards from players, PeakMonsters also allows buying and selling of sets. A set is basically a collection of cards listed by the seller on a specific price.
To access the Buy Sets feature, click on the dropdown icon in the Buy tab, then click on Buy Sets.
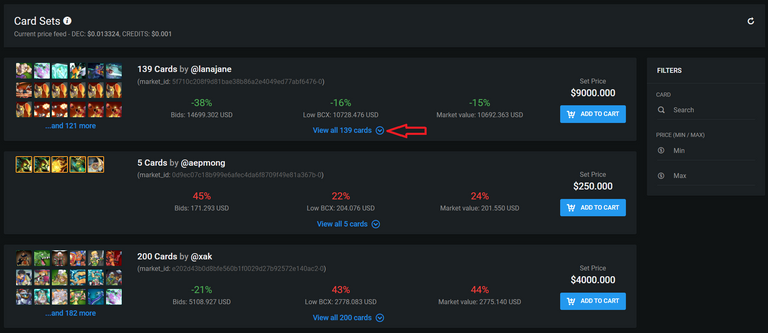
For each set, the current TOTAL Market value, Low BCX value, and bids for all the cards in the set are also shown. By looking at these figures, you can easily tell if you will be getting a good deal or not.
If you want to view the cards that are included in the listed set, simply click on the "View All cards" as indicated by the arrow in the image above.
Selling cards
When selling multiple cards in the in-game market, the most dragging part is repeating all the steps for each card that you want to list. With PeakMonsters, you can list multiple cards in few simple steps.
Step 1: Go to My Cards and select the cards that you want to sell
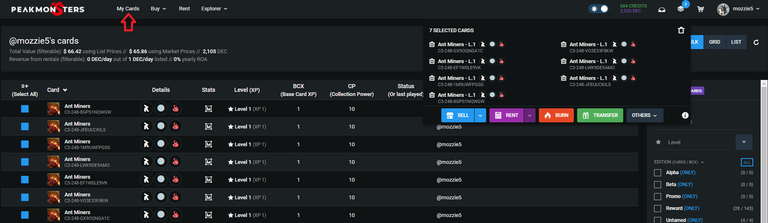
First, we have to click on the My Cards tab as indicated by the arrow in the image above. After that, select the cards that you want to sell by clicking on the corresponding tickbox of the cards that you want to sell.
Tip: If you are listing A LOT of cards, you might want to filter your collection first, click on the Select All option, then deselect the cards that you want to keep. This way, there will be less clicks needed to select your cards.
Step 2: Click the stack icon and SELL

Click on the Stack icon in the upper right corner of the screen. After that, we can now see the 7 Ant Miners that we have selected in the previous step. If all of the selected cards looks good, click on the SELL button to proceed to the next step.
Step 3: Set listing price
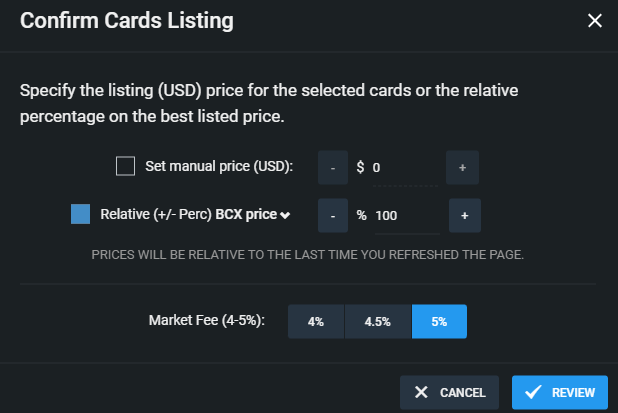
In setting the listing price of your cards, you have two options:
- Set Manual price
- Manually input the listing price for ALL your cards
- Set based on Relative BCX price
- Set a listing price based on BCX price or Low buy price. Putting 100% means that you want to list your card 100% higher than the current BCX price or low buy price, depending on the option that you chose.
Note: If you use the Set Manual price option when listing multiple cards, it will list ALL your cards on your specified price. This means that if you are selling an Ant Miner and a Kron at the same time, and then you set the manual listing price at $0.42 (Ant Miner's current selling price), you will also be selling your Kron at $0.42!
Step 4: Confirm card listing details
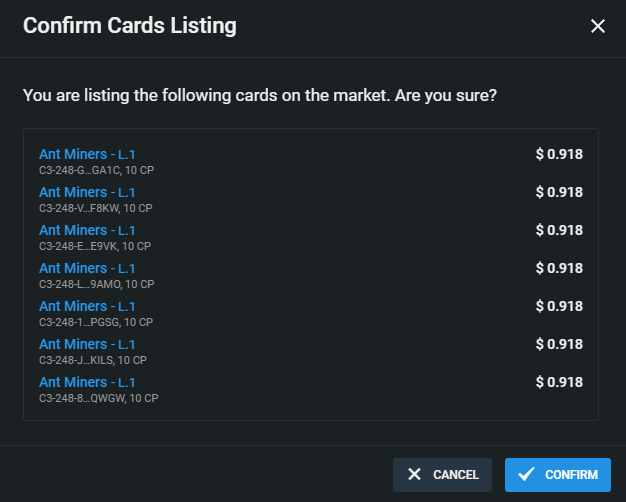
Before pushing through with the transaction, make sure that all of the details are correct. If everything looks good, click on the CONFIRM button.
Optional step: Check if your card is already listed

To make sure that your card is already listed, simply refresh the page and look for your cards. If the listing pushed through, the selling price should be visible under the "Market/Rent price" column.
Note: Don't forget to remove your filters! Your listed cards won't show up if you're filtering with "On Market = No".
Sell as SET
If you prefer selling your cards in one go, using the Sell as Set feature is the way to go.
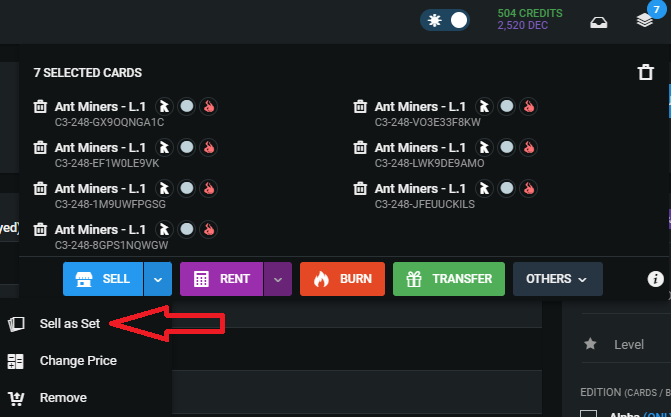
Using the Sell as SET feature is quite similar to selling multiple cards. The main difference is instead of clicking on the SELL button, you would have to click on the dropdown button right beside it, and choose the Sell as Set option.
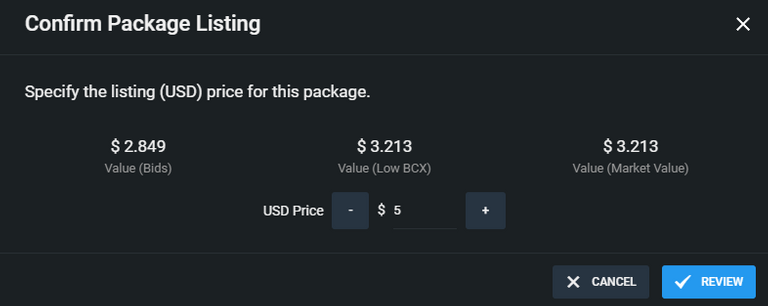
After that, the Confirm Package Listing pop-up will show. Input the price that you want to sell your set and click Review.
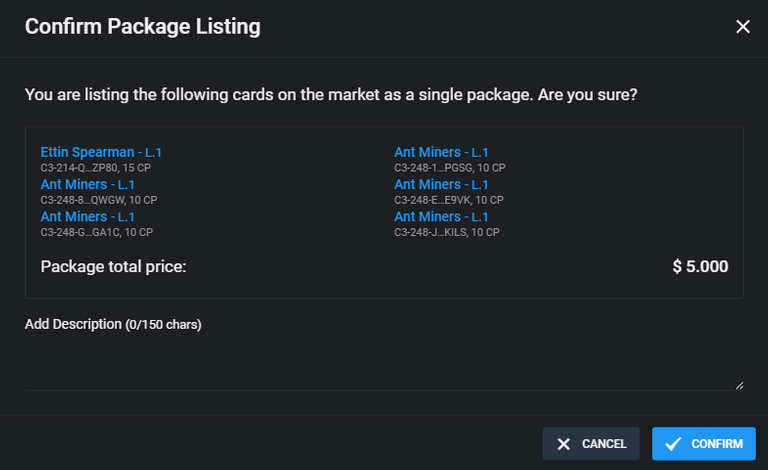
For the last step, review all the cards in the package listing. Once you've made sure that all the details are accurate, click CONFIRM. Voila! Your Card Set is now listed for Sale in the market.
There you have it! I hope this post helps you fully utilize all the amazing features in the PeakMonsters market, and have a much better buying and selling experience.
CREDITS
PeakMonsters for making this amazing tool. Most of the images in this post are from their platform.
All the cool-looking dividers are made by @flauwy
Cover photo made in Canva.
Electronic-terrorism, voice to skull and neuro monitoring on Hive and Steem. You can ignore this, but your going to wish you didnt soon. This is happening whether you believe it or not. https://ecency.com/fyrstikken/@fairandbalanced/i-am-the-only-motherfucker-on-the-internet-pointing-to-a-direct-source-for-voice-to-skull-electronic-terrorism
https://twitter.com/bitinvest_news/status/1447233921058582533?s=20
https://twitter.com/bitinvest_news/status/1447233921058582533
The rewards earned on this comment will go directly to the person sharing the post on Twitter as long as they are registered with @poshtoken. Sign up at https://hiveposh.com.