~ New Players Corner - Which Setup Should I Choose? ~
~ New Players Corner – Which Setup Should I Choose? ~
Greetings Splinterlands community! Coming back at you with another installment of the New Players Corner. This post will encompass standard setups for low collection power players and those just beginning their Splinterlands journey. As always thank you for joining me and being a member of this amazing community.
First things first I want to congratulate h3llr4iser as he is the winner from the last post and will receive a 2500 CP delegation! If you would like to be the winner from this post please read to the bottom, post your IGN (in game name) and leave a comment with what you would like me to write about on the next post of New Players Corner.
Let’s dive in!
Standard Setup:
Undoubtedly you played the tutorial! For those of you who have just recently joined the game and are not familiar with positional mechanics it was probably a bit confusing, but you got through it. Take a look at the following image and notice the positional delegations and note attached to each position. Then take a look below that to see how the match played out!
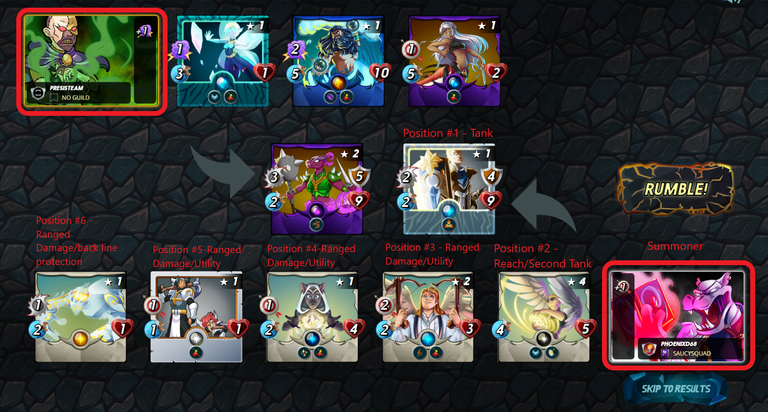
Let’s break this down position by position!
Summoner:
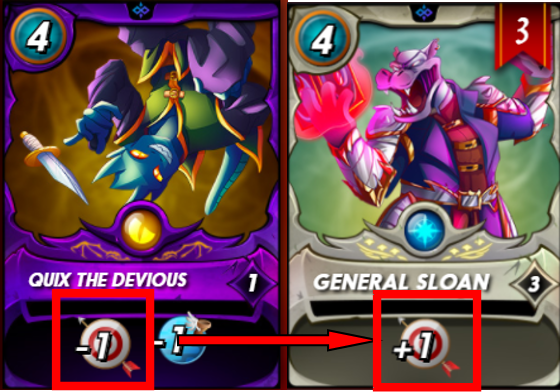
The summoner card is pivotal to your success or failure in a match. It has just as much power as the rest of your choices (sometimes more). The summoner has the ability to enhance your abilities or reduce the effectiveness of your enemy. In the graphic you will see I chose General Sloan. General Sloan provides a flat +1 attack to ranged attacks (not magic, not melee). You can see denoted on my card selections I chose damage dealers on the back line (positions 3 through 5) that relied upon my summoner to increase their effectiveness. It is in this way you will build synergies between your summoner and monster selection. Summoners can often be used to negate or counter an enemy summoners buff (enhancement) for the opposing team. In the image below you can see that if my enemy had selected Quix the Devious as his summoner he would have countered my summoner and my damage would have been greatly reduced.
For those of you who read my previous installment you will know that my recommendation is to focus on one to two splinters and acquire at least a level 2 summoner from those splinters. Your team selection and cards that are available to you are limited by the splinter of the selected summoner. However, if you choose a splinter and decide later you no longer like it, or your splinter is not available for play during a match, you can apply these premises to build a team from any splinter.
Position #1 – Tank:
This is your meat shield! A high health and typically medium damage unit. This unit is designed to take the brunt of the assault from the enemy team. Often you will find that tanks have both high health as well as an armor value associated with them. Some of them also have ancillary abilities that may help to prevent additional forms of damage. Generally, these are Shield, Void, and Void Armor. Additionally, there is another stat which can really turn the tide of the battle in your favor called “Taunt”. I’m going to focus on the common and rare cards which have these stats and are typically a bit more accessible and can be found for a nominal price on the market:
• Shield:
o Shield will reduce the damage from melee and ranged attacks. This is a very important attribute when facing off against a melee centric opponent. It will reduce melee and ranged damage by half (rounded up). If an opponent hits you for 1 damage it will negate the damage to 0.

• Void:
o For enemies who choose to attack with primarily magic you will notice that this damage will bypass your armor. This is quite problematic for many tanks. Luckily you have options to acquire one of these tanks for modest costs on the market and it will greatly increase your survivability. You will also notice that some tanks may not have any armor but do have void with a large health pool.

• Void Armor:
o Tanks with void armor are particularly valuable as they provide equal defense against melee, ranged, and magic damage. The damage from magic which typically bypasses armor is now forced to go through your tanks shield in order to mitigate the damage.

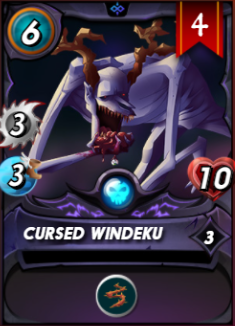
• Other considerations for this slot are often essential. Some splinters offer tanks which have high health but a different skill which may not be directly tank related but can offer a huge benefit. For instance, if you are playing the death splinter and are using the Cursed Windeku you will notice this unit has the “Thorns” ability. This will reflect a portion of the damage back to the attacker and can be pivotal in your victory.
Position #2:
This slot is very important. This is the position that will typically absorb damage from Snipe attacks and blast damage which splashes from the tank. You can also place melee units here which have the “Reach” ability. You may also put ranged or magic units here but be aware that if your tank dies and you have a ranged unit in this position, it will move to the first position and be unable to attack. You may also place high health units here with the Sneak and Opportunity abilities. This will allow them to attack from the second position without having the Reach ability. You may also place units here which may have no attack but have high health or dodge. This will soak damage from snipe or blast damage while also moving into the tank position and protecting your back line if your tank were to die. A good skill to look for in this position is reflect (Pelacor Conjurer gets this at level 4 and is currently .05 USD per BCX). You can also look at cards such as Gelatinous Cube or Rift Wing.
Position #3 - #5:
These are the most protected slots you have. The real threat to these units comes in the form of Opportunity from either a rule set or monster ability. While this is hard to mitigate there are things you can do to make this increasingly difficult for Opportunity heavy teams. Running a Taunt in your tank position will force all enemy monsters to hit your tank, in this way you will protect your lower health back line monsters. If running taunt, you will want to include a healer or repair in your protected slots (position #3 - #5). This is also where you would put your high damage or essential utility monsters as well. For instance, if you were running two high mana cost cards (say for instance Pelacor Arbalist and Prismologist) you would want them here so they can chip away at the enemy team without being killed in the first round of the fight. If you were to place these units in the 2nd position or the 6th position you would have issues with sneak and snipe monsters destroying them potentially in the first round. In the first image you can see that my 3 position was Pelacor Arbalest, followed by my Crystalsmith, and finally the Silvershield Archer. Another consideration is to put your most valuable card (typically the tank healer or repair) in the 4th slot. Sneak monsters will target the last in your lineup first and work successively through your back line. That is why the success of your team not only falls on the tank and second position but also the 6th.
Position #6:
An often-overlooked position by those who are relatively new to the game. This position will eat all of the sneak attacks which would otherwise destroy your backline and bypassing your tank and second position. Even if you are able to put a 0 or 1 mana cost monster here it can win you a match. Optimally you would like to have a card with substantial health here. A few good cards to use in this position are Pelacor Conjurer, Gelatinous Cube, Rift Wing, Furious Chicken (or any of the fiends associated with Chaos Legion), or a Failed Summoner. It is also a viable option here to run a secondary tank if the mana limit supports such a decision, especially if the tank you chose for backline protection has a ranged attack!

And this brings me to my final point. There is no cookie cutter standard setup. The beauty of this game is that each fight is different. Rule sets never stay static, and you have to use your own judgement when creating a team composition. I hope that some of the information contained within this post has been valuable. If you read this far, I commend you. Please post below with your IGN and what you would like to talk about on the next installment of New Players Corner for a chance at winning a 2500 CP delegation.
Warmest Regards,
Phoenix
Congratulations @phoenixd68! You have completed the following achievement on the Hive blockchain and have been rewarded with new badge(s):
Your next target is to reach 50 comments.
You can view your badges on your board and compare yourself to others in the Ranking
If you no longer want to receive notifications, reply to this comment with the word
STOPTo support your work, I also upvoted your post!
Check out the last post from @hivebuzz:
Support the HiveBuzz project. Vote for our proposal!
I completely agree with your conclusion.
No matter what you do even using some cheese tactic for a hummongous rental price - there is no silver bullet in Splinterlands. Learn the splinters and the strategies and try to outsmart your opponent - that's the best advice you can gove a new player i feel. :)
You were curated by the
