Grimbardun Fighter - a deadly neutral tank!
Hello guys, this is my entry to the "Splinterlands Social Media Challenge!". If you want to participate and read more about the challenge, click here.
The Rebellion edition came recently, there came a lot of new summoners and monsters. There are some meta-changing abilities and gameplay changes too which made it more interesting and challenging at the same time. One of the keys to success in this game is to know all of your units and how they can be best used in the battle. And here is me trying to educate myself and others with these posts about one of the new units that came out during this sale. In this post, we will talk about an impressive melee attacker who is a powerful tank and is a neutral unit, the Grimbardun Fighter.
Let's start by looking at its stats in detail.

Grimbardun Fighter
 | |
|---|---|
GrimBardun Fighter is a common neutral unit that came out during the recent Rebellion sale. It is a high mana cost unit costing a whooping 9 mana to use but it comes with some nice stats. It deals significant melee attack damage and comes with armour of its own. Its 'shield' ability makes it a good tank, especially against melee and ranged attackers. The high attacking strength along with 'shield' and 'corrosive ward' ability at only level 3 makes it a very useful attacker.
I will show you how I utilised it in one of my battles.
My Lineup
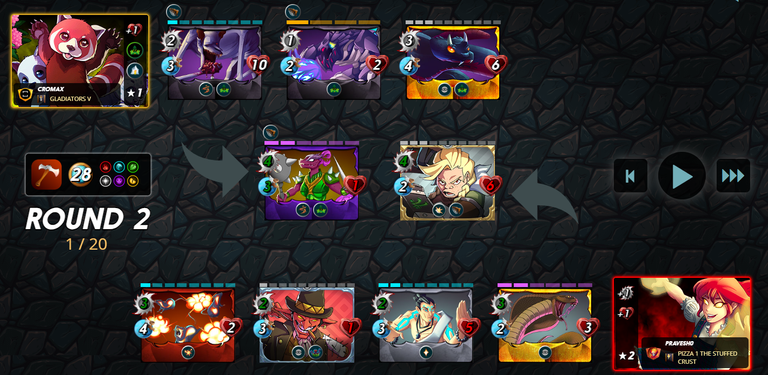
This is my lineup for the battle
It was a 28-mana cap battle and only had the "Melee Mayhem" ruleset so all the melee attackers can attack from any position during this battle. It won't affect the placement of my GrimBardun fighter in this particular battle but this is a good ruleset where this monster can excel easily.
All the elements were active during this battle. I went with Tarsa as I wanted to increase my melee attack damage by 1.

Grimbardun Fighter was my tank for this battle as it comes with the 'Shield' ability that reduces the attack damage received from melee and ranged attackers by 1 and I was expecting my opponent to use a lot of melee attackers. That was the main reason to put it in the first position. But its attacking strength is impressive on its own, dealing 3 melee attack damage on its own.
The next in my lineup was Uraeus which dealt 2 melee attack damage on its own. It comes with a 'sneak' ability which targets the enemy back line and more often than not, there are units with low health placed at the end, especially in lower leagues. It just costs 3 mana which is super useful in an under 30 mana cap battle.
Xenith Monk was placed in the third position. It cost 4 mana and dealt just 1 melee attack damage but I used it in my lineup because of its relatively good health and its 'heal' ability which allows it to survive for much longer and heals it after each round. I could use it in this position just because it was the 'Melee Mayhem' ruleset.
Gobalano Soldier was the next unit in my lineup. It just costs 3 mana and comes with two interesting abilities: 'sneak' and 'ambush'. The Ambush ability allows it to attack even before the battle begins. The only disadvantage is its relatively lower health.
Another low-health monster in my lineup was Exploding Rats, which I don't usually use in my battles. But this time I wanted to add in some extra attacking strength so I used this. Costing 4 mana it deals 2 melee attack damage of its own. Its best thing is the 'blast' ability that can change the fate of the game if it stays alive for some rounds.
Last but not least was Radiated Scorcher which is just a one-mana costing unit capable of doing 1 melee attack damage on its own. I didn't expect much from this one. But all these units would get an extra melee attack point and that is a lot of attacking strength overall.
Now that my lineup was set, it was time for battle.
I will share my battle here, which I have uploaded to YouTube.
My Strategy
The ruleset for this battle was "Melee Mayhem" and I used it to my advantage by giving all the melee attackers and buffing their attack by 1. It was possible because I used Tarsa as my summoner which also increased the health of all friendly monsters by 1 which I needed badly as I focused more on attacking strength rather than defensive.
Using a good attacking lineup was the paramount focus of my strategy but I had faith in my Grimbardun Fighter to hold the fort for long because of its 'shield' ability.
I used some sneaky units to get rid of the weaker units at the end which didn't go as smoothly as planned. But it mostly works in these types of battles.
This strategy, as you will see, worked in my favour and gave me a comfortable win in the end.
My opponent went with a similar strategy. They used the Lily Shieldpaw which increased the health of all their units and gave them 'camouflage' ability. Their primary tank was Djinn Chwala which looked tough to get rid of!
The first round was an interesting one. It started with the demise of their Venari Marksrat and their Djinn Chwala becoming more powerful. My exploding Rats died after taking 'thorns' damage back but they did their job well. I didn't expect much from them.
My Grimbardun Fighter stood its ground firmly while their tank took a lot of beating and by the end of the round it was almost done.
The start of the next round was not good for me as I lost another monster and it didn't look good for me. But the Grimbardun Fighter held the first position and became a strong wall at the front of the lineup.

The Xenith Monk was a good support in this battle along with Uraeus who stood there longer than I expected. It was a close battle but I came out victorious. The MVP for this battle has to be Grimbardun Fighter which stood there for almost 4 rounds and held the entire lineup or it would have been over soon for me.
Conclusion
As you just saw in the above battle, Grimbardun Fighter plays a crucial role in your lineup, not only it increase the attacking strength of your lineup by dealing heavy melee attack damage it also adds to the defensive strength and what better example I could show of that than the battle above.
Some players may complain about its relatively lower health even after costing 9 mana and it gets harder to use it in lower mana cap battles. But considering all of these it is still impressive that can help you in your battles, especially in certain rulesets where you know the opponent is going to use a lot of melee or ranged attackers. I recommend it. Let me know if you find it useful as well.
Thanks for reading...
Splinterlands is a popular NFT-based play2earn game. If you have not joined the game yet, then you are missing a lot of fun. You can join by using my referral link.
Note:
- Text dividers are from freeztag.
- Card images are from @splinterlands.
- Banner created in Canva (free version).
| SPLINTERLANDS.COM | SPLINTERSHARDS (SPS) | BLOG | DISCORD | TELEGRAM |
!1UP Good work!
!PGM !PIZZA
You have received a 1UP from @underlock!
@monster-curator, @oneup-curator, @pimp-curator, @vyb-curator, @pob-curator, @fun-curator
And they will bring !PIZZA 🍕.
Learn more about our delegation service to earn daily rewards. Join the Cartel on Discord.
$PIZZA slices delivered:
@curation-cartel(10/20) tipped @pravesh0
Checkout our BDVoter Daily Hive Showcase & Participate into our Daily giveaway to win various prize.
Thanks for sharing! - @alokkumar121
