Protect your CUB, Polycub, SPS and DEC with a Hardware Wallet connected to metamask
This post is a very practical tutorial as I have done many in my Blog, but I think it is important and I think it can be extremely useful to all users.
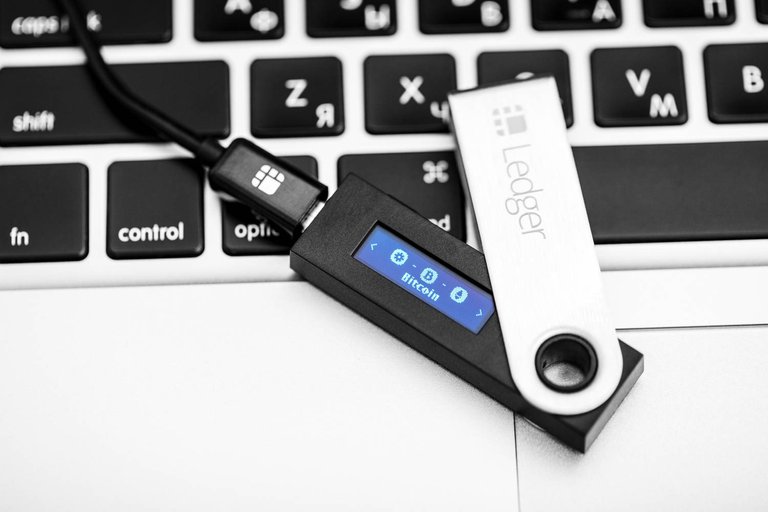
The hardware wallet that I'm going to examine is the Ledger Nano S, the most famous hardware wallet that I think is most used by the general public including me.
We will look at connecting to Metamask and protecting CubFinance, Polycub, and Splinterlands if you want to protect your DECs and SPSs on Metamask or in Cubfinance Farms.
1) Purchase the Ledger nano S
In order not to take anything for granted I remind you that the reference site is clearly that of the hardware manufacturer, no private users or used products, only completely new products just out of the factory.
Reference site https://www.ledger.com/start/
2) Set up your Ledger following the instructions.
Once you have your Ledger i inside the box you will find
- The Ledger nano S
- The USB C cable
- A card with the SEED on it (3)
- A card that takes you to start.ledgerwallet.com where you can download the original copy of Ledger Live.
- Various accessories
Once you have connected the device, a very simple device-guided procedure will begin.
You will be asked to set a PIN of 8 numeric characters that you will use every time you want to authorise a transaction.
You will be referred to your 24-word Seed and asked to put it on paper and confirm it.
Once you've done this you can rest assured that it will be the last time you will have to deal with your seed, unless you lose or destroy your Ledger and want to restore it.
3) Through the App Manager section set the ETH and BSC apps
Clearly these are not the only apps that can be set but for the purposes of this guide they are the essential apps.
Update applications and firmware to the latest version.
4) Connect to Metamask.
You can use the Metamask you've always used or take the opportunity to make a change of address/wallet and move your funds (which I honestly always recommend, as well as frequently changing your keys on Hive).
Anyway, once you have opened metamask you will need to follow these steps.
- Press on your "Avatar" which tends to be a coloured circle and press connect Hardware Wallet
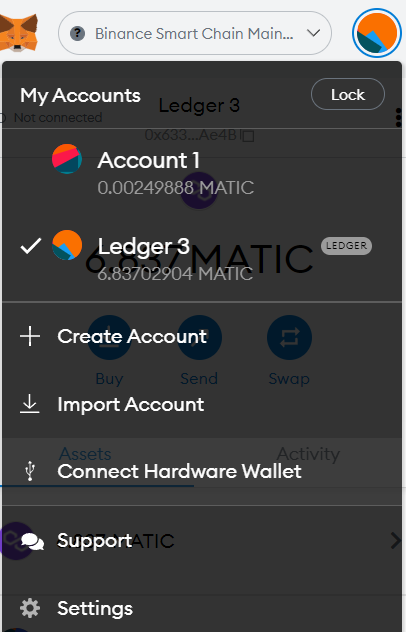
Select Ledger clearly and follow the instructions
Select the address you like best, it doesn't matter which one you choose
Once you have completed the path guided by Metamask you should find a new Wallet with the name Ledger and a number, that will be your new wallet on Metamask protected by Ledger.
5) Move your funds from the old Wallet to the Ledger Wallet.
Obviously send the funds necessary to pay the commissions (BNB and Matic in the case of CUB and Polycub) as the last ones.
6) Re-enter the funds in the Cubfinance and Polycub platforms.
You will see that in order to confirm any operation, including approvals, you will be asked to manually give your OK in the transaction review.
For Polycub you will have to use the ETH! application and not Polygon!
7) End of guide
Now every time there will be an operation you will manually confirm it, every exit of funds from a farm, every Harvest, every operation will be in your complete control and you can sleep even more peacefully!
I voluntarily insert in the final part of the motivations to perform these operations because I believe that most users know the great dangers that run on the Blockchain and Metamask let's be clear is a portfolio a bit fragile.
In any case, the reasons that I consider most valid are:
Complete security of my operations
Having the security that even if my Metamask wallet is targeted my funds are physically protected by a device that only I have access to.
The security of a Ledger Device and its low cost compared to the security it provides me with
Sleep peacefully

Questo post è un tutorial molto pratico come ne ho fatti molti all'interno del mio Blog, ma che reputo importante e che credo possa essere estremamente utile a tutti gli utenti.
L'Hardware wallet che prenderò in esame è la Ledger Nano S, l'Hardware wallet più famoso e che credo sia maggiormente usato dall'utenza generale me compreso.
Verra preso in esame il collegamento a Metamask e la protezione di CubFinance, Polycub, e Splinterlands se volete proteggere i vostri DEC e SPS su metamask.
1) Acquistare la Ledger nano S
Per non dare nulla per scontato ricordo che il sito di riferimento è chiaramente quello del produttore Hardware, no agli utenti privati o prodotti usati, esclusivamente prodotti completamete nuovi appena usciti di fabbrica.
Sito di riferimento https://www.ledger.com/start/
2) Settare la vostra Ledger seguendo le istruzioni.
Una volta ottenuta la vostra Ledger i all'interno della scatola troverete
- La Ledger nano S
- Il cavo USB C
- Cartoncini dove riportare il SEED (3)
- Un cartoncino che vi riporta a start.ledgerwallet.com dove scaricare la copia originale di Ledger Live.
- Accessori vari
Una volta che avrete effettuato il collegamento del Dispositivo inizierà una procedura Guidata dal dispositivo e molto semplice.
Vi verrà chiesto di settare un PIN di 8 caratteri numerici che userete ogni qualvolta volete autorizzare una transazione
Vi verrà riferito il vostro Seed a 24 parole e vi verrà richiesto di riportarlo in forma cartacea e confermarlo.
Una volta fatto questo potete stare tranquilli che sarà l'ultima volta che avrete a che fare con il vostro seed, se non che perdiate o distruggiate la vostra Ledger e volete ripristinarla.
3) Tramite la sezione App Manager settate le app ETH e BSC
Chiaramente non sono le uniche Applicazioni che possono essere settate ma per i propositi di questa guida sono le applicazioni essenziali.
Aggiornate applicazioni e firmware all'ultima versione.
4) Connessione a Metamask.
Potete usare il Metamask che avete sempre utilizzato o cogliere l'occasione per fare un cambio indirizzo/wallet e spostare i vostri fondi ( scelta che onestamente consiglio sempre, come anche di cambiare con una certa frequenza le vostre chiavi su Hive)
Ad ogni modo una volta aperto metamask dovrete seguire questi passaggi.
- Premere sul vostro "Avatar" che tendenzialmente è un cerchio colorato e premere connect Hardware Wallet
Selezionate chiaramente Ledger e seguite le istruzioni
Selezionate l'indirizzo che più vi piace, è indifferente quale sceglierete
Una volta concluso il percorso guidato da Metamask dovreste trovare un nuovo Wallet che ha come nome Ledger e un numero, quello sarà il vostro nuovo wallet su Metamask protetto dalla Ledger.
5) Spostate i vostri fondi dal vecchio Wallet al Wallet Ledger.
Chiaramente inviate come ultimi i fondi necessari al pagamento delle commissioni ( BNB e Matic nel caso di CUB e Polycub)
6) Reinserite i fondi nelle piattaforme Cubfinance e Polycub.
Vedrete che per confermare qualunque operazione, approvazioni comprese vi verrà chiesto a device inserito di dare il vostro OK manualmente nella revisione della transazione.
Per Polycub dovrete usare l'applicazione ETH! e non Polygon!
7) Fine guida
Ora ogni volta che ci sarà da fare un operazione sarete voi che manualmente la confermerete, ogni uscita di fondi da una farm, ogni Harvest, ogni operazione sarà in vostro completo controllo e potrete dormire sonni ancora più sereni!
Inserisco volontariamente nella parte conclusiva le motivazioni all'eseguire queste operazioni perchè credo che buona parte degli utenti sappiano i grandi pericoli che si corrono sulla Blockchain e che Metamask diciamolo chiaramente è un portafoglio un pò fragile.
Ad ogni modo le motivazioni che io ritengo maggiormente valide sono:
Completa sicurezza delle mie operazioni
Avere la sicurezza che anche se il mio wallet Metamask dovesse essere preso di mira i miei fondi sono fisicamente protetti da un dispositivo al quale solo io ho accesso
La sicurezza di un Dispositivo Ledger e il suo basso costo paragonato alla sicurezza che mi fornisce
Dormire sonni sereni e tranquilli
I would also like to thank @kaliphae for his wonderful dividers
Cubfinance image from https://docs.cubdefi.com/
Posted Using LeoFinance Beta
Your content has been voted as a part of Encouragement program. Keep up the good work!
Use Ecency daily to boost your growth on platform!
Support Ecency
Vote for new Proposal
Delegate HP and earn more
Thank you very much for your support! :)
Great tutorial! With crypto, safety is always in the first place, and using a hardware wallet is definitely a good choice!
I have picked this post on behalf of the @OurPick project and it will be highlighted in the next post!
Posted Using LeoFinance Beta
Exactly! Safety must always be the top priority, thank you very much for including me in this wonderful initiative
Great guide and very useful to keep our funds safe.
!ALIVE
@riccc96! You Are Alive so I just staked 0.1 $ALIVE to your account on behalf of @yeckingo1. (3/10)
The tip has been paid for by the We Are Alive Tribe through the earnings on @alive.chat, feel free to swing by our daily chat any time you want.

Thanks! I hope it is clear and helps! Safety always comes first!
Posted Using LeoFinance Beta
@tipu curate !discovery 20
Upvoted 👌 (Mana: 9/39) Liquid rewards.
This post was shared and voted inside the discord by the curators team of discovery-it
Join our community! hive-193212
Discovery-it is also a Witness, vote for us here
Delegate to us for passive income. Check our 80% fee-back Program
Great guide. If I may ask what's the price range for the ledger.
!1UP
Thanks for stopping by my post! :)
The Ledger Nano S costs just over 60 USD while the nano X is 150 USD, and a new version of the Nano S is coming out soon, you can learn more about the products on the official Ledger website https://www.ledger.com/ :)
Posted Using LeoFinance Beta
You have received a 1UP from @b0s!
@monster-curator, @leo-curatorAnd they will bring !PIZZA 🍕
Learn more about our delegation service to earn daily rewards. Join the family on Discord.