Countess Sinash Fanart || Splinterlands Art Contest Week 276. (Eng/Esp)
English version
Hello friends, welcome to a new post! I hope you are quite well, and have a nice day.
Today I share with you my new entry for the Splinterlands community drawing contest. Last week I couldn't participate because I was sick and my mind couldn't write due to tiredness, just that day I had gone to the beach and stayed up all night, but the good thing is that I'm fine and I'm here.
This drawing in general is important for me, because it is my first drawing in digital, and the process of doing this was very incredible, the process I can say that I really enjoyed it, and I thought it would be much more difficult, but having experience in drawing the control of the lines and the use of colors ends up being the same, my eye helped me a lot, but anyway this is something very different from what I'm used to do, the sensation is not the same and sincerely I stay with the traditional, but hey, the effects and tools that we have in digital are amazing, probably in the future I will buy one of those graphic tablets, meanwhile I will continue using my finger, JAJSJAJ, but well, now it's time to tell you about the character I chose and how I did it, feel at ease.

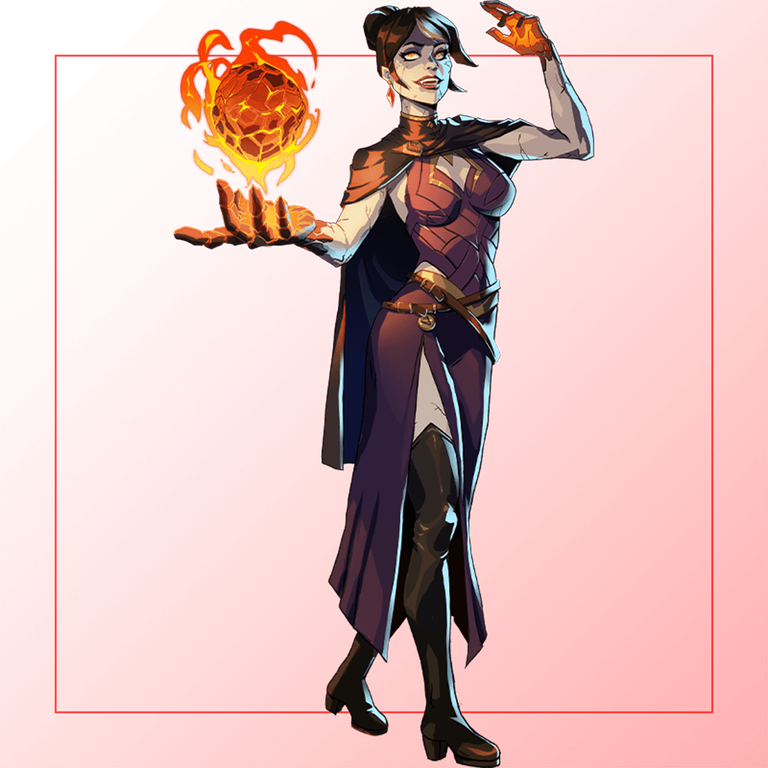
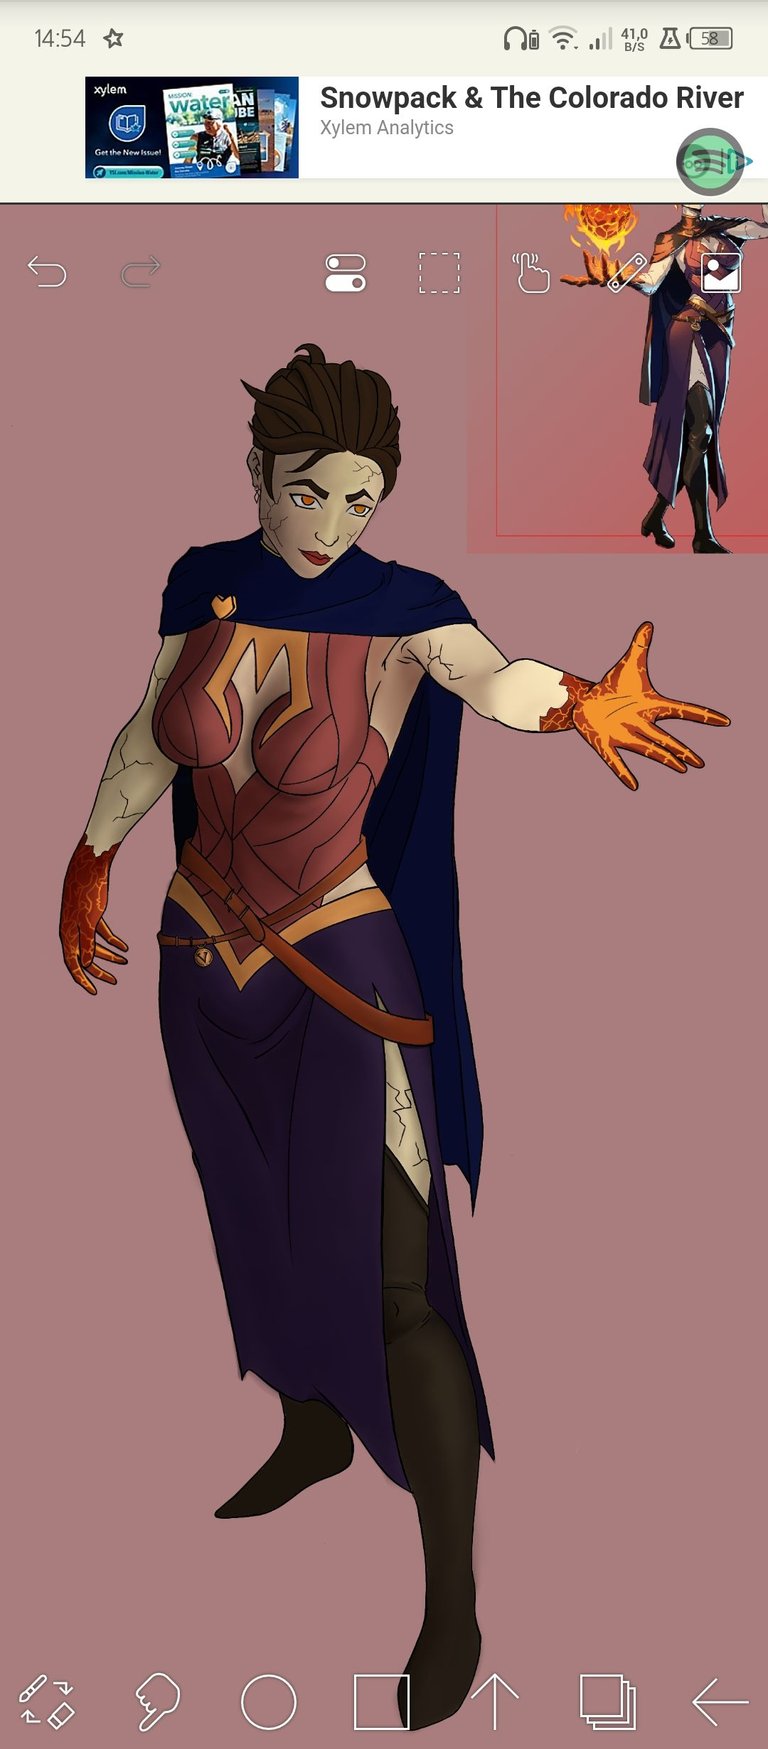
For this week I decided to draw the character Countess Sinash, a fire type character. I used a side pose keeping the fire charge, soon I will draw more water or death type characters, I feel that I'm already burning the fire ones, HAHAHAHAHAHAHAHAHA. For this drawing I used the drawing program Ibis Paint X in its version for android phone.
Well, here you can see a speedpaint of this drawing where the procedure is shown very fast, but I like to write so below I will also leave a couple of images in which I will define each step of the process, enjoy it:).
Speedpaint
https://youtube.com/shorts/ChPUgG6GmtI?si=97g7P6SjMmm9LXTKl
Step by step:

First I start making a sketch of the pose of this one and then I define it, as a reference I use the application Easy pose, it is an application to mold 3d characters, that because I didn't feel comfortable making the sketch, so I was a long time designing a pose that in any way was not so complicated so I could later put his shadows and lights without so much problem.
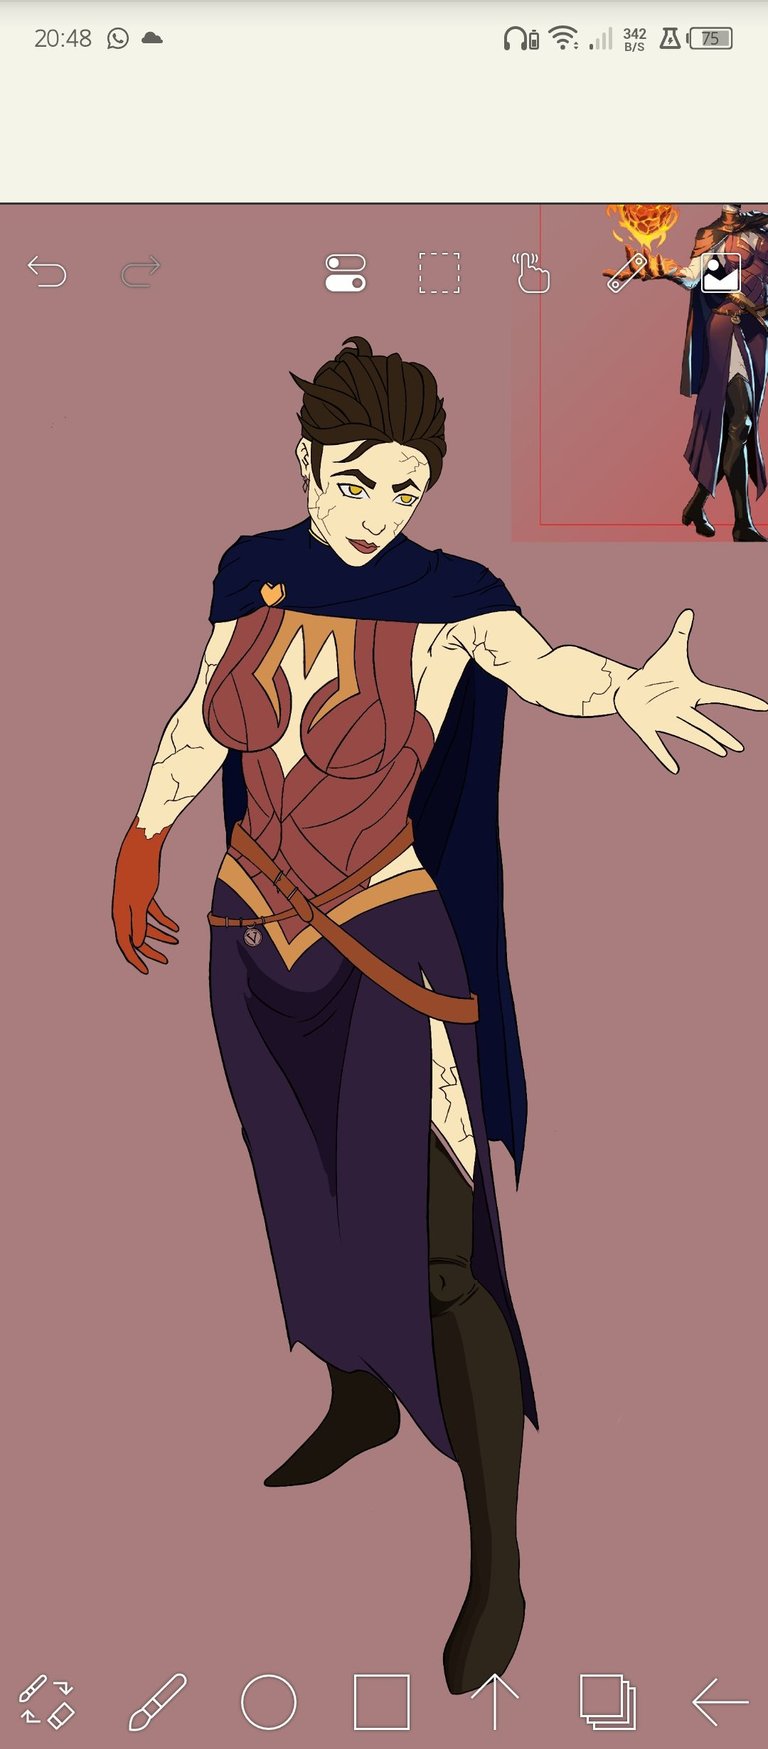
In another layer I started to put the base colors of my drawing, I started with the skin using a light flesh color with a pinkish cold shade and her hands I drew them with the red color, the hair I painted with the dark brown color as well as the eyebrows, the lips I drew with the red color and the eyes with the mustard yellow color. For the cape I used a very dark navy blue color and for her skirt I used a more opaque night blue color, for her upper train I used a red color a little bit opaque orangey, and for the strips that she has in the middle of the suit by chest and in the waist with the skirt I used the dark yellow color, for the loose belts that she has on I used a light brown color, almost like an ocher, the boots I also drew them with the brown color but very dark.
Now I start to make the shadows of the skin, for this I use colors like the brown color but with low intensity and opacity also in the color wheel I use this pink color with low intensity, inside the skin. For the hair I used the brown color with the same shade as the original color, for this I used the eyedropper, I chose this and then what I do is to lower the intensity and go varying with these tones to create volume and contrasts between each layer and strand of hair, then we continue with the layer, for the cape I only used a dark blue color and I was doing the same using low opacity and saturation and I was intercalating between each mode, also for the torso dress, the shirt, only using more reddish colors and so it goes down with the colors of the skirt and boots.
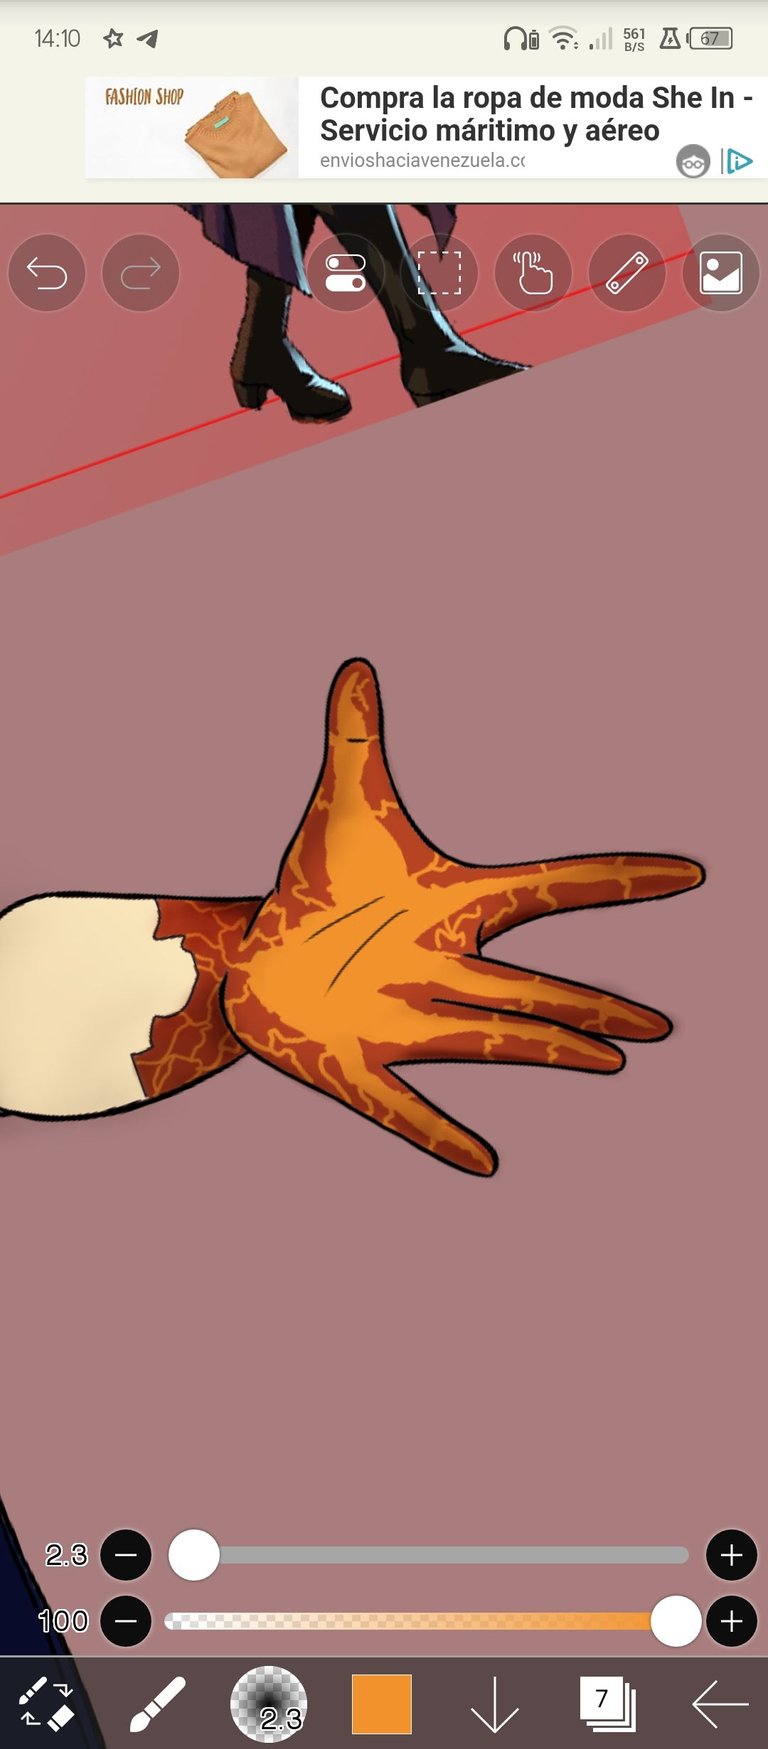
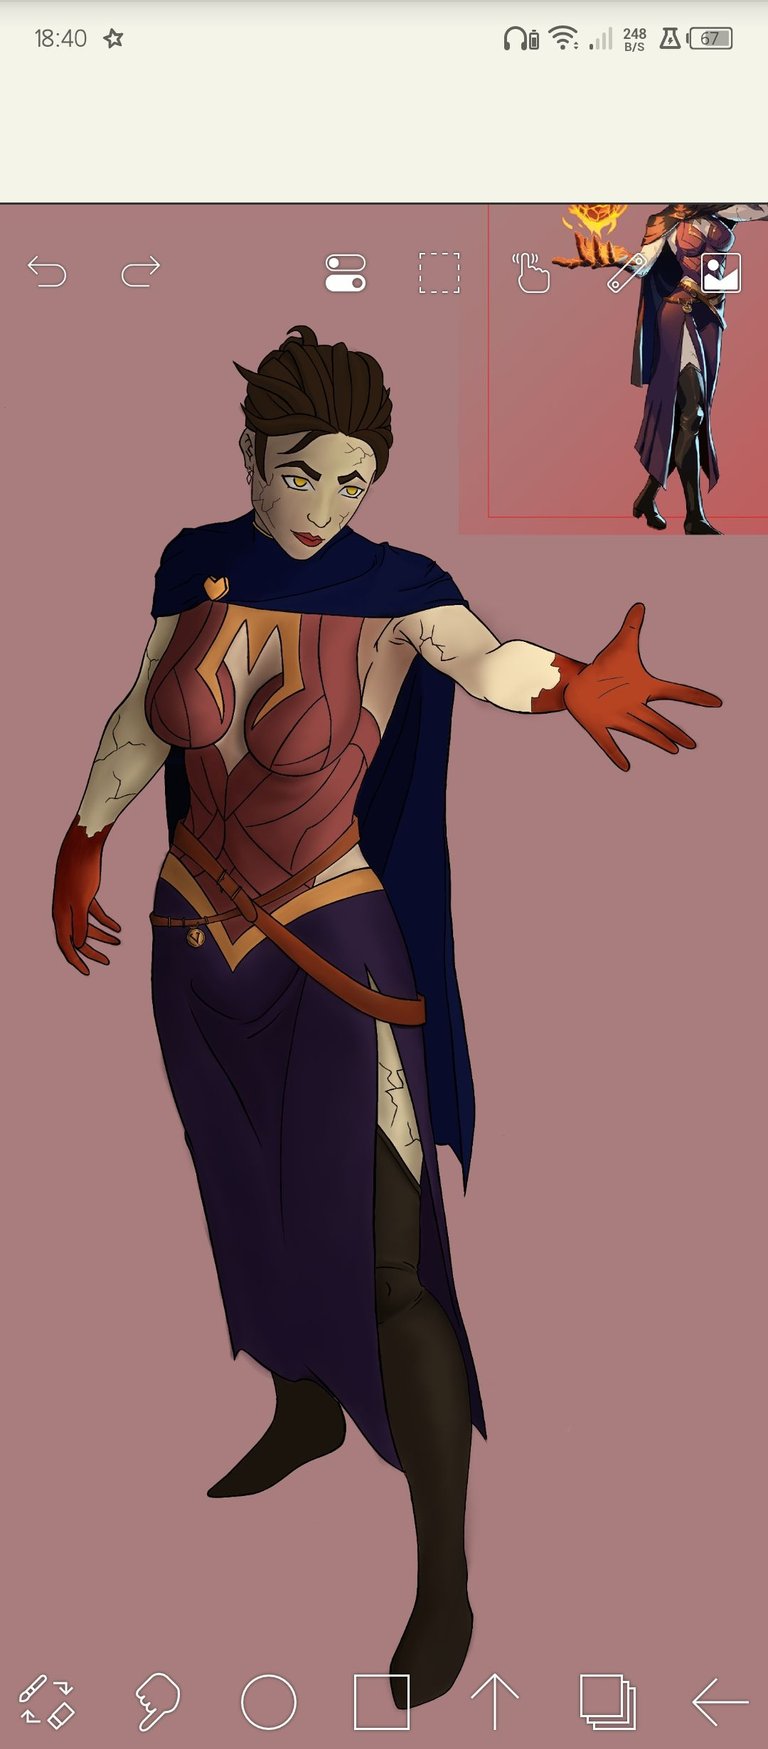
In his hand I drew a big part of the palm with a light intense orange color followed with some cracks that these would be where the fire would come out of his hands and also would make his hands shine a little bit and the cracks that go through here, for this I went down to the color source layer and drew with orange, then I went up to the shadows layer with the multiply mode, and I started shading with the reddish tones.
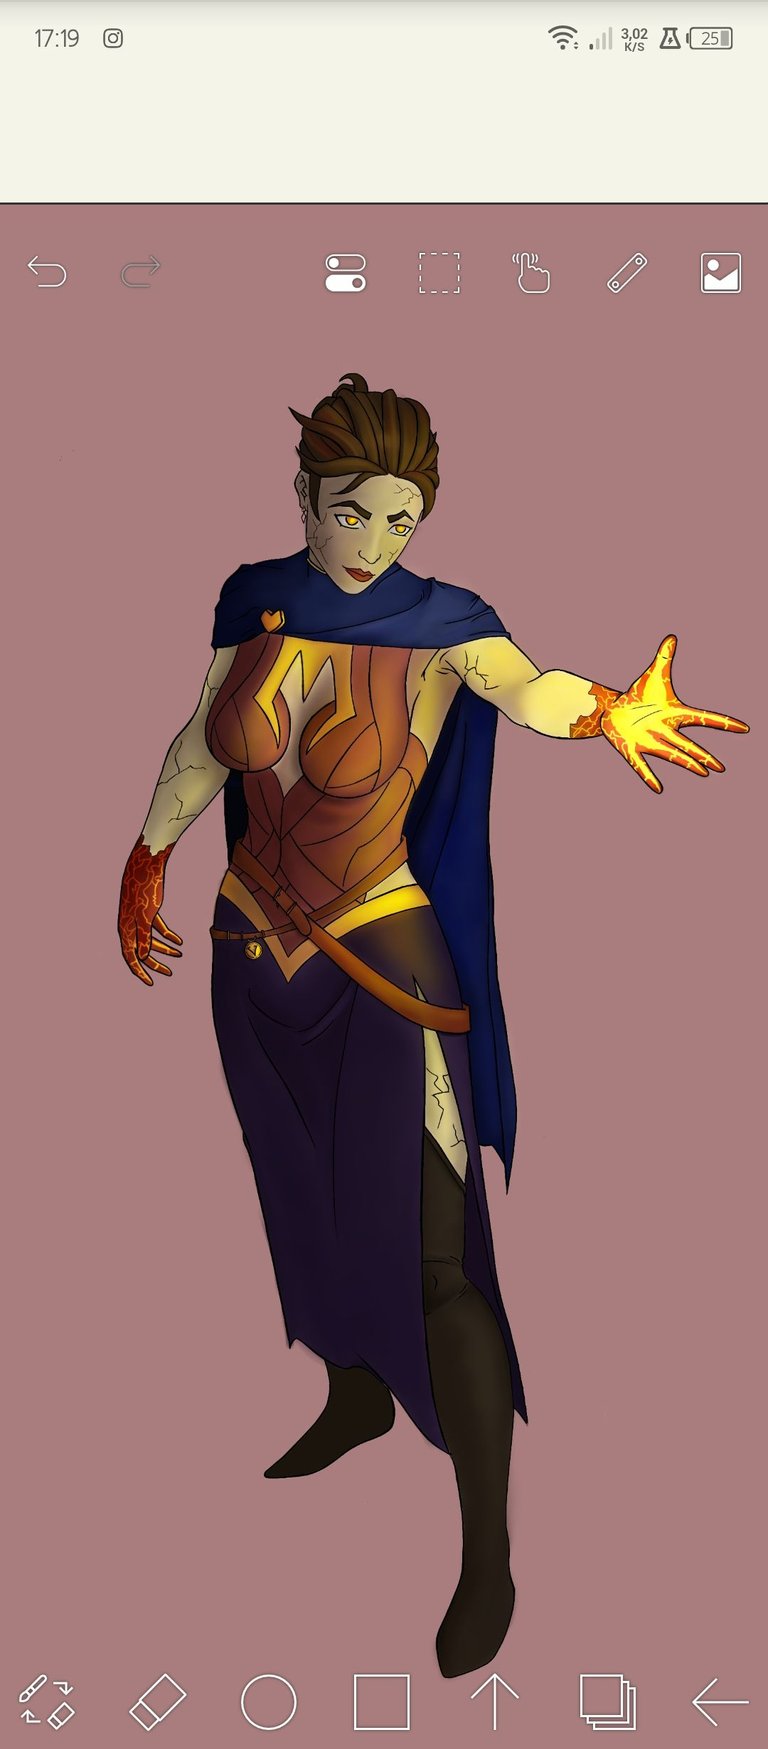
Now we continue with the lighting, for this I open a new layer in the soft light layer and I used mostly yellow colors, many shades that would help me to highlight the lighting of the fire, for this I used mostly the angle where the fire would come from and I took that as a reference to create the light and generate more contrast and volume in certain areas, for that I used an airbrush with low opacity and then as with the shadows I used the blur tool to soften the shadows and lights, then I added several layers and I was retouching the lights to make this look more intense and have more contrast.
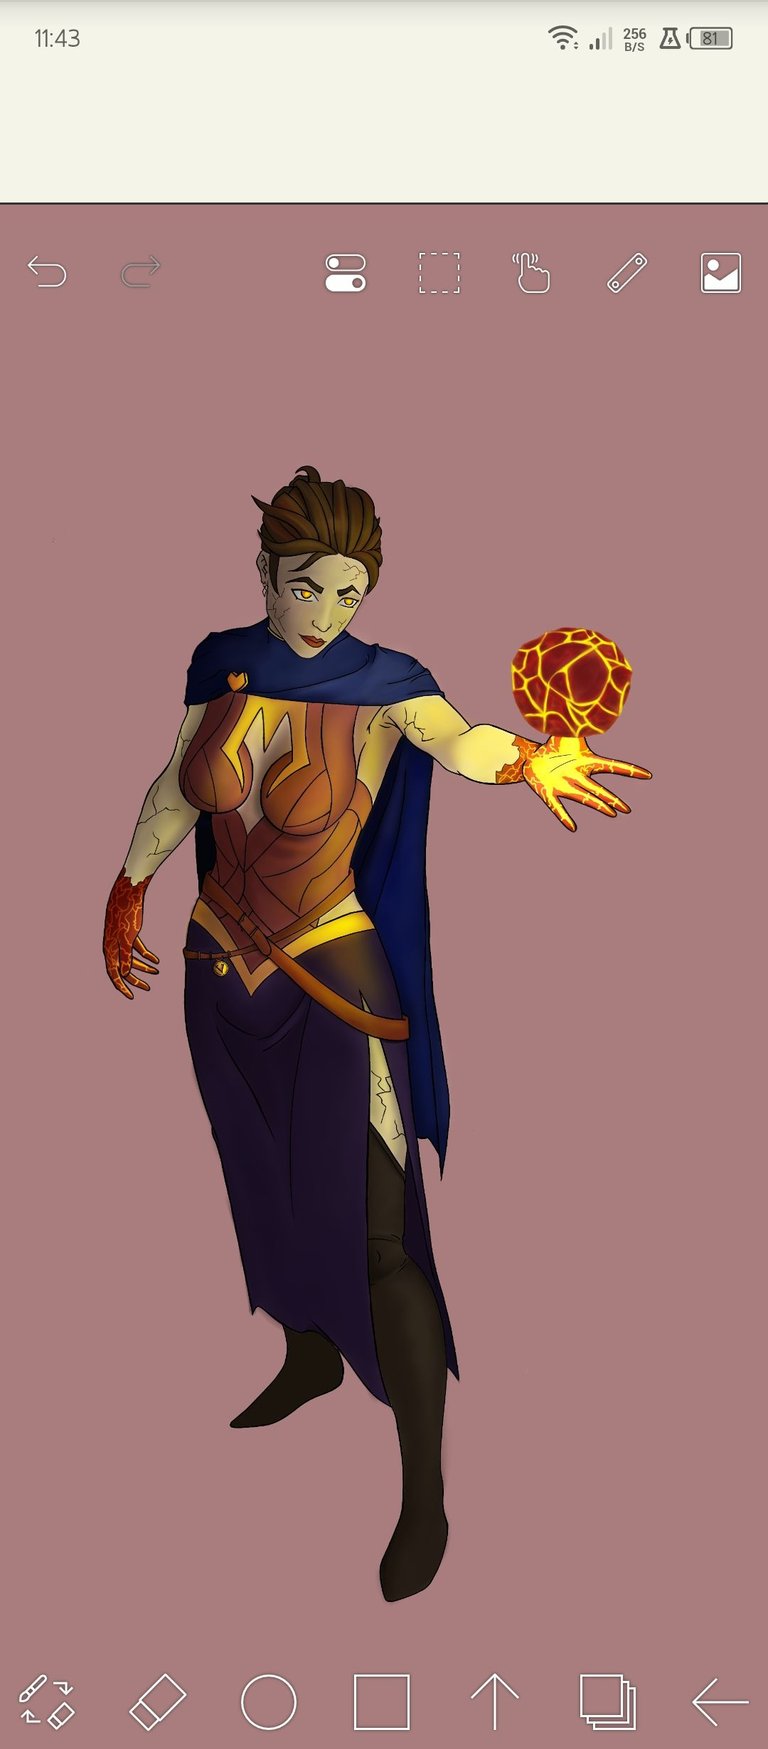
Now I have to make the fireball. For that I start making a sketch of a circle and then this circumference I was detailing it with several lines that would be the cracks of this fireball which would have volcanic rock around for that I used the red color and then I was shading with brown or brick red colors, and also after that I created another layer for the lines, the cracks of concentrated fire lava also, and I went to the lighting layer and highlight these lines.
Then with the yellow color I grabbed a soft tip marker pencil brush and with low opacity I was making random lines that will create this effect of fire flame that is moving and growing, I was creating like this and then I was layering with an increasingly intense yellow color that will only touch the central areas of the flames then I outlined with a very saturated shade of orange and so I kept going until I created the shape of this flare.
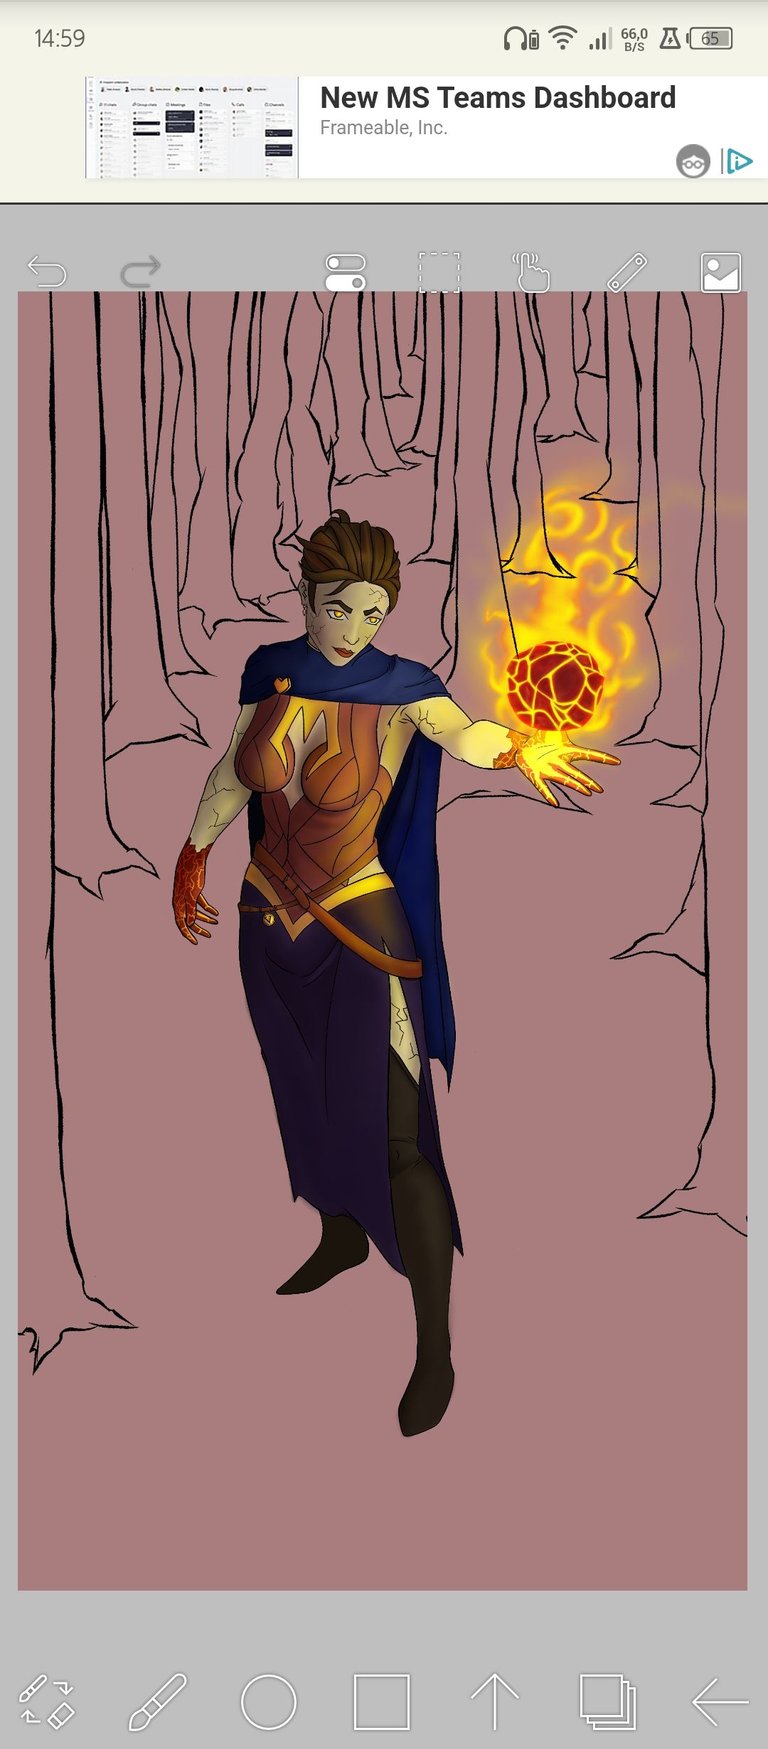
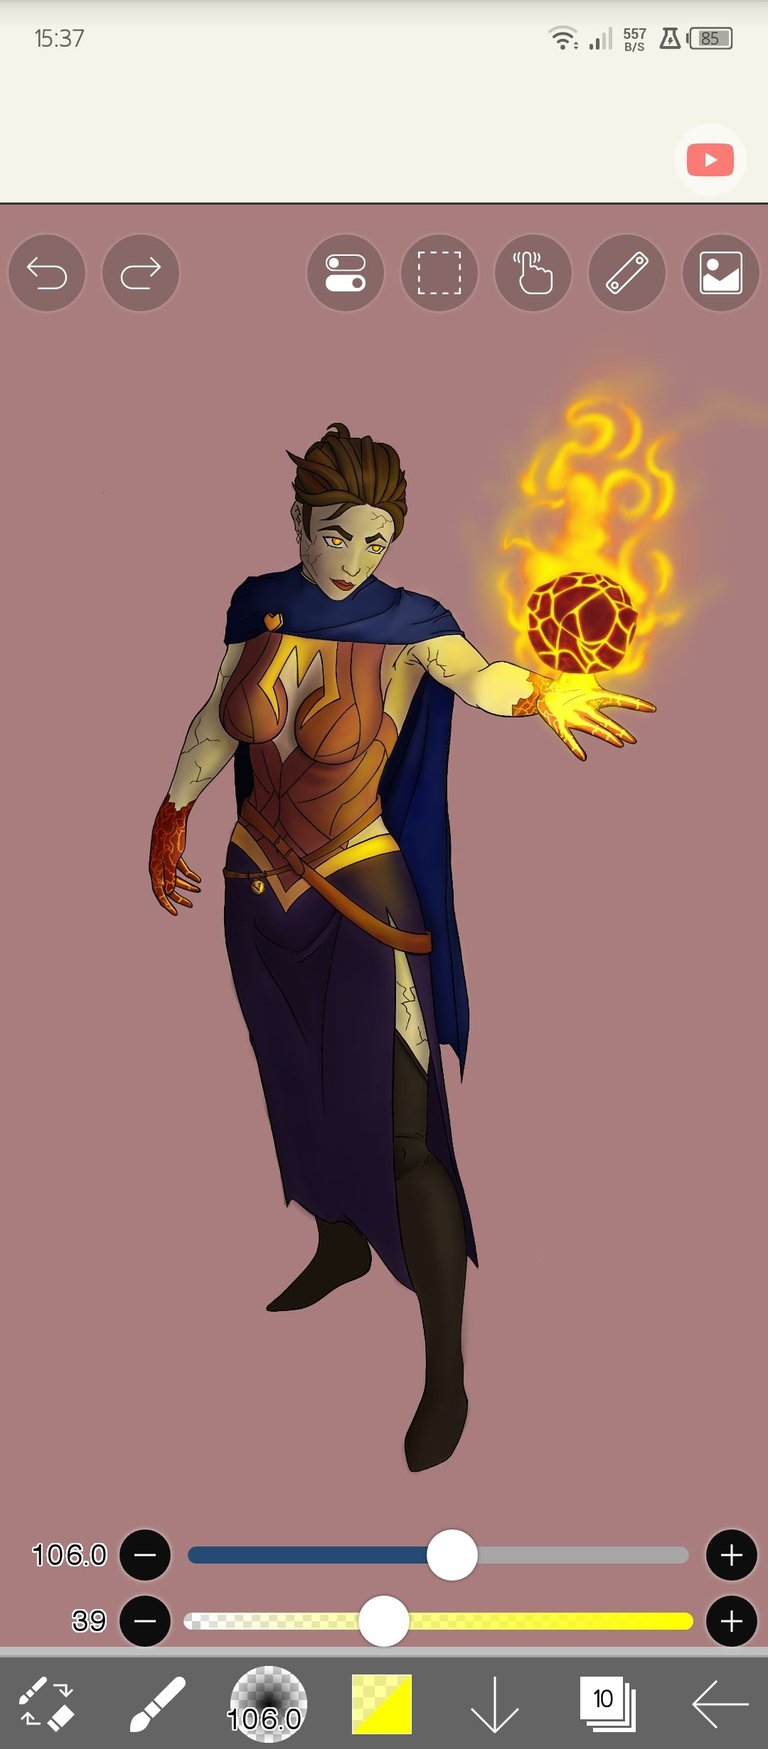
Now I only needed to make a background, for this I drew a couple of trees around the silhouette of the character, so that this would create a composition where the figure of the character and the fire would stand out, I used several tall trees, a little twisted, which I would then draw with a shade of red with a lot of brown as if it were a reddish brown rather, and then I would draw some yellow lines as if these were also constituted with some load of fire or lava, and to finish, the floor would be a floor with a brush texture of grass that would be the first layer with a very low capacity and then I would use another brush of a thicker grass and I would draw on this on the areas that had more strength of darkness by the light and the contrast of the fire and with a very light gray color create a soft haze around the environment.
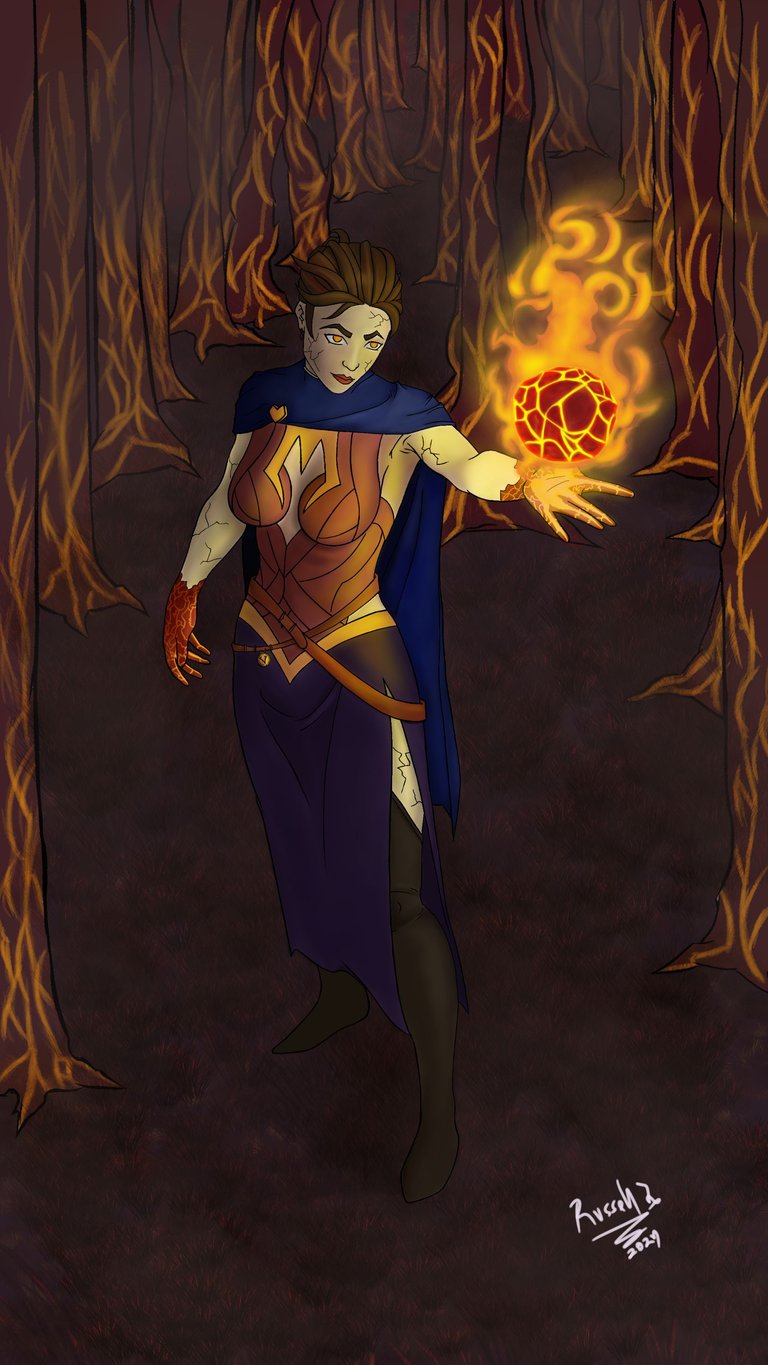
This is my first digital drawing as I said, and it really presented a very cool challenge that I personally liked and that I will feel very excited to repeat for a long time more, this drawing took a week to be done and I would like to know what you thought about it.
Thanks for reading, see you next time!
Versión en español
Hola amigos, bienvenidos a un nuevo post! Espero que estén bastante bien, y tengan un lindo día.
El día de hoy comparto con ustedes mi nueva entrada para el concurso de dibujo de la comunidad de Splinterlands. La semana pasada no pude participar porque había enfermado y mi mente no podía escribir por el cansancio, justo ese día había ido a la playa y me había trasnochado, pero lo bueno es que estoy bien y estoy acá.
Este dibujo en general es importante para mí, ya que es mi primer dibujo en digital, y el proceso de hacer esto fue muy increíble, el proceso puedo decir que lo disfruté realmente, y pensé que sería mucho más difícil, pero al ya tener experiencia en el dibujo el control de las líneas y el uso de los colores termina siendo lo mismo, mi ojo me ayudó mucho, pero de cualquier forma esto es algo muy distinto a lo que estoy acostumbrado a hacer, la sensación no es la misma y sinceramente me quedo con lo tradicional, pero ey, los efectos y herramientas que tenemos en digital son asombrosas, probablemente en un futuro opte por comprarme una de esas tabletas gráficas, por mientras seguiré usando mi dedo, JAJSJAJ, pero bueno, ya, ahora toca hablarles del personaje que elegí y como lo hice, sientense a gusto.
Para esta semana decidí dibujar al personaje de Countess Sinash, personaje de tipo fuego. Usé una pose de costado manteniendo la carga de fuego, próximamente dibujare más personajes de tipo agua o muerte, siento que a los de fuego ya los estoy quemando, JAJJAJAJA. Para este dibujo usé el programa de dibujo Ibis Paint X en su versión para teléfono android.
Bueno, acá podrán ver un speedpaint de este dibujo donde se muestra el procedimiento muy rápido, pero a mí me gusta escribir así que a continuación dejaré también un par de imágenes en las que iré definiendo cada paso del proceso, disfrutenlo:).
Speedpaint
https://youtube.com/shorts/ChPUgG6GmtI?si=97g7P6SjMmm9LXTKl
Paso a Paso:
Primero empiezo haciendo un boceto de la pose de éste y después lo defino, como referencia use la aplicación Easy pose, es una aplicación para moldear personajes 3d, eso porque no me sentía cómodo haciendo el boceto, así que estuve un rato largo diseñando una pose que de cualquier forma no fuera tan complicada para que pudiera después poner sus sombras y luces sin tanto problema.
En otra capa empecé a poner los colores base de mi dibujo, empecé con la piel usando un color carne claro con un matiz frío rosado y sus manos las dibujé con el color rojo, el pelo lo pinté con el color marrón oscuro al igual que las cejas, los labios los dibujé con el color rojo y los ojos con el color amarillo mostaza. Para la capa usé un color azul marino muy oscuro y para su falda usé un color azul noche más opaco, para su vestimenta del tren superior usé un color rojo un poco opaco naranjoso, y para las tiras que tiene en medio del traje por pecho y en la cintura con la falda usé el color amarillo oscuro, para los cinturones sueltos que tiene puesto usé un color marrón claro, casi como un ocre, las botas también las dibujé con el color marrón pero muy oscuro.
Ahora empiezo a hacer las sombras de la piel, para esto uso colores como el color marrón pero con baja intensidad y opacidad también en la rueda de colores uso este color rosado con baja intensidad, dentro de la piel. Para el cabello usé el color marrón con la misma tonalidad que el color original, para esto usé el gotero, elegí esto y después lo que hago es bajarle la intensidad e ir variando con estos tonos para crear volumen y contrastes entre cada capa y mechón del cabello, después seguimos con la capa, para la capa solo usé un color azul oscuro y fui haciendo lo mismo usando baja opacidad y saturación e iba intercalando entre cada modo, así también para la vestimenta del torso, la camisa, solo que usando colores más rojizos y así va bajando con los colores de la falda y las botas.
En su mano dibujé una gran parte de la palma con un color naranja claro intenso seguido con algunas grietas que estas serían de donde saldría el fuego de sus manos y también harían brillar un poco sus manos y las grietas que pasan por acá, para esto bajé a la capa de origen del color y dibuje con naranja, después subí a la capa de las sombras con el modo multiplicar, y empecé a sombrear con los tonos rojizos.
Ahora seguimos con la iluminación, para esto abro una nueva capa en la capa de luz suave y usó más que nada colores amarillos, muchas tonalidades que me ayudarían a resaltar la iluminación del fuego, para esto usé más que nada el ángulo de donde vendría el fuego y tome eso como referencia para crear la luz y generar más contraste y volumen en ciertas zonas, para eso usé un pincel aerógrafo con baja opacidad y después al igual que con las sombras usé la herramienta de difuminar para suavizar las sombras y las luces, después fui agregando varias capas y fui retocando las luces para que esto se viera más intenso y tuviese más contraste.
Ahora tengo que hacer la bola de fuego. Para eso empiezo haciendo un boceto de un círculo y después esta circunferencia la fui detallando con varias líneas que serían las grietas de esta bola de fuego qué tendría roca volcánica alrededor para eso utilicé el color rojo y después fui sombreando con colores marrones o rojo ladrillos, y también después de eso le cree otra capa para las líneas, las grietas de lava de fuego concentrado también, y fui a la capa de iluminación y resalte estas líneas.
Después con el color amarillo agarré un pincel lápiz rotulador de punta suave y con baja opacidad fui haciendo líneas al azar que crearán este efecto de llama de fuego que se está moviendo y que está creciendo, fui creando así y después fui dando capas con un color amarillo cada vez más intenso que solamente tocará las áreas centrales de las llamas después contorneé con un tono de naranja muy saturado y así seguí hasta crear la forma de esta llamarada.
Ahora solo necesitaba hacerle un fondo, para esto dibujé un par de árboles alrededor de la silueta del personaje, para que esto creara una composición donde se resaltará la figura del personaje y el fuego, usé varios árboles altos, un poco torcidos, que después dibujaría con un tono de rojo con mucho marrón como si fuera un marrón rojizo más bien, y después le dibujaría algunas líneas amarillas como si estos también se constituyeran con alguna carga de fuego o lava, y para terminar, el piso sería un piso con una textura de pincel de grama que sería la primera capa con una muy baja capacidad y después usaría otro pincel de una grama más gruesa y dibujaría sobre esto sobre las zonas que tuvieran más fuerza de oscuridad por la luz y el contraste del fuego y con un color gris muy claro cree una suave neblina alrededor del ambiente.
Y así quedaría terminado mi dibujo este es mi primer dibujo en digital como ya dije, y realmente presentó un reto muy genial que a mí en lo personal me gustó y que me voy a sentir muy entusiasmado de repetir durante un buen tiempo más, este dibujo a la final tomo una semana en hacerse y me gustaría saber qué les pareció.
¡Gracias por leer, hasta la próxima!
Thanks!!!
Excelente ilustración, me gustó mucho los efectos de luces que resaltan en el diseño, saludos.
Muchas gracias, saludos!
https://reddit.com/r/blogs/comments/199p13h/excelente_ilustración_de_splinterlands/
The rewards earned on this comment will go directly to the people( @cetb2008 ) sharing the post on Reddit as long as they are registered with @poshtoken. Sign up at https://hiveposh.com.
¡Felicidades! Esta publicación obtuvo upvote y fue compartido por @la-colmena, un proyecto de Curación Manual para la comunidad hispana de Hive que cuenta con el respaldo de @curie.
Si te gusta el trabajo que hacemos, te invitamos a darle tu voto a este comentario y a votar como testigo por La Colmena.
Si quieres saber más sobre nuestro proyecto, te invitamos a acompañarnos en nuestro servidor de Discord.
Thanks!
Checkout our BDVoter Daily Hive Showcase & Participate into our Daily giveaway to win various prize.
Thanks for the support!!!
Congratulations @russellab17! You have completed the following achievement on the Hive blockchain And have been rewarded with New badge(s)
Your next target is to reach 800 replies.
You can view your badges on your board and compare yourself to others in the Ranking
If you no longer want to receive notifications, reply to this comment with the word
STOPThanks!
All good @russellab17! You're a real Hive pro! Onward to that new goal!
The process is great I can say that you really enjoy it keep it up!
!PGM !PIZZA
BUY AND STAKE THE PGM TO SEND A LOT OF TOKENS!
The tokens that the command sends are: 0.1 PGM-0.1 LVL-0.1 THGAMING-0.05 DEC-15 SBT-1 STARBITS-[0.00000001 BTC (SWAP.BTC) only if you have 2500 PGM in stake or more ]
5000 PGM IN STAKE = 2x rewards!
Discord
Support the curation account @ pgm-curator with a delegation 10 HP - 50 HP - 100 HP - 500 HP - 1000 HP
Get potential votes from @ pgm-curator by paying in PGM, here is a guide
I'm a bot, if you want a hand ask @ zottone444
Yes, I really like this! Thank you very much for that, greetings!
$PIZZA slices delivered:
@japex1226(3/5) tipped @russellab17