Doesn't Even Need to Go Close Range to Defeat the Opponent
Introduction
Hello there! @Saydie here, playing Splinterlands everyday!
I'm here for this week's Battle Mage Secrets with the featured ruleset Close Range. This is a ruleset that makes range monsters to be able to attack on the fist Position.
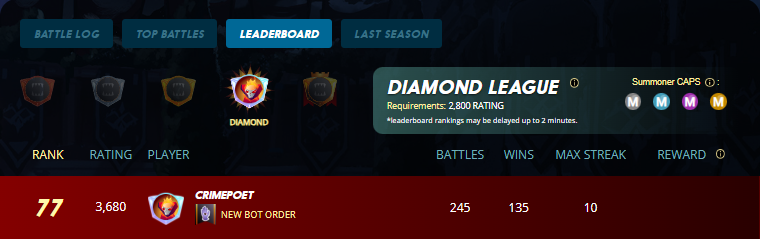
The Battle that I will show to you this week was from @crimepoet which is my alternate account playing with NFTY arcade deck delegation and was currently playing at the Diamond league but before I reveal the battle, let us learn more about this ruleset.

Close Range
 Close Range |  Range attacks may be used in the first position in battles. Range attacks may be used in the first position in battles. |
Choose summoners that give a bonus to Ranged attack or to speed and then choose high damage Ranged attack monsters.
Beware of the possibility that your opponent might pick Lir Deepswimmer and Ilthain as summoner or monsters with Return Fire.
Revealing Battle Conditions and Team Lineup

Ruleset
| Description | |
|---|---|
 Diamond League Modern Format | 48 Mana Cap Available Elements:  Fire, Fire,  Water, Water,  Earth, Earth, Death Death |
Close Range | Range attacks may be used in the first position in battles. |
 Target Practice | All Range and Magic attack Monsters have the Magic attack Monsters have the  Snipe ability. Snipe ability. |
 Tis But Scratches | All monsters have the  Cripple ability. Cripple ability. |
Opponent's Line- up
 |  |  |  |  |  |  |
My Team
 |  |  |  |  |  |  |
For this battle, there's 48 mana cap that we can use where the active rulesets were Target Practice, Tis But Scratches and Close Range which is this weeks featured ruleset. With this in consideration, my lineup was consist of:
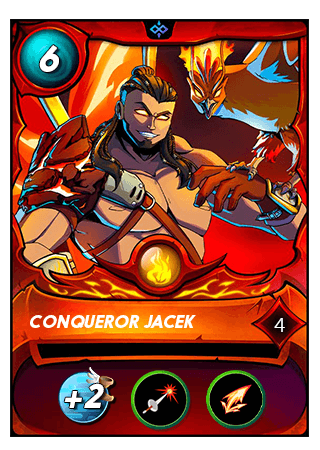
Summoner: Conqueror Jacek - Gives +2 speed on all ally monsters along with the Pierce and Scattershot ability.
1st Position: Arkemis the Bear - As the Primary tank, this monster has the Protect ability which gives +2 armor on all allied monsters and reduce damage from monsters with 5 or more damage to only 1 with Forcefield. It also has Enrage and when attacking, it will reduce the damage of the target to half with Halving.
2nd Position: Firecaller - Has Martyr which will increase the stats of the monsters adjacent to it when defeated together with Fury which deals double damage on monsters with Taunt and Snare which removes the Flying ability of the target.
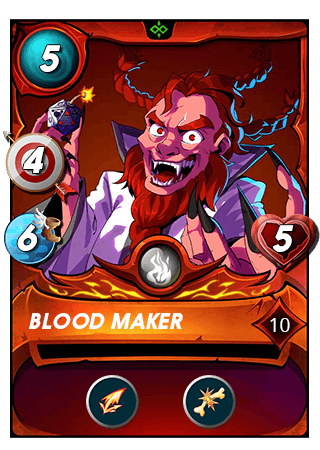
3rd Position: Blood Maker - Reduce the health of the target with Cripple and also possesses the Scattershot ability.
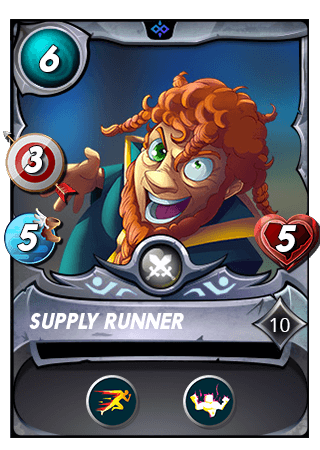
4th Position: Supply Runner Increases the speed and health of all ally monsters as long as its alive with Swiftness and Strengthen.
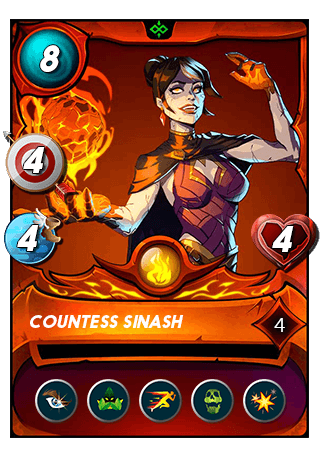
- 5th Position: Countess Sinash - Also has Swiftness together with Opportunity which allows to target the monster with the smallest health, dealing Blast on adjacent monsters and preventing them from healing with Affliction while being untargetable from direct damage due to Camouflage.
- 6th Position: Iidri Fyre - Forces monsters to target this card with Taunt and when this dies, it will inflict 1 damage on all opponent monsters with Redemption.
Revealing the Battle

Round 1:

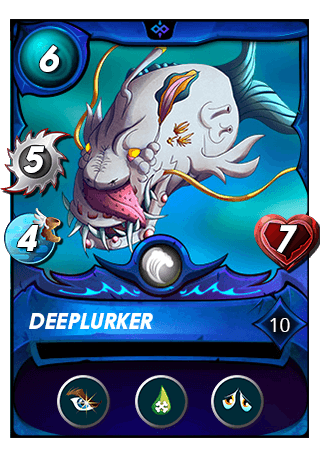
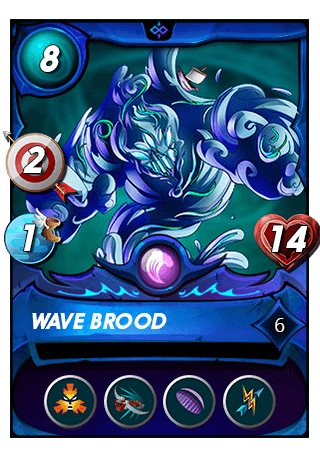
15-17/47 Bloodmaker deals 3 damage on Wave Brood and reduce its health with Cripple but it has Return Fire that deals 2 armor damage.
18-19/47 Supply Runner deals 2 damage on Deeplurker.
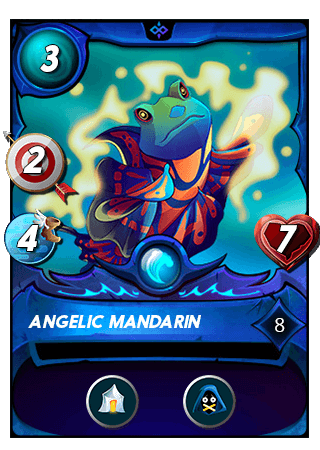
20-23/47 Countess Sinash deals 4 damage on Wave Brood and 1 damage to Angelic Mandarin with Blast but Return Fire damage made it to lose armor.
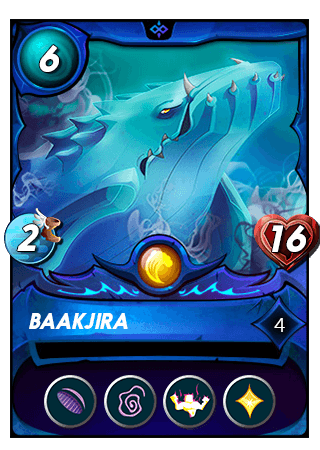
24-25/47 Firecaller deals 3 damage to Baakjira.
26-28/47 Arkemis the Bear deals 3 damage on Baakjira and half its attack with Halving.
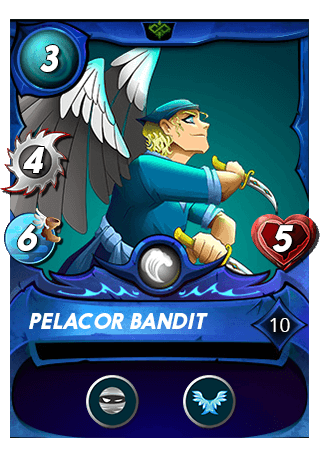
29-30/47 Pelacor Bandit deals 4 armor damage on Iidri Fyre.
31-33/47 Angelic Mandarin deals 2 armor damage on Iidri Fyre whic then receives 1 damage due to Return Fire.
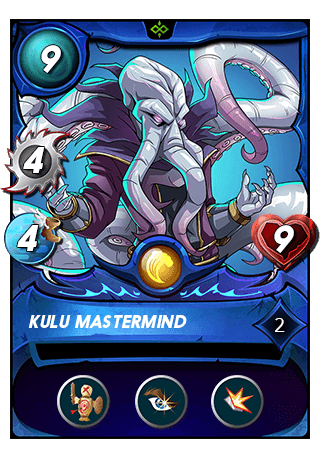
34-44/47 Kulu Mastermind and Deeplurker defeats Iidri Fyre which triggers its Redemption, dealing 1 damage on all the opponent monsters.
45-47/47 Baakjira restores its health using Heal.
Round 2:

1-2/26 Bloodmaker removes the armor of Kulu Mastermind.
3-4/26 Supply Runner deals 3 damage on Deeplurker.
5-10/26 Countess Sinash defeats Deeplurker and deals Blast damage on Kulu Mastermind and Pelacor Bandit.
11-12/26 Firecaller deals 2 damage on Kulu Mastermind.
13-15/26 Arkemis the Bear deals 4 damage on Baakjira.
16-22/14 Angelic Mandarin and Kulu Mastermind defeats Firecaller, activating Martyr to increase the stats of Arkemis the Bear and Bloodmaker.
24-26/26 Baakjira restores its health using Heal.
Round 3:

1-2/23 Bloodmaker deals 3 damage on Kulu Mastermind.
3-5/23 Supply Runner deals 3 damage on Wave Brood but Return Fire remove its armor.
6-7/23 Arkemis the Bear deals 5 damage on Baakjira.
8-12/23 Countess Sinash defeats Wave Brood and deal 2 damage on Angelic Mandarin.
13-21/23 Pelacor Bandit and Kulu Mastermind defeats Supply Runner.
22-23/23 Baakjira restores its health using Heal.
Round 4:

1-3/15 Bloodmaker defeats Pelacor Bandit.
4-5/15 Arkemis the Bear deals 5 damage on Baakjira.
6-9/15 Countess Sinash deals 2 damage on Kulu Mastermind and deals Blast damage to Baakjira and Angelic Mandarin.
10-13/15 Angelic Mandarin and Kulu Mastemind deals 4 damage to Bloodmaker.
14-15/15 Baakjira restores its health using Heal.
Round 5 and 6:

1-4/11 Bloodmaker defeats Angelic Mandarin.
5-6/11 Arkemis the Bear deals 5 damage on Baakjira.
7-15/15 Countess Sinash deals 4 damage on Baakjira and removes it heal with Affliction while its Blast damage defeats Kulu Mastermind.

With round 5, since Baakjira was the only monster left to the opponent team and only has 1 health remaining, it only takes 1 attack from Bloodmaker to finally end the battle with my victory.
Battle Recap
Here is a replay of the battle which at you can watch at Splinterlands.
Did your Strategy Work?
The high damage output from my range monsters together with the Pierce ability from my summoner allows my attacks to deal significant damage to my opponents without even my range monsters placing in the first position and maximize the use of Close Range ruleset but it was not really necessary at this match since I was still able to win my battle.
That was it for this post. Thank you and see you at the next one.
Previous Battles
 |  |  |
All the image that I edited here belongs to Splinterlands.
Card abilities and rulesets from Splintercards
All the battle links provided comes from my personal accounts and from the scholar account that I am using from Balthazar Guild.
Thank you for reading my post. If you're interested to play Splinterlands, you can join by clicking the images below and follow me on Twitter and 3Speak for timely Splinterlands updates.
 |  |  |

strong team saydie. jacek is def good in this ruleset
Countess Sinash carry me with those blast.
blast too strong lol just finished brawls i did bad but oops
Greetings,
What a long day!
I pray that you had a successful day
It was interesting to learn this combination of cards on Pretoria battlefield.
The season ends in a few hours, have you reached your guild of choice?
I am targeting the Diamond League, but it will remain a complex mission.
@sagarkothari88 vote 15%
Regards
| Hive Curators Community | Support Witness | Follow Curation Trail |
Keep Up the good work on Hive ♦️
Good day to you too. Hope that you were able to learn something from this battle.
I was hoping to reach modern diamond leaderboard but the struggle was real so will try again tomorrow.
Good luck with your EOS chest. Would be great if you get 5 digit SPS.
Checkout our BDVoter Daily Hive Showcase & Participate into our Daily giveaway to win various prize.
Thanks for sharing! - @alokkumar121
