Prevailing Against The Most Toxic Ruleset Combination
Introduction
Hi! @saydie here playing Splinterlands everyday!
Splinterlands is an auto- battler card game where the strategy for each battle changes depending on 3 factors. The first one is the Element Availability which limits the use of cards depending on the elements that are available for each battle followed by the Mana- cap which limits the use of cards depending on their mana cost and finally, we have the Rulesets that serves as the game modifier between each game. Sometimes, it gives monsters abilities and there are times that it tells us to play with negatives status condition. By looking on this factors, we decided what we think is the best line-up to use for each battle. On this post, I will share to you an epic battle with what I think was the most toxic ruleset combination in the game and how I was able to prevail on it so without further ado, let us proceed with the battle.

Onto the Battle and Ruleset

| Mana- cap and Available Elements | |
|---|---|
 Diamond League Modern Format | 31 Mana Cap Available Elements:  Fire, Fire,  Water, Water,  Life, Life,  Death Death |
This battle was between @agonyaccepted which is my alternate account playing in Diamond league using NFTY Arcade deck delegation against @ ipray2win with only 31 mana- cap and 4 elements being Fire, Water, Life and Death. At this point, every thing was still fine but after this comes 3 ruleset that are meant to damage you no matter what type of attack you have which were:
| Description | |
|---|---|
 Counterspell | All monsters have the  Magic Reflect ability. Magic Reflect ability.It was an ability that the Owster Rotwell can give on monsters. |
 Briar Patch | All monsters have the  Thorns ability. Thorns ability.Mylor Crowling from the Dice set give Thorns ability on all ally monsters. |
 Fire & Regret | All monsters have the  Return Fire ability. Return Fire ability.WHen it comes to Return Fire, summoners Ilthian and Lil Deepswimmmer has this ability given to ally monsters. |
In order to win the battle, you need to damage the opponent's monsters until they were defeated but with the following ruleset designed to damage your monsters each time you attack, it makes attacking very difficult cause you need to consider the damage you can take when choosing your line-up. With this in consideration, I choose the following cards.
 | Since adding more damage can be fatal for us because they might just be reflected, the summoner that I used for this battle was Kelya Frendul since it gives additional armor to all ally monsters which can allow to protect them from melee and range damage. |
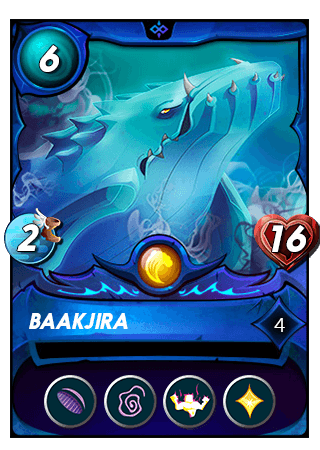 | Since attacking monsters can have a backlash, I decided to use Baakjira for my main tank since it has a huge amount of health that was further increased by its Strengthen and sustained by Heal. It also have Void which would reduce damage from magic monsters. |
 | As one of the few cards with Reflection Shield, this car was immune to any kind of reflected damage and the only exception on my team and at the same time, this was a melee monster that can attack at the 2nd position with Reach. |
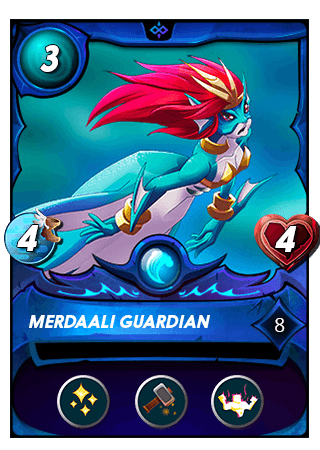 | On 3rd position was another non damage monster, Merdaali Guardian which its main purpose is to provide support to my tank with additional Heal and Repair to restore an ally armor. It also has Streghten to further increase the health of my team. |
 | Will further reduce any magic attacks with Silence but at the same time, it also have Triage which helps to restore the health of a backline monster, including itself. |
 | The combination of Life Leech and Cripple works in favor for Merdhampir cause it gains health for every time it reduces the health of a opponent which sustain it through the battle. |
 | Just Like Merdaali Guardian, Swamp Spitter also also have Repair that will further solidify our defense. |
To The Battle

Round 1:

At the start of the round 1, the monsters on my team has begins a barrage of attacks that damages Pelacor Conjurer with only 1 health remaining but each attack has caused for Angelic Mandarin, Merdaali Guardian and Swamp Spitter to lose their armors but this is where the Repair from Merdaali Guardian and Swamp Spitter restores the armor my monsters, making Merdhampir the only one without armor.
After this, comes the opponent with their attack targeting Baakjira using Djinn Renova and Doctor Blight which removes its armor and afflicted by Poison but aside from that, it was able to recover its health using Heal.
Round 2:

During this round, my team was able to defeat
Pelacor Conjurerbut since Merdhampir was exposed, it recieved 3 damage from Return Fire but since it has Life Leech, it was still able to gain +1 health when it attack the opponent.At the opponent side, they tried to restore the armor of Chaos Knight which serves as their current tank while attacking at front using Djinn Renova and Doctor Blight that though does not able to inflict damage, they were successful on preventing Baakjira from using Heal due to Affliction and they were also able to remove the armor from Swamp Spitter trough Stitch Leech which attak using Sneak.
Round 3:

This was not a financial advice though and always do your own research before making important decisions. That was all for me. Thank you for reading my post and see you at the next one!
My team attacks Chaos Knight and was able to drop its health to 3 while Merdhampir remains armor less but was able to survive trough its Life Leech and the Triage from Angelic Mandarin. Baakjira on the otherhand has now becomes exposed and begins to lose health due to poison.
Furthermore, Baakjira continues to receive damage from Djinn Renova, Chaos Knight and Doctor Bligh even though they also suffer from the effects of the rulesets, dealing damage to them when they attack. It has caused Stich Leech to drop its health to 3 and Djinn Renova to 6 and Doctor Blight to 4.
Round 4:

On round 4, we finaly defeated
Chaos Knightbut at the same time, it was not only Merdhampir that was exposed and damage, Angelic Mandarin also begins to lose some health.The Opponent team also continues to lose health but they were steadily cutting away the health of Baakjira. However, seems like Stitch Leech have not make any progress from attacking Swamp Spitter despite only having 1 health remaining.
Round 5:

On round 5, my team has managed to defeat
Scavo Hirelingand reduce the health of Djinn Renova to 1.Djinn Renova Restores the Health of Stitch Leech which allowed it to survive while inflicting 2 damage to Baakjira which resulted for its health to drop to 1.
Round 6:

The batte ended on round 6 when Djinn Renova, Stitch Leech and Doctor Blight was defeated one after another but it was also during this time when Baakjira finaly drops. That said, it was able to fulfill its role as a tank until the end of the battle.
And with this comes the end of the battle which is quite tense because the opponent also try to reduce reduce the damage it recieves and even going further to increase the damage I can receive from reflected damage using Amplify but at the end I was still able to win. If you want to watch the replay of this battle you can watch it by clicking this link.
That was it for this post. Thank you and see you at the next one.
Previous Post
 |  |  |
All the image that I edited here belongs to Splinterlands.
Card abilities and rulesets from Splintercards.
All the battle links provided comes from my personal accounts and from the scholar account that I am using from Balthazar Guild.
Thank you for reading my post. If you're interested to play Splinterlands, you can join by clicking the images below and follow me on Twitter and 3Speak for timely Splinterlands updates.
 |  |  |

I'm not sure I ever encountered all these rules in a combined game. It was a very interesting battle :-)
I have picked this post on behalf of the @OurPick project! Check out our Reading Suggestions posts! Please consider voting for our Liotes HIVE Witness. Thank you!
Wow! Thank you! I was also not sure if I have ever encounter these 3 rulesets combined in one battle that's why I made a post about it.
Done with the witness vote. Thanks for the support.
Thanks a lot :-)
Checkout our BDVoter Daily Hive Showcase & Participate into our Daily giveaway to win various prize.
Thanks for sharing! - @alokkumar121
