First and Last Cards: The Foundation of Splinterlands Strategy
Splinterlands’ unique game play is unlike almost every other collectible trading card game out there. In the fast-paced Splinterlands Arena, the player’s part is not to control the actions of each card in battle, but simply to create the team.
Splinterlands is not just a collectible card game in which the players truly own their cards, but a team-building and drafting game not entirely unlike fantasy football. Instead of well-known NFL players, Splinterlands has monsters and summoners. You might even say that we’re putting the fantasy back in fantasy sports.
( )
)
When it comes to building an effective team in just minutes from a huge collection of cards with a set of rules and restrictions you were given at that exact moment, how you spend your time matters.
Once you have selected your Summoner (which for many players is determined by the current Daily Quest), the first and perhaps most important decision you’ll be making is which card to place in front.
The meat of the Splinterlands team sandwich is usually quicker and easier to select than the tank, and it is the middle of the team on which patterns and consistencies can sometimes be relied.
The last important decision you will make going into each battle is the card that brings up the rear. If mistakes are made with either the first or last cards on the team, the battle will almost certainly be lost.
Which Tank?
Although the term is difficult to nail down, it is fairly easy to spot a “tank” by its stats. If you are ever in doubt of whether or not a card is a tank, try it in the first position a few times and you’ll know very quickly.
A tank is a card that (for any reason) does well in the first row. It is a card that can either do so much damage so quickly that it brings most of the opponent’s team down alone, or one that can take enough hits that your back-row attackers can do their dirty work. Such is the difference between an offensive tank and a defensive tank. Some tanks are neither offensive nor defensive, but just sit there as a sort of distraction. Other tanks are low-mana, designed to simply take a few hits so that you can get your real attackers into position.
For almost every card, there is a situation in which it would work as a tank. Because of the widely varying Rulesets, Range attackers even sometimes have a place in the front.
These are a few of my favorite tanks, with a small strategic explanation accompanying each.
Goblin Mech
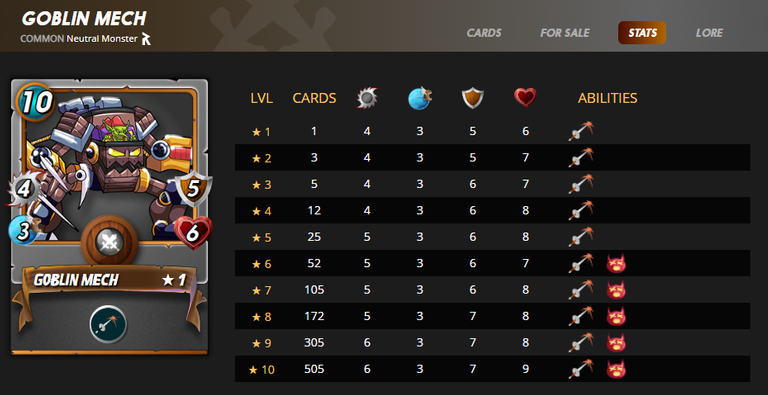
You can count on the Gobsons to make ’em reliable and dangerous. Goblin Mechs may not be comfortable for the pilots that drive them, but they can do some serious damage in the front of a good team. Notice that even at level 1, this Goblin-powered monstrosity has a Melee attack of 4. Play it with Daria Dragonscale and get a buff of Attack +1 right off the bat.
Have you noticed that some of the best tanks are Common Reward cards? Even though it’s not being given as a Reward card anymore, the Goblin Mech is pretty much essential to any collection. Luckily, because it’s a Common and there are so many in circulation, new players are usually able to pick one up for just a few pennies worth of Dark Energy Crystals, which they can earn from a couple days of wins.
Another thing I love about the Goblin Mech is that it continues to be an unstoppable beast even as you advance in level and competition. I usually play in the Champion League, and I have never felt the need to level my Goblin Mech beyond 7. Still, I use it a lot, and I would venture to say that it’s one of the most winning cards for Splinterlands newbies.
Sea Monster
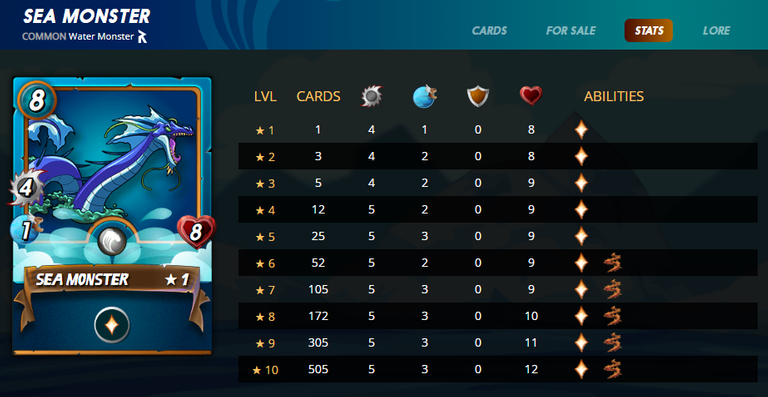
Another one of my absolute favorite Common Tanks is the Sea Monster. Why are Sea Monsters so common, you may be wondering. In the Splinterlands, the oceans are even more treacherous than those of the Earth we know. Sea Monsters are plentiful to say the least.
Even though this tank has a 4 attack like the Goblin Mech, the thing that really stands out about the Sea Monster is the fact that it has Healing at level 1. Healing at the base level is a surprisingly rare ability, and as you may expect, extremely useful. With the Sea Monster and its high initial Health, this is even more true. It does not gain the coveted Thorns ability until level 6, and it starts of at slow speed. In low level play, it is a perfect tank for Reverse Speed play, but as you get into higher levels, the Sea Monster does not maintain its usefulness unless leveled up all the way.
I have added this as second to the list because it is another tank that I consider essential for new players who demand to win more than they lose. Without a Sea Monster in your deck, you may have a hard time through the Silver Leagues.
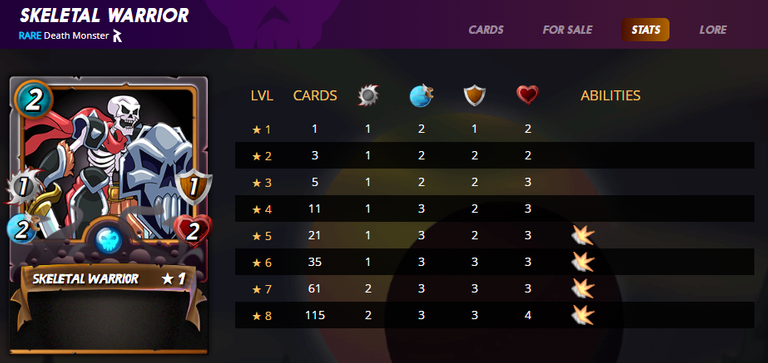
Skeletal Warrior
( )
)
This fellow is a new love for me, as I only recently started accepting Death Quests and leveling up my Death cards. What is my favorite thing about the Skeletal Warrior? His Mana cost. I have been finding him ideal for not only low-Mana battles, but many different Rulesets (especially Equalizer).
The Skeletal Warrior is another Reward Edition card, but a Rare one this time. This means that while they may cost more per BCX on the market, it only takes 115 BCX to reach max level, and it only takes a measly 21 BCX to get the Warrior his Shield. When it gains Shield, the Skeletal Warrior goes from good to great, especially in low-Mana battles. When you use a couple of debuffs in addition, most of the enemy’s attackers will amount to zero damage to the shielded Skeletal Warrior. Then all you need to do is throw some of those powerful Death Range and Magic attackers that we all know and love, like the Twisted Jester, Phantom Soldier, Vampire and the dreaded Octopider.
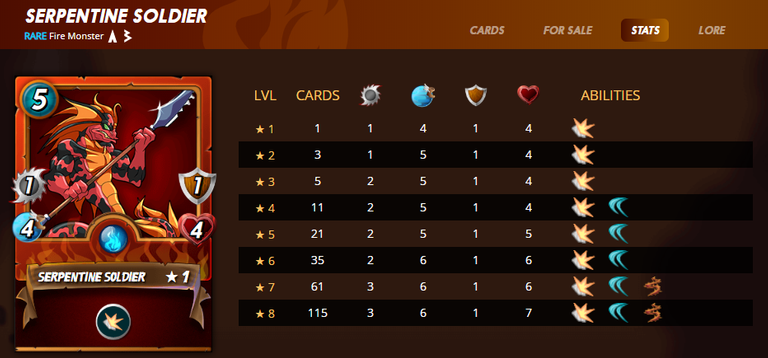
Serpentine Soldier
( )
)
The Serpentine Soldier is another Rare tank with Shield, but one that almost always does more damage than it takes. Notice that by level 6, the Serpentine Soldier has a speed of 6, as well as the Dodge ability. This makes it extremely difficult to hit by any Melee or Range attacks. Plus, at level 7, the Serpentine also gains the Thorns ability, which can make the difference of victory from defeat in the eleventh hour.
The Serpentine Soldier comes from the Alpha and Beta sets. It has been out of print for some time, so the scarcity has increased. Many players have also noticed the utility of this card as a tank, so lots of them have been combined to max.
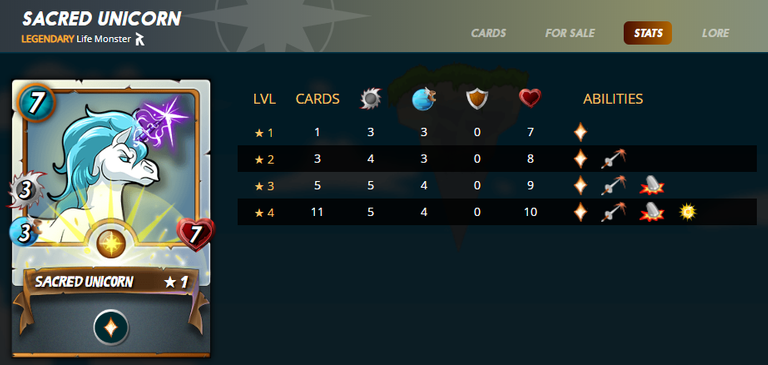
Sacred Unicorn
( )
)
Never assume that you can’t have a card just because it is Legendary. They may be the rarest type of card in the game, with only roughly 1 of 100 cards flipped turning out to be Legendary, but leveling them to max requires a relatively small number of cards. The Unicorn for example is a Reward card that takes only 11 BCX to level to max. In addition, most Legendary cards gain a new ability with each level. Some Legendaries have level 4 abilities that are not quite worth it, but the Unicorn’s definitely is if you plan to play at Champion levels.
The Unicorn may not be the easiest card in the Splinterlands canon to play expertly, but I find myself using it in a good portion of my Life Splinter battles, and winning more often than losing.
You may assume that my favorite thing about the Sacred Unicorn is the Healing ability, but I actually love it for the combination of Trample and Piercing, which can take out the enemy’s whole team in little more than the blink of an eye.
Stonesplitter Orc
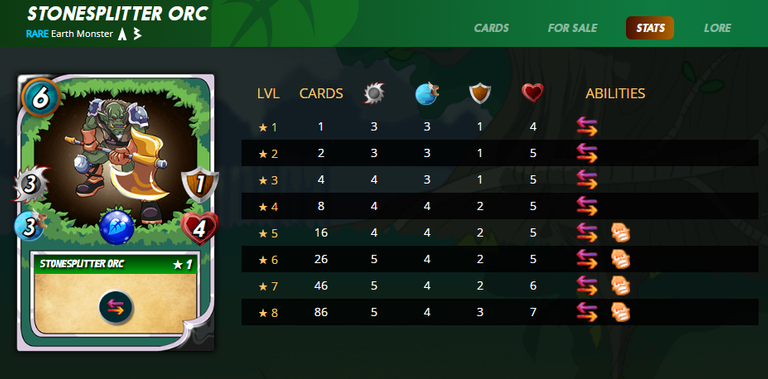
I just can’t help myself when it comes to Retaliate and Enrage. They are literally my 2 original favorite abilities, and even though I haven’t always battled with Earth, my original favorite tank was the Naga Warrior, who employs a similar tactic. People still tell me about how they remember getting clobbered by my Melee Water team in the early days of Splinterlands.
The Orc has Retaliate right from the get-go, and a Melee attack of 3. This is important because even if he is debuffed, he can still do some damage, especially thanks to the Retaliate.
Also, just look at the size of his axe and the severity of his underbite. He just doesn’t seem like someone you should mess with.
What About the Back?
While not quite as important as the tank, the back Monster is another sort of foundation for your Splinterlands team. A poor selection or an unprotected back line could prove detrimental to the battle’s outcome. There are several different approaches to the back monster of which I will share examples.

The Health Giant
Some cards do great in the back just because they have a lot of Health points. Sometimes being able to take enough hits to buy you a few turns is all it takes. For example, I sometimes like to use the Sea Monster in back for not only high Health, but because it has Healing. Many times, abilities that make a monster strong as a tank also make it strong in the back.
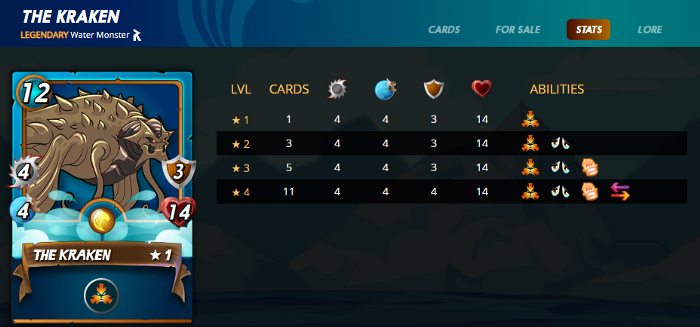
Some of these Giants, such as the Kraken and Magnor, have the Taunt ability, which requires enemy monsters to attack them exclusively until they are dead. I have found this ability to be extra effective when placed toward the back of the team. If you can level you Kraken to the point of gaining Retaliate, it becomes nearly unbeatable in the back.
Thorns in the Back
This is one of the simplest and most reliable rules that almost always pays off in Splinterlands. Nearly all of the Sneak attackers in the game are Melee attackers, which means that Thorns and Retaliate tend to be extra effective in the back. If possible, I like to use Thorns in the front and Thorns in the back, but when I must choose between them, I’ll almost always take Thorns in the back.
There are many cards that work well for Thorns in the back, but there is one in particular that I almost always prefer: The Enchanted Defender. The reason is simple. This card, with only 1 Heart, will never work as a tank, but since it is heavily armored, it can tear apart your enemy’s team with Thorns before falling. It just stands there and takes hits, and your enemy suffers.

Squishies in the Way
Another delightful technique for driving your enemy crazy (and occasionally winning) is to pad the back of your team with inconsequential cards that do little to nothing. In this case, you would need to focus on the offensive abilities of your front half, expecting the weaker monsters in the back to get taken out one by one.
If done correctly, you can debuff your enemy’s team, pad your back half for almost no Mana, and set yourself up for 5–6 free hits, giving you time to finish the other team.
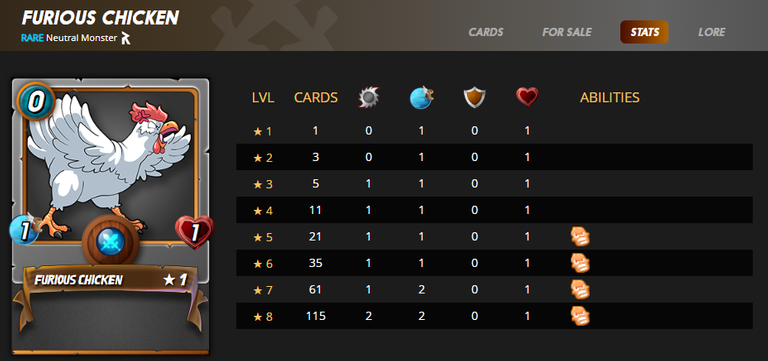
Some excellent examples of this type of squishy card are Furious Chicken, Creeping Ooze, Flame Monkey, Albatross and Cocatrice.
As I said before, there are many ways to play the front and back of your team effectively. There is at least one piece of solid advice I can give when it comes to the first and last cards of your Splinterlands team, no matter your opponent, skill level or collection. Pay close attention to your choices in these positions, for they will make or break your battle.
Congratulations @sejclarke! You have completed the following achievement on the Hive blockchain and have been rewarded with new badge(s) :
Your next target is to reach 30 posts.
Your next target is to reach 200 upvotes.
You can view your badges on your board and compare yourself to others in the Ranking
If you no longer want to receive notifications, reply to this comment with the word
STOPTo support your work, I also upvoted your post!