Between Victories and Defeats: Observing to Learn How to Be the Best

Hello summoners! Welcome to my blog. I'm participating in the Splinterlands Community Engagement Challenge and today's theme is about moments that made me a better player. It's undoubtedly a very interesting topic, as everyone must have very different experiences that transformed them into a more experienced player. If you're also interested, know that there's still time to participate, and I'll leave the link here so you can check it out.


In Splinterlands, there are so many ways to gain the experience needed to become great players. Logically, the more battles you play, between wins and losses, the more you will be forged into the greatest battlemage. One of the paths that helps me achieve better results in my performances is precisely absorbing and understanding losses. Winning is great, but even in defeats we can see details that sometimes go unnoticed. Therefore, I tend to take something positive even from losses, and this has helped me reverse as many battles as possible.

👁️ Observe Your Opponents and Learn
Sometimes battling becomes almost automatic, because since each match lasts an average of two to three minutes, you want to finish as quickly as possible to reach the next opponent, and so on. Doing this, you might not have time to observe your opponents' strategies, and seeing their past battles can show you the path to victory.
It may seem simple and easy, but know that this can be a great weapon to help you win. Through this history of the last six battles, it's possible to know which Archon your opponent might use next. In this specific case in the image below, I noticed that my opponent had used Loving the Moo quite a bit, a Water Archon, and yes, it's quite powerful when used with the right cards.

Fortunately for me, I was able to “read his mind” and based on the last battles, he used that Archon against me again. There are players who like to use a different Archon in each battle to precisely confuse their opponent and in fact this can be a determining factor in winning, and this player probably already has basically all the Archons in their collection, and whoever has this kind of “power” has a great chance of winning.

⚔️ The Time for Battle Has Arrived!
Now that we understand what my opponent's next move might be, it's easier to decide which Archon to use to prepare for the Magic Reflect and Blast abilities he provides to his units. So I thought the best Archon to neutralize these abilities was to have Archon Bella Ratajowlski in the battle.
Splinterlands taught me to love this card, and even more so to love Bloodline Ulund, because these warrior hippos are truly fierce and enjoy a good fight. The ability that all my units gain is the Deflect ability, which means that damage dealt secondarily, i.e., to adjacent units, will not be affected.
For this specific battle, only the Death element was unavailable. The mana cost is considered high; 55 mana is enough to create a good team. This time there are three modifiers, and we'll see their specifics below:

Holy Protection: All units take no damage upon receiving the first attack;
Taking Sides: Neutral units cannot be summoned;
Even Stevens: Only units with an even mana cost can be used in battle.

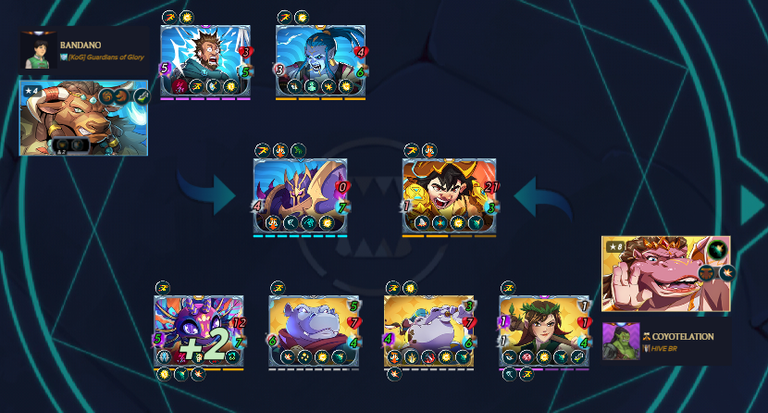
As you already know, my battle formation was designed to neutralize my opponent. So I tried to choose the best units available to me at that moment, remembering that odd-numbered units could not be summoned. My cards are:

⚔️ Position 1: To be a temporary Tank, Moribund Arrowbait is the right choice for me to take advantage of its Bloodline Tribute ability.
⚔️ Position 2: Despite being level 2, Dar 'Gottem' Gearnut is still an impressive Tank if you want a unit that can hold out as long as possible before falling.
⚔️ Position 3: Olivia of the Brook is an incredible card because of its Mimic ability, so it holds pleasant surprises for me in battle.
⚔️ Position 4: From this position onwards, are my units that will take advantage of Bloodline Tribute, and Thunderous Herald will help me eliminate as many enemy units as possible on the battlefield.
⚔️ Position 5: Even though it's not at maximum level, that doesn't stop Calabash Sage from being an incredible support card.
⚔️ Position 6: For the last position, Calamity will be ready if needed, and everyone should know its destructive power when this unit is alone in battle.

In round 1, Moribund Arrowbait did what was expected, dying twice and giving more power to my Ulund units. Calamity, with its Shapeshift ability, also benefits.

In round 2, the numerical advantage was in my favor, but I couldn't be complacent, as quantity isn't always a positive advantage. But I was confident.

In round 3, Calamity, upon attacking, removes Commander Slade's Deflect ability. Therefore, it's always good to have this salamander on your team.

In round 4, Calamity once again took center stage, this time defeating the enemy Tank and paving the way for my victory.
In round 5, to deliver the final blow, Calamity uses its magic attack. An undeniable victory.

I hope you understand that the more you observe what your opponents do in their last battles and thus understand what they will do, the greater your chances of winning, and this will give you a great experience of basically reading your opponent's mind.
Thank you for getting this far. It's really cool and important to have your support for my content in this incredible Splinterlands universe. If you don't have an account in the game, don't worry, just click on my referral link. Until next time, and see you on the battlefield.

Olá invocadores! Sejam muito bem-vindos ao meu blog. Estou participando do Splinterlands Community Engagement Challenge e o tema de hoje é sobre momentos que me fizeram ser um jogador melhor. Sem dúvidas é um tema bem interessante, pois cada um deve possuir formas bem diferentes de como o transformaram em um jogador mais experiente. Se você também ficou interessado, saiba que ainda tem tempo de participar e deixarei o link aqui para poder conferir melhor.
Em Splinterlands, existem tantas formas de conseguirmos adquirir a experiência necessária para nos tornarmos grandes jogadores. É lógico que quanto mais batalhas você jogar, entre vitórias e derrotas, mais e mais será forjado para ser o maior mago de batalha. Um dos caminhos que me ajudam a ter resultados melhores em meus desempenhos é justamente absorver e entender as derrotas. Vencer é muito bom, mas também nas derrotas conseguimos ver detalhes que às vezes passa despercebidos diante de nós. Por isso, costumo tirar algo positivo até nas derrotas e isso tem me ajudado a reverter o máximo de batalhas possível.
👁️ Observar os Adversários e Aprender
Às vezes batalhar se torna algo até automático, pois como cada partida dura em média de dois a três minutos, você quer tentar acabar o mais rápido para chegar ao próximo adversário e assim por diante. Fazendo isso, talvez não sobre tempo de observar as estratégias dos adversários e poder ver suas últimas batalhas podem te mostrar o caminho para vitória.
Pode parecer algo bem simples e fácil, mas saiba que essa pode ser uma ótima arma para te ajudar a vencer. Através desse histórico das últimas seis batalhas, é possível saber qual poderia ser o próximo Arconte que o seu adversário usaria. Nesse caso específico na imagem abaixo, percebi que meu adversário tinha usado bastante o Loving the Moo, um Arconte de Água e sim, ele é bem poderoso quando usado com as cartas certas.
Felizmente para mim, pude “ler seu pensamento” e baseado nas ultimas batalhas, ele usou novamente esse Arconte contra mim. Existem jogadores que gostam de cada batalha, usar um Arconte diferente para justamente confundir seu adversário e de fato isso pode ser um fator determinante para vencer e esse jogador já deve possuir basicamente todos os Arcontes em sua coleção e quem tem esse tipo de “poder”, as chances de vitória é grande.
⚔️ Chegou a Hora da [Batalha!]
Agora que percebemos qual poderia ser a próxima decisão do meu adversário, então ficou mais fácil de decidir qual Arconte usar para justamente se preparar para as habilidades Magic Reflect e Blast que ele disponibiliza para as unidades dele. Então pensei que o melhor Arconte para neutralizar essas habilidades era ter a Arconte Bella Ratajowlski na batalha.
Splinterlands me ensinou a amar essa carta, inclusive gostar ainda mais da Bloodline Ulund, pois esses hipopótamos guerreiros são mesmo ferozes e gostam de uma boa briga. A habilidade que todas minhas unidades ganham é a habilidade Deflect e isso quer dizer que danos causados de forma secundária, ou seja, nas unidades adjacentes não sofrerão nada.
Para essa batalha em específico, apenas o elemento Morte não estava disponível. O custo de mana é considerado alto, 55 de mana é possível criar um bom time. Os modificadores desta vez são três e logo abaixo veremos suas especificidades:
- Holy Protection: Todas as unidades ao receber o primeiro ataque, não sofrem nenhum dano;
- Taking Sides: Não é possível invocar unidades neutras;
- Even Stevens: Apenas unidades com custo de mana par, pode ser usado na batalha.
Como já sabem, minha formação de batalha foi pensada em neutralizar meu adversário. Então tentei escolher os melhores que estavam na minha disposição naquele momento, pois lembrando que unidades ímpares não era possível invocar. Minhas cartas são:
- ⚔️ Posição 1: Para ser um Tank temporário, Moribund Arrowbait é a escolha certa para eu aproveitar sua habilidade de Bloodline Tribute.
- ⚔️ Posição 2: Apesar de ser level 2, mas mesmo assim o Dar 'Gottem' Gearnut é um Tank impressionante se você quer uma unidade que segura o máximo de tempo antes de cair.
- ⚔️ Posição 3: A Olivia of the Brook é uma carta incrível por causa de sua habilidade Mimic, então surpresas agradáveis ela reserva para mim na batalha.
- ⚔️ Posição 4: A partir desta posição, estão minhas unidades que se aproveitarão do Bloodline Tribute e Thunderous Herald vai me ajudar a executar o máximo de unidades inimigas no campo de batalha.
- ⚔️ Posição 5: Mesmo não estando no level máximo, isso não impede de Calabash Sage ser uma carta de suporte incrível.
- ⚔️ Posição 6: Para a última posição, Calamity estará pronta caso seja preciso e todos devem saber o seu poder destrutivo quando essa unidade estar sozinha na batalha.
Na rodada 1, Moribund Arrowbait fez o que era previsto, morrer as duas vezes e dar mais poder para minhas unidades Ulund, Calamity por ter a habilidade Shapeshift, se beneficia também.
Na rodada 2, a vantagem numérica estava ao meu favor, mas não poderia estar tranquilo, pois nem sempre quantidade é uma vantagem positiva. Mas eu estava confiante.
Na rodada 3, Calamity ao atacar, retira a habilidade Deflect do Commander Slade. Por isso sempre é bom ter essa salamandra em nosso time.
Na rodada 4, Calamity novamente sendo protagonista e agora derrotando o rank inimigo, deixando caminho mais fácil para minha vitória.
Na rodada 5, para dar o último golpe, Calamity com seu ataque mágico. Vitória incontestável.
Espero que tenham entendido que quanto mais você observar o que seus adversários fazem em suas últimas batalhas e assim conseguir entender o que ele irá fazer, as chances de vencer aumentam bastante e isso vai te proporcionar uma grande experiência de basicamente ler a mente de seu oponente.
Obrigado por você ter chegado até aqui. É bem legal e importante ter o seu apoio para com meus conteúdo desse universo incrível de Splinterlands. Caso você não tenha conta no jogo, não se preocupe, basta clicar em meu link de referência. Até a próxima e te vejo no campo de batalha.
.gif)

New cards :D !wine !PIZZA
Congratulations, @mizuosemla You Successfully Shared 0.300 WINEX With @coyotelation.
You Earned 0.300 WINEX As Curation Reward.
You Utilized 3/5 Successful Calls.
Contact Us : WINEX Token Discord Channel
WINEX Current Market Price : 0.075
Swap Your Hive <=> Swap.Hive With Industry Lowest Fee or Highest Reward : Click This Link
Read Latest Updates Or Contact Us
Thanks bro!
!ALIVE :)
$PIZZA slices delivered:
@mizuosemla(3/10) tipped @coyotelation
Join us in Discord!
Delegate Tokens and HP to Fallen Angels to earn weekly rewards!
Delegate | Join to the guild
Congratulations @coyotelation! You have completed the following achievement on the Hive blockchain And have been rewarded with New badge(s)
Your next payout target is 12000 HP.
The unit is Hive Power equivalent because post and comment rewards can be split into HP and HBD
You can view your badges on your board and compare yourself to others in the Ranking
If you no longer want to receive notifications, reply to this comment with the word
STOPCheck out our last posts:
Thanks for sharing! - @clove71
