Batallas con bajo límite de mana: Splinters, invocadores, unidades y habilidades destacadas para una alineación eficiente (Esp/Eng).

Portada generada con elementos de/Cover generated with elements from: @splinterlands


Saludos comunidad de Hive NFTGame Latino les doy la bienvenida a este post hablando de mi proyecto favorito: Splinterlands! Ya voy a tener casi 1 año desde que conocí esta magnífica comunidad así que he querido compartir estas líneas enfocadas a tener un mejor entendimiento del juego para aquellos que están comenzando, así que empecemos!
Greetings Hive NFTGame Latino community, I welcome you to this post talking about my favorite project: Splinterlands! It will be almost 1 year since I met this magnificent community so I wanted to share these lines focused on having a better understanding of the game for those who are just starting out, so let's get started!

La inspiración para este artículo fue primeramente mi buen amigo @morenow quien me comentaba lo complicado que era para el las partidas de bajo mana y segundo mi estimada @mirlenyjerez jugadora que esta comenzando en splinterlands y ya esta comenzando a adquirir cartas y el juego por momentos le parece un poco confuso.
The inspiration for this article was firstly my good friend @morenow who told me how complicated low mana games were for him and secondly my dear @mirlenyjerez, a player who is starting in splinterlands and is already beginning to acquire cards and the game at times. It seems a little confusing.

Las partidas de muy bajo mana siempre son un desafío, ya sea porque no contamos con cartas de bajo mana o simplemente estamos acostumbrados a jugar con batallas que tengan en promedio un limite de mana de 30, estas batallas exigen de un gran conocimiento no solo de las cartas que se disponga, sino también se debe considerar las ruleset y que tipo de invocador debemos escoger.
Very low mana games are always a challenge, either because we do not have low mana cards or we are simply used to playing with battles that have an average mana limit of 30, these battles require great knowledge not only of the cards available, but we must also consider the ruleset and what type of summoner we should choose.
En este contexto he querido presentar 3 batallas de muy bajo mana donde explico como preparar una alineación eficaz para superar estas batallas considerando las reglas de batalla, las habilidades de las unidades y las habilidades de los invocadores. Empecemos con la primera batalla.
In this context I wanted to present 3 very low mana battles where I explain how to prepare an effective lineup to overcome these battles considering the battle rules, the abilities of the units and the abilities of the summoners. Let's start with the first battle.

⚔️ 1era Batalla/1st Battle ⚔️

Link:
https://splinterlands.com/?p=battle&id=sm_usbALTpa76tdA2mOz13K

Esta primera batalla que vamos a describir fue en la liga de plata con un límite extremo: 12 de mana, siempre me han preguntado como proceder o cual es el mejor splinter para encarar este tipo de batallas. En general todos los splinter tienen cartas de bajo mana para armar buenas alineaciones, la diferencia la hará aquellas cartas con las que podamos contar. En este sentido mis mejores unidades están en la clase tierra ya que cuento con 2 cartas que hacen la diferencia: Queen Micelia que aporta 2 puntos de defensa y Failed Summoner un mini tanque de 2 de mana con gran cantidad de vida, así nos aseguramos que nuestra vanguardia soportará varios ataques. Veamos como se desarrolla esta batalla:

This first battle that we are going to describe was in the silver league with an extreme limit: 12 mana, I have always been asked how to proceed or what the best splinter is to face this type of battles. In general, all splinters have low mana cards to build good lineups, the difference will be those cards that we can count on. In this sense, my best units are in the land class since I have 2 cards that make a difference: Queen Micelia, which provides 2 points of defense, and Failed Summoner, a 2-mana minitank with a large amount of life, this way we make sure that our vanguard will withstand several attacks. Let's see how this battle develops:
⚡ Round 1 & 2

Desde el 1er round podemos ver que la estrategia de nuestro oponente fue dejar toda la tarea ofensiva en la carta oportunista Bertrol Gobson, en cambio nosotros llevamos más unidades ofensivas y es que Cutter Brieze y Khmer Princess son 2 unidades que juntas suman 3 de mana, mientras Cutter es puramente ofensiva, Khmer Princess no solo es ofensiva, sino que además puede sanar al tanque.
From the 1st round we can see that our opponent's strategy was to leave all the offensive task on the opportunistic card Bertrol Gobson, on the other hand we have more offensive units and that is that Cutter Brieze and Khmer Princess are 2 units that together add up to 3 mana, While Cutter is purely offensive, Khmer Princess is not only offensive, but can also heal the tank.
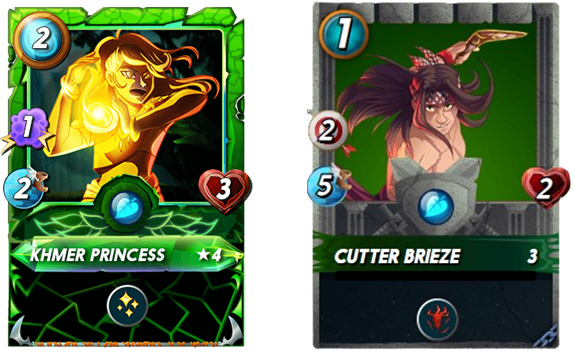
Cutter Brieze y Khmer Princess
Para el segundo round logramos eliminar al Hill Giant y al Micelic Morphoid, mientras que nuestra alineación se mantiene intacta.
For the second round we managed to eliminate the Hill Giant and the Micelic Morphoid, while our lineup remains intact.
⚡ Rounds 3 & 4

En el 3er round logramos eliminar al Gobson dorado y al Agent of Chaos dejando al oponente sin poder atacar, terminamos asi la partida en el 4to round con Cutter eliminando al Xenith Archer y consiguiendo la victoria. La clave para esta victoria con muy bajo mana fue tener importantes unidades ofensivas en las últimas posiciones y saber proteger la retaguardia con unidades de 0 mana. Vayamos a la siguiente batalla.
In the 3rd round we managed to eliminate the golden Gobson and the Agent of Chaos, leaving the opponent unable to attack, thus we finished the game in the 4th round with Cutter eliminating the Xenith Archer and achieving victory. The key to this victory with very low mana was having important offensive units in the last positions and knowing how to protect the rear with 0 mana units. Let's go to the next battle.

⚔️ 2da Batalla/2nd Battle ⚔️

Link:
https://splinterlands.com?p=battle&id=sl_101af669849eefd0d2746399a3b4a947&ref=bulkathos
Aquí volvemos a tener una batalla de muy bajo mana: 13. Están disponibles todos los splinters a excepción del elemento fuego y entre las ruleset solo pueden usarse unidades melé. Bajo estas condiciones, mi estrategia fue disminuir el daño melé del oponente y apostar toda mi estrategia a una unidad con gran daño melé: Desert Dragon, veamos a continuación las ventaja que tiene usar este tanque en la primera posición.
Here we once again have a battle with very low mana: 13. All splinters are available except for the fire element and among the ruleset only melee units can be used. Under these conditions, my strategy was to reduce the opponent's melee damage and bet my entire strategy on a unit with high melee damage: Desert Dragon. Let's see below the advantages of using this tank in the first position.
⚡ Round 1

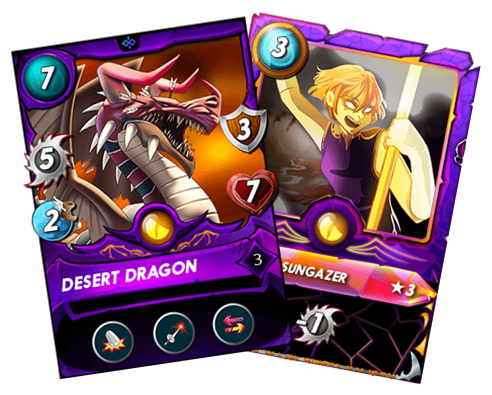
Desde el 1er round podemos ver la ventaja tan decisiva que tiene Desert Dragon: Tiene la habilidad Retaliate que le da la posibilidad de devolver un ataque melé, por lo que podemos ejecutar varios ataques un 1 solo round y fue eso lo que sucedió, dejando a las puertas de la muerte al Cruel Setrophod & Tide Bite, esto fue posible gracias a la segunda habilidad que tiene este tanque: Pierce que le permite atravesar la defensa si su daño es muy superior a la defensa.
From the 1st round we can see the decisive advantage that Desert Dragon has: It has the retaliate ability that gives it the possibility of returning a melee attack, so we can execute several attacks in a single round and that is what happened, leaving the doors of death to the Cruel Setrophod & Tide Bite, this was possible thanks to the second ability that this tank has: Pierce which allows it to break through the defense if its damage is much higher than the defense.

Retaliate & Piercing
⚡ Round 2


En el segundo round podemos contemplar el último as bajo la manga de esta carta y es la habilidad Trample que le permite al Desert Dragon ejecutar un ataque extra si el 1er objetivo que ataca es eliminado, de esta manera nuestro tanque puede realizar hasta 3 ataques en 1 solo turno. La clave de la victoria en este combate fue reducir el daño del enemigo para que hicieran el mínimo de daño a nuestro tanque para así activar sus habilidades. Próxima batalla!
In the second round we can see the last ace up this card's sleeve and it is the Trample ability that allows the Desert Dragon to execute an extra attack if the first target it attacks is eliminated, in this way our tank can make up to 3 attacks in 1 single shift. The key to victory in this fight was reducing the enemy's damage so that they did the minimum amount of damage to our tank in order to activate their abilities. Next battle!

⚔️ 3ra Batalla/3rd Battle ⚔️

Link:
https://splinterlands.com?p=battle&id=sl_1f5dc3ba48629cde3db13ec1976fe923&ref=bulkathos
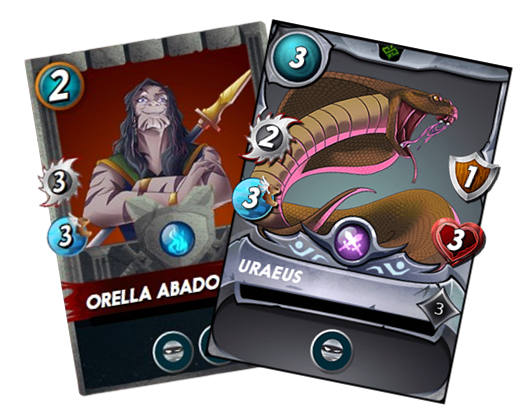
Acá tenemos una partida no tan extrema como las 2 anteriores pero igualmente desafiante: 15 de mana con la posibilidad de escoger cualquier splinter a excepción del Dragón. En estas condiciones uso mi estrategia favorita y es usar cartas que ataquen la retaguardia enemiga, aquí es donde brillan 2 cartas de bajo mana muy excepcionales: Orella Abadon y Uraeu, estas cartas serán el núcleo ofensivo de nuestra alineación.
Here we have a game not as extreme as the previous 2 but equally challenging: 15 mana with the possibility of choosing any splinter except the Dragon. Under these conditions I use my favorite strategy and that is to use cards that attack the enemy rearguard, this is where 2 very exceptional low mana cards shine: Orella Abadon and Uraeu, these cards will be the offensive core of our lineup.
⚡ Rounds 1 & 2


Si bien tener una efectiva ofensiva es importante, también lo es tener una buena defensa, para la clase fuego aun no consigo un mini tanque que sea lo suficientemente efectivo así que mi estrategia fue usar al Venari Heatsmith por su defensa y habilidad Void Armor y al Flame Monkey para regenerar su escudo, esto nos permitirá aguantar lo suficiente para romper las líneas enemigas en los primeros 2 rounds.
Although having an effective offense is important, it is also important to have a good defense, for the fire class I still cannot find a mini tank that is effective enough so my strategy was to use the Venari Heatsmith for its defense and Void Armor ability and the Flame Monkey to regenerate his shield, this will allow us to hold out long enough to break the enemy lines in the first 2 rounds.

Venari Heatsmith & Flame Monkey
⚡ Round 3 & 4

En el 3er y 4to rounds nuestro oponente solo tiene a Blinding Reflector que aunque sorporta bastante bien los ataques su destino es la derrota a manos de Orella Abadon, esta carta al ser gladius tiene la habilidad bloodlust lo que le permite aumentar todas sus estadísticas al eliminar objetivos, con el tiempo puede volver un rival a temer con un daño excepcional. Victoria!
In the 3rd and 4th rounds our opponent only has Blinding Reflector, which although it withstands the attacks quite well, its destiny is defeat at the hands of Orella Abadon. This card, being a gladius, has the bloodlust ability, which allows it to increase all its statistics by eliminating targets, over time can return an opponent to fear with exceptional damage. Victory!


Conclusiones/Conclusions
Tanto en el formato moderno como en wild las batallas con un límite de mana bajo siempre son un desafío, las estrategias que comparto con ustedes en estas líneas son el producto de años probando distintas estrategias en diferentes ligas y con diferentes ediciones. Como cierre mis 2 estrategias favoritas son el uso combinado de la habilidad retaliate/thorns y cartas con la habilidad sneak en la fila secundaria, esta alineación te asegura una estrategia de ataque y contrataque efectiva.
In both the modern and wild formats, battles with a low mana limit are always a challenge, the strategies that I share with you in these lines are the product of years of testing different strategies in different leagues and with different editions. In closing, my 2 favorite strategies are the combined use of the retaliate/thorns ability and cards with the sneak ability in the secondary row, this alignment ensures you an effective attack and counterattack strategy.

Bien amigos, les agradezco si llegaron hasta aqui, siempre es un gusto compartir estrategias que ayuden a mejorar nuestro juego. Posiblemente haga una segunda parte de esta publicación enfocándome en estrategias con otros elementos para compartir más estrategias que nos de una mayor comprensión de como abordar esta batalla. Nos vemos en una próxima publicación! Buena suerte y larga racha de victorias. Saludos!
Well friends, I thank you if you made it this far, it is always a pleasure to share strategies that help improve our game. I may make a second part of this post focusing on strategies with other elements to share more strategies that give us a greater understanding of how to approach this battle. See you in a next publication! Good luck and long streak of victories. Best regards!

If you are new to splinterlands and want to get into and get to know this game you can do it at the link below:
Si eres nuevo en splinterlands y quieres adentrarte y conocer este juego puedes hacerlo en el siguiente enlace:
Bulkathos

All images were taken from:
Todas las imagenes fueron tomadas de:
@splinterlands


👏 Keep Up the good work on Hive ♦️ 👏
❤️ @bhattg suggested sagarkothari88 to upvote your post ❤️
🙏 Don't forget to Support Back 🙏
Que genial! en cuanto a la primera estrategia no la conocía para nada, es más, si veía que me ya la habían usado en mi contra y no entendía como atacaban tanto, la última es la que suelo usar, igual también note el cambio que tienen al ser de más nivel, que aun no las tengo de ese nivel pero si he usado varias, ahora con la carta gladius aun no tengo ninguna de esas. Ahora toca verlo en práctica 😅
Gracias por la ayuda es una comunidad genial y me encanta compartir contigo 😊
Que bien! Me alegra que te haya sido de ayuda este post lo hice con gran detalle y de forma didáctica para que se pudiera comprender mejor. Saludos.
!LUV
mirlenyjerez, bulkathos sent you LUV. 🙂 (1/1) tools | trade | connect | wiki | daily
Made with LUV by crrdlx.