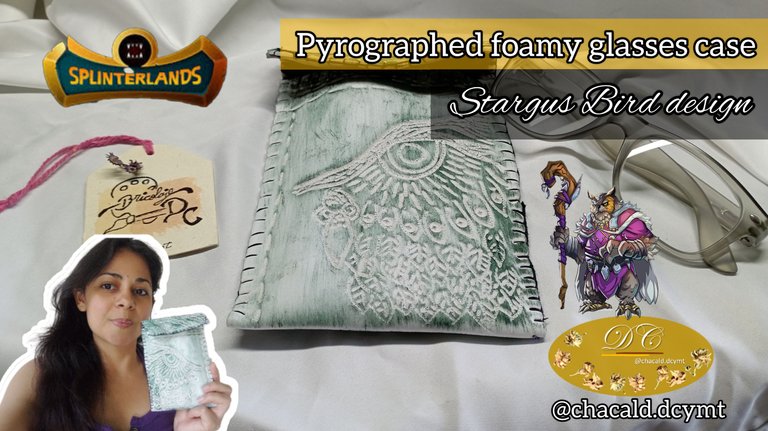
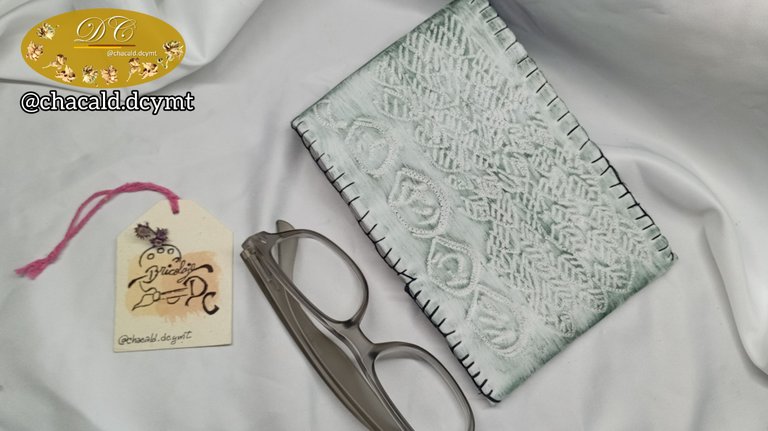
Pyrography foamy glasses case, with Stargus Bird design [Eng-Esp]
Greetings friends who love arts and crafts! Welcome once again to my DC DIY workshop, this time we are going to make a beautiful pyrography glasses case in foamy. Join me and I will show you the creative process.
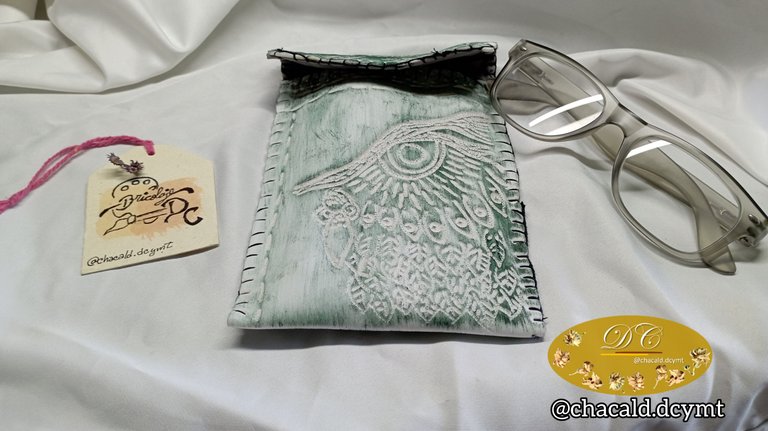
For the design of the case I was inspired by the card of Splinterlands Aves Sturgis, which is one of my favorite characters.
¡Saludos amigos amantes de las artes manuales!sean bienvenidos una vez más a mi taller Bricolaje DC, en esta oportunidad vamos a hacer un bonito estuche para lentes pirograbado en foamy con diseño Ave Stargus. Acompáñenme y les enseño el proceso creativo.
Para el diseño del estuche me inspiré en la carta de Splinterlands Aves Sturgis, que es uno de mis personajes favoritos.
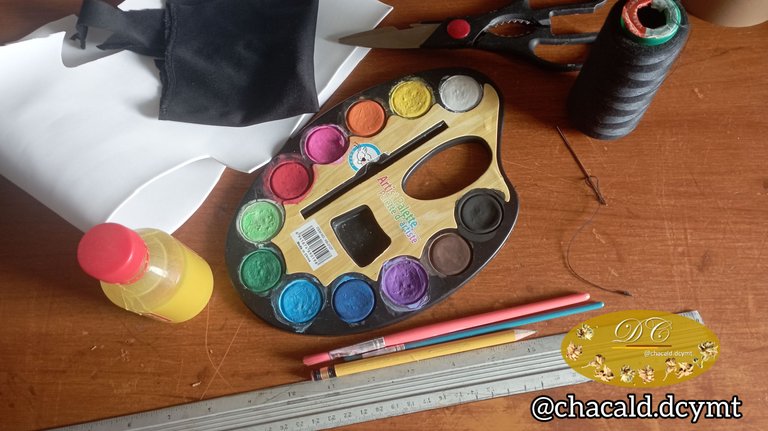
For this project we will need the following materials:
-A piece of foamy foamy unicolor
-Scissors
-Measuring ruler
Super glue (shoe glue)
-Thread and needle (one color opposite to the foamy)
-Paint and brush
-A skewer stick
-Piece of soft fabric
Magnet and metal part (a small washer)
-Super glue (shoe glue)
Para este proyecto necesitaremos los siguientes materiles:
-Un trozo de foamy unicolor
-Tijera
-Regla de medidas
-Super pegamento (pegamento para zapatos)
-Hilo y aguja (un color opuesto al foamy)
-Pintura y pincel
-Un palito de brocheta
-Trozo de tela suave
-Imán y pieza metálica (una arandela pequeña)
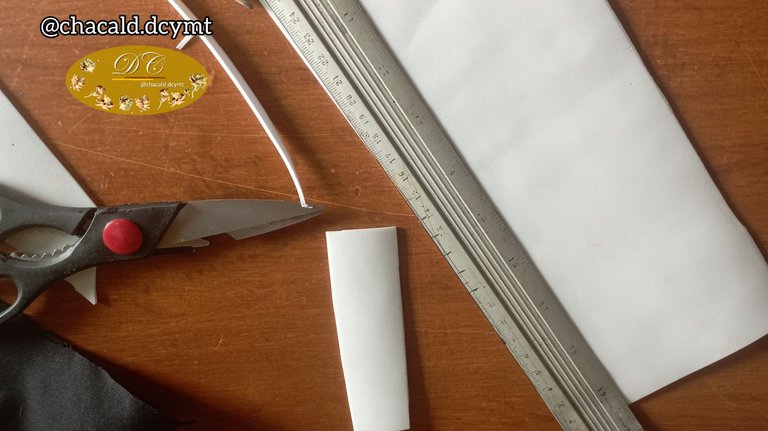
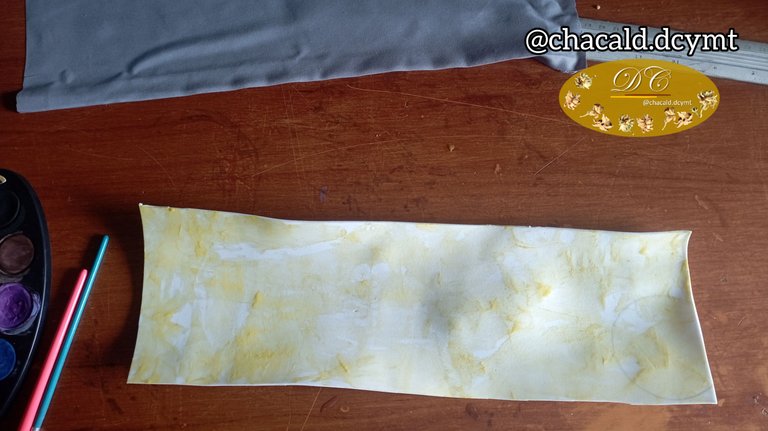
-We start by cutting the foamy. We can help us with the size of the glasses but a standard size is 35 centimeters long by 11 centimeters wide. It will be enough to make the case with lid.
-Comenzamos cortando el foamy. Podemos ayudarnos con la medida de los lentes pero una medida estandar es 35 centímetros de largo por 11 centímetros de ancho. Será suficiente para hacer el estuche con tapa.
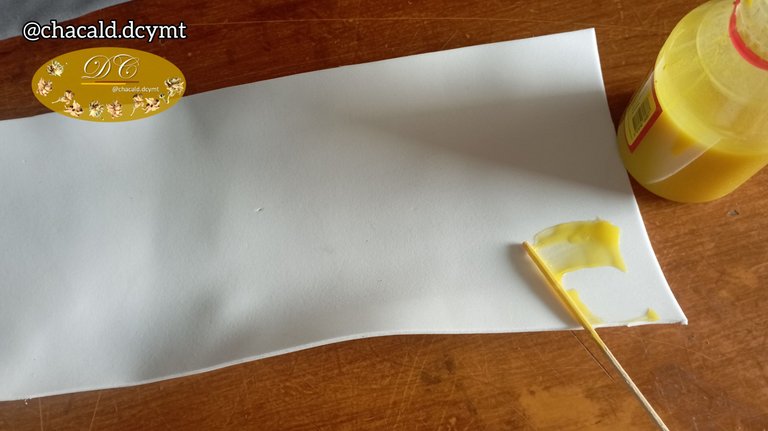
-Apply a layer of super glue that covers the entire piece of foamy. We try to cover everything well.
-Aplicamos una capa de super pegamento que cubra todo el trozo de foamy. Tratamos de que quede todo bien cubierto.
 |  |
|---|
-Once we have applied all the glue, we are going to glue the fabric. This will be the inside of the case.
-Una vez que hemos aplicado todo el pegamento, vamos a pegar la tela. Esta será la parte de adentro del estuche.
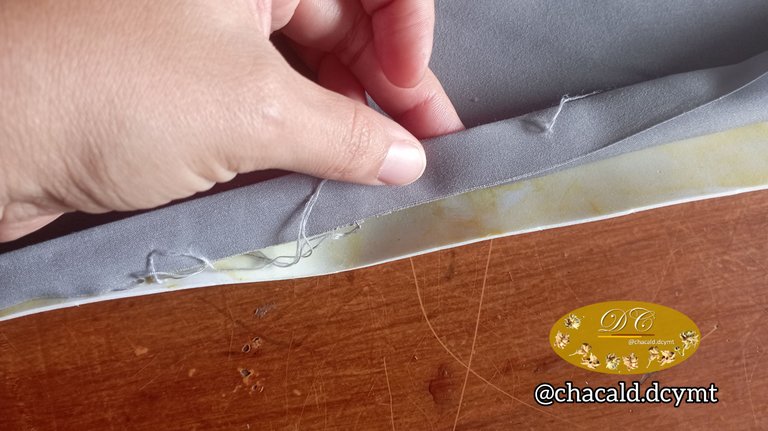
-Fold the edges of the fabric inward to create a better finished edge.
-Doblamos los bordes de la tela hacia adentro para que quede un borde con un mejor acabado.
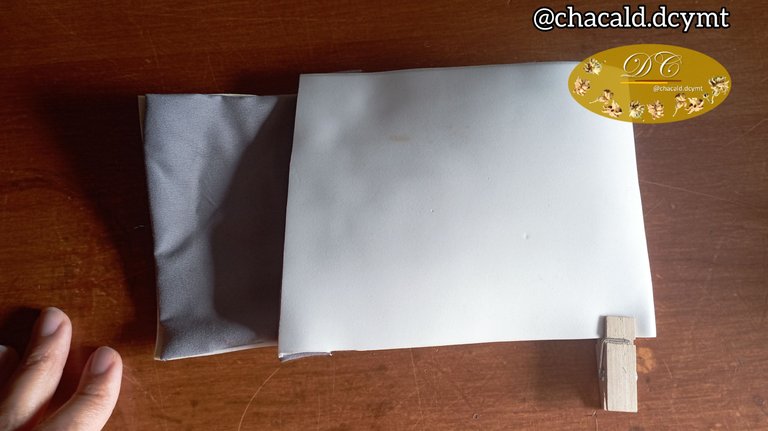
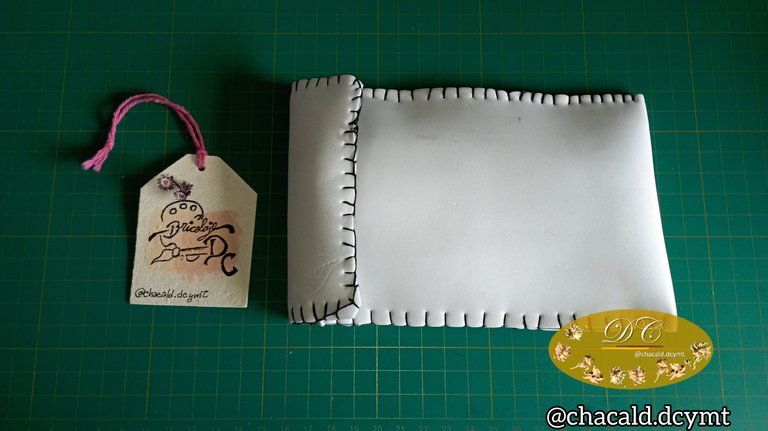
-We fold the piece that would be foamy on the outside and fabric on the inside, with a double at 14 centimeters and the excess will be the lid.
We can help us with a hook that presses the double while we fix it.
-Doblamos la pieza que sería de foamy por fuera y de tela por dentro, con un dobles a los 14 centímetros y el excedente será la tapa.
Podemos ayudarnos con un gancho que prense el dobles mientras fijamos.
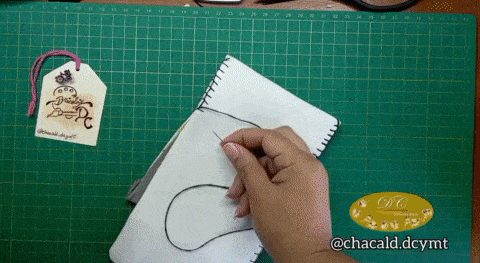
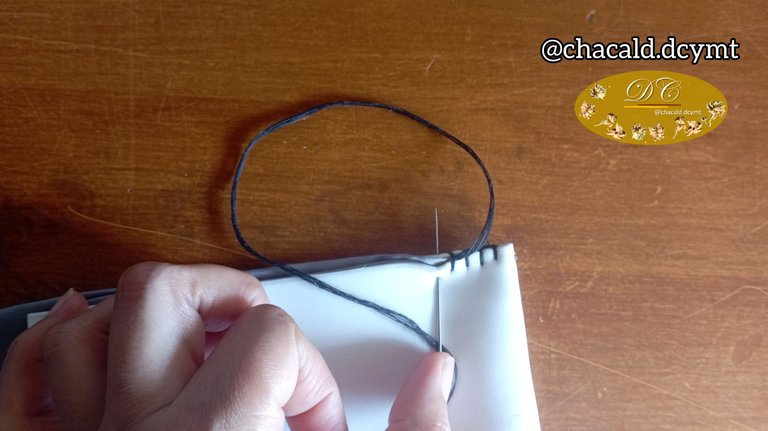
-Now we are going to pass a visible seam all around the edge. I used white foamy and the opposite color thread is black.
-To make it resistant and visible, we take a strand of double thread so that when we pass it through the needle there are 4 strands of thread left.
-We start sewing.
-Ahora vamos a pasar una costura visible por todo el borde. Yo utilicé foamy de color blanco y el hilo en color opuesto es negro.
-Para que quede resistente y visible, tomamos una hebra de hilo doble para que al pasarlo por la aguja queden 4 hebras de hilo.
-Comenzamos a coser.
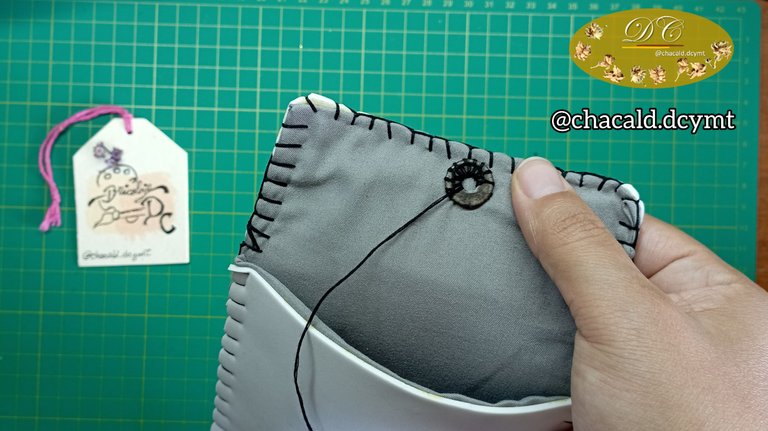
-After having the edges with the seam, we are going to glue the magnet on one side and the washer on the other. That will be the closure of our case.
-Luego de tener los bordes con la costura, vamos a pegar el imán de un lado y la arandela en el otro. Ese será el cierre de nuestro estuche.
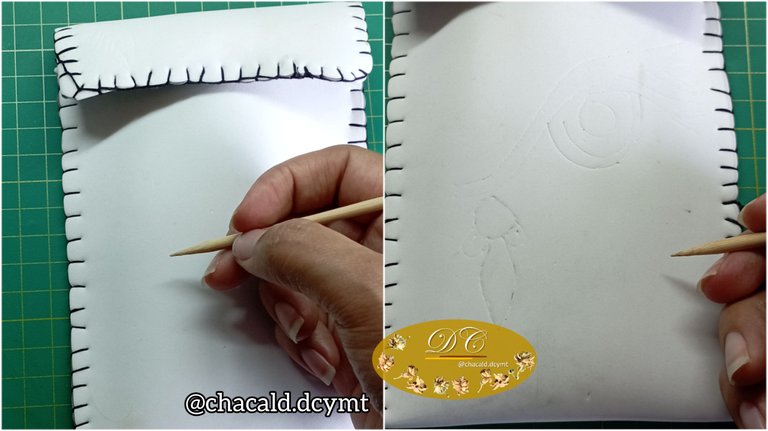
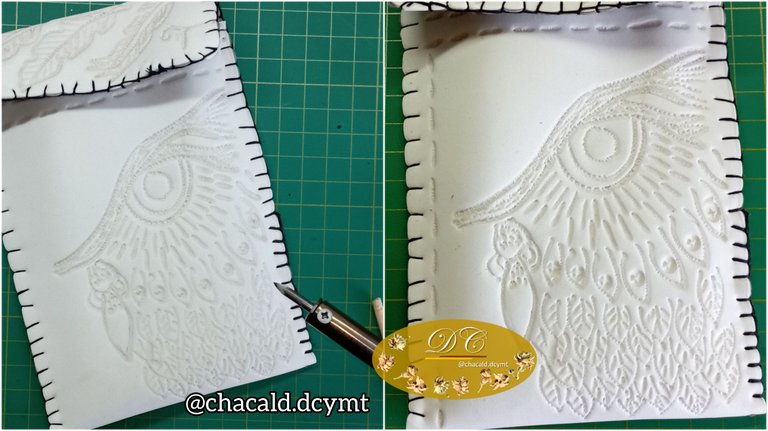
-It's time to engrave on foamy the design of the Stargus Bird. First we transfer it to a white sheet, then with the skewer stick we are going to mark the sheet located on the foamy.
-Es el momento de grabar sobre foamy el diseño del Ave Stargus. Primero lo transferimos a una hoja blanca, luego con el palito de brocheta vamos a remarcar la hoja ubicada sobre el foamy.
-Preheat the soldering iron, when it is hot enough we will go over each line of the owl design.
-Precalentamos el cautín, cuando esté bien caliente vamos a repasar cada línea del diseño de búho.
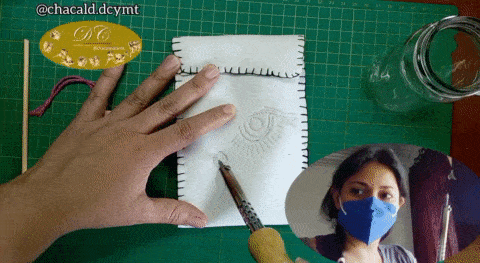
-We must use a mask to avoid an allergy due to the smell of the foamy material.
-Debemos utilizar mascarilla para evitar una alergia por el olor del foamy.

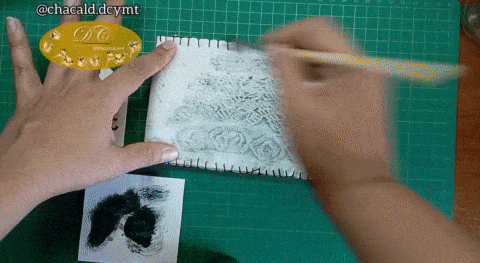
-After doing all the pyrography on the case, we will age with acrylic paint and a brush.
-Luego de hacer todo el pirograbado sobre el estuche, vamos a envejecer con pintura acrílica y un pincel.
And that's it! We have a personalized and pyrography foamy case.
On the front, I made the face of the Owl, the feathers on the lid and on the back I made the runes that the Stargus Bird holds on his belt and on the staff.
Y listo! Tenemos un estuche personalizado y pirograbado en foamy.
En la parte frontal, hice la cara del Búho, las plumas en la tapa y por la parte de atrás hice las runas que el Ave Stargus sostiene en su cinturón y en el bastón.
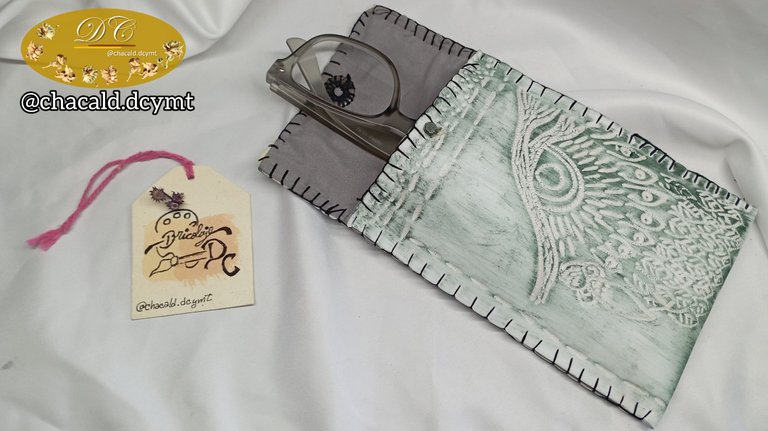
I hope you like my work. See you next time. Bye!
Espero les guste mi trabajo. Nos vemos en una próxima oportunidad. Chao!
If you are not yet playing Splinterlands go here and join.
Si todavía no estás jugando Splinterlands entra aquí y súmate...
Original content by the author.
Resources: App: Canva / Giphy / Inshot
📷 Redmi 10 Smartphone
Translation done with Deepl.com
✿ All Rights Reserved || © @chacald.dcymt 2023 ✿
💌 Discord: chacald.dcymt#3549
X: @chacald1
_
Contenido original del autor.
Recursos: App: Canva / Giphy / Inshot
📷 Redmi 10 Smartphone
Traducido con Deepl.com
✿ Todos los Derechos Reservados || © @chacald.dcymt 2023 ✿
💌 Discord: chacald.dcymt#3549
X: @chacald1
Qué trabajo tan bonito y muy útil, me encantó el pirograbado que le hiciste, ahora a disfrutarlo😃🤗
Wowww esto quedo realmente precioso, gran trabajo, y el resultado final no parece que fuera foami, si no leemos los materiales cualquiera lo pondría en duda.
Te felicito hermosa, cada día te superas mas, mi admiración para ti...
Bendiciones mi hermosa @chacald.dcymt 💖
!DIY
!LADY
View or trade
LOHtokens.@dayadam, you successfully shared 0.1000 LOH with @chacald.dcymt and you earned 0.1000 LOH as tips. (1/3 calls)
Use !LADY command to share LOH! More details available in this post.
Beautiful work full of great detail and really beautiful. Congratulations
You can query your personal balance by
!DIYSTATSSaludos @chacald.dcymt, ye quedó indo el estuche pensé que era tela estampada, jamás hubiese imaginado que creaste el diseño con un cautín, excelente trabajo amiga.
Feliz viernes!
Wao me encanto como hiciste el trazo del buho 😍 te quedo muy profesional y como amante de las aves quiero uno 😍 sobre todo si s un buhito tierno y bonito jeje
El resultado final esta divino.
Anotado en mi lista. Un estuche de Búho para @elbuhito 😘💜.
Gracias por el apoyo y por la valoración de mi trabajo, significa mucho para mi. Un abrazo infinito 😘💜
https://twitter.com/hivediy47901/status/1733100535400497311
Gracias por el apoyo 😊👍🏼
Yay! 🤗
Your content has been boosted with Ecency Points, by @chacald.dcymt.
Use Ecency daily to boost your growth on platform!
Support Ecency
Vote for new Proposal
Delegate HP and earn more
Lindo trabajo, te quedo espectacular, saludos.
Que buen trabajo amiga felicitaciones, que creativa, como siempre.
Gracias 😊...me gustó mucho este proyecto 👍🏼