Wood Nymph Decorative Flower Quilling Technique [Eng-Esp]

Hello to all my Hive friends... 🐱
Today I am with you again to show you my art, I love every week to go through this wonderful world of magic, color, and lots of Splinterlands characters to look for new elements or characters to build different crafts such as jewelry, accessories, 3D figures and other things that motivate me, inspire me and activate my creativity and thus be able to create for you.
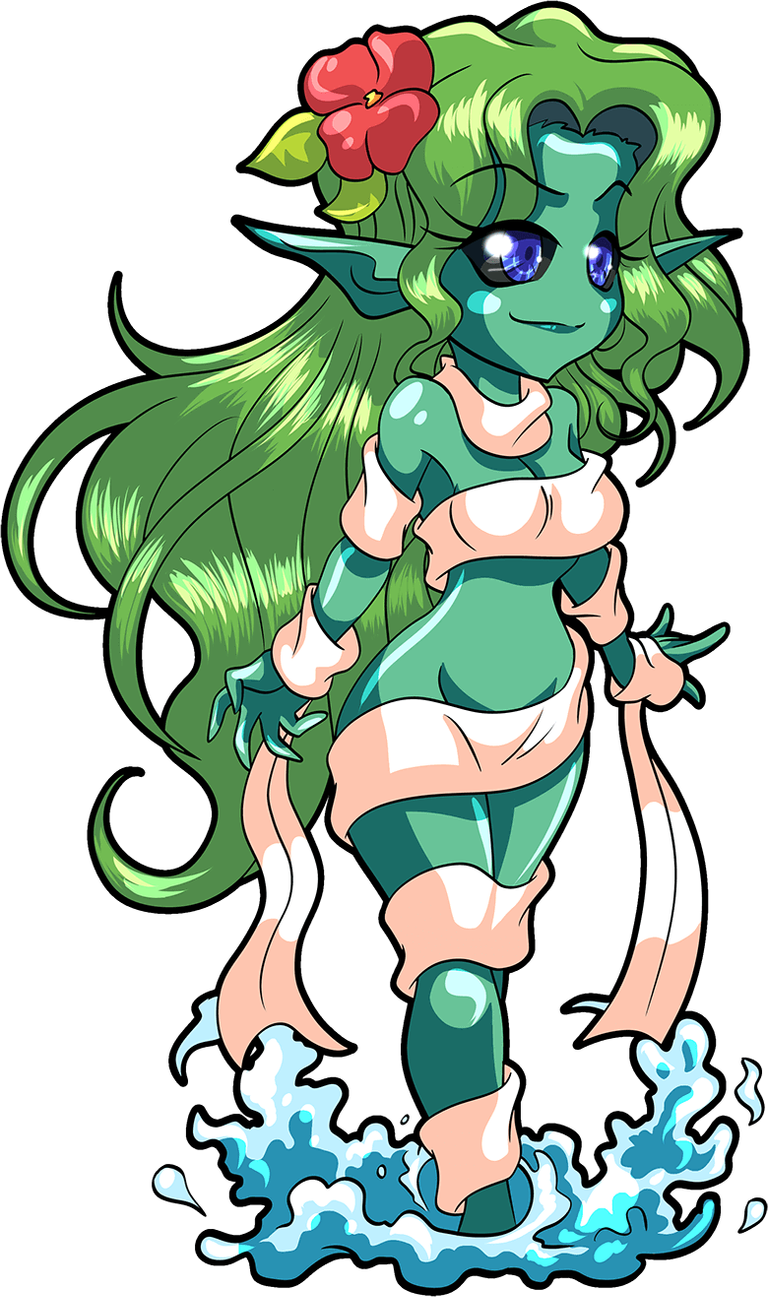
Today I’m sharing a new piece of art with you. I decided to create a decorative flower inspired by the character “Spirit of the Forest,” using the 2D quilling technique.
If you want to know more about the game, I leave you my reference link to enter it and navigate through this wonderful world: https://splinterlands.com?ref=dayadam
Hoping you like my work, without further ado, I leave you with my creative process.
Let's start:😃

Hola a toda mi gente de Hive... 🐱
Hoy estoy con ustedes nuevamente para mostrarles mi arte, me encanta semana a semana pasar por ese maravilloso mundo de magia, color, y muchísimos personajes de Splinterlands para buscar nuevos elementos o personajes para construir diversas manualidades bien sean bisutería, accesorios, figuras en 3D entre otras cosas que me motiven, inspiren y activen mi creatividad y de esa manera poder crear para ustedes.
Para hoy les traigo un nuevo trabajo de arte, decidí realizar una flor decorativa inspirada en el personaje "Spirit of the Forest", en 2D en la técnica de quilling.
Si quieren saber más con respecto al juego les dejo mi enlace de referencia para que ingresen en él, y naveguen por este maravilloso mundo: https://splinterlands.com?ref=dayadam
Esperando les guste mi trabajo, sin más preámbulos, les dejo mi proceso creativo.
Comencemos:😃

 |
 |
 |

• Cintas para quilling.
• Aguja para quilling.
• Cartulinas.
• Guillotina de cortar papel.
• Cristal de bisutería.
• Pega blanca extra fuerte (de carpintería).
• Pincel.
• Tijera.
• Quilling paper.
• Quilling needle.
• Cardstock.
• Paper cutter.
• Beads.
• Extra-strong white glue (woodworking glue).
• Paintbrush.
• Scissors.

• Start by taking a 3mm-wide red quilling strip. Using the quilling needle, roll the strip until you reach the end, then remove it from the needle, loosen it slightly, and seal it with extra-strong white glue to form an open circle. You will need 16 circles of the same size.
• Shape each circle into a teardrop shape, then join them in groups of four. Once the groups are joined, shape the ends slightly.
• Take 3mm-wide quilling tape and wrap a strip around each of the grouped pieces to form a petal.
• Join these petals two by two, then glue the 4 together more easily.
• To make the piece sturdy and durable, apply a layer of extra-strong white glue to both sides and let it dry thoroughly.

• Comenzamos tomando cinta para quilling de 3mm de ancho de color rojo, con ayuda de la aguja para quilling enrollaremos una cinta hasta llegar al final de la misma, sacamos de la aguja, soltamos un poco, sellamos con pega blanca extra fuerte para obtener un círculo abierto. Necesitaremos 16 círculos del mismo tamaño.
• Moldearemos cada circulo en forma de gota, luego uniremos en grupos de 4, unidos los grupos moldearemos un poco en los extremos.
• Tomaremos cinta de quilling de 3mm de ancho, vamos a pasar una tira alrededor de cada una de las piezas agrupadas para formar un pétalo.
• Estos pétalos los uniremos de dos en dos para luego pegar los 4 con mayor facilidad.
• Para hacer la pieza dura y resistente aplicaremos una capa de pega blanca extra fuerte por ambos lados, dejaremos secar muy bien.
 |  |
 |  |
• Using 3mm-wide green quilling paper, make two open circles, one smaller than the other. Shape these into leaves.
• Take 2mm-wide light green quilling paper and make two small half-moons, which I glued onto the leaves I made earlier to create a raised effect.
• Now, using 2mm-wide yellow quilling paper, make an open circle and shape it as shown in the image. Glue it to the center of the flower. Like the leaves, place these on either side of the flower.
• To finish and add some details to the flower, I made some pink quilling shapes. I created open circles of various sizes, shaped them into different forms, and glued them to each petal of the flower to make it resemble the flower worn by the character I created.
• And just like that, we have this 2D decorative flower I created, inspired by the flower worn in the hair of the character from the card "Wood Nymph".
• Con cinta para quilling de color verde de 3mm de ancho, realizaremos dos círculos abiertos uno más pequeño que el otro. Estos los moldearemos en forma de hojas.
• Tome cinta de color verde más claro de 2mm de ancho realicé dos pequeñas media lunas, las cuales pegué en las hojas que realicé con anterioridad para darle un efecto de relieve.
• Ahora con cinta de color amarilla de 2mm de ancho realizaremos un círculo abierto el cual moldearemos tal y como pueden ver en la imagen y pegaremos en el centro de la flor, al igual que las hojas estás las coloque a los lados de la flor.
• Para finalizar y darle algunos detalles a la flor hice algunas figuras con Quilling de color rosado, con la cual realicé algunos círculos abiertos de diversos tamanos moldee de diferentes formas y pegué en cada pétalo de la flor, esto para darle semejanza a la flor del personaje que realicé.
• De esta manera tenemos lista esta flor decorativa en 2D que elabore, inspirada en la flor que lleva en su cabello el personaje de la carta "Wood Nymph ".
 |  |
 |  |

 |
 |  |
 |
|
 |  |
 |
 |
What did you think, did you like it?
I hope you did, I hope you liked my explanation, procedure and photos, I made them with love for you.
"Let out that muse that inspires you, and let your imagination fly".
Thank you all, see you next time.

¿Que les pareció, les gustó?
Espero que sí, que les haya gustado mi explicación, procedimiento y fotos, los hice con mucho cariño por y para ustedes.
"Deja salir esa musa que te inspira, y deja volar tu imaginación".
Gracias a todos, nos vemos en la próxima.
Thanks for the support ✨
!discovery
Gracias por el apoyo 🤎
This post was shared and voted inside the discord by the curators team of discovery-it
Join our Community and follow our Curation Trail
Discovery-it is also a Witness, vote for us here
Delegate to us for passive income. Check our 80% fee-back Program
https://www.reddit.com/r/quilling/comments/1tanphb/i_made_a_flower_using_quilling_techniques_what_do/
This post has been shared on Reddit by @dayadam through the HivePosh initiative.
Gracias por el apoyo 😃
This is so beautiful to look at, we love it!!
Amazing job, keep it up!
selected by @ibbtammy
Thanks for the support 💞
Very nice👍
Thank you so much 💖
!LADY
que bello, está muy bien
how beautiful, it's very good
Gracias.
!PIZZA
How pretty 🤩
Thanks 💖
!PIZZA
Hermosa, gran trabajo 🤗
Gracias mi corazón ❤️
!LADY
Congratulations @dayadam! You have completed the following achievement on the Hive blockchain And have been rewarded with New badge(s)
Your next target is to reach 19500 replies.
You can view your badges on your board and compare yourself to others in the Ranking
If you no longer want to receive notifications, reply to this comment with the word
STOPGracias @hivebuzz 😊
¡Eso es genial @dayadam! ¡Estamos emocionados de ver tu participación en Hive! ¡Sigue así!
$PIZZA slices delivered:
@dayadam(2/10) tipped @little.nikki
dayadam tipped yasmarit
Learn more at https://hive.pizza.