Splinterlands Art Contest: Rexxie
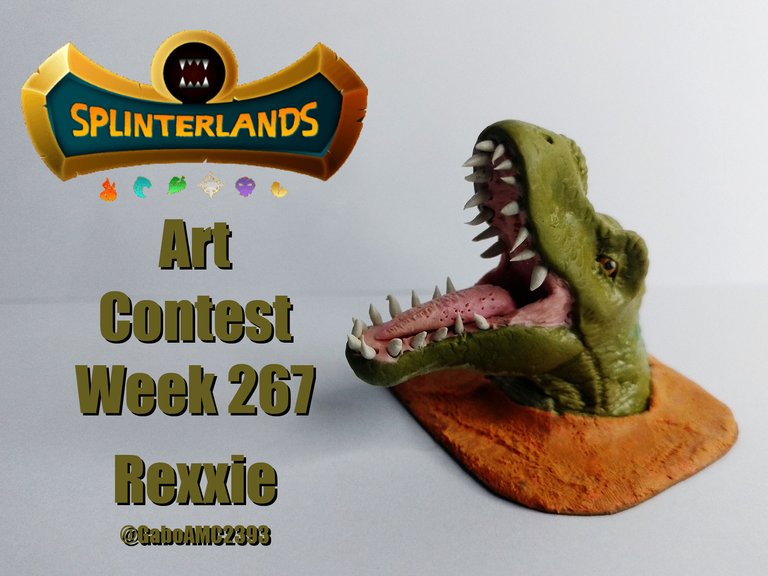
Greetings, fellow art lovers. Today I would like to share with you my participation in the splinterlands art contest.
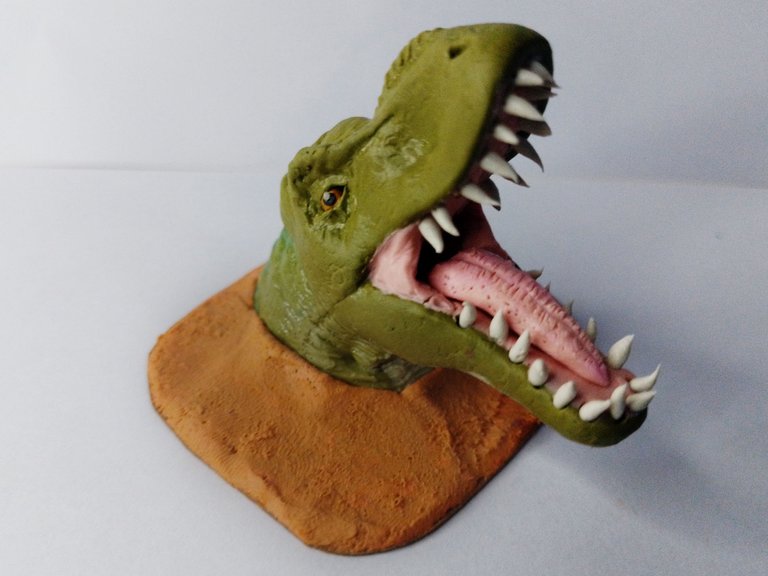
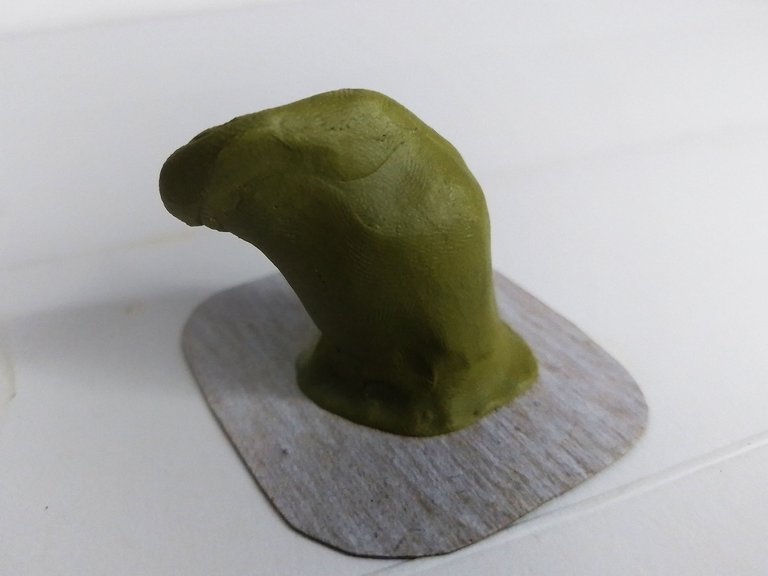
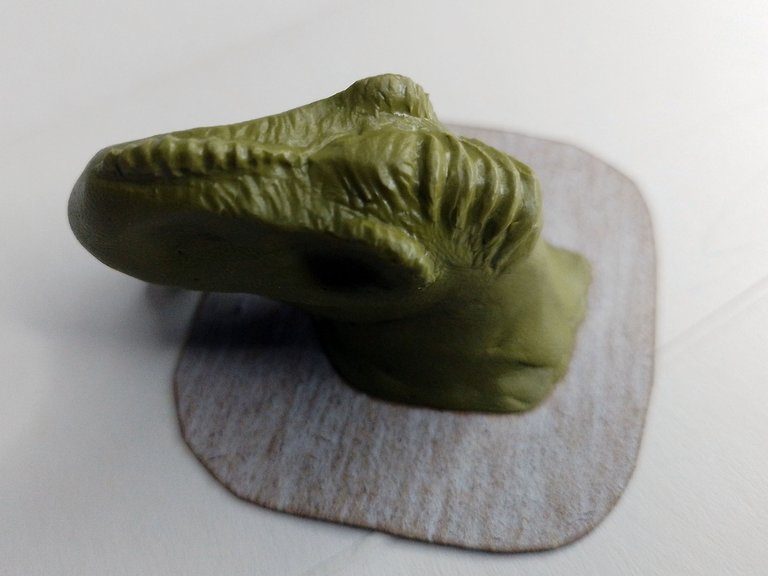
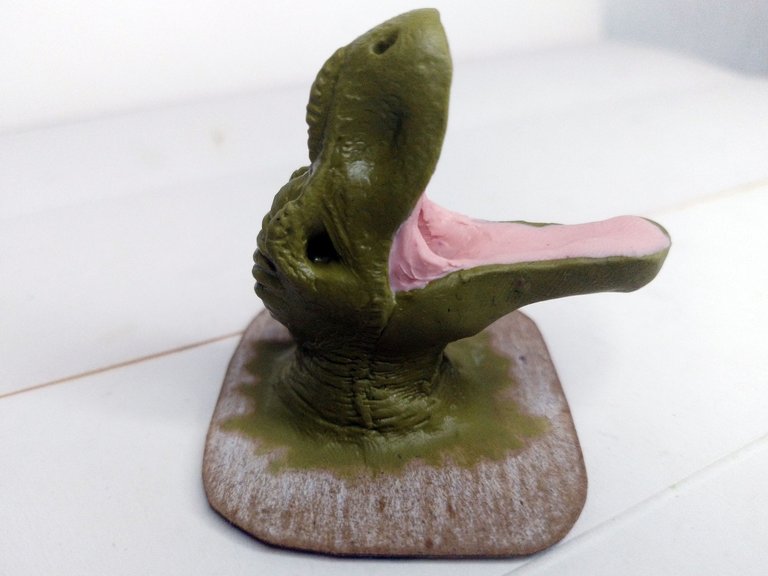
Today I wanted to share with you a sculpture that took me quite some time to make but well worth it for the result. I had seen Rexxie in the splinterlands Discord for a while now. He is a character that I always see there, so I thought it was a good idea to make a dinosaur with a realistic style that resembles this character.
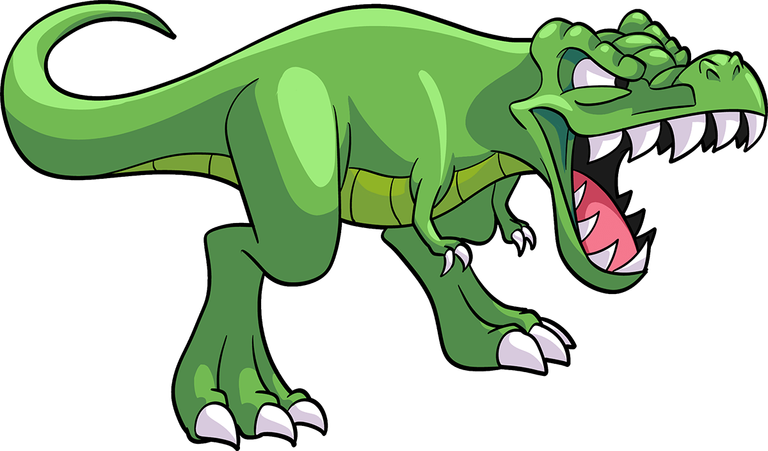
Below you can see a reference image and a picture of the sculpture I made:
Español
Saludos, compañeros amantes del arte. Hoy me gustaría compartir con ustedes mi participación en el concurso de arte de splinterlands.
Hoy quise compartir con ustedes una escultura que me tomó bastante tiempo hacer pero que bien vale la pena por el resultado. Desde hace tiempo había visto a Rexxie en el Discord de splinterlands. Es un personaje que siempre veo allí, así que me pareció buena idea hacer un dinosaurio con estilo realista que se asemejara a este personaje.
A continuación pueden ver una imagen de referencia y una foto de la escultura que hice:
Source / Fuente
https://next.splinterlands.com/card-detail/25/regular/1?tab=lore
If you would like to know more about the contest, please visit the following link for more information:
https://peakd.com/hive-13323/@splinterlands/splinterlands-art-contest-week-267
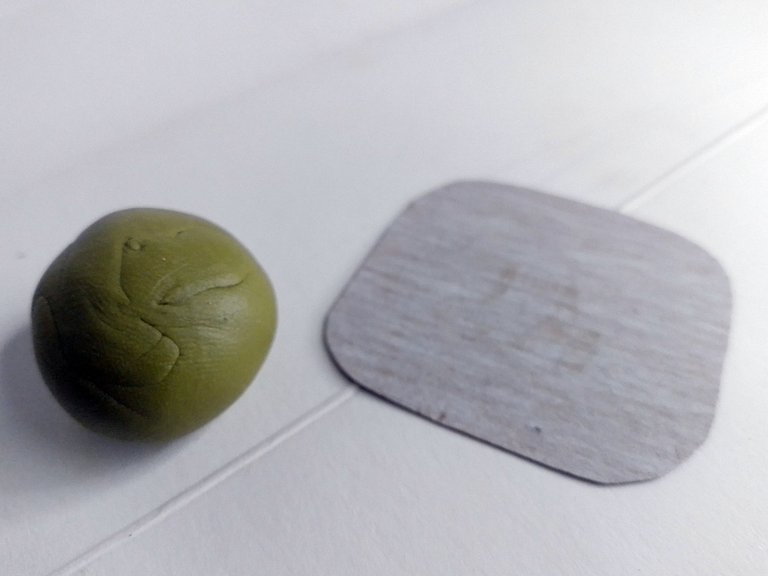
Step by step
The materials I used for this sculpture were less than what I usually use for other sculptures, as I simply used plasticine and cardboard for the base. I did not use wires as it is a solid piece of plasticine that does not need a base.
Si gustan saber más sobre el concurso, pueden visitar el siguiente enlace en donde encontrarán más información:
https://peakd.com/hive-13323/@splinterlands/splinterlands-art-contest-week-267
Paso a paso
Los materiales que utilicé para esta escultura fueron menos que los que suelo usar para otras esculturas, pues simplemente usé plastilina y cartón para la base. No usé alambres pues es una pieza sólida de plastilina que no amerita una base.
 |  |
|---|
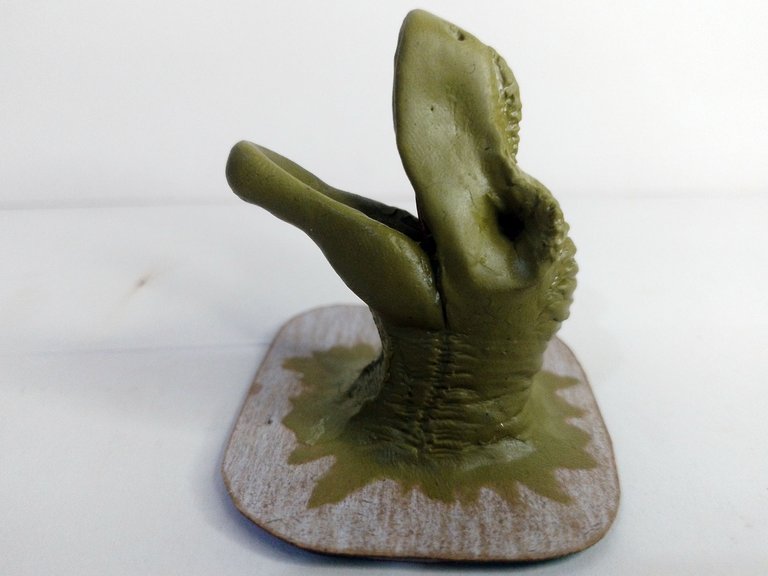
So I began to mold the basic shape of the dinosaur's head. At first it looked like a deformed mass, elongated to one side, but I continued shaping it until I got as close to the dinosaur's head as possible.
Así pues comencé a moldear la forma básica de la cabeza del dinosaurio. Al comienzo parecía una masa deforme y alargada hacia un lado, pero continué dándole forma hasta lograr lo más parecido a la cabeza de ese dinosaurio.
Once this was done, I made a cut along the head to open the dinosaur's mouth. I made a huge mouth as it is what characterizes this character and is the most striking.
On the other hand, I began to mold factions shapes of the top of the head.
Una vez hecho esto, hice un corte a lo largo de la cabeza para abrir la boca del dinosaurio. Le hice una boca enorme pues es lo que caracteriza a este personaje y es lo más llamativo.
Por otra parte, comencé a moldear facciones formas de la parte superior de la cabeza.
 |  |
|---|
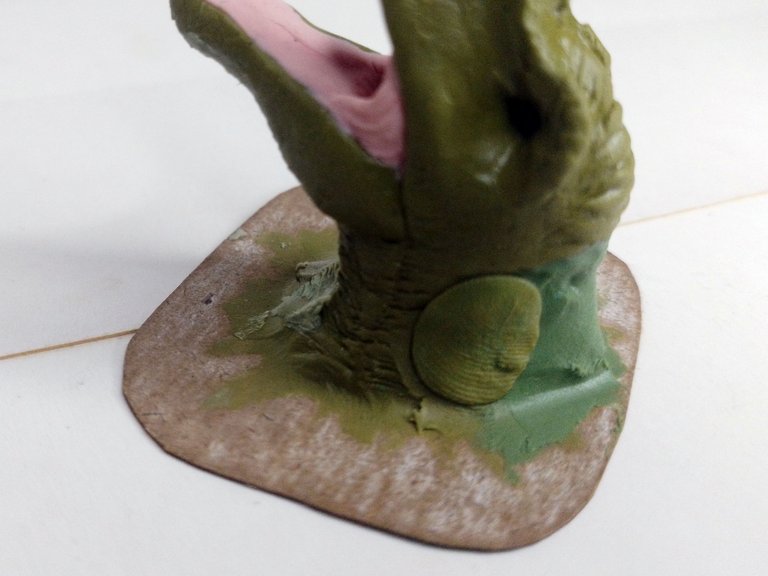
With the base shape ready, I added a lot more clay to create bumps and other shapes that the character has along the skull.
Notice how I first placed the plasticine pieces and then fused these pieces with the rest of the figure.
Con la forma base lista, agregué mucha más plastilina para crear protuberancias y otras formas que el personaje tiene a lo largo del cráneo.
Fíjense cómo coloqué primero los trocitos de la plastilina y luego fusione estos trocitos con el resto de la figura.
 |  |
|---|
Notice that I added a lot of details in the neck and in the face as well, like wrinkles, folds, dividing lines between the upper part of the skull and the lower part; besides, I also made the eye sockets for the eyes.
Fíjense que añadí un montón de detalles en el cuello y en la cara también, como arrugas, pliegues, líneas divisoras entre la parte superior del cráneo y la inferior; además, también le hice las cuencas para los ojos.
 |  |
|---|
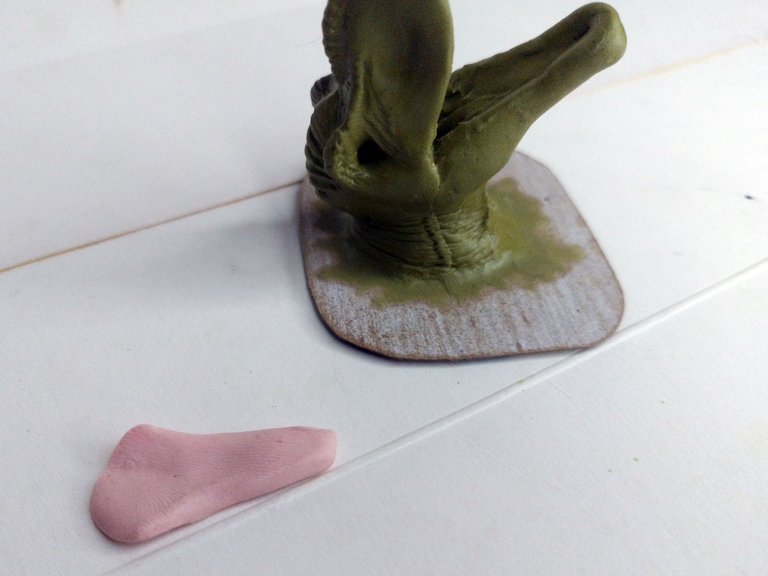
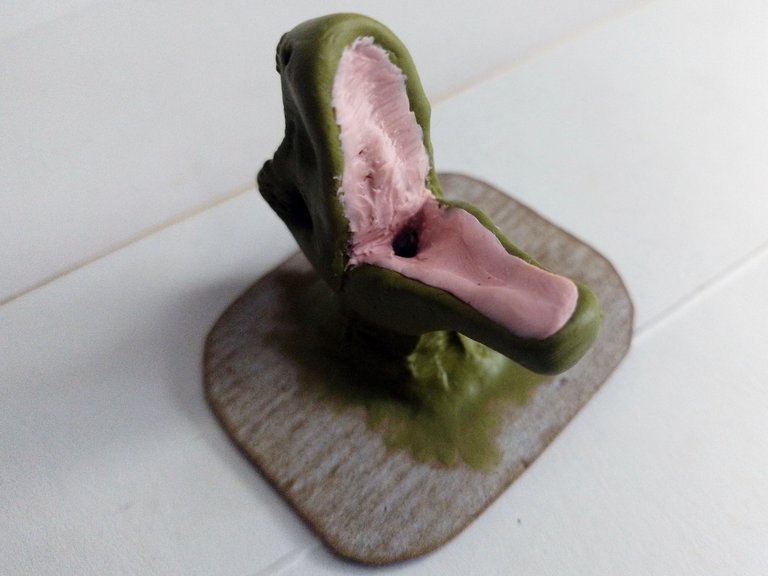
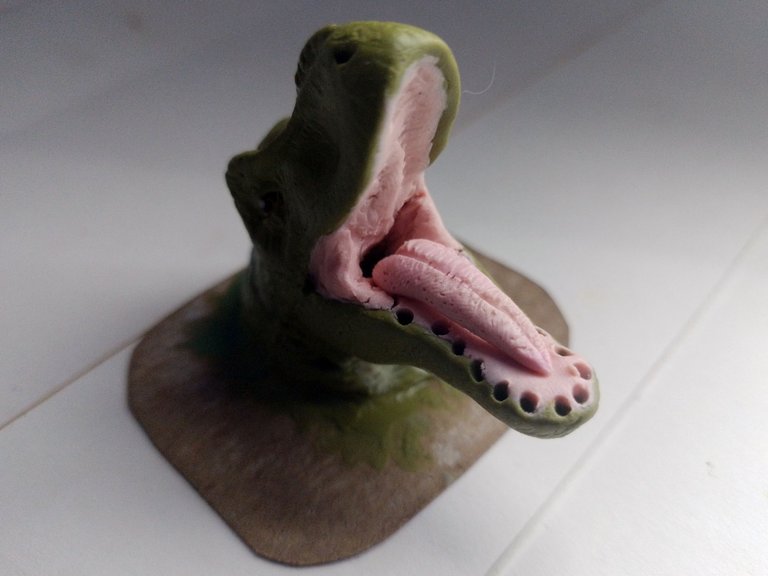
I made the inside of the mouth in a different color than the dinosaur's skin, since the mouth is usually a lighter color similar to pink.
So I took plasticine of this color and glued it along the mouth, covering the whole inside. I also placed some long folds in the corners of the mouth, something that is appreciated when the dinosaur opens its mouth, so I had to place it.
El interior de la boca la hice de otro color distinto al de la piel del dinosaurio, pues la boca suele ser de un color más claro y similar al rosado.
Por eso tomé plastilina de este color y la pegué a lo largo de la boca, cubriendo todo el interior. También coloqué unos pliegues largos en las esquinas de la boca, algo que se aprecia cuando el dinosaurio abre su boca, así que debía colocarlo.
 |  |  |
|---|
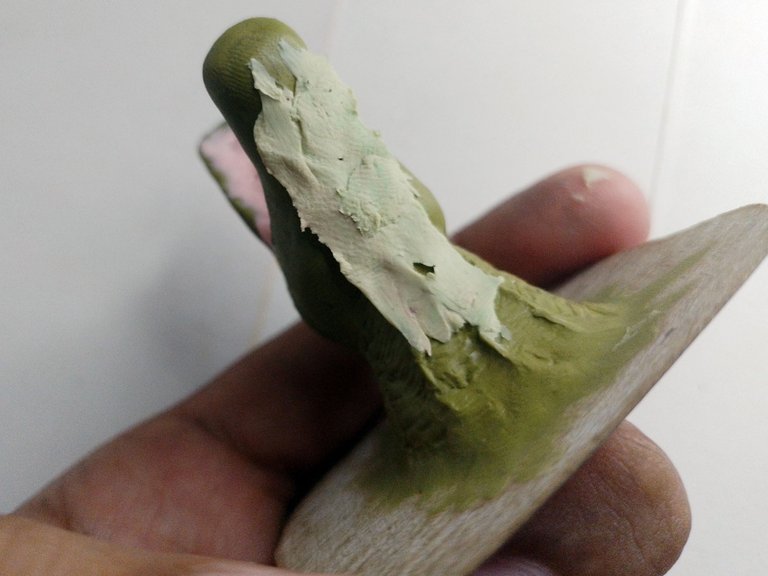
In the neck area I applied a lighter colored plasticine and blurred it throughout the area, redoing the creases and wrinkles that the neck had in this area.
En el área del cuello apliqué plastilina de un color más claro y la difuminé en toda el área, volviendo a hacer los pliegues y arrugas que tenía el cuello en esta área.
 |  |
|---|
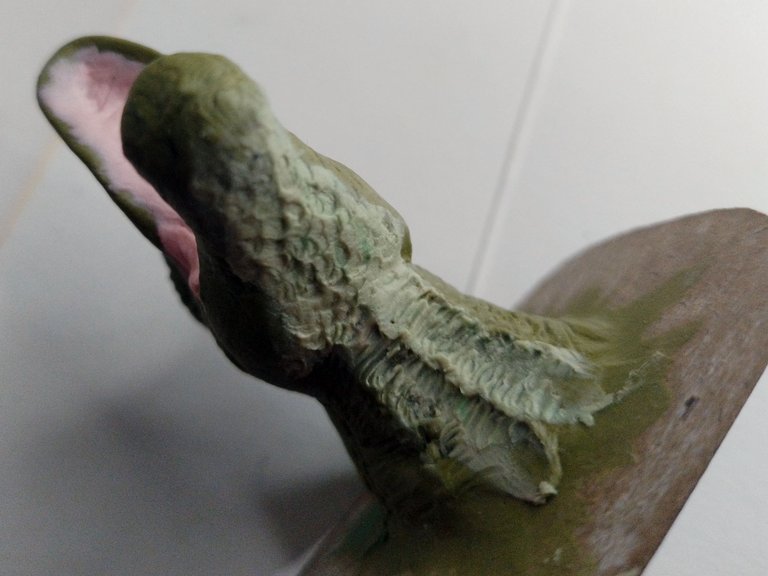
In the same way, on the dinosaur's back I also applied another color of plasticine and placed different shapes to simulate the dinosaur's rough skin.
De igual manera, en el lomo del dinosaurio también apliqué otro color de plastilina y le coloqué diferentes formas para simular la piel rugosa del dinosaurio.
 |  |
|---|
With the skin texture ready, I went back to work on the mouth, molding the tongue and making the holes where the dinosaur's teeth will go.
Con la textura de la piel lista, volví a trabajar en la boca, moldeando la lengua y haciendo los orificios en donde irán los dientes del dinosaurio.
The last thing I did was to put each tooth in its place and the dinosaur's own eyes in the sockets, using some plasticine of the same color to make the eye lids.
As an added bonus, I covered the base with more plasticine, in a different color than the Dinosaur's skin.
Lo último que hice fue colocar cada diente en su lugar y los propios ojos del dinosaurio en las cuencas, usando un poco de plastilina del mismo color para hacer los párpados del ojo.
Como algo adicional, cubrí la base con más plastilina, de color distinto a la piel del Dinosaurio.
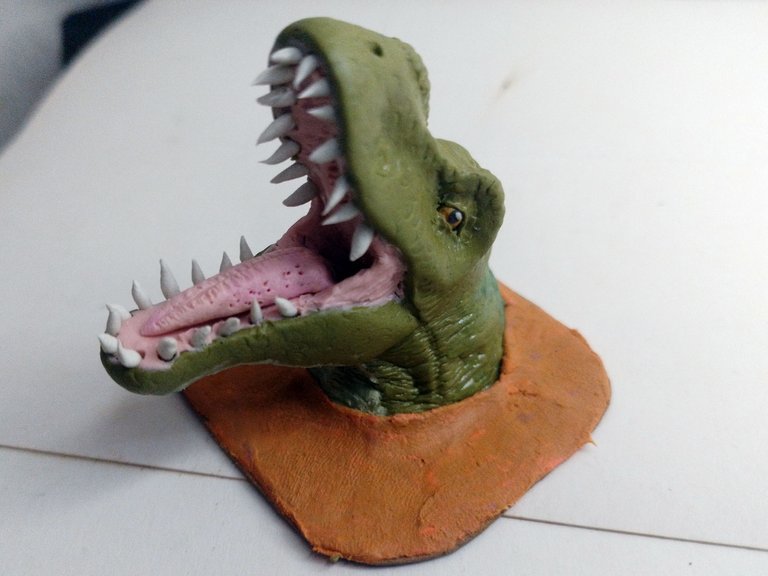
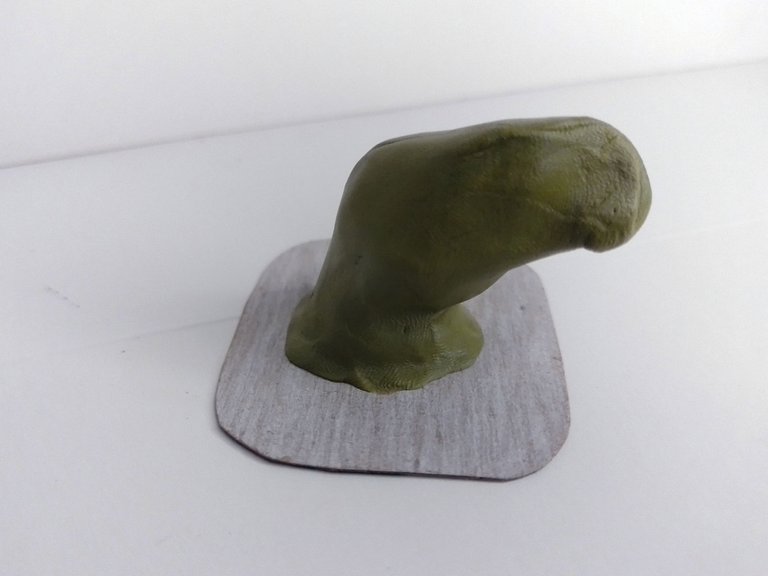
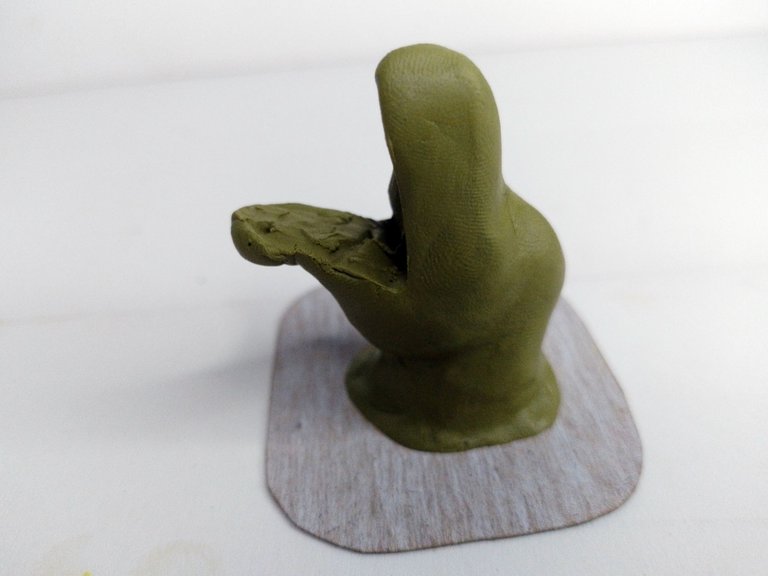
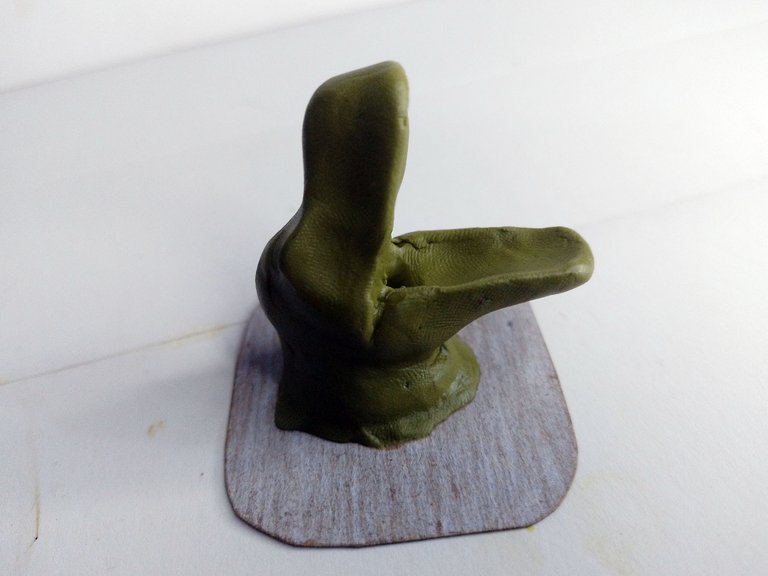
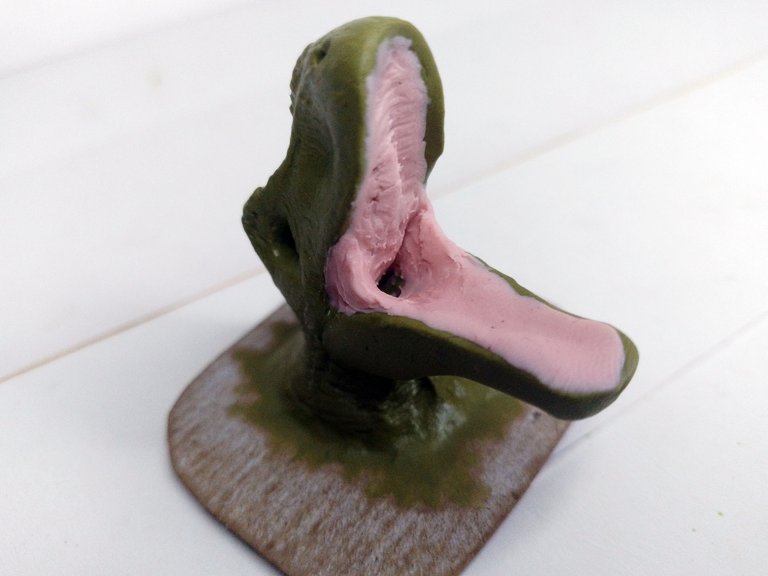
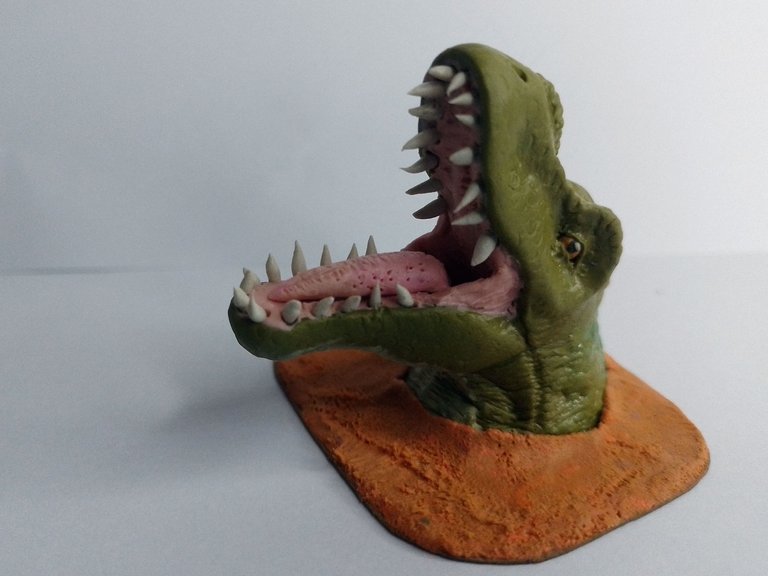
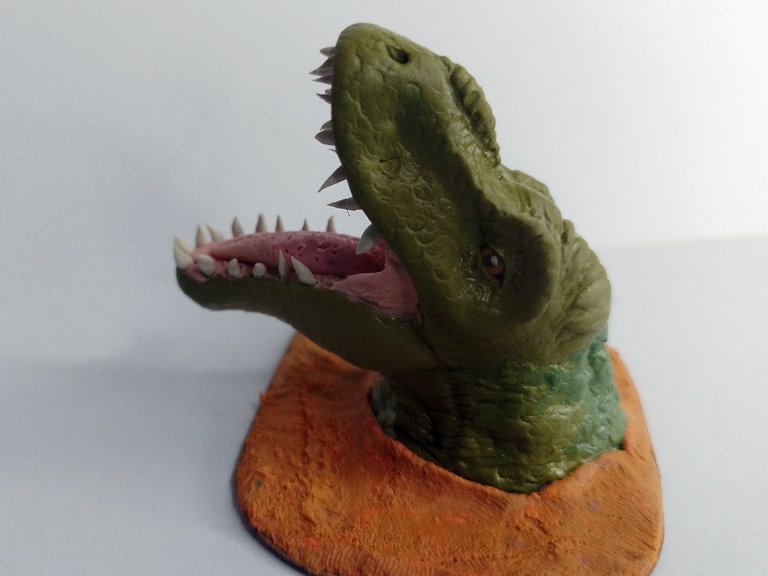
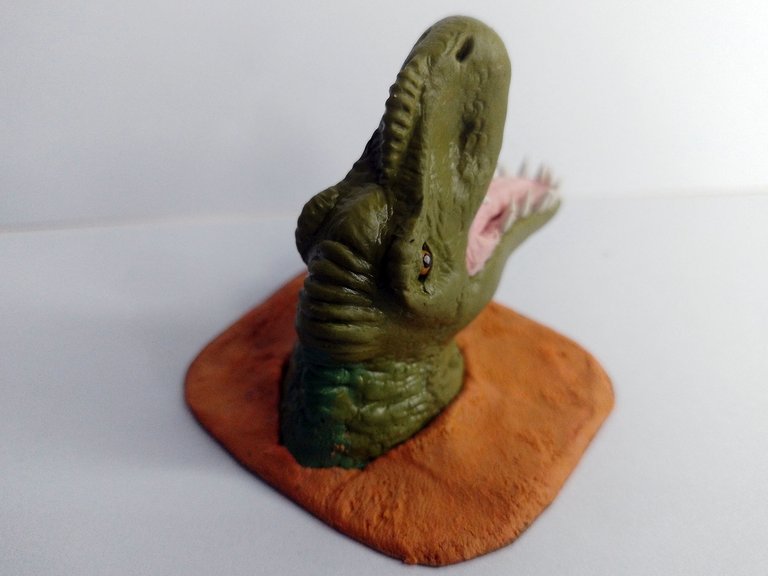
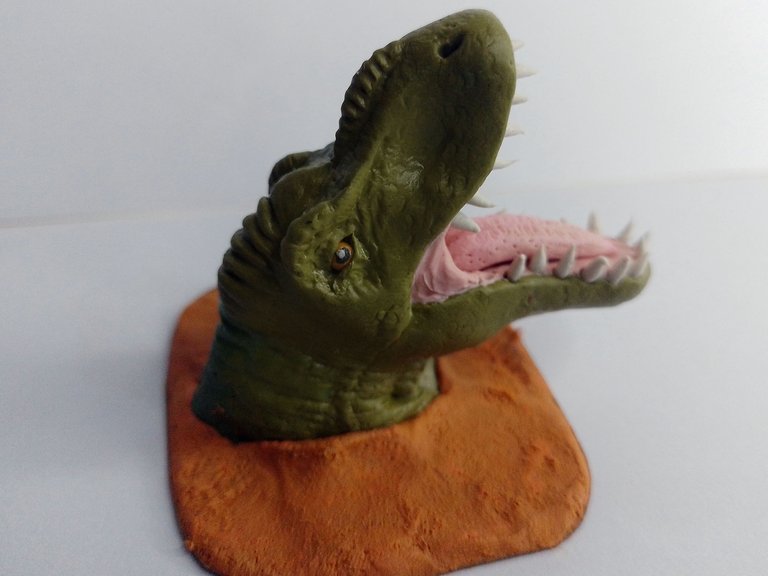
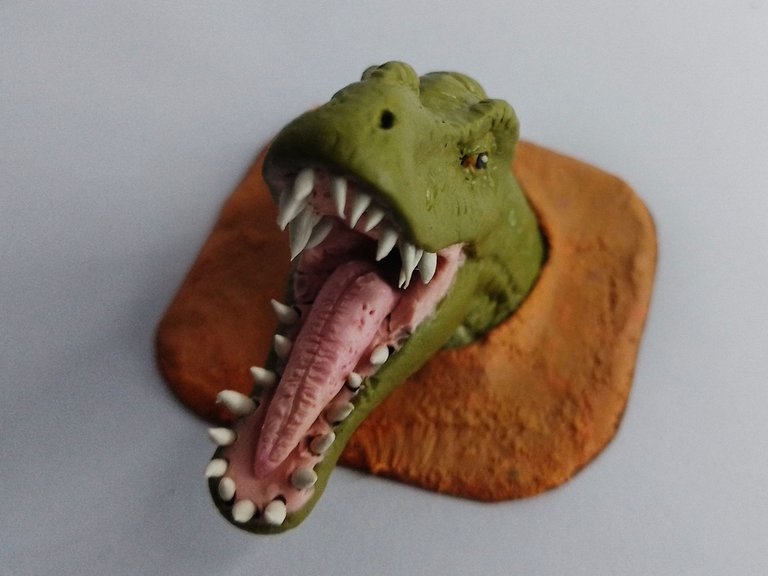
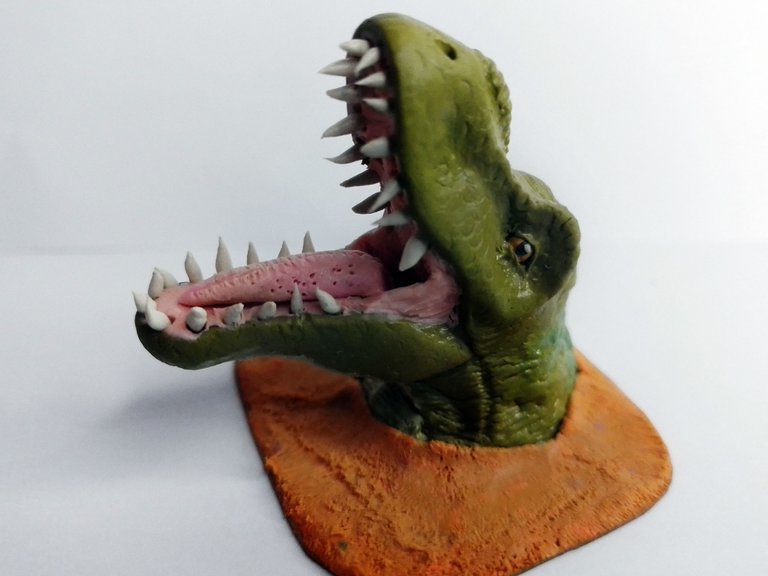
This way my Rexxie sculpture was finished. Below you can see pictures of the final result:
De esta manera mi escultura de Rexxie quedó terminada. A continuación pueden ver fotografías del resultado final:
Well friends, this has been all for now. I hope you liked my sculpture. I invite you to leave your opinions below in the comments, as always I will be happy to read them. With nothing more to add, I'll say goodbye then...
See you next time!
Bien amigos, esto ha sido todo por ahora. Espero que mi escultura haya sido de su agrado. Los invito a dejar sus opiniones abajo en los comentarios, como siempre estaré encantado de leerlos. Sin más que agregar, me despido entonces...
¡Hasta la próxima!


😍 Wowwwwww está ESPECTACULARRRRR. Me dejaste sin palabras. Cada día crece más mi admiración hacia ti, y tu trabajo.
Muchísima suerte en el concurso @gaboamc2393 💙
Oye fan número uno muchas gracias por tus palabras, muy bonitas la verdad. Siempre hay que tratar de mejorar en lo que se hace jejej esa es la idea. Muchas gracias por tu bonito comentario.
💙
Simplemente waooo amigo, te quedo increíble y los ojos parecen tan reales, que trabajo tan maravilloso 👏
Te deseo éxitos en el concurso.
Bueno es que dicen que los ojos son el reflejo del alma, así que su buscas darle "vida" a algo, hay que ser detallistas en los ojos jejejeje
Gracias por los buenos deseos, éxitos para ti también 😊
Impresionante trabajo, se ve realista, felicitaciones amigo.
https://twitter.com/cbit_roxana_mdh/status/1726025393604280674?t=c_v3_4V7GHSivAVCBZk6Pg&s=19
Oye gracias por el apoyo y compartirlo!
Esta escultura te quedó fantástica. Los ojos y los dientes fueron minparte favorita...eres genial trabajando este material.
!VSC
!LUV
@chacald.dcymt has sent VSC to @gaboamc2393
This post was rewarded with 0.1 VSC to support your work.
Join our photography communityVisual Shots
Check here to view or trade VSC Tokens
Be part of our Curation Trail
@chacald.dcymt ha enviado VSC a @gaboamc2393
Éste post fue recompensado con 0.1 VSC para apoyar tu trabajo.
Únete a nuestra comunidad de fotografía Visual Shots
Consulte aquí para ver o intercambiar VSC Tokens
Se parte de nuestro Trail de Curación
Fueron las dos cositas que más me costaron porque son esas en las que hay que imprimir más detalle. Me encanta que fuesen tus dos partes favoritas.
Guao amigo que hermosura de escultura, cada detalle perfecto increíble.
Una maravilla de plastilina 😱
Creo que yo con plastilina solo se realizar bolitas y jugar como en primaria.
Lo felicito es un trabajo digno de admirar, usted es un artista.
Pues nunca es tarde para aprender jejeje en mi blog tengo una colección de tutoriales que puedes seguir si te animas, capaz tienes un talento o culto que no conocías.
Umm voy a pensarlo, pero creo que no podría 😔 , no lo veo fácil aunque usted lo haga parecer así.
Creo que necesitaría mucha pero mucha práctica.
Amazing work @gaboamc2393 friend!
!discovery 30
!VSC
@jlinaresp has sent VSC to @gaboamc2393
This post was rewarded with 0.1 VSC to support your work.
Join our photography communityVisual Shots
Check here to view or trade VSC Tokens
Be part of our Curation Trail
@jlinaresp ha enviado VSC a @gaboamc2393
Éste post fue recompensado con 0.1 VSC para apoyar tu trabajo.
Únete a nuestra comunidad de fotografía Visual Shots
Consulte aquí para ver o intercambiar VSC Tokens
Se parte de nuestro Trail de Curación
This post was shared and voted inside the discord by the curators team of discovery-it
Join our Community and follow our Curation Trail
Discovery-it is also a Witness, vote for us here
Delegate to us for passive income. Check our 80% fee-back Program
Saludos @gaboamc2393, te quedó espectacular el dinosaurio, los dientes y los ojos se ven realistas, al ver la foto de portada pensé que habías usado masa flexible, y vaya es plastilina! has hecho un gran trabajo.
Feliz domingo!
!DIY
Nooo jeje curiosamente esta es una de las figuras más sencillas en cuanto a materiales se refiere, porque solo uso plastilina y cartón, más nada jejeje
Impresionante obra de arte.
You can query your personal balance by
!DIYSTATSTe ha quedado super bien, ese ojo se ve llamativo, lo bueno que te ahorraste material porque no usaste alambre
Nooo, no usé alambre y quedó bien bonita y se mantiene. A veces estas piezas sencillas lucen mejor que otras super complicadas.
Felicidades por tu trabajo amigo @gaboamc2393 te quedó genial.
Muchas gracias, me alegra que te haya gustado! Gusto en ver que pasara por mi blog a comentar.
https://www.reddit.com/r/Dinosaurs/comments/1oye5xd/a_trex_head_i_made_myself_out_of_clay/
This post has been shared on Reddit by @gaboamc2393 through the HivePosh initiative.