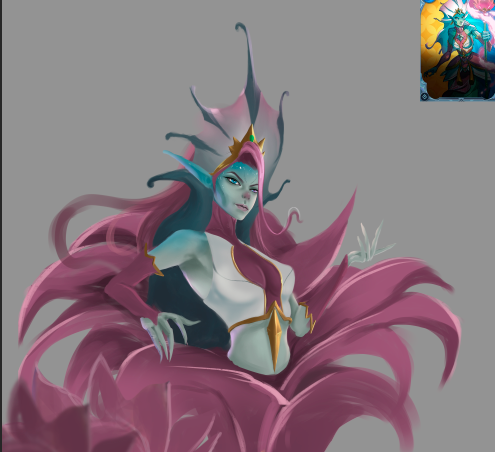
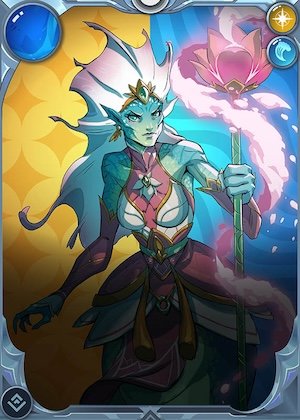
Splinterlands art contest / PRUNDA UNDERVESCH / FanArt
Arte Digital | Digital Art
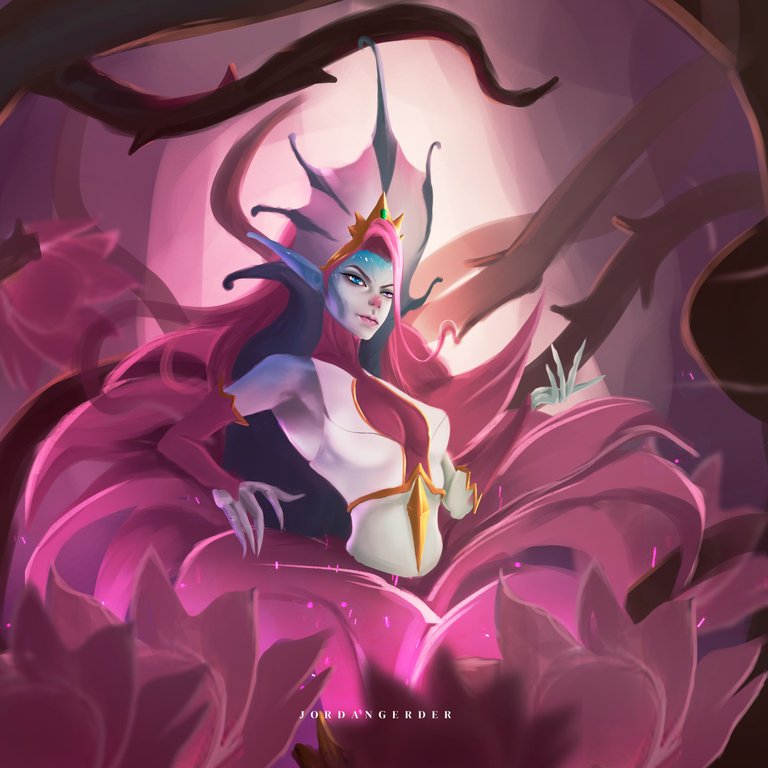
Hello people. How are you doing today? I hope I enjoyed the vacation. I was a little busy with the preparation of my entry for the art contest created by @splinterlands, it lasted a little longer than usual, but I wanted this to be an amazing entry, for this I chose the beautiful Prunda, the idea was inspired by a flower bud or the rebirth of it, the beautiful Prunda was the center of this flower and was accompanied by other flowers of the same species...
Let's see a little about the creation process, it's always good to see what's behind each art, come with me⏩⏩⏩...
Materiales | Materials
- Desktop computer
- Tableta Huion H950P
- Programa Adobe Photoshop 2019
- Ordenador de mesa
- Huion H950P tablet
- Adobe Photoshop 2019 program
Proceso | Process
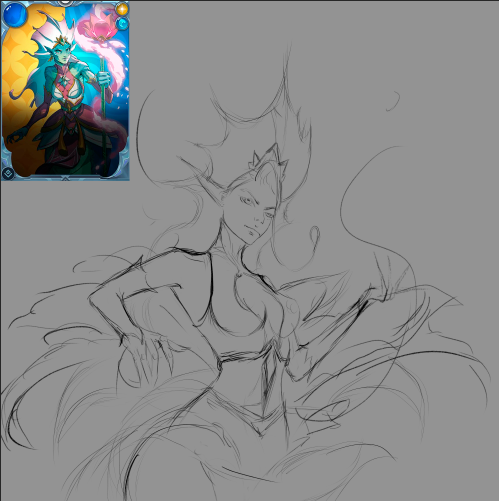
Paso 1
- Inciamos con un bosquejo de lo que sería el personaje agregué al personaje orginal en un extremo para captar todas las partes y no perder ningun detalle, asi es como resulta mas facil su creación:
Step 1
- We start with a sketch of what the character would be, I added the original character at one end to capture all the parts and not lose any details, this is how its creation is easier:
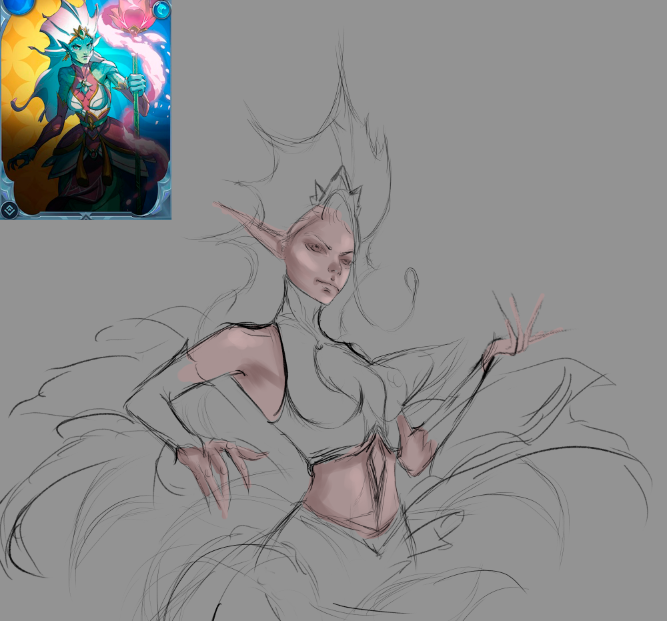
Paso 2
- Una ves que conseguimos un bosquejo mas claro, o donde se aprecie el personaje al cual agregaremos color, es momento de pasar a la siguiente etapa donde se seleccionan tres tonos de color no muy saturados para empezar a crear volumen en su piel:
Step 2
- Once we get a clearer sketch, or where we can see the character to which we will add color, it is time to move on to the next stage where three not very saturated color tones are selected to start creating volume in their skin:
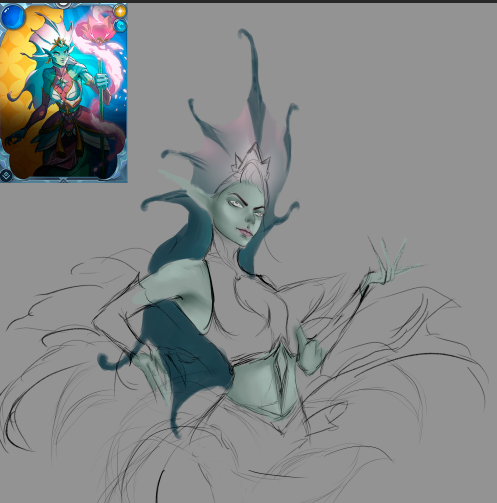
Paso 3
- Es momento de mezclar los parches de color que agregué anteriormente (este paso lo hago con la herramienta dedo), para luego suavizar un poco con un pincel difuso, y asi es como conseguimos una piel mas trabajada:
Step 3
- It's time to mix the color patches that I added previously (I do this step with the finger tool), and then soften a little with a diffuse brush, and this is how we get a more polished skin:
Paso 4
- Momento de agregar detalles, agregué algunos que no estaban en el arte original como el cabello, este se miraba mas atractivo con algo de cabello, trabajé en su vestuario y detallé un poco los pétalos de las flores, tambien añadí todos los detalles que habian en su rostro para lograr mayor parecido con el arte de inspiración...
Step 4
- Time to add details, I added some that were not in the original art like the hair, this one looked more attractive with some hair, I worked on her costume and detailed the flower petals a little, I also added all the details that were in his face to achieve greater resemblance to the art of inspiration...
Paso final
- Para finalizar todo el proceso de creación agregué detalles finales como brillos, mas luces y ajustes totales de color.
Final step
- To finalize the entire creation process, I added final details such as highlights, more highlights and total color adjustments.
We got an incredible result, I really enjoyed the creation process. I hope you liked it, I have elaborated it with love for all the viewers who visit this publication, see you in the next one 😍
𝑮𝒓𝒂𝒄𝒊𝒂𝒔 𝒑𝒐𝒓 𝒗𝒊𝒔𝒊𝒕𝒂𝒓 𝒎𝒊 𝒃𝒍𝒐𝒈, 𝒂𝒑𝒓𝒆𝒄𝒊𝒐 𝒎𝒖𝒄𝒉𝒐 𝒕𝒖 𝒂𝒑𝒐𝒚𝒐 / 𝑻𝒉𝒂𝒏𝒌 𝒚𝒐𝒖 𝒇𝒐𝒓 𝒗𝒊𝒔𝒊𝒕𝒊𝒏𝒈 𝒎𝒚 𝒃𝒍𝒐𝒈, 𝑰 𝒓𝒆𝒂𝒍𝒍𝒚 𝒂𝒑𝒑𝒓𝒆𝒄𝒊𝒂𝒕𝒆 𝒚𝒐𝒖𝒓 𝒔𝒖𝒑𝒑𝒐𝒓𝒕.
▶ 


 ◀
◀
TWITTER ⚪ NFT SHOWROOM ⚪ INSTAGRAM ⚪ DISCORD

Very nice.
!BBH !WITZ !invest_vote
@jordangerder! Your Content Is Awesome so I just sent 1 $BBH (Bitcoin Backed Hive) to your account on behalf of @dotwin1981. (17/50)
lolztoken.com
Sprach der Spatz und flog in den Ventilator
Credit: damus-nostra-2
@jordangerder, ich habe dir im Namen von @dotwin1981 einen $LOLZ Token gesendet
Verwende den Befehl !WITZ oder !LOOL, um einen Witz und ein $LOLZ zu teilen.
ENTER @WIN.HIVE'S DAILY DRAW AND WIN HIVE!
.(3/10)
@dotwin1981 denkt du hast ein Vote durch @investinthefutur verdient!
@dotwin1981 thinks you have earned a vote of @investinthefutur !
Checkout our BDVoter Daily Hive Showcase & Participate into our Daily giveaway to win various prize.
https://twitter.com/AlienArtHive/status/1776216212663325148
Congratulations @jordangerder! You have completed the following achievement on the Hive blockchain And have been rewarded with New badge(s)
Your next payout target is 18000 HP.
The unit is Hive Power equivalent because post and comment rewards can be split into HP and HBD
You can view your badges on your board and compare yourself to others in the Ranking
If you no longer want to receive notifications, reply to this comment with the word
STOPCheck out our last posts: