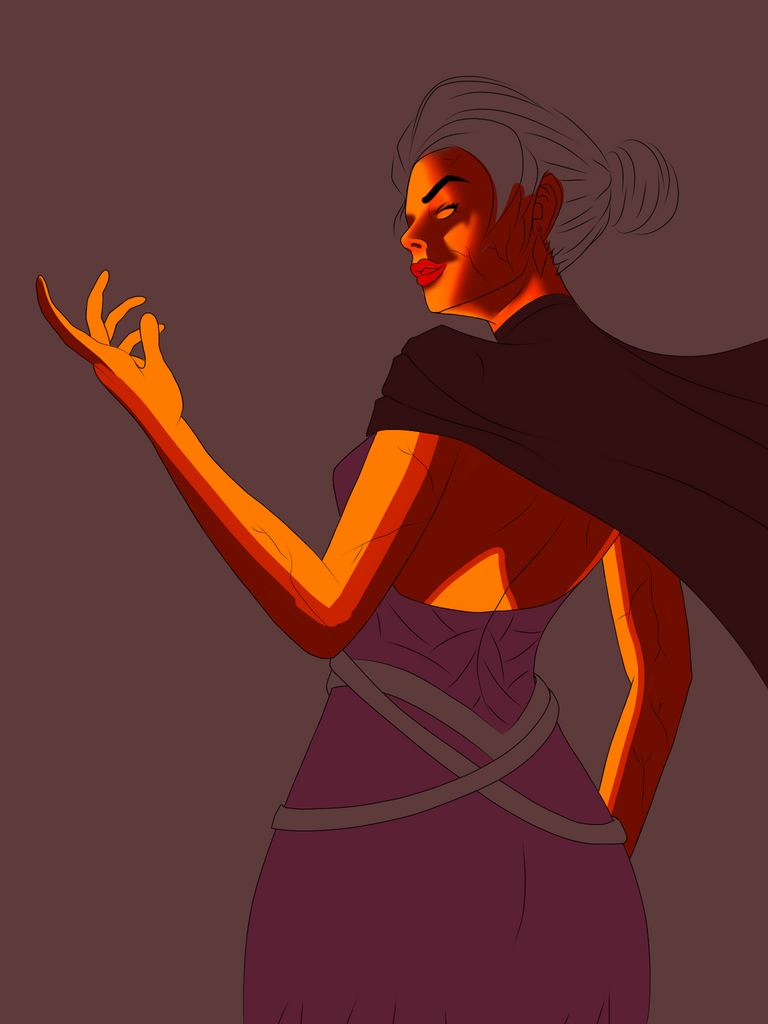
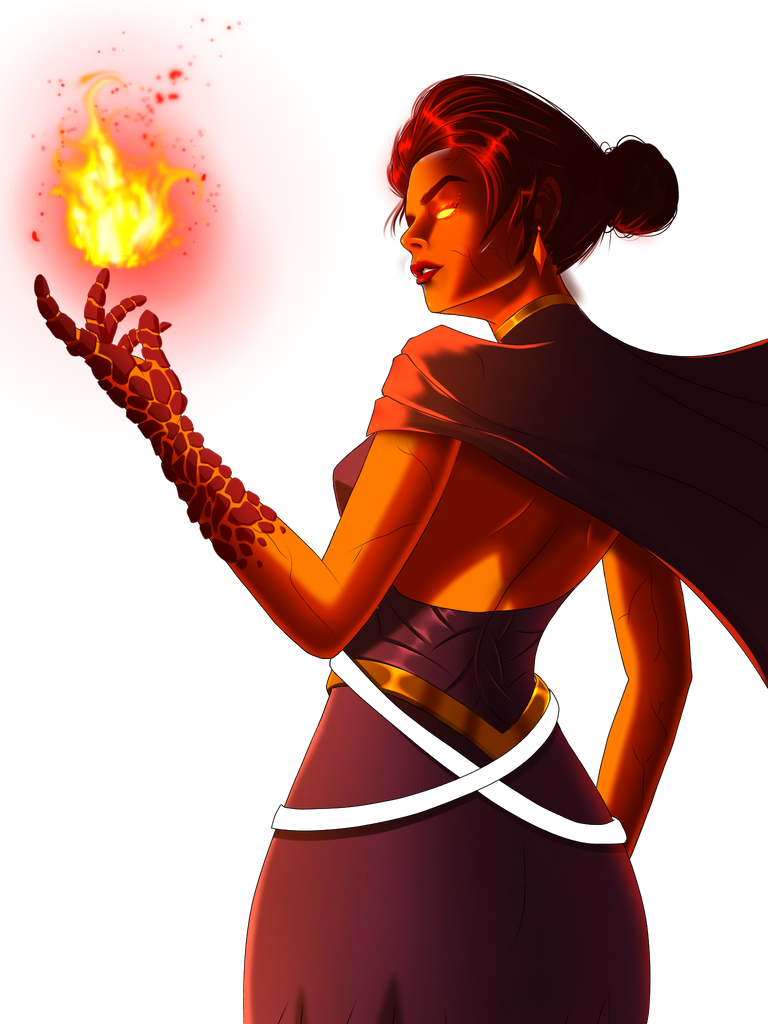
Countess Sinash as my entry for this week's Splinterlands Art Contest
Splinterlands Art Contest
Hello guys and welcome back to my new blog!
Countess Sinash
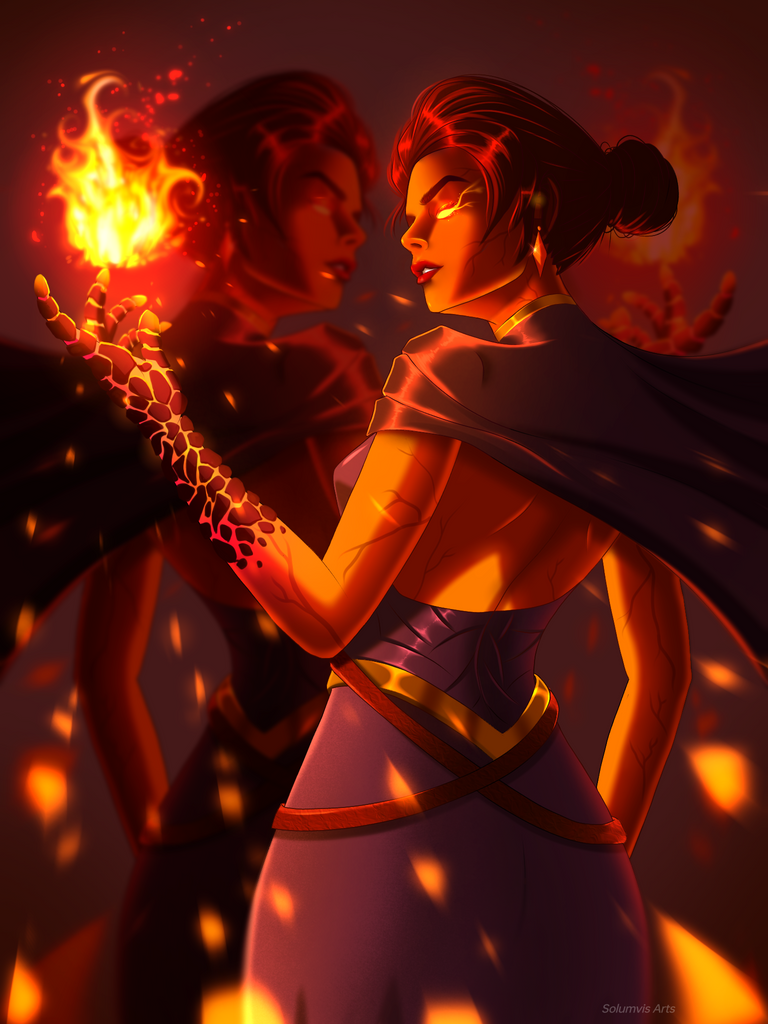
For this week I decided to draw Countess Sinash in my style as my entry for the contest. I decided to draw her because of her glossy clothes and cape haha. I know it's a weird reason, right? Ever since I got my stylus I wanted to try the things I couldn't do until now like adding those small nice glossy highlights on hair and clothes like you see on some paintings but until now it was incredibly hard to do with fingers so this upgrade really helped me add in those delicate details which makes the painting more interesting. Aside from that I mentioned in my previous blog that I like drawing fire splinters. I love how that strong light creates those dark shadows and highlights but this time I used a technique I learned from Pinterest and other YouTube tutorials I watched so far. I'll explain that in the process below so without further ado let's begin the process but before that enjoy the painting below hehe.
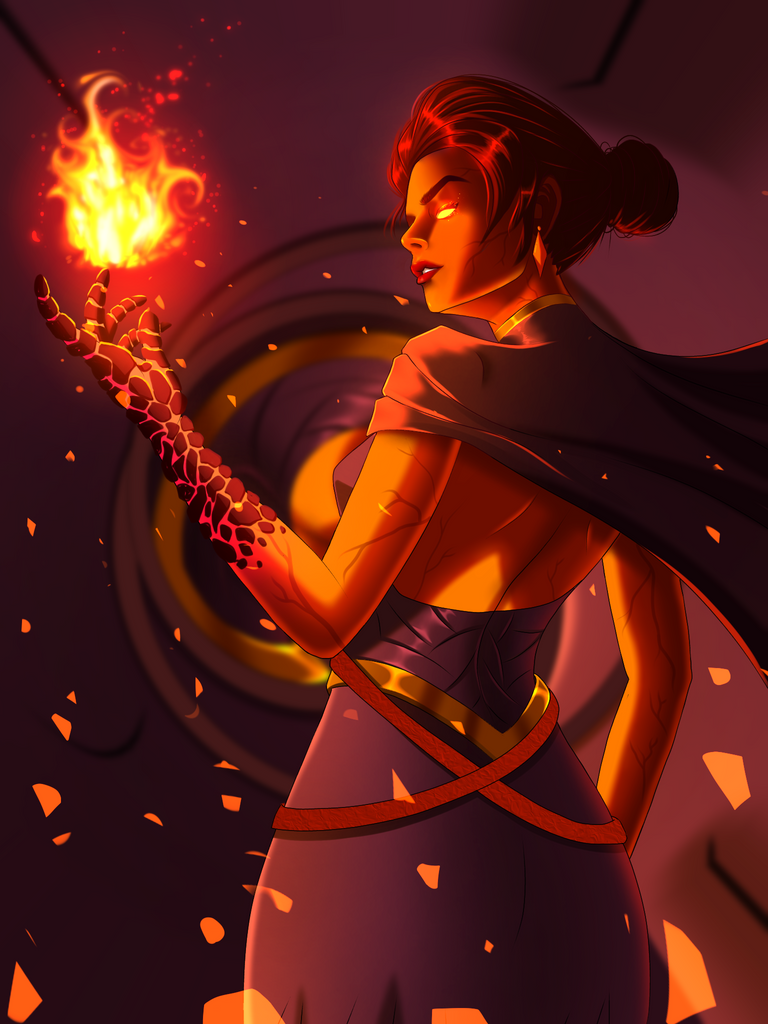
The process...


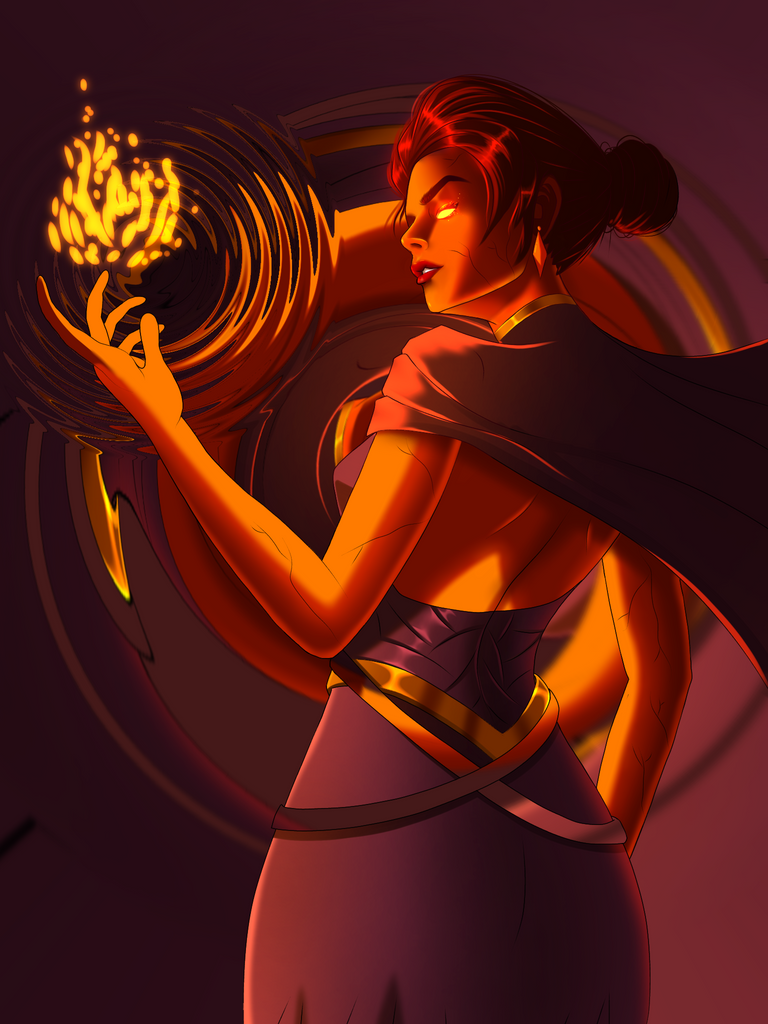
✨Result✨
Fire process...
I forgot to take progress shots of the one I made above so I'm posting some process shots of a new one I made just now plus @sephiwolf showed interest in the process. I hope this helps :)
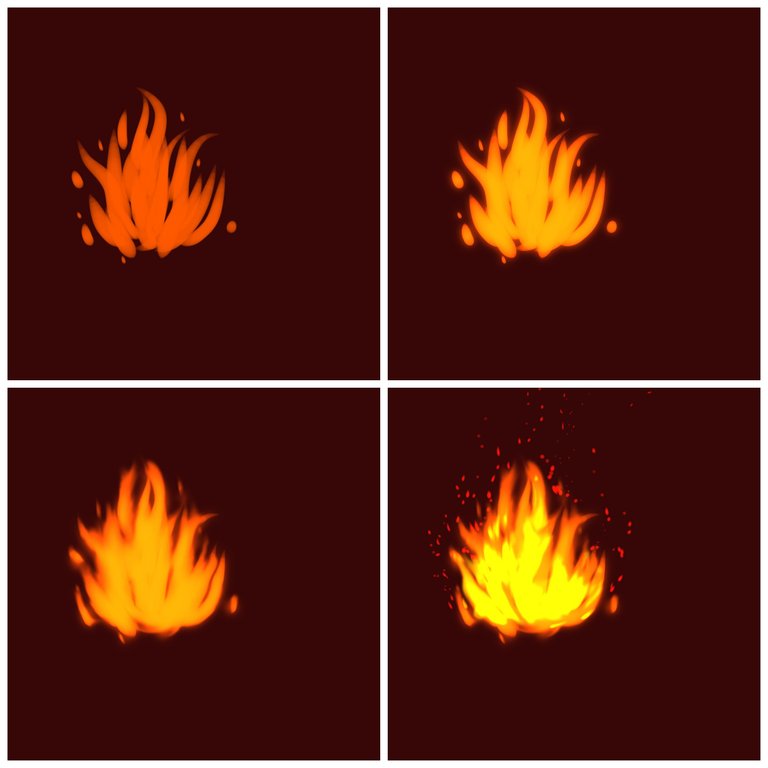
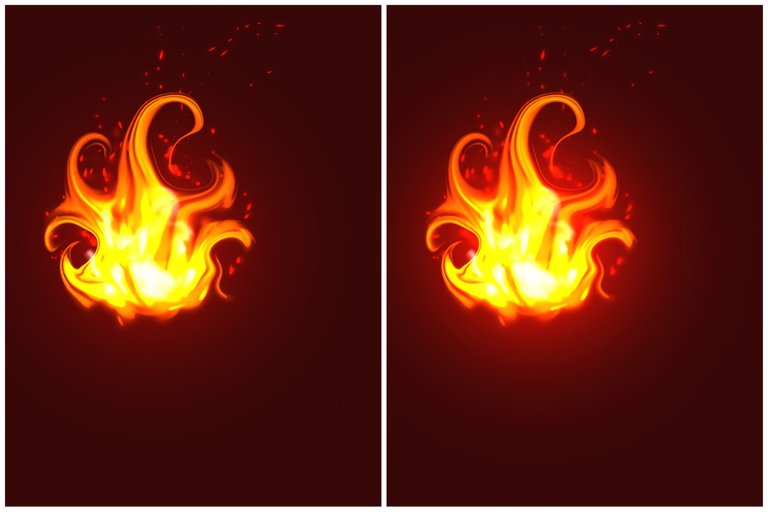
Step 1: Paint a dark reddish background and after that paint some strokes like you see on the first pic using a pen fade brush with orange colour on an add/glow layer.
Step 2: Duplicate the the above layer and blur it using gaussian blur to create the background glow.
Step 3: Click on smudge tool to blend it a bit as you see on the picture. The amount of smudging depends on your preference but do not overdo it.
Step 3: Create a new glow layer above this one and paint more strokes with yellow colour. As we go to the center of the flame lighter colour is used so similarly on some parts of the flame, paint with white colour. Now smudge the newly added colours a bit. After that add some fire particles around the flame.
Step 4: Merge all the flame stroke layers. Now use liquify tool to control the flow of the flame in any direction your want. I like it twisted a bit so I move the liquify brush in circles to get that pattern.
Final step: Create a new layer on top of all the layers and pick red colour on an airbrush and tap on the flame again to get a much more powerful glow. I didn't blur the flame here compared to the one in the main painting because I prefer it that way on it. This is an optional step by the way.
Short Explanation
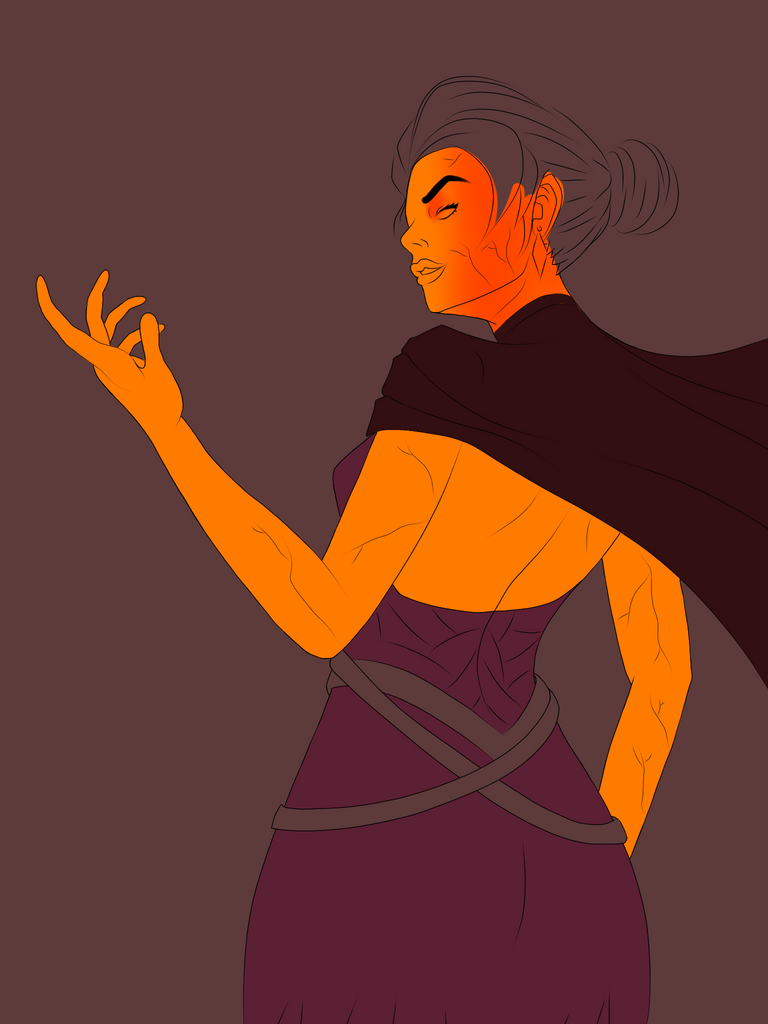
I tried to take a risk this time by trying out a complicated pose I found on Pinterest. I know drawing this wouldn't be easy but I was confident that I can get the body anatomy right however the head and face proportions were so off so I had to create a new lineart many times until I fixed the issue. Even then I had major trouble with the lip perspective. You can say it pretty much made me a lot annoyed XD. I think after my 11th try I got it right lol. That was so much harder than I expected haha.
The idea was that the character is holding a flame in her hand so the shading has to be done with respect to that. I usually just go with a light skin colour and a dark variant of the said skin colour as shade but this time I decided to use some warm colours that you see in a realistic painting when a fire source is close. After painting the base colour and shades I decided to paint a narrow red stroke between them to connect them. The magic happens when you start to blend the red with the shade colour. Now it feels like the area which is visible to light is causing a sort of glow on the skin. I think it's pretty cool haha. I saw artist Sam Yang using this technique on some of his portrait paintings so I tested it here and I'm glad I did it because It looks much better than plain shade colour.
I didn't have a reference while painting so it was kinda hard. It was pretty hard to find references in this lighting condition. I tried to look for it but didn't find any to my liking so I decided to wing it so there might be mistakes but I made sure that it looked decent by studying the lighting on the pose reference. Since the light source was in this direction I only need to add the highlights of the hair in there because the rest of the area will be hidden in the dark.
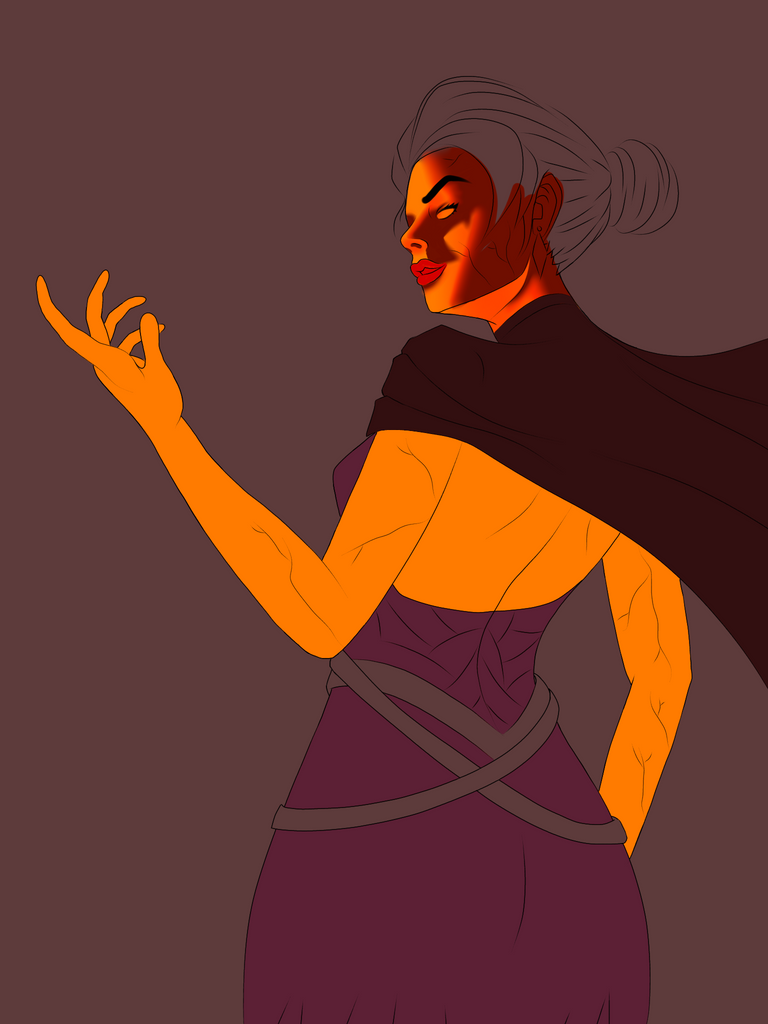
After fully rendering the skin I moved on to paint the clothes which is the best part. If you observe closely I added a highlight on top a highlight to get a more glossy effect while also showing how strong the light source is. Airbrush really helped me here to get that 3d effect with less effort. I painted the back of her clothes using it. I painted the same glossy effect I applied on the neck area to the upper area of her dress and the cape around her shoulders. Next up was to finish the other accessories on her clothes such as the golden belt and brown belt. I did something new with the brown belt. After painting the shadows and highlights on it I used a leather texture clipped in overlay mode to create that realistic feel to the belt. Now what was left to do was the flame and the background.
The last time I made a flame it looked a bit cartoonish. I studied a bit about creating it this time before painting so I was able to create a better one this time. I decided to use the same painting which I made in overlay mode with a gentle Gaussian blur applied on it to create that background. I had other plans to do with the flames as well. I decided to make it look like it was emitting fire particles from it so I drew them in a perspective form to make it look more realistic and applied glow to it. After that, I used a radial blur on the particle layer to make the viewer focus more on the flame source. Since I added this radial blur I figured it's best to keep the right section of the character in a blur as well. It looked more interesting this way and shows how intense the flame is. With this, I was finally done with the painting.
Tools used: Ibis paint x, Notebook and Pencil
Duration: 10hrs
Thank you for stopping by and I hope to see you guys in my next blog as well 😁
UGH SO GOOD 😍Okay, this is now my favorite haha! The fire, molten hand and the eyes are my favorite.
Thanks jiji😁!
This is my current favourite one as well hehe.
beautiful color palette, I love the whole composition itself.
Thanks bro. Happy to hear that 😊.
I liked it very much, an excellent job you did with the fire, I would like to see more detail that part of the process. greetings
!PIZZA
Unfortunately, I forgot to take screenshots of that part. If I make more fire themed splinters in the future I'll be sure to post them here.
Thanks for visiting 🤩!
$PIZZA slices delivered:
@splintercell-01(2/5) tipped @solumviz
sephiwolf tipped solumviz
Wowww 🤩 this one is one of your best yet. Upgrade success!! The glow is just right 😙🤌
Thanks Ema 🤩. This is the one I was keeping in queue. I told you about it last day hehe.
Yesss. The tab has really allowed you increase your level of detail, very nice.
This post has been manually curated by @bhattg from Indiaunited community. Join us on our Discord Server.
Do you know that you can earn a passive income by delegating to @indiaunited. We share more than 100 % of the curation rewards with the delegators in the form of IUC tokens. HP delegators and IUC token holders also get upto 20% additional vote weight.
Here are some handy links for delegations: 100HP, 250HP, 500HP, 1000HP.
100% of the rewards from this comment goes to the curator for their manual curation efforts. Please encourage the curator @bhattg by upvoting this comment and support the community by voting the posts made by @indiaunited.
Thanks:)
Your drawing is too beautiful. I love these fire characters, and even people like you make them look more amazing with all those light effects and the flames, just beautiful. Great job!👏
I like fire characters too hehe. The glow and particle effects around them make them truly amazing like the fire itself!
Thank you for replying :)
Do you know you can win a Chaos Legion pack and many other things just by following some simple steps ?? Check out our Latest Daily Showcase and Participate our latest Giveaway. Thanks
This is absolutely gorgeous 😍😍
Thanks Alexa :)
I really love how you drew the fire! Loved it!
!PGM !PIZZA
BUY AND STAKE THE PGM TO SEND A LOT OF TOKENS!
The tokens that the command sends are: 0.1 PGM-0.1 LVL-0.1 THGAMING-0.05 DEC-15 SBT-1 STARBITS-[0.00000001 BTC (SWAP.BTC) only if you have 2500 PGM in stake or more ]
5000 PGM IN STAKE = 2x rewards!
Discord
Support the curation account @ pgm-curator with a delegation 10 HP - 50 HP - 100 HP - 500 HP - 1000 HP
Get potential votes from @ pgm-curator by paying in PGM, here is a guide
I'm a bot, if you want a hand ask @ zottone444
Yay! I'm glad you liked it.
Wow, te quedó bellísima!
Thank you :)
Thanks for sharing! - castleberry#6859

Thanks bro :)