PERFECT "BASIC" COMP - SPLINTERLANDS PT/EN


(nativo)
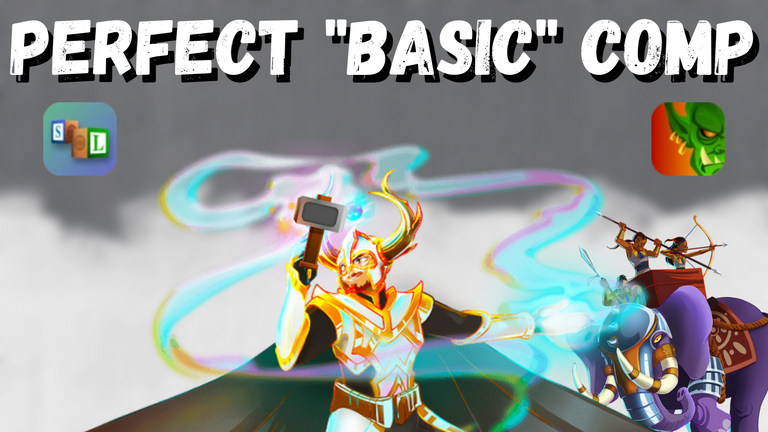
Criar estratégias no Splinterlands é algo muito gratificante, pois a variedade de regras e a disposição de cartas nos permite montar infinitas composições e vencer o inimigo através da inteligência. Mas existem "combos" de regras de combate que parecem te deixar totalmente sem opções.
No post de hoje eu falarei sobre um desses combos de regras que são muito difíceis de se lidar, e mostrar as duas estratégias que eu utilizei para conseguir driblar isso e montar a composição perfeita.

TROCA DE SOCOS 

Ao iniciar uma nova partida e avistar essa combinação de regras de combate, eu fiquei receoso pois apenas unidades físicas sem nenhuma habilidade torna o combate muito simplório e difícil de se criar uma boa estratégia, ficando fadado à um combate de 1 contra 1, onde aquele que cair primeiro será substituído até não haver mais ninguém.

Apesar de ser bem difícil pensar em estratégias poderosas nessa situação, existem sim algumas cartas que podem fazer total diferença para definir o vencedor dessa trocação de socos. Eu estou falando dos invocadores.
Os invocadores são a exceção da regra Back to Basics, ou seja, os seus efeitos são aplicados nas criaturas após a regra ser aplicada, permitindo que você conceda buffs ou habilidades para os monstros, ganhando certa vantagem em relação ao oponente.
Vou citar alguns dos principais invocadores que são extremamente efetivos nas regras mencionadas e depois falarei sobre a minha batalha, onde além de fazer uso de um bom invocador, adotei outra estratégia super interessante da qual falarei mais em breve.
INVOCADORES 
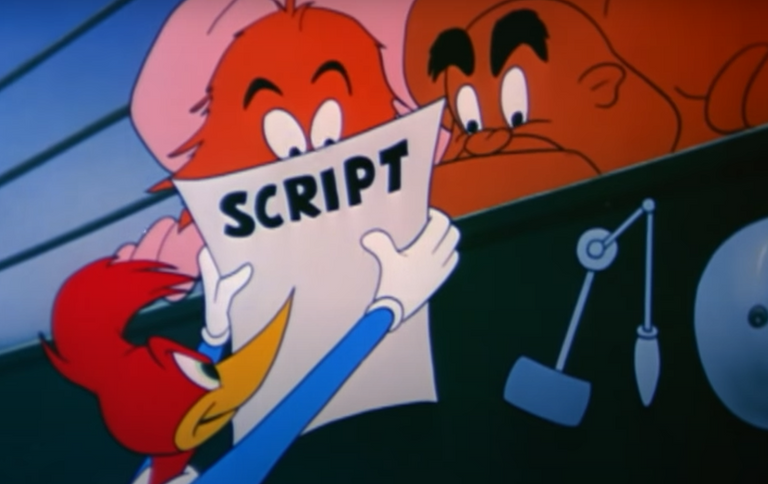
A melhor analogia aos invocadores nessa situação são os técnicos de luta livre. Os lutadores são meros atores e quem realmente definirá o campeão são os técnicos, pois tudo seguirá conforme o script deles.
Vamos ver então quais são os melhores técnicos (vulgo invocadores) que farão você vencer nessas batalhas de regras extremamente específicas.
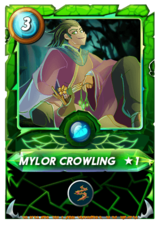
| Mylor é aquele invocador injusto que coloca espinhos em seu próprio lutador para fazer seu oponente se ferir ao atacar. A habilidade de Thorns é uma ótima maneira de fazer o oponente morrer mais rápido, gerando muita vantagem à quem utilizá-lo. |
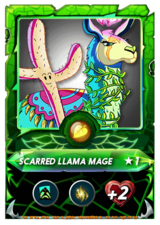
| A partir daqui os invocadores começam a ser mais poderosos, começando pela Llama que é famosa por tornar um monstro extremamente poderoso quando estiver sozinho em campo. Em partidas de baixa mana com essas regras, vale a pena optar por uma única unidade que vai resistir e causar muito dano por conta dos buffs recebidos. |
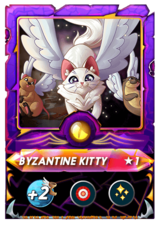
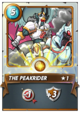
| Se os outros parecem fortes, imagine essa gatinha que fará seu lutador bater incrivelmente rápido, sem a possibilidade de errar e ainda irá regenerá-lo todo turno. É praticamente impossível vencer um confronto com as regras Back to Basics e Up Close and Personal contra esta invocadora se você não possuir outro invocador igualmente poderoso. |
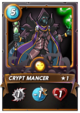
| Vocês já perceberam o padrão né? Qualquer invocador que dê alguma habilidade às suas cartas já trará um benefício muito maior do que um buff puro (com exceção dos invocadores que concedem 3 buffs/debuffs ao mesmo tempo), e a possibilidade de envenenar seus oponentes fará eles morrerem mais facilmente. Eu o considero a pior opção dentre os citados aqui, pois a chance de aplicar o veneno não é 100% e o tem pouca chance de o dano ser ativado mais de 1 ou 2 vezes. |
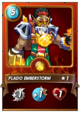
| Apesar do seu buff de dano ser inútil, o aumento de vida e principalmente a distribuição da habilidade Blast é extremamente efetivo nessas partidas, pois enquanto seu oponente estiver causando dano só na sua linha de frente, você estará mitigando a vida de duas unidades de uma só vez. Ao longo da partida o time inimigo cairá apenas com o dano espalhado pelo Blast, simplesmente sensacional. |
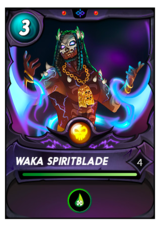
| Outro invocador que apesar de ter sua habilidade de cura inutilizada, faz um ótimo uso para suas outras habilidades. Repair pode ser a habilidade mais roubada nesse tipo de confronto, pois apesar da cura restaurar 2~3 de vida em média por turno, a armadura reparada poderá aguentar todo o dano do oponente, ou seja, pode mitigar 4, 5 ou mais de dano sem nenhum problema. E se por acaso a sua unidade morrer, ele ainda terá uma segunda vida que virá com a armadura totalmente recuperada. |
todos os outros invocadores que derem vários buffs/debuffs ou valores exorbitantes de armadura.
 |  |  |  |
|---|
A maioria deles (99%) são cartas lendárias, mas é como eu disse: nessas partidas quem define o vencedor são os invocadores, então os melhores são os que possuem maior chance de vitória.
Poréeeeem, existe uma outra estratégia pouco conhecida que pode ser usada para "burlar" as regras de combate, e eu irei mostrar ela através de uma das minhas batalhas. Quer conferir? Então continue a leitura!
BATALHA 
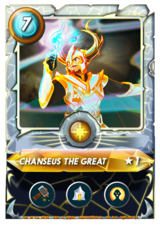
Quando me deparei com Back to Basics e Up Close and Personal juntos, eu já sabia qual invocador eu deveria utilizar pois possuía o Chanseus alugado. Porém, alguns dias atrás eu havia passado pela mesma situação e acabei perdendo pois meu oponente utilizou uma estratégia que eu nunca havia pensado. Dessa vez quem a utilizaria seria eu!
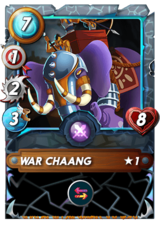
Apesar da regra permitir apenas unidades físicas, as cartas que possuem o dano principal físico + outro tipo de dano também ficam liberadas, ou seja, pegar o War Chaang fará com que você consiga atacar com duas unidades em cada round. Ao somarmos isso com a regeneração de armadura do Chanseus, você terá mais defesa e mais dano que o oponente, praticamente grantindo a vitória! (a menos que ele monte uma composição se aproveitando dos mesmos efeitos).
Vamos ver o resultado desse combo?
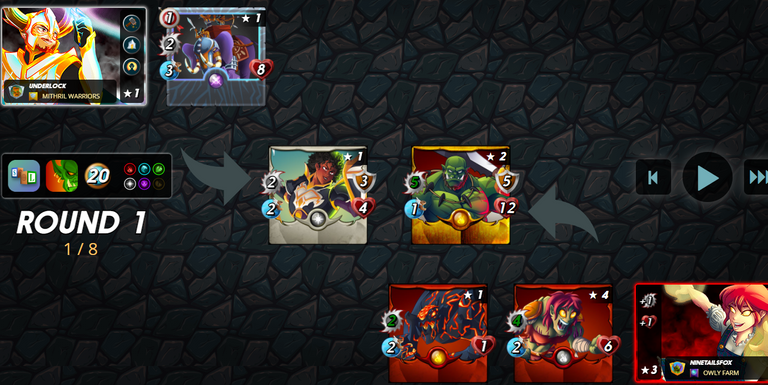
Como eu disse no título do vídeo, a composição perfeita. Duas unidades conseguindo atacar e a chance zero do oponente causar dano em minha Chaos Knight permitiu que eu obtivesse uma vitória esmagadora (e bem cômica) sobre o meu oponente.

Para assistir essa batalha completa e acompanhar o sofrimento do meu adversário, basta CLICAR AQUI!
CONCLUSÕES
Quando parecer que não há nada que você possa fazer, sempre pense duas vezes, reflita as suas opções e cogite alugar alguma carta que possa fazer total diferença para a sua vitória.
Nessa baralha o Chanseus já era o suficiente para me fazer vencer, mas o dano extra do War Chaang é muito importante pois pode ser o necessário para superar a armadura do oponente e conseguir causar dano, ou até mesmo ser buffado e aplicar o Blast junto de um Yodin.
Muito obrigado a todos que leram até aqui, espero que tenham gostado. Se vocês curtirem meus conteúdos, peço que deixem o seu voto na postagem e sigam o meu perfil, pois agora começarei a fazer três postagens por semana!
MUITO OBRIGADO PELA ATENÇÃO DE TODOS E ATÉ A PRÓXIMA!
(Se possível, siga o meu perfil para acompanhar posts futuros, prometo que não se arrependerá 🤝)

(translate google)
Creating strategies in Splinterlands is something very rewarding, as the variety of rules and the arrangement of cards allows us to assemble infinite compositions and defeat the enemy through intelligence. But there are "combos" of combat rules that seem to leave you totally out of options.
In today's post I'll talk about one of those rule combos that are very difficult to deal with, and show the two strategies I used to get around it and put together the perfect composition.
TRADING PUNCHES
When starting a new game and seeing this combination of combat rules, I was afraid because only physical units without any skills makes combat very simple and difficult to create a good strategy, being doomed to a 1 against 1 combat, where that whichever falls first will be replaced until there is no one left.
Although it is very difficult to think of powerful strategies in this situation, there are some cards that can make all the difference to define the winner of this exchange of punches. I'm talking about summoners.
Summoners are the exception to the Back to Basics rule, that is, their effects are applied to creatures after the rule is applied, allowing you to grant buffs or abilities to monsters, gaining a certain advantage over your opponent.
I will cite some of the main summoners that are extremely effective in the aforementioned rules and then I will talk about my battle, where in addition to making use of a good summoner, I adopted another super interesting strategy that I will talk more about soon.
SUMMONERS
The best analogy to summoners in this situation is wrestling coaches. The fighters are mere actors and who will really define the champion are the coaches, because everything will follow according to their script.
Let's see then which are the best technicians (aka summoners) that will make you win in these extremely specific rules battles.
| Mylor is that unfair summoner who put spikes on his own fighter to make his opponent hurt himself when attacking. The ability of Thorns is a great way to make the opponent die faster, giving a lot of advantage to whoever uses it. |
| From here the summoners start to be more powerful, starting with the Llama which is famous for making a monster extremely powerful when alone on the field. In low mana matches with these rules, it's worth opting for a single unit that will resist and deal a lot of damage due to the buffs received. |
| If the others seem strong, imagine this kitty that will make your fighter hit incredibly fast, without the possibility of missing and will still regenerate him every turn. It's virtually impossible to win a match with the Back to Basics and Up Close and Personal rules against this summoner if you don't have another equally powerful summoner. |
| You already noticed the pattern, right? Any summoner that gives their cards some ability will already bring a much greater benefit than a pure buff (with the exception of summoners that grant 3 buffs/debuffs at the same time), and the possibility of poisoning your opponents will make them die more easily . I consider it the worst option among those mentioned here, because the chance of applying the poison is not 100% and it has little chance of the damage being activated more than 1 or 2 times. |
| Although your damage buff is useless, the health increase and especially the distribution of the Blast skill is extremely effective in these matches, because while your opponent is only dealing damage in your front line, you will be mitigating life two units at once. During the game the enemy team will fall only with the damage spread by the Blast, simply sensational. |
| Another summoner that despite having his healing ability unusable, makes great use of his other abilities. Repair can be the most stolen skill in this type of confrontation, because although the heal restores 2~3 health on average per turn, the repaired armor will be able to withstand all the opponent's damage, that is, it can mitigate 4, 5 or more damage with no problem. And if by chance his unit dies, he still has a second life that will come with his armor fully recovered. |
all other summoners who give multiple buffs/debuffs or exorbitant amounts of armor.
| | | |
|---|
Most of them (99%) are legendary cards, but it's like I said: in these games the winner is the summoners, so the best are the ones with the highest chance of winning.
However, there is another little-known strategy that can be used to "ignore" the rules of combat, and I'll show it through one of my battles. Want to check it out? So keep reading!
BATTLE
When I came across Back to Basics and Up Close and Personal together, I already knew which summoner I should use because I had rented Chanseus. However, a few days ago I had the same situation and ended up losing because my opponent used a strategy that I had never thought of. This time the one who would use it would be me!
Although the rule only allows physical units, cards that have the main physical damage + other damage are also released, that is, taking War Chaang will make you able to attack with two units in each round. When we add that to Chanseus' armor regeneration, you'll have more defense and more damage than the opponent, practically granting victory! (unless he assembles a composition taking advantage of the same effects).
Let's see the result of this combo?
As I said in the title of the video, the perfect composition. Two units managing to attack and the opponent's zero chance of dealing damage to my Chaos Knight allowed me to achieve a crushing (and quite comical) victory over my opponent.
To watch this full battle and follow my opponent's suffering, just CLICK HERE!
CONCLUSIONS
When it seems like there's nothing you can do, always think twice, reflect on your options and consider renting a card that can make all the difference to your victory.
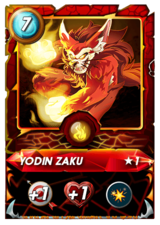
In this deck, Chanseus was enough to make me win, but the extra damage from War Chaang is very important because it can be enough to overcome the opponent's armor and manage to deal damage, or even be buffed and apply Blast along with a Yodin.
Thank you so much to everyone who read this far, I hope you enjoyed it. If you like my content, I ask you to leave your vote on the post and follow my profile, because now I will start making three posts a week!
THANK YOU SO MUCH FOR EVERYONE'S ATTENTION AND UNTIL THE NEXT TIME!
(If possible, follow my profile to follow future posts, I promise you won't regret it 🤝)
Sharing on facebook: https://www.facebook.com/luismar.underlock/posts/4882184645243405
!1UP Good work!
You have received a 1UP from @michupa!
@monster-curator, @oneup-curator, @bee-curator, @ccc-curator, @pimp-curator, @thg-curator, @vyb-curator, @pob-curator, @neoxag-curatorAnd they will bring !PIZZA 🍕
Learn more about our delegation service to earn daily rewards. Join the family on Discord.
PIZZA Holders sent $PIZZA tips in this post's comments:
@curation-cartel(8/20) tipped @underlock (x1)
Join us in Discord!
voa bruxão... 😎