🔨🔥 CHIMNEY WALLSTOP 🔥🔨 Splinterlands Art Contest SPT W-266
🔨🔥¡Hola amigos de Hive! espero que estén teniendo un agradable día. Sean bienvenidos a este nuevo Post.
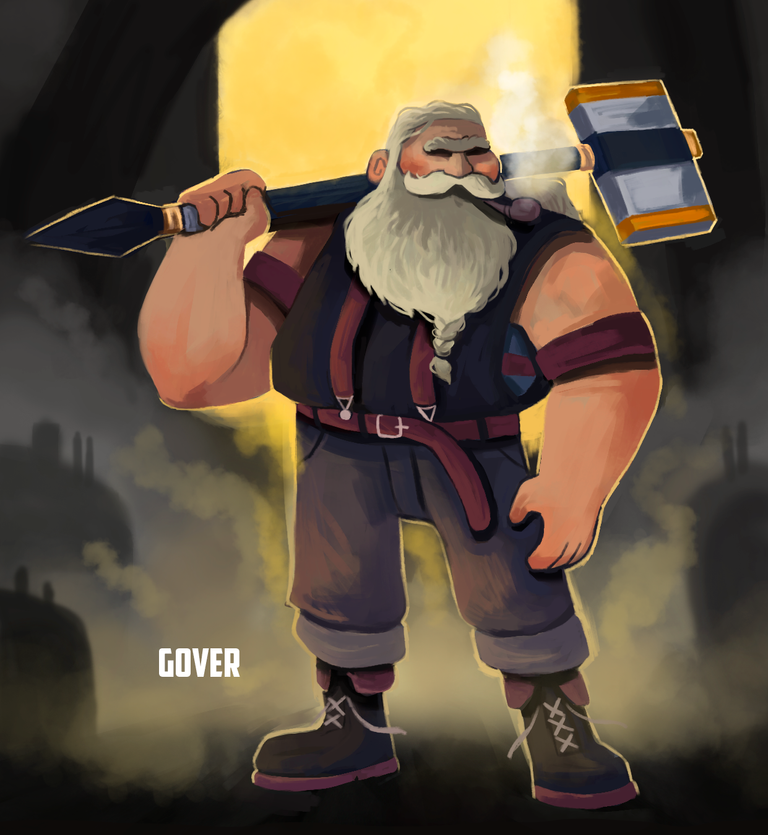
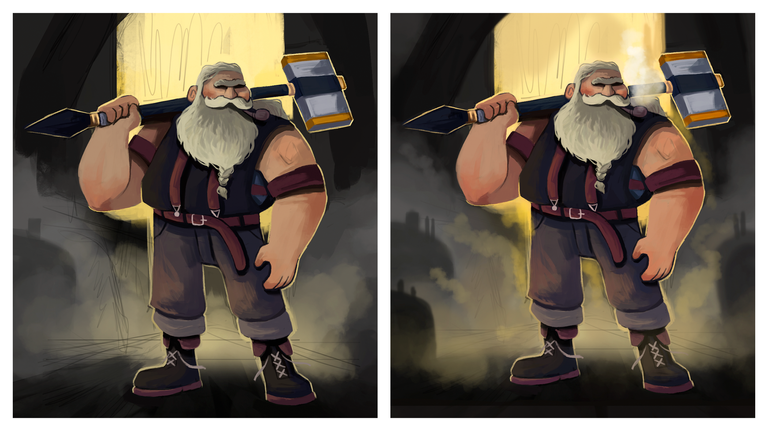
El día de hoy quiero presentar mi entrada al concurso de arte semanal de @splinterlands , en esta ocasión he decidido hacer al personaje CHIMNEY WALLSTOP.
Este dibujo será completamente diferente a los que siempre suelo hacer para este concurso de arte, ya que mis interpretaciones suelen ser más infantiles y tiernas, con mi toque personal que siempre me encanta hacer en cada uno de mis dibujos. Pero hoy decidí cambiar eso y probar algo diferente, tanto en los pinceles como en la composición y el fondo, así que sin nada más que decir, pasemos con el proceso.
-🔨🔥Hello friends of Hive! I hope you are having a nice day. Welcome to this new Post.
- Today I want to present my entry to the weekly art contest of @splinterlands , this time I decided to do the character CHIMNEY WALLSTOP.
- This drawing will be completely different from the ones I always do for this art contest, since my interpretations are usually more childish and tender, with my personal touch that I always love to do in each of my drawings. But today I decided to change that and try something different, both in the brushes and in the composition and background, so without anything else to say, let's go through the process.
PROCESO | PROCESS
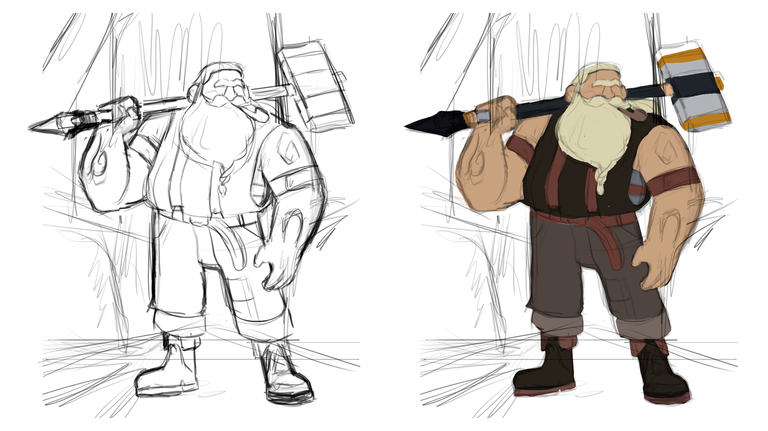
Bueno, chicos, para hacer este dibujo lo primero que hice fue hacer el boceto, como mencioné anteriormente, este dibujo lo hice un poco diferente, en este caso quise hacer al personaje un poco más apegado al original, adulto, robusto y con mucha actitud, cambien completamente las proporciones que estoy acostumbrado a hacer y lo hice imponente. Fue divertido hacerlo y fue más sencillo porque toda mi vida he hecho una anatomía realista, por lo cual hacer este tipo de cuerpo me resultó más sencillo. Para hacer el personaje lo hice con su indumentaria original, le agregué un pantalón y botas y le quité los brazaletes que tiene en los brazos porque no combinaba con lo que quería hacer, obviamente conservé su especie de martillo porque es algo único de él.
Mi idea para este dibujo era que el personaje fuera un herrero que acababa de hacer su herramienta y ahora está listo para el combate. También quise hacer una escena con un fondo semejante a una herrería, obviamente sin tanto protagonismo, pero quería que diera esa sensación.
Luego de hacer el boceto procedí a colorear al personaje, para ello con la herramienta de laso hice un contorno del personaje y encima de él fui pintando, siempre utilizo los colores originales de cada personaje porque es algo indispensable de estos retos.
- Well, guys, to make this drawing the first thing I did was to make the sketch, as I mentioned before, this drawing I did a little different, in this case I wanted to make the character a little more attached to the original, adult, robust and with a lot of attitude, completely change the proportions that I'm used to do and I made it imposing. It was fun to do and it was easier because all my life I have done realistic anatomy, so doing this type of body was easier for me. To make the character I made him with his original clothing, I added a pair of pants and boots and I took off the bracelets he has on his arms because it didn't match with what I wanted to do, obviously I kept his hammer because it's something unique to him.
- My idea for this drawing was for the character to be a blacksmith who had just made his tool and is now ready for combat. I also wanted to make a scene with a background similar to a blacksmith shop, obviously without so much prominence, but I wanted it to give that feeling.
- After making the sketch I proceeded to color the character, for this with the lasso tool I made an outline of the character and on top of it I painted, I always use the original colors of each character because it is something indispensable in these challenges.
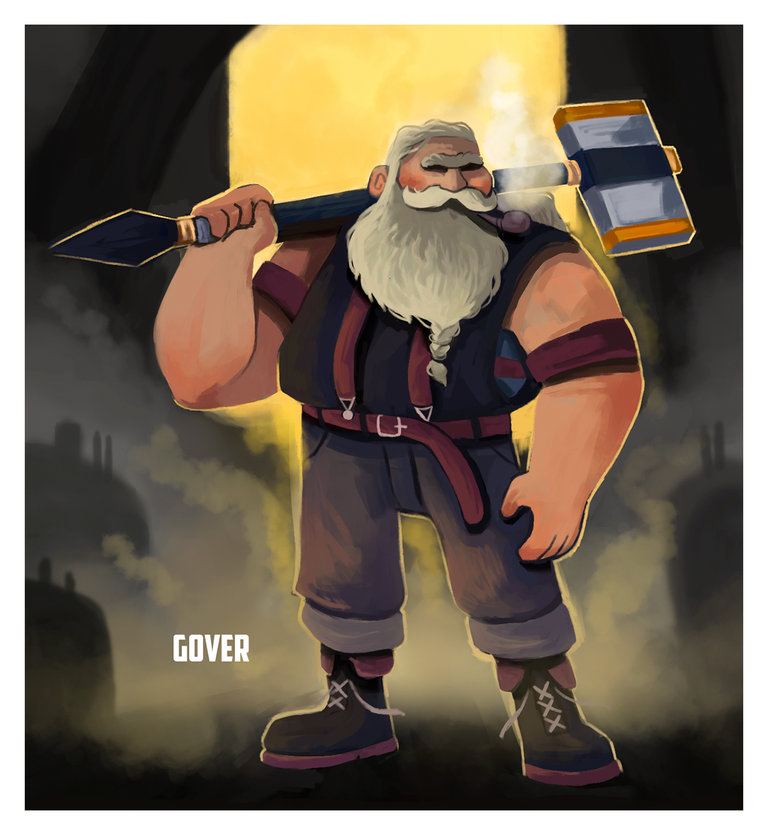
Una vez que coloreé al personaje le agregué un fondo, como ya mencioné anteriormente, quería que el fondo fuera como una especie de herrería, para ello utilicé colores grises y negros, para dar la sensación de humo, atrás del personaje añadí una especie de horno gigante con una luz amarilla para realizar la silueta del personaje y por último agregué algunos hornos a los costados para darle aún más detalle al dibujo. Obviamente, agregué una luz de reflejo en el suelo porque está refleja la luz del horno que está atrás del personaje.
Una vez que hice la base del fondo, procedí a colorear el dibujo, para ello comencé con el personaje, normalmente suelo empezar por el fondo, pero esta vez estaba ansioso de colorear al personaje. Primero coloreé el rostro, para ello utilicé pinceles suaves, sin nada de textura, ya que estaba probando algo nuevo, al principio me sentía muy raro coloreando con estos pinceles, puesto que estoy acostumbrada a los pinceles con textura de crayón, pero conforme iba coloreando me sentía más cómodo.
Hacer la barba siempre es algo divertido, normalmente no me sale a la primera, así que con estos pinceles decidí experimentar un poco, jaja de verdad espero que haya quedado bien. Luego coloreé el bigote y el rostro, lo cual fue sencillo porque no tenían mucho detalle.
- Once I colored the character I added a background, as I mentioned before, I wanted the background to be like a kind of blacksmith shop, for this I used gray and black colors, to give the feeling of smoke, behind the character I added a kind of giant oven with a yellow light to make the silhouette of the character and finally I added some ovens to the sides to give even more detail to the drawing. Obviously, I added a reflection light on the ground because it reflects the light from the oven behind the character.
- Once I made the base of the background, I proceeded to color the drawing, for that I started with the character, normally I usually start with the background, but this time I was eager to color the character. First I colored the face, for this I used soft brushes, without any texture, since I was trying something new, at first I felt very strange coloring with these brushes, since I am used to crayon textured brushes, but as I was coloring I felt more comfortable.
- Doing the beard is always fun, I usually don't get it right the first time, so with these brushes I decided to experiment a little bit, haha I really hope it turned out well. Then I colored the mustache and the face, which was easy because they didn't have much detail.

Después de colorear el rostro procedí a colorear, realizar algunos ajustes, coloreé la pipa que tiene el personaje y posterior coloreé la parte superior del torso. Primero empecé por el brazo derecho del personaje, utilizando el mismo pincel suave empecé a unir los colores para que se viera una textura más lisa y homogénea (admito que los dedos de este brazo me quedaron muy raros). Luego procedí a colorear la camisa, los tirantes que le añadí y el cinturón del personaje, también uní los colores para que quedara un coloreado liso y uniforme, por último repetí el mismo proceso con el otro brazo.
Luego coloreé el pantalón del personaje, quería que se viera rústico y desgastado, por eso agregué u tono más rojizo al pantalón. Después coloreé las botas, uniendo los colores, le agregué los cordones y seguí haciendo el contorno del personaje con el color amarillo.
- After coloring the face I proceeded to color, made some adjustments, colored the pipe that the character has and then colored the upper torso. First I started with the right arm of the character, using the same soft brush I began to unite the colors so that a smoother and more homogeneous texture was seen (I admit that the fingers of this arm were very strange). Then I proceeded to color the shirt, the suspenders that I added and the belt of the character, I also joined the colors so that it was a smooth and uniform coloring, finally I repeated the same process with the other arm.
- Then I colored the pants of the character, I wanted it to look rustic and worn, so I added a more reddish tone to the pants. Then I colored the boots, joining the colors, added the laces and continued making the outline of the character with the yellow color.

Para finalizar con el personaje coloreé el martillo, primero empecé por el mango y seguí hasta colorear el martillo, este coloreado fue mucho más suave porque quería que se viera como un martillo de metal recién hecho, por lo que quería darle una textura bien bonita.
Para finalizar coloreé el fondo, usando un pincel con efecto de nubes hice el humo, tomando los diferentes toda que estaban ahí fui haciendo el humo en diferentes direcciones, mientas más cerca estaban a la luz los iba haciendo más claros y mientras estaban más lejos los hacía más oscuros, también detalle un poco más los hornos y por último le agregué un poco de humo a la pipa, ya que quería que estuviera prendida y se combinara con el ambiente lleno de humo, creo que eso le da más personalidad al dibujo.
- To finish with the character I colored the hammer, first I started with the handle and went on to color the hammer, this coloring was much softer because I wanted it to look like a freshly made metal hammer, so I wanted to give it a nice texture.
- To finish I colored the background, using a brush with a cloud effect I made the smoke, taking the different all that were there I made the smoke in different directions, the closer they were to the light I made them lighter and the farther away I made them darker, I also detailed a little more the ovens and finally I added some smoke to the pipe, because I wanted it to be lit and combined with the atmosphere full of smoke, I think that gives more personality to the drawing.
¡Y listo! Espero que les haya gustado el dibujo, es la primera vez que hago un dibujo usando estos pinceles y espero hacerlo hecho de buena manera, no estoy acostumbrado, pero aun así me encantó el resultado.
Nos vemos en el próximo post ¡Un saludo!
- And that's it! I hope you liked the drawing, it's the first time I make a drawing using these brushes and I hope I did it in a good way, I'm not used to it, but I still loved the result.
- See you in the next post Greetings!
Tableta gráfica Huion. / Huion graphics tablet.
Programa Photoshop. / Photoshop program.
Traductor Deepl. / Deepl Translator.
Instagram:@artbygover

Separador y Fotos editadas en Canva
Photos edited in Canva
Support Splinterlands by Submitting a positive review about Splinterlands on Gam3s & also nominate Splinterlands for the People's Choice Awards on Gam3s. Don't forgot to take screenshot & share those on Splinterlands GAM3 Awards Challenge! Comment section to earn some delicious upvote from Splinterlands.