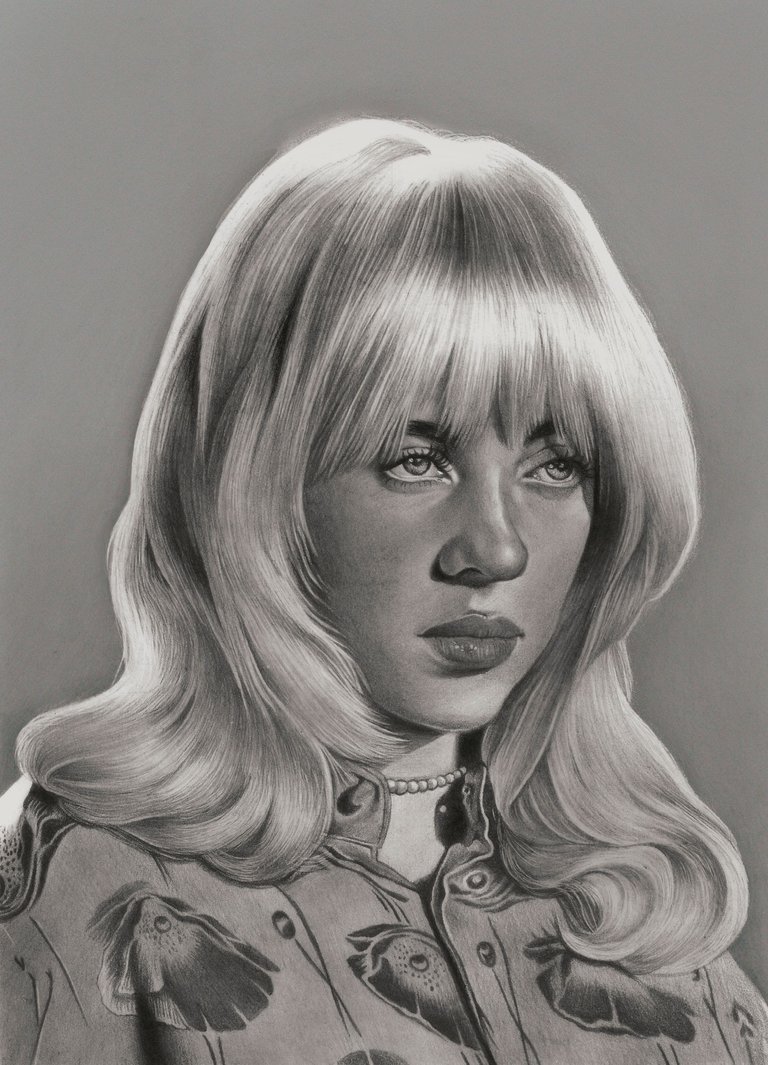
[Esp/Eng] ✏️ Retrato a lápiz de Billie Eilish / Pencil portrait of Billie Eilish ✏️
Hola amigos de Hive! Espero que estén teniendo un excelente y bendecido día.
El día de hoy he decidido compartir con ustedes la creación de este dibujo que hice en tradicional, específicamente con lápices de grafito.
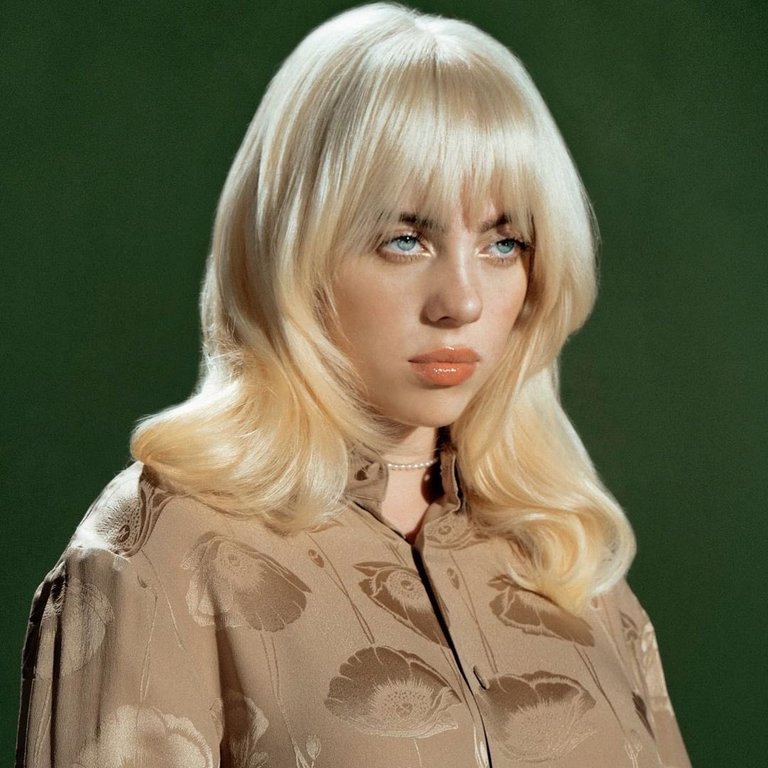
Ya tenía bastante tiempo sin hacer un dibujo a lápiz para mí, algo con lo que pueda practicar y relajarme un poco, así que hace unos días decidí volver a crear un nuevo dibujo para mi colección. En esta ocasión he decidido dibujar a Billie Eilish, es una cantante muy famosa. Honestamente, nunca he escuchado su música, pero siempre he visto dibujos de ella y aunque ya la he dibujado antes, en esta ocasión quise volver a dibujarla.
- Hello Hive friends! I hope you are having an excellent and blessed day.
- Today I decided to share with you the creation of this drawing I did in traditional, specifically with graphite pencils.
- It had been a long time since I did a pencil drawing for me, something I can practice and relax a little, so a few days ago I decided to create a new drawing for my collection. This time I decided to draw Billie Eilish, she is a very famous singer. Honestly, I've never listened to her music, but I've always seen drawings of her and although I've drawn her before, this time I wanted to draw her again.
PROCESO | PROCESS
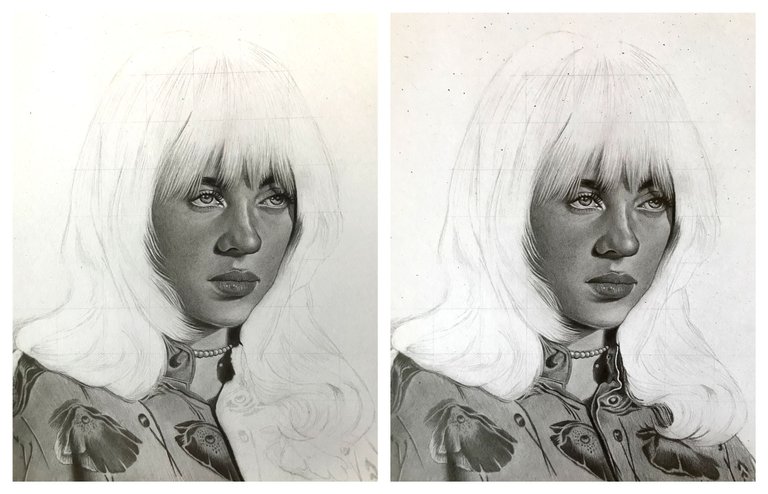
Bueno amigos, lo primero que siempre hago es hacer el boceto, pero antes de eso siempre suelo colocar la imagen de referencia en una aplicación llamada 'Drawing Gris Maker' la cual me permite hacer unas cuadrículas y de esa forma puedo realizar un boceto más preciso, honestamente hay muchas técnicas para realizar un boceto y encajar el rostro, pero considero que la cuadrícula me resulta más preciosa a la hora de lograr un parecido lo más semejante posible a la imagen de referencia. Luego de colocar la foto en la aplicación y tener la cuadrícula lista me pongo a realizar la cuadrícula en el papel, con la ayuda de una regla marco guías cada 2 centímetros para que los cuadrados sean del mismo tamaño. En la app también hay una opción para que los cuadrados sean del mismo tamaño. (si quieren un tutorial de como usar la app me lo pueden dejar en los comentarios).
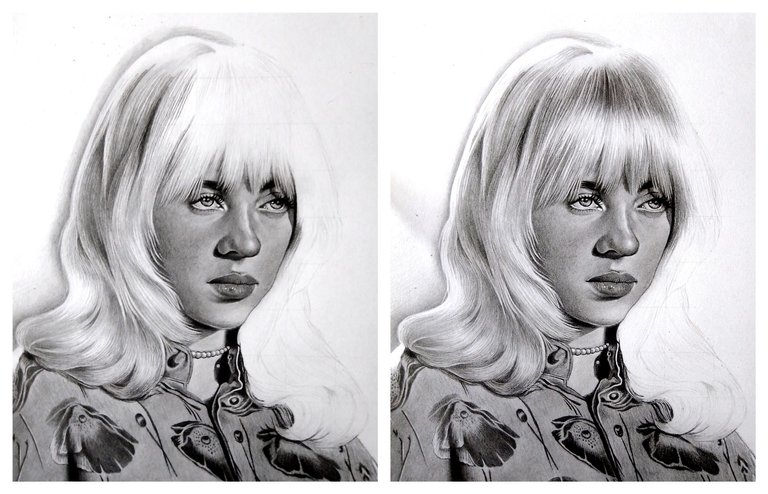
Después de realizar el boceto empecé a sombrear el rostro. Para ello utilicé el lápiz HB y lo fui aplicando suavemente por el rostro, después de aplicar la primera camada con el lápiz utilicé un pincel de maquillaje con un poco de carboncillo en polvo para unir y difuminar. Una vez que tenía esa parte del rostro sombreada, procedí a hacer los dos ojos y la nariz. Para los ojos utilicé los lápices, hb, 2b y 8b, fui aplicando cada uno en su debido momento para oscurecer realizar algunas zonas, en las cejas utilicé el lápiz 8b y en la nariz utilicé los tres que mencioné anteriormente, también con un poco de gel blanco le hice algunos reflejos en los ojos. Para terminar el rostro empecé a colorear la boca, primero utilicé el lápiz 2b para aplicar una capa base, después con el 8b fui oscureciendo poco a poco los labios y con el gel blanco agregué algunos brillos tanto en los labios como en la parte posterior.
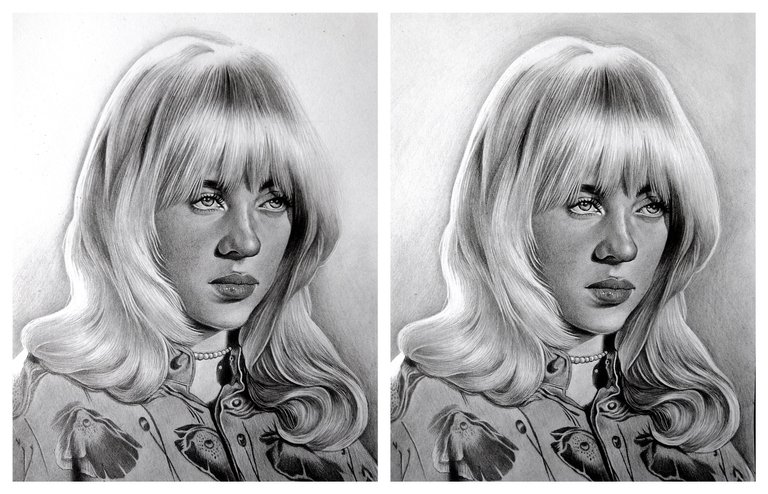
Una vez listo el rostro procedí a realizar la camisa y el cuello, para ello primero coloreé el cuello y el collar. Después con el lápiz 8b fui coloreado los patrones oscuros de la camisa, debo resaltar que esta parte fue muy tardada porque siempre me tomo mi tiempo para hacer la ropa y que quede perfecta, la ropa es mi punto débil, así que en esta parte me tomé mi tiempo, aproximadamente unas 5 horas. Después de hacer el patrón oscuro, con el lápiz 2b fui coloreando el resto de la camisa, después de colorear utilicé el pincel para difuminar y que quedara más homogénea la textura.
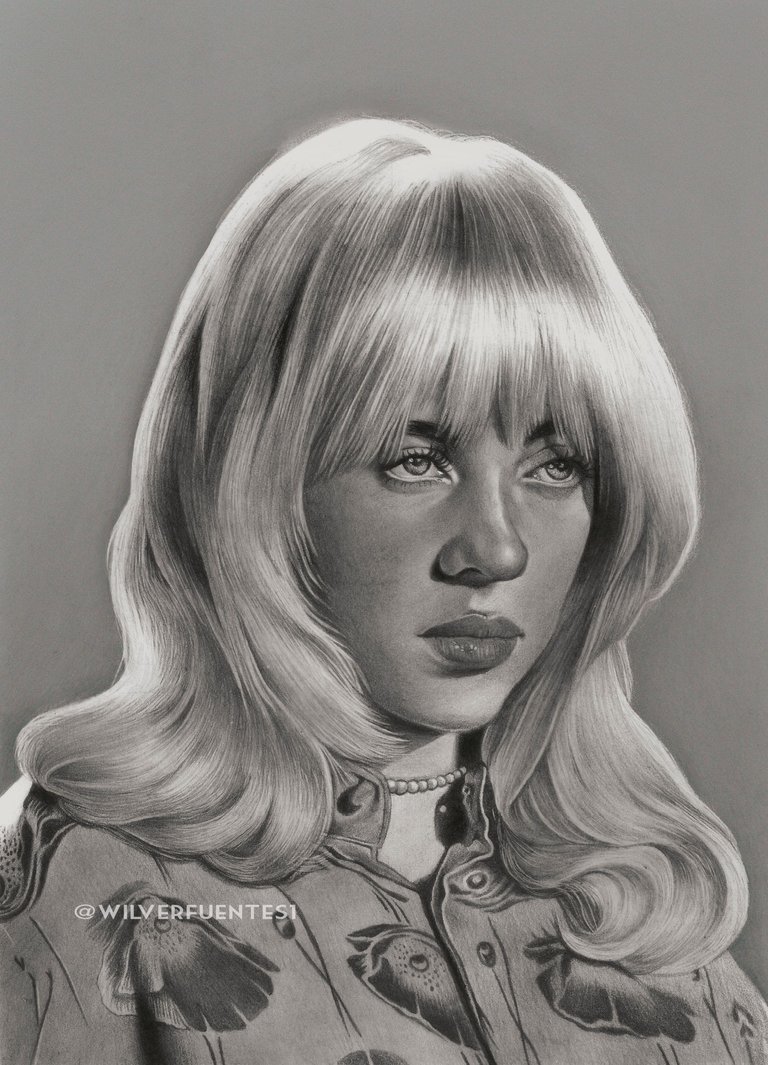
Para finalizar este dibujo empecé a. Colorear el cabello (debo aclarar que aquí utilicé otra cámara, por eso las fotos se ven diferente). Esta es mi parte favorita, me encanta dibujar cabello, lo primero que hice fui utilizar una aguja de tejer para marcar el papel, esto lo hago en las zonas de cabello con reflejos y también para que el cabello quede un poco más realista. Luego con el lápiz 2B fui haciendo la primera capa, después utilicé el pincel para unir y difuminar, es importante usar siempre el pincel, ya que esto ayuda a unir el grafito y hace que el cabello se vea mucho mejor. Una vez que tenía la primera capa aplicada, con el lápiz 8b fui oscureciendo algunas zonas para dar volumen y contraste. Repetí el mismo proceso por todo el cabello y al final el resultado me encantó. Todos los pelitos sueltos que ven por ahí fueron realizados con la aguja de tejer antes de aplicar el grafito, por eso es bueno que siempre hagan ese paso antes de dibujar cabello.
- Well friends, the first thing I always do is to make the sketch, but before that I always place the reference image in an application called 'Drawing Gris Maker' which allows me to make some grids and that way I can make a more accurate sketch, honestly there are many techniques to make a sketch and fit the face, but I consider that the grid is more precious to me when it comes to achieve a resemblance as similar as possible to the reference image. After placing the photo in the app and having the grid ready I start to make the grid on paper, with the help of a ruler I mark guides every 2 centimeters so that the squares are the same size. In the app there is also an option to make the squares the same size (if you want a tutorial on how to use the app you can leave it in the comments).
- After making the sketch I started shading the face. For this I used the HB pencil and I applied it gently on the face, after applying the first layer with the pencil I used a makeup brush with some powdered charcoal to blend and blur. Once I had that part of the face shaded, I proceeded to do the two eyes and the nose. For the eyes I used the pencils, hb, 2b and 8b, I applied each one at the right time to darken some areas, in the eyebrows I used the pencil 8b and in the nose I used the three I mentioned before, also with a little white gel I made some reflections in the eyes. To finish the face I started to color the mouth, first I used the 2b pencil to apply a base coat, then with the 8b I darkened little by little the lips and with the white gel I added some glosses both on the lips and on the back.
- Once the face was ready I proceeded to make the shirt and the collar, for this I first colored the collar and the neck. Then with the 8b pencil I colored the dark patterns of the shirt, I must emphasize that this part took me a long time because I always take my time to make the clothes and make them perfect, clothes are my weak point, so in this part I took my time, approximately 5 hours. After making the dark pattern, with the 2b pencil I was coloring the rest of the shirt, after coloring I used the brush to blur and to make the texture more homogeneous.
- To finish this drawing I started to. Coloring the hair (I must clarify that here I used another camera, that's why the pictures look different). This is my favorite part, I love drawing hair, the first thing I did was to use a knitting needle to mark the paper, I do this in the areas of hair with reflections and also to make the hair look a little more realistic. Then with the 2B pencil I made the first layer, then I used the brush to blend and blur, it is important to always use the brush, as this helps to blend the graphite and makes the hair look much better. Once I had the first layer applied, with the 8b pencil I went darkening some areas to give volume and contrast. I repeated the same process all over the hair and in the end I loved the result. All the loose hairs you see around were made with the knitting needle before applying the graphite, that's why it's good to always do that step before drawing hair.


Y listo amigos, espero que les haya gustado este paso a paso, y espero que también hayan aprendido un poco más sobre el dibujo a lápiz.
Un saludo y nos vemos en el próximo post.
- And that's it friends, I hope you liked this step by step, and I hope you also learned a little more about pencil drawing.
- Best regards and see you in the next post.
Lápices de grafito / Graphite pencils
Pinceles / Brushes
Aguja de tejer / Knitting needle
Instagram:@wilverfuentes1

Separador y Fotos editadas en Canva
Photos edited in Canva
Estoy muy impresionado con esta obra de arte que tienes aquí, no puedo creer que co solo lápiz y papel hayas hecho esto 😱 Definitivamente cuando se tiene talento el cielo es el límite. Creo que es la primera vez que veo tu blog y todo lo que compartes es muy grato, pero me alegra haber coincidido inicialmente con este trabajo, es asombroso y amo a Billie, por eso llegué hasta aquí en primer lugar. Muchas gracias por compartir tan buen contenido en Hive...
Muchas gracias compañeros! Ese es el resultado de muchos años de práctica y amor al dibujo. Gracias a Dios tengo el talento para realizar dibujos así de buenos, pero sin la práctica jamás habría llegado a este nivel. Me alegra mucho saber que te gustó el dibujo, siempre disfruto dibujar a Billie, considero que tiene un rostro perfecto para dibujar. Un saludo!
¡Felicidades! Esta publicación obtuvo upvote y fue compartido por @la-colmena, un proyecto de Curación Manual para la comunidad hispana de Hive que cuenta con el respaldo de @curie.
Si te gusta el trabajo que hacemos, te invitamos a darle tu voto a este comentario y a votar como testigo por La Colmena.
Si quieres saber más sobre nuestro proyecto, te invitamos a acompañarnos en nuestro servidor de Discord.
Muchas gracias por su apoyo! 🤝🏻
Congratulations @vicente99! You have completed the following achievement on the Hive blockchain And have been rewarded with New badge(s)
Your next target is to reach 150 posts.
You can view your badges on your board and compare yourself to others in the Ranking
If you no longer want to receive notifications, reply to this comment with the word
STOPTo support your work, I also upvoted your post!
Check out our last posts:
Buen trabajo amigo, te quedó super, canva es la mejor plataforma para eso,eres muy bueno
Muchas gracias amigo! Me alegra que te haya gustado el dibujo. Saludos!
Thanks for the support mate! 🤝🏻
This is Incredible!! It looks exactly like the actual picture but in black and white... I'm 100% sure Billie Eilish would be struck if she saw the drawing of her.
Thank you so much!! I tried my best on this drawing. The truth is I would be very happy if Billie saw my drawing but I highly doubt she can see it.
You're welcome! You could email it to her, you'd never know what might happen!
Wow, that's awesome, you draw beautiful, and very realistic.
Thanks so much!! I'm glad you liked the drawing!
Espectacular 😎
Muchas gracias!