🌿🍄 MADCAP MAGUS 🍄🌿 Splinterlands Art Contest SPT W-254
🌿🍄 ¡Hola queridos amigos! Saludos a todos ustedes, espero que estén teniendo un agradable día. Bienvenidos a una nueva entrega.
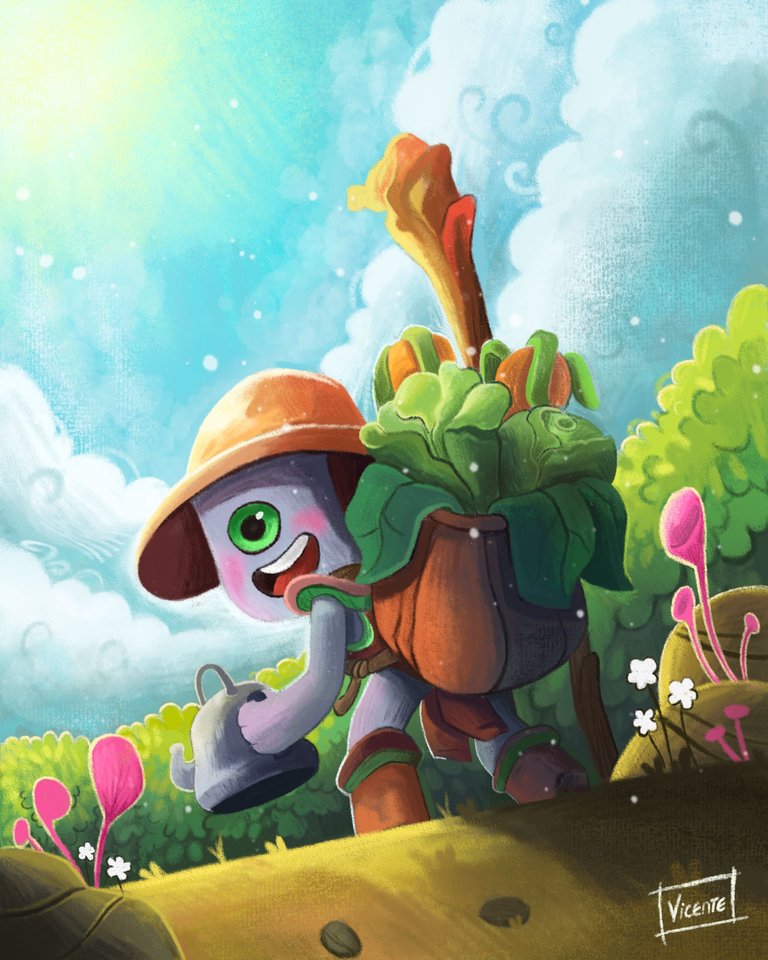
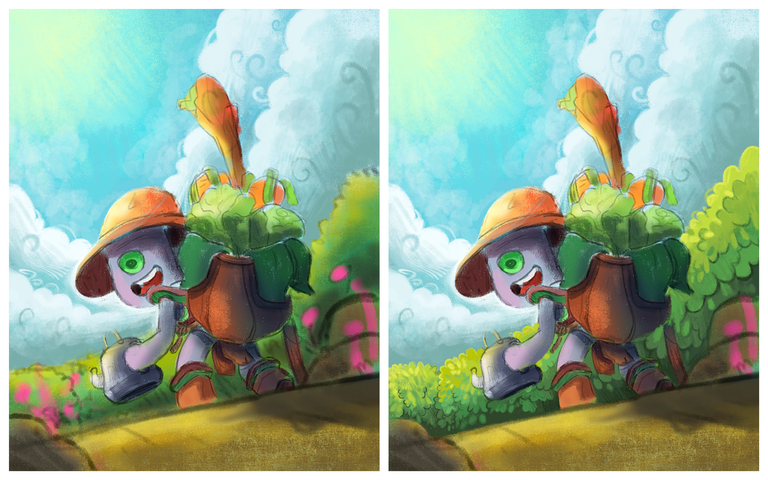
El día de hoy quiero compartirles mi participación para el concurso de arte semanal de @splinterlands . Para el dibujo de esta semana he decidido hacer al personaje MADCAP MAGUS.
Decidirme por esta carta fue sencillo, porque a pesar de que el personaje tiene vibras de guerrero, combatiente y de ser un mago poderoso, también es un personaje al cual le gustan muchos las verduras de hora verde, como la col rizada, la lechuga y la zanahoria. Esto me facilito mucho la elección porque se adapta muy bien a mi estilo de dibujo, lo único "raro" es que nunca había hecho un personaje con un solo ojo, pero siempre llega una primera vez en todo. ¡Vamos a ello!
- 🌿 Hello dear friends! Greetings to all of you, I hope you are having a pleasant day. Welcome to a new installment.
- Today I want to share with you my participation for the @Splinterlands weekly art contest. For this week's drawing I decided to do the character MADCAP MAGUS.
- Deciding on this card was easy, because even though the character has a warrior, fighter and powerful mage vibe, he is also a character who likes a lot of green vegetables, such as kale, lettuce and carrots. This made my choice much easier because he fits my drawing style very well, the only "weird" thing is that I had never made a character with only one eye, but there always comes a first time in everything. Let's get to it!
PROCESO | PROCESS
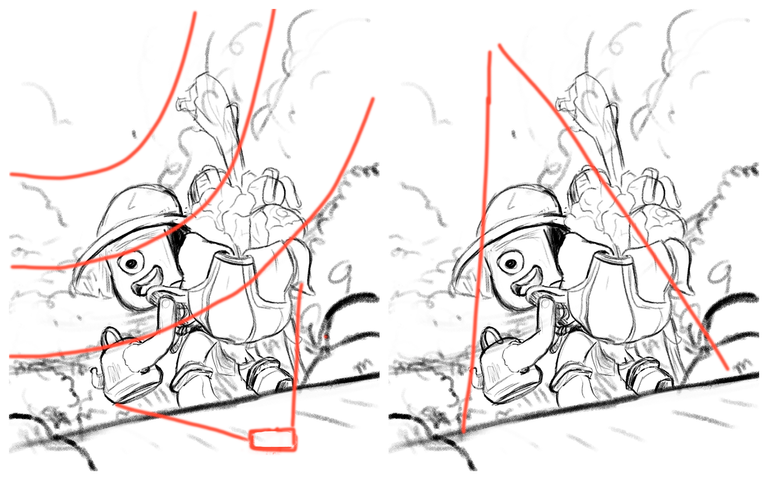
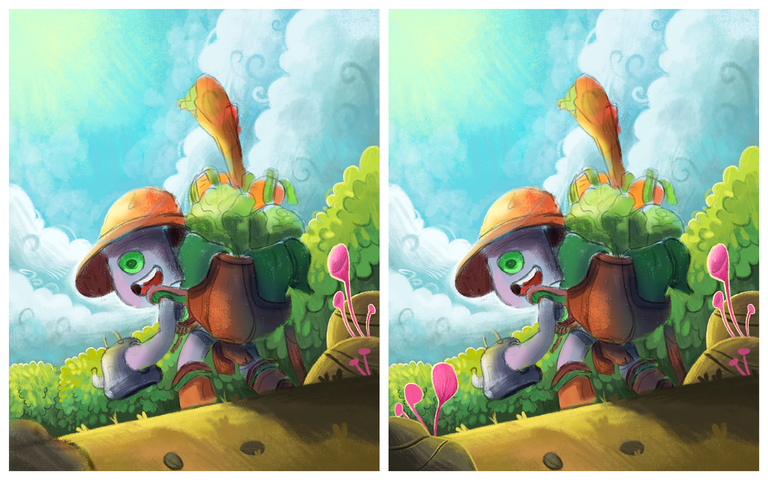
Bueno, lo primero que hice fue hacer el boceto. A pesar de que en mi mente tenía una idea vaga de lo que quería hacer, no fue tan sencillo plasmarlo en el lienzo. Honestamente, hice varios bocetos, unos me gustaron, otros no, pero al final decidí quedarme con este.
Decidí hacerlo con una pose nueva para mí, normalmente suelo hacer a mis personajes de frente, pero esta vez quise experimentar tanto con la pose como con la perspectiva y composición. Para ello imaginen que tienen una cámara y la colocan justo debajo del personaje, como si estuviera tirada en el camino por donde el personaje está pasando. Una vez que ubiqué la "cámara" en ese lugar fue mucho más fácil para mí hacer el resto del dibujo. Ya que jugué mucho con las curvas y a medida que el fondo se alejaba las curvas se hacían más prominentes. También le agregué un bolsito con todas las verduras que mencioné anteriormente y una regadera en la mano para que darle más detalle al personaje.
- Well, the first thing I did was to make the sketch. Even though in my mind I had a vague idea of what I wanted to do, it wasn't so easy to capture it on canvas. Honestly, I made several sketches, some I liked, others I didn't, but in the end I decided to keep this one.
- I decided to do it with a new pose for me, I usually do my characters from the front, but this time I wanted to experiment with the pose as well as with the perspective and composition. To do this imagine you have a camera and you place it right below the character, as if it were lying on the road where the character is passing by. Once I placed the "camera" in that spot it was much easier for me to do the rest of the drawing. I played a lot with the curves and as the background receded the curves became more prominent. I also added a little bag with all the vegetables I mentioned before and a watering can in the hand to give more detail to the character.
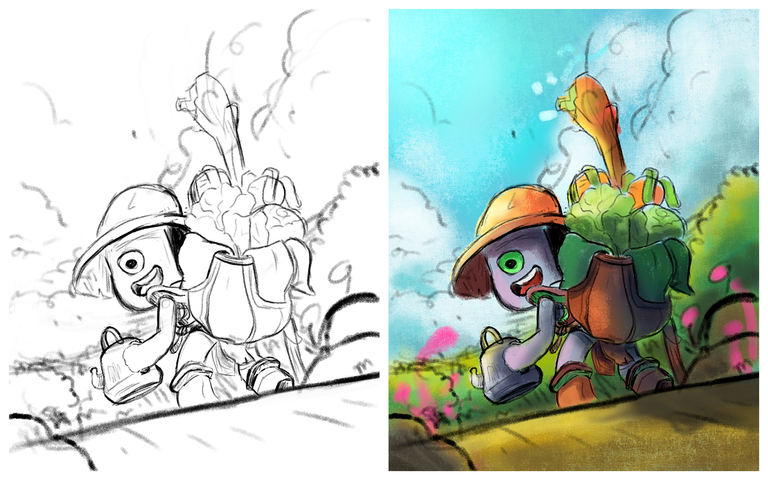
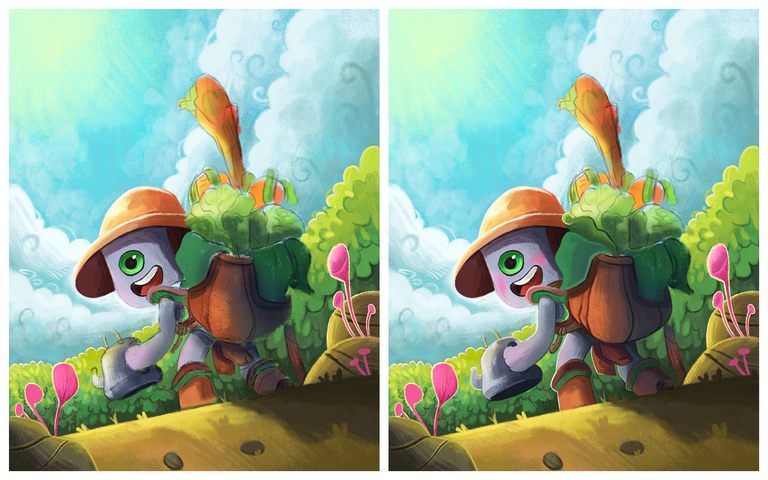
Una vez que tenía listo el boceto empecé a colorear. Para ello empecé por el fondo, en este caso por el enorme y bello cielo azul y sus nubes muy esponjosas. Dado que en el estudio de color el cielo es todo azul, decidí agregarle un poco de luz con un color más amarillo, esto para simular un poco la luz del sol y para que el cielo no se vea tan azul. Para colorear las nubes fui poco a poco, empecé por las nubes de abajo y poco a poco fui subiendo. También añadí algunas nubes más arriba, pero estas las hice un poco menos marcadas, ya que quería una sensación de profundidad.
Una vez que tenía hecha la parte del cielo y las nubes, procedí a colorear el muro de hojas. Este paso fue sencillo porque empecé por el tono más oscuro y poco a poco fui agregando hojas con tonos más claros, a algunas hojas les hacía un pequeño LineArt para separarlas un poco y que no vieran tan juntas. Teniendo el muro de arbustos hecho, empecé a colorear el suelo y las rocas que están por ahí, primero empecé por las rocas que están en el lado derecho, coloreé poco a poco, le añadí detalles y un poco de luz porque el reflejo apunta hacia ese lado. Luego coloreé el suelo, pero este no es un suelo de césped, es más un camino de tierra, por eso no le hice tanta vegetación y en su lugar le añadí algunas piedras. Por último coloreé la piedra que está en el lado izquierdo, jugando con las sombras y el reflejo del sol, y como detalle final le agregué algunas flores en un color rosado para que dieran un poco de contraste entre tanto verde y marrón (las flores las hice para que apuntaran al personaje y que la mirada del espectador siempre lleve al personaje).
- Once I had the sketch ready I started coloring. For this I started with the background, in this case the huge and beautiful blue sky and its very fluffy clouds. Since in the color study the sky is all blue, I decided to add a bit of light with a more yellow color, this to simulate a bit of sunlight and to make the sky look not so blue. To color the clouds I went little by little, I started with the lower clouds and little by little I went up. I also added some clouds higher up, but I made them a little less marked, because I wanted a sense of depth.
- Once the sky and clouds were done, I proceeded to color the wall of leaves. This step was simple because I started with the darkest tone and little by little I added leaves with lighter tones, to some leaves I made a little LineArt to separate them a little so they didn't look so close together. Having the bush wall done, I started to color the ground and the rocks that are around, first I started with the rocks that are on the right side, I colored little by little, I added details and a little light because the reflection points to that side. Then I colored the ground, but this is not a grassy ground, it's more of a dirt road, so I didn't do so much vegetation and instead I added some stones. Finally I colored the stone that is on the left side, playing with the shadows and the reflection of the sun, and as a final detail I added some flowers in a pink color to give a little contrast between so much green and brown (the flowers were made to point to the character and that the viewer's gaze always leads to the character).
Llegó la hora de colorear el personaje. Para ello comencé por el rostro, siempre suelo pintar poco a poco, pero de manera sencilla, así que poco a poco fui coloreando cada zona del rostro y del hongo que tiene en la cabeza (literalmente es un hongo con extremidades, por ende él es un hongo, pero ustedes entienden). Luego procedí a colorear el resto del cuerpo, primero empecé por la parte superior, luego coloreé el brazo con la regadera y después terminé de colorear el resto del cuerpo.
Como penúltimo paso coloreé el bolsito con sus verduras (honestamente fue lo que más me encantó 😊), me llevo un buen rato detallar las verduras, pero valió la pena. Para terminar coloreé el bastón del personaje, con unos tonos espectaculares, me encanta el contraste que hay en la parte superior del bastón y como detalle extra agregué algunas margaritas para darle mi toque personal jeje.
- It was time to color the character. For this I started with the face, I always paint little by little, but in a simple way, so little by little I colored each area of the face and the mushroom on his head (literally it is a mushroom with extremities, so he is a mushroom, but you understand). Then I proceeded to color the rest of the body, first I started with the upper part, then I colored the arm with the watering can and then I finished coloring the rest of the body.
- As a penultimate step I colored the little bag with its vegetables (honestly it was what I loved the most 😊), it took me quite a while to detail the vegetables, but it was worth it. To finish I colored the character's cane, with spectacular tones, I love the contrast at the top of the cane and as an extra detail I added some daisies to give it my personal touch hehe.
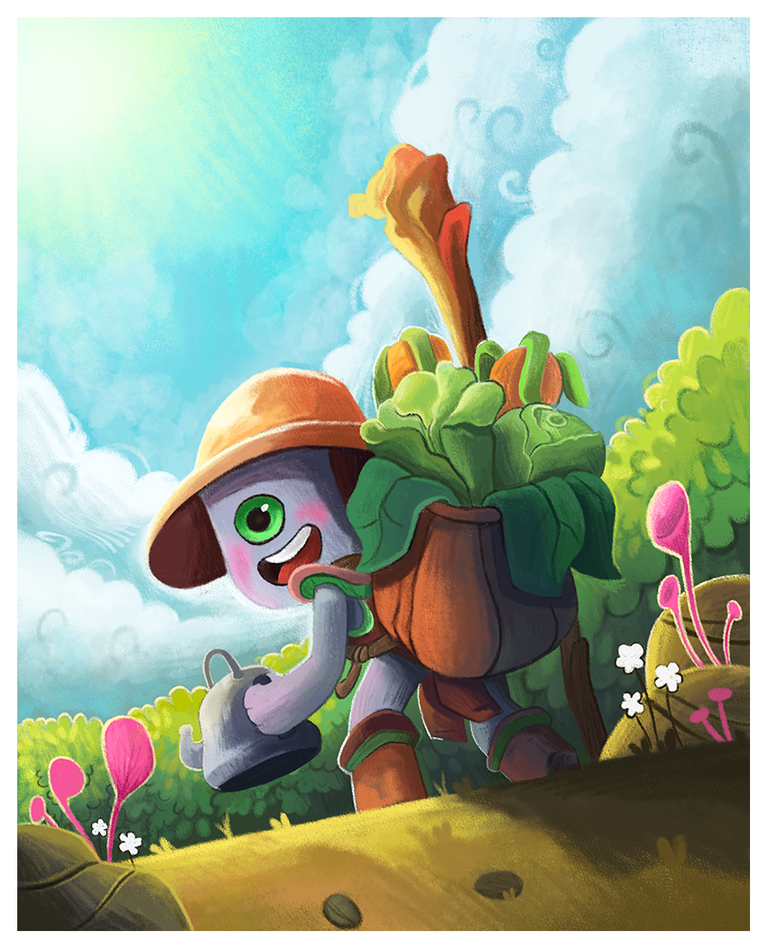
🌿 Espero que lo hayan disfrutado. Aquí les dejo el resultado final.🌿
- I hope you enjoyed it. Here is the final result.🌿
Tableta gráfica Huion. / Huion graphics tablet.
Programa Photoshop. / Photoshop program.
Traductor Deepl. / Deepl Translator.
Instagram:@byvicente99

Separador y Fotos editadas en Canva
Photos edited in Canva
Es hermoso! Todo lo que haces lo es, me encanta el ángulo contrapicado de la composición y lo dulce que luce el personaje en tu estilo! Increíble, mucho éxito! 🥰😍
Muchas gracias! Quise hacer algo diferente está vez y estoy contento con el resultado. Que bueno que te gustó el dibujo y gracias por tus buenos deseos
Contáctenos para saber más del proyecto a nuestro servidor de Discord.
Si deseas delegar HP al proyecto: Delegue 5 HP - Delegue 10 HP - Delegue 20 HP - Delegue 30 HP - Delegue 50 HP - Delegue 100 HP.
Muy a tu estilo recreaste este personaje y te quedo muy lindo como siempre ❤️ Felicitaciones por otro trabajo impecable 👌
Muchas gracias, fue un poco difícil pero al final resultó muy bien 😊
This is so cute! 😍
!PGM !PIZZA
BUY AND STAKE THE PGM TO SEND A LOT OF TOKENS!
The tokens that the command sends are: 0.1 PGM-0.1 LVL-0.1 THGAMING-0.05 DEC-15 SBT-1 STARBITS-[0.00000001 BTC (SWAP.BTC) only if you have 2500 PGM in stake or more ]
5000 PGM IN STAKE = 2x rewards!
Discord
Support the curation account @ pgm-curator with a delegation 10 HP - 50 HP - 100 HP - 500 HP - 1000 HP
Get potential votes from @ pgm-curator by paying in PGM, here is a guide
I'm a bot, if you want a hand ask @ zottone444
Thanks for the support
$PIZZA slices delivered:
@splintercell-01(3/5) tipped @vicente99
¡Qué hermosos personaje! Definitivamente cautivó mi atención.
¡Desde ya te sigo! Lindo arte.
¡Muchas gracias! 😊 Es bueno saber que mi arte te gustó. Gracias por tu apoyo
Thanks for sharing! - castleberry#6859

Thanks for the support !! 😊