Tarsa's Newbie Fan Art | Splinterlands Art Contest Week #253
Hello everyone! I am Xanreo. This is my first time publishing my art here in this kind of community. Actually, I was planning to post here before, but I was scared of sharing my Art because I am still a beginner in digital art. So, I am just a silent reader of those talented aspiring digital artists at Hive. Every time that I saw their art and they joined in Splinterlands weekly art challenge, I was envious because they are really good at making their own version of how the heroes look in every card that they choose.
So for today's blog, I decided to join in the Splinterlands Art Contest Week 253. Though I am not confident enough to join, I am thinking that joining in on this kind of activity here would help me learn how to color and draw. So I will give it a try.
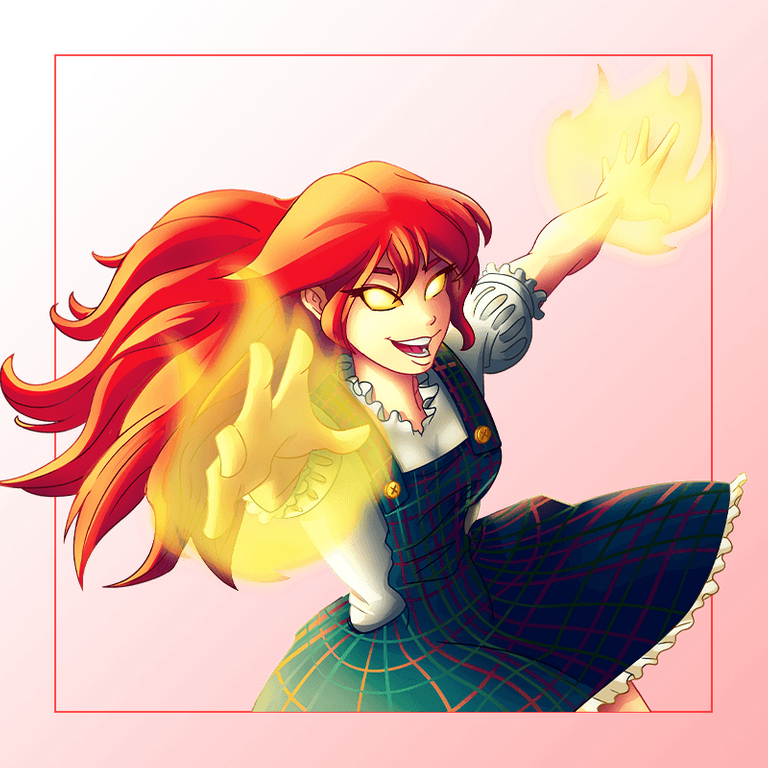
Image Reference Source: Splinterlands | Tarsa
To be honest, I don't know anything about splinterlands. I just like how the heroes look and how every artist used their creativity to draw them. In every card that I saw on Splinterland's website page, The girl, like Eudora, and with a combination of Valir's skills from Mobile Legends, caught my Attention. I really like her, so I decided that she would be the first Splinterlands hero that I would draw.
ART PROCESS:
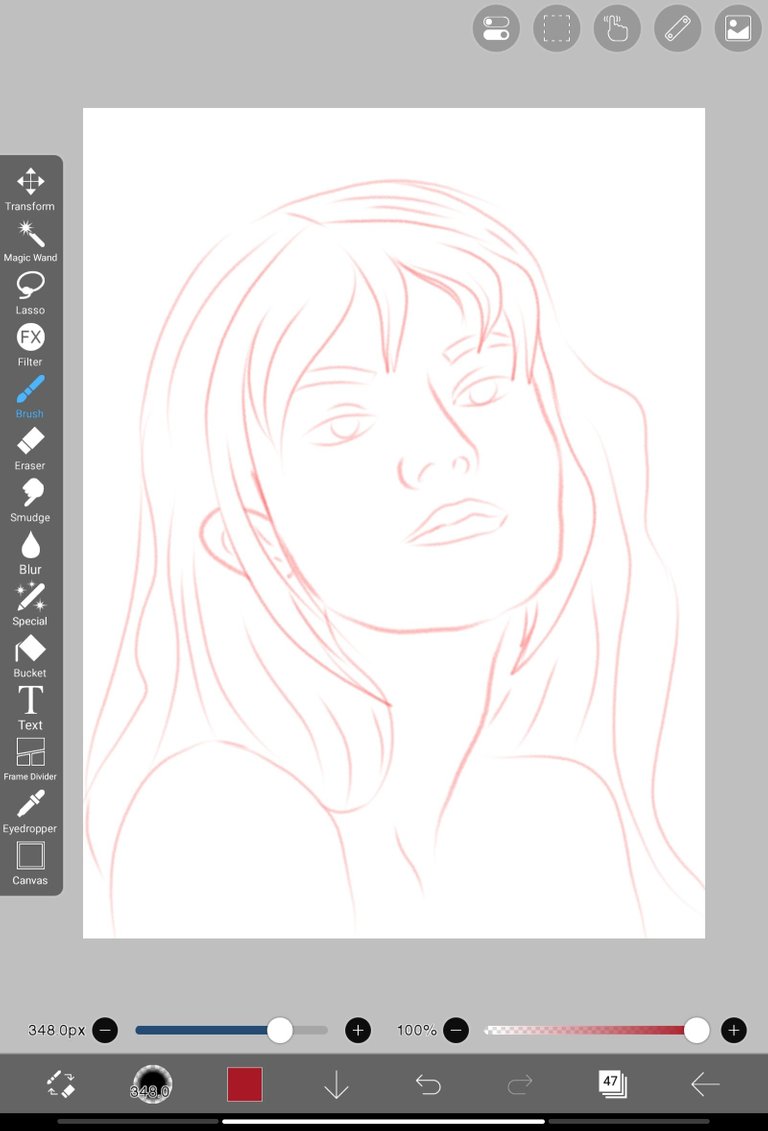

So the first thing that I draw is the base lines. I used Pencil Graphite in the red color (because I will use black later for the final lines). This helps me not be confused about where to erase in the next layer. I just copied Tarsa's hairline exactly as it looked on the card but changed it in a different direction. The thing that I am imagining is that she looks mad and is using her power.
Anyway, I didn't draw the lines that easily. There are a lot of adjustments, of course. Believe it or not, but at this part, I only use my right index finger to draw while sitting comfortably on my chair, like how the Filipino people sat. I don't know, but that is how I can focus and draw. I have my stylus pen here, but I prefer to use my fingers to draw on the screen of my Tablet.
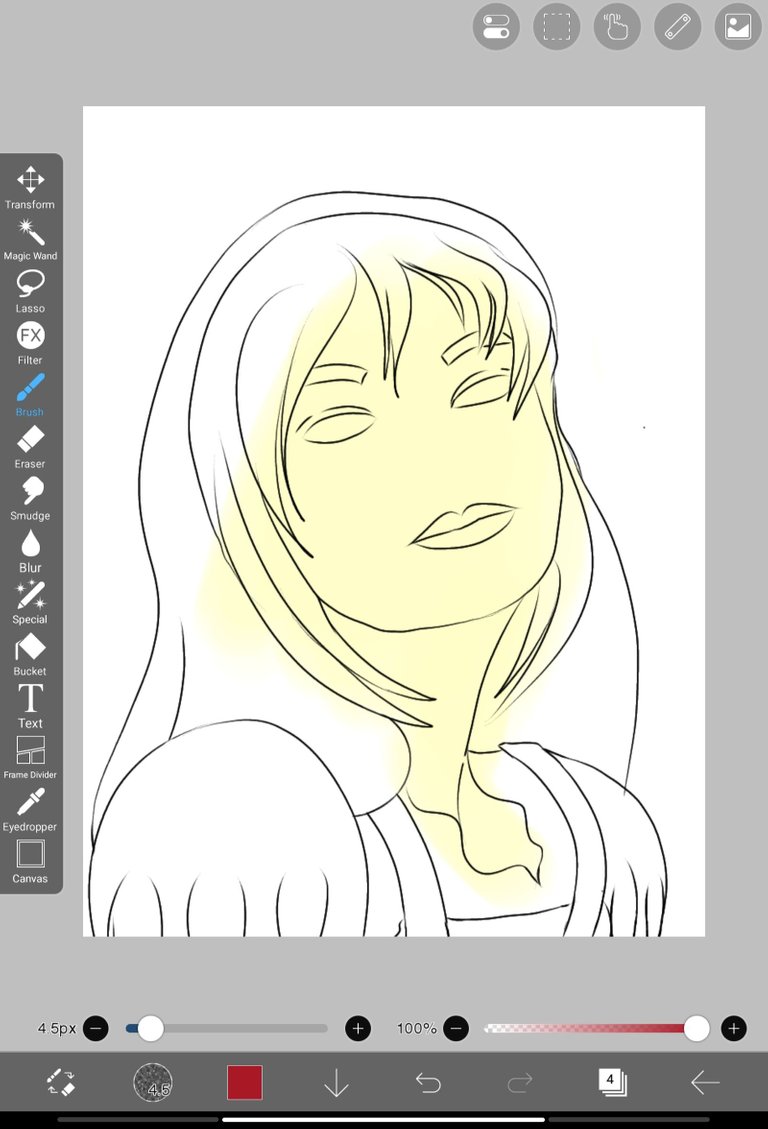
For this one, I don't know where to put the light and shadow reflections. So, I just got some ideas from the reference that I uploaded above. On the left side of her face is the light, and on the right side is the dark shadow. In this part, I used a light yellow for the base color and a light brown for the shadow in the next layer. The brush that I used here is the Pen Fade and I used the smudge after to make the color smooth and blend in the middle.
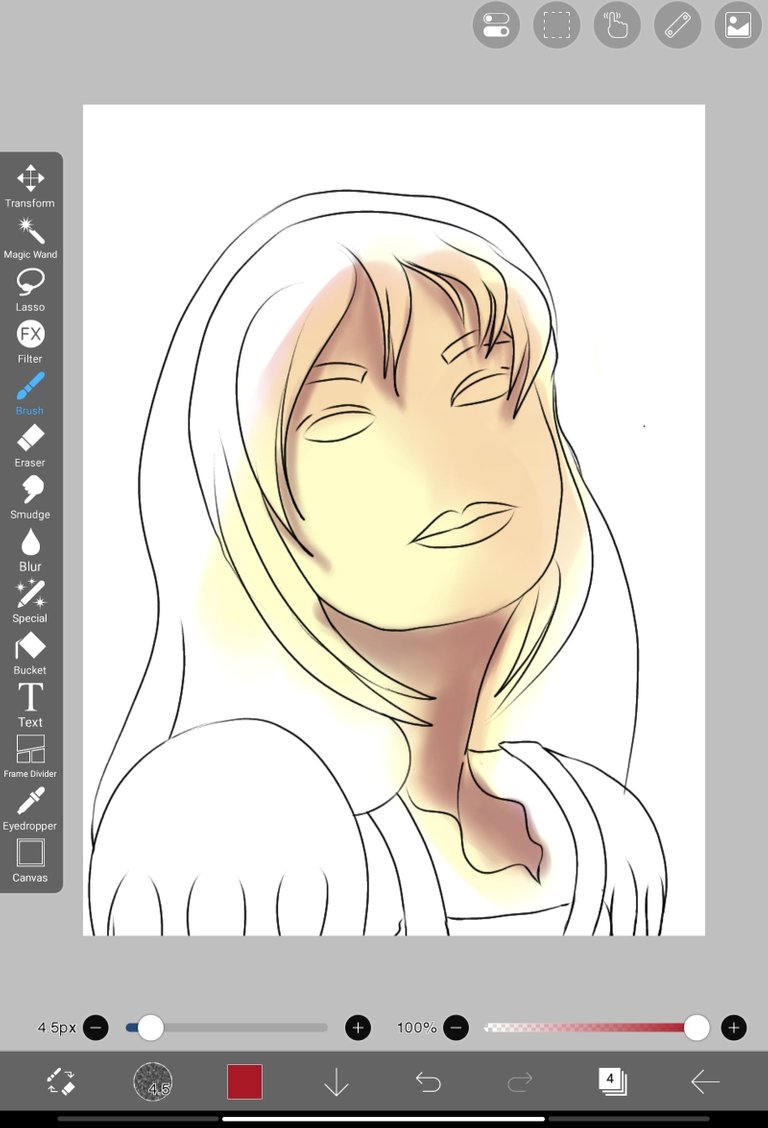

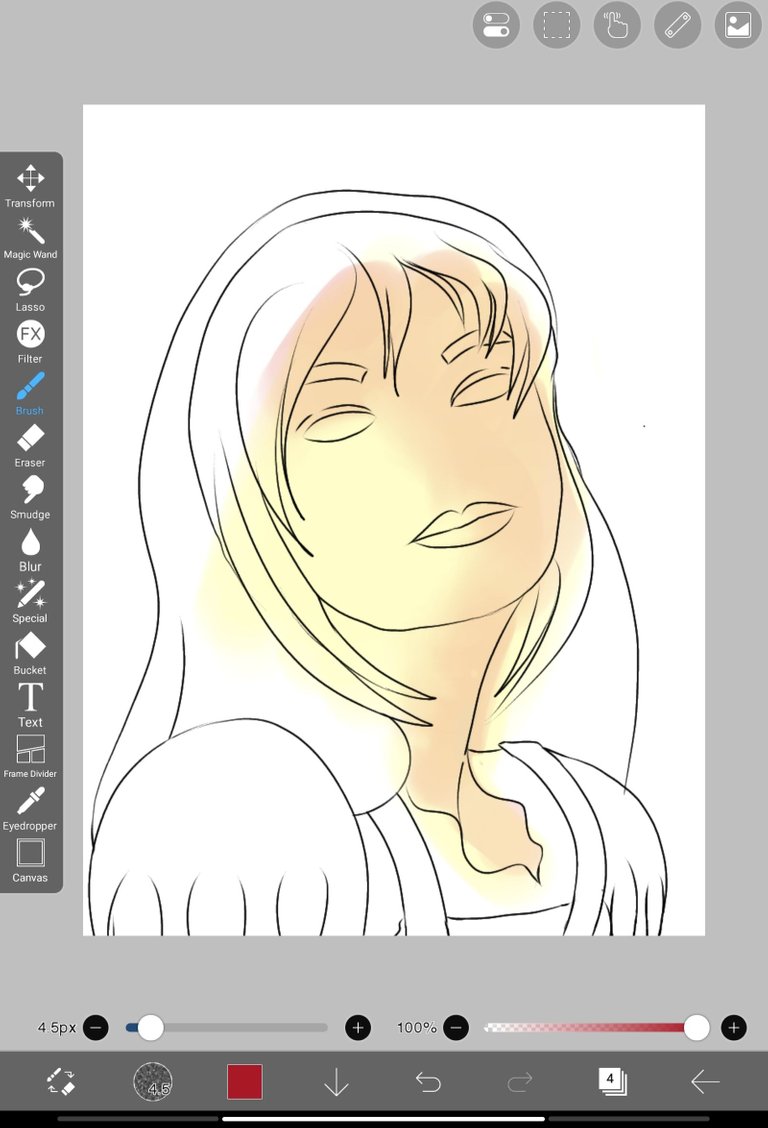
The next step that I took was coloring the shadow of her bangs and the shadow on the left side of her face and her neck. I picked a darker brown than the light brown for the shadow that I put in the previous layer, and I only used the same brush pen, which is the pen fade.
As a beginner, It's really hard for me to draw a nose. There are a lot of processes that I went through before I could perfect the color of her nose, and I wanted to give up. But I'm glad that I was able to do it after hours of coloring, blending, erasing, and repeating the process. I think this is not perfect yet, but at least I have made progress.
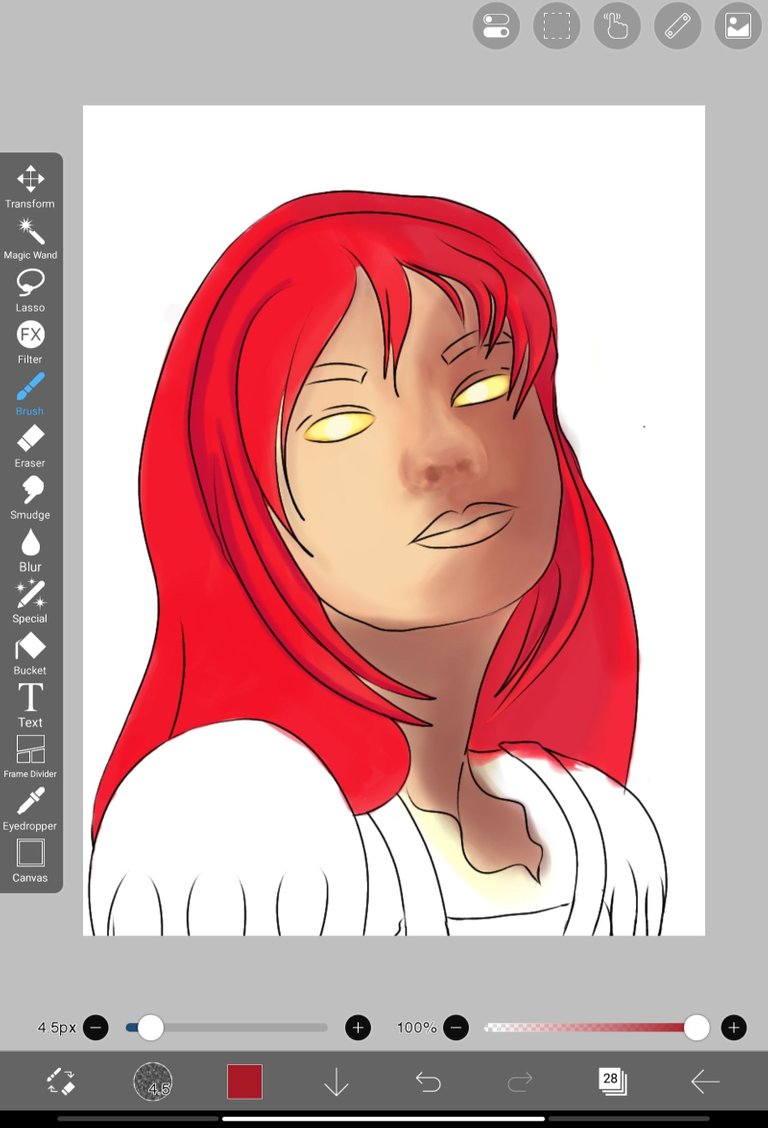
When I became satisfied with the nose, I started to color her hair using the same brush, which is a pen fade in the color shade red, and for the sidelines, I used the color Maroon. Then, Just like the color of her hair in the reference that I uploaded above, I picked the colors yellow and orange for the middle color of her hair and blended them using the smudge brush. Then, I colored her eyes. I still use the Pen Fade brush, and just like the color of her eyes in the reference photo, I picked light yellow for the base color, yellow for the second layer, orange for the side lines, and white for her iris.
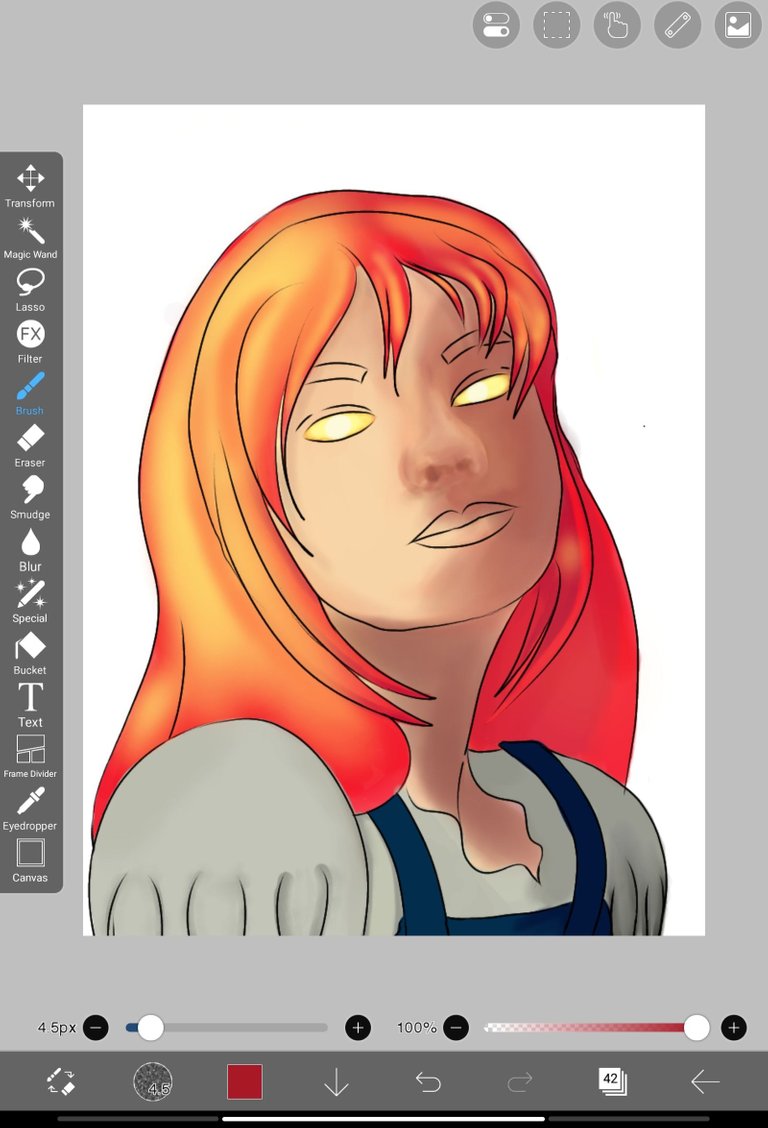
Next, I colored her dress. I don't know if I drew her dress right. Anyway, I used the same color that was in the reference photo. For the inner part of her dress, I used a combination of light gray for the lighter side and dark gray for the side where the shadow is. For her jumpsuit dress, I used the colors blue and dark blue and blended them in the middle using a smudge brush.

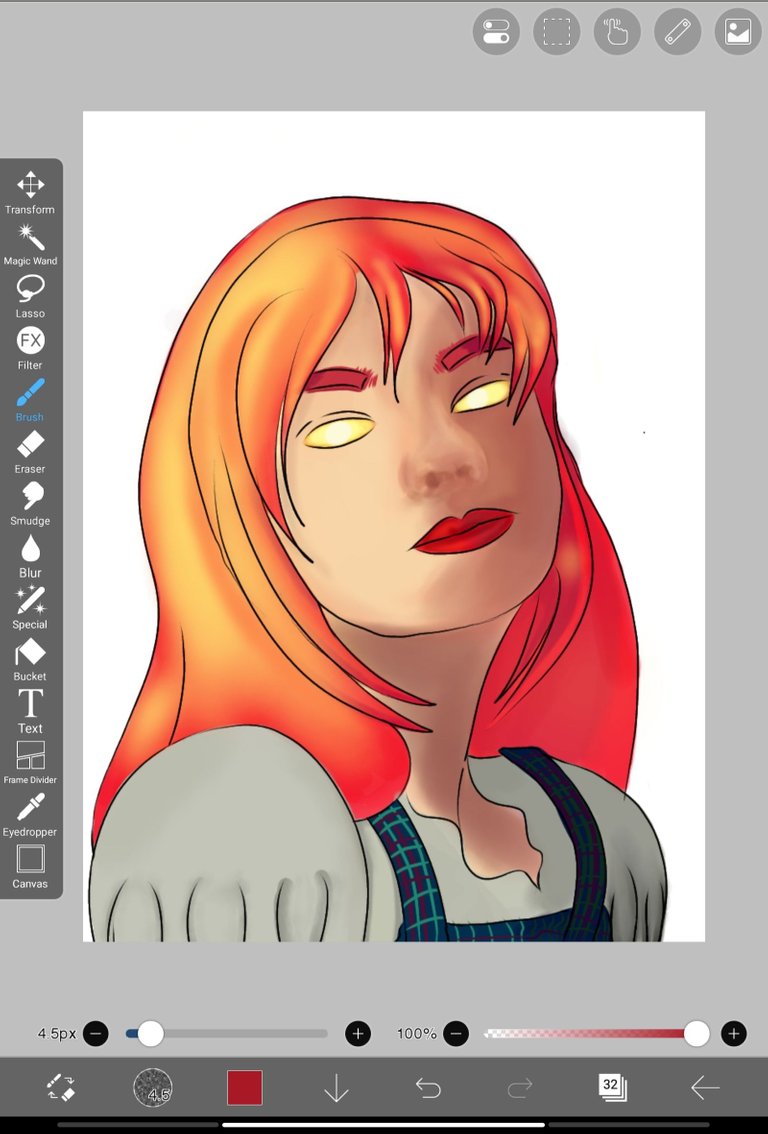
For her lips, for the base color, I use a light color of red first, then in the second layer, I use a dark red color, and for the shadows of her lips and in the shadow, I use the color maroon. For her eyebrows, I also used the same color as her lips. I put the color maroon on where her bangs covered the other part of her eyebrows as a shadow.
Then, when I was done with the lips and eyebrows, I also started to add the red and green line designs of her jumpsuit dress. Actually, it took me a minute to think about how I would be able to put the lines and what I should do to curve them.
Force fade > Drawing tools > Béizer Curve

And finally! After how many hours of adjustments, coloring, and correcting, I removed the lines to see if they were good or not. Removing the lines doesn't mean that the art is finished. Hehe I still need to add some colors and details. Like her eyebags, eyelids, more adjustments in the noselines, blush on, etc.
And when I was satisfied with the outcome, I changed the color of the background to black.
BUT WAIT! I AM NOT FINISHED YET...
Because there are these things that I will put as a design and props to make it not look plain. We will put a design on her eyes and let us draw her using her power.
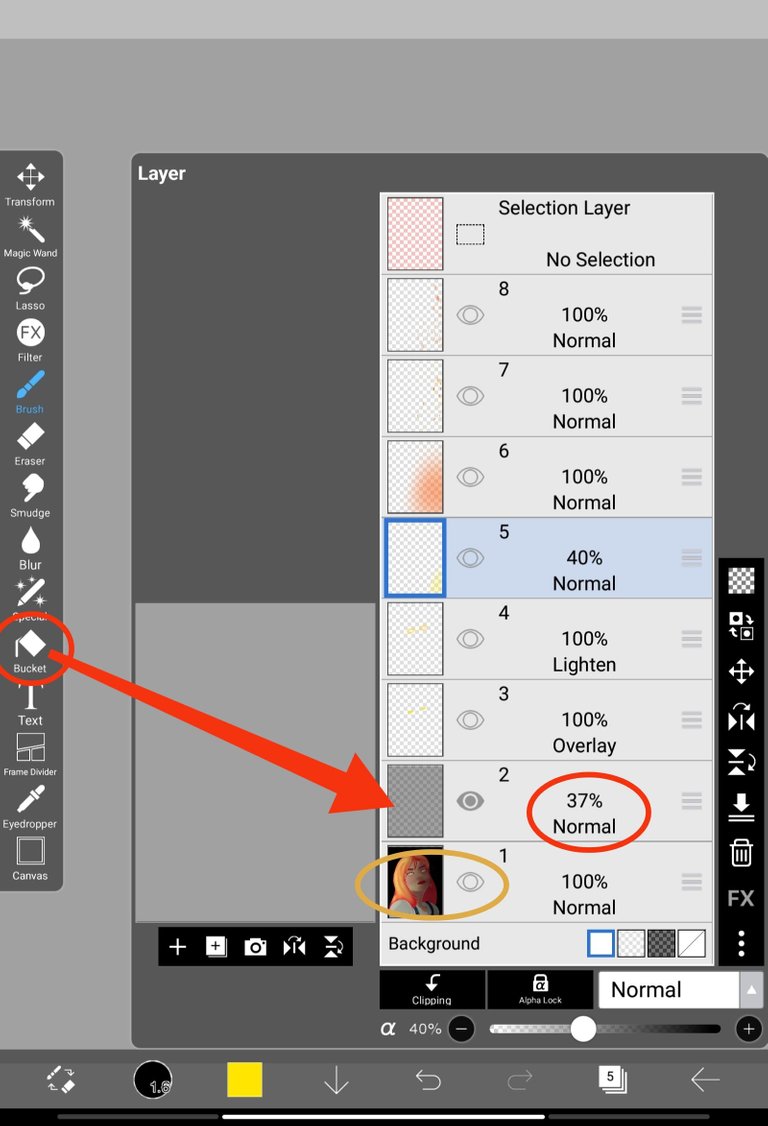
After I saved the image I drew, I started again and made new layers. For the first layer, I uploaded the image I drew earlier. Then I hide it first, add a new layer, fill it with a black color using a bucket, and set the layer transparency to 37%. I unhide the image I drew earlier, add a new layer, and set the blending mode to overlay. Then I used pen fade to color the eyes and set the color to yellow as a base color.
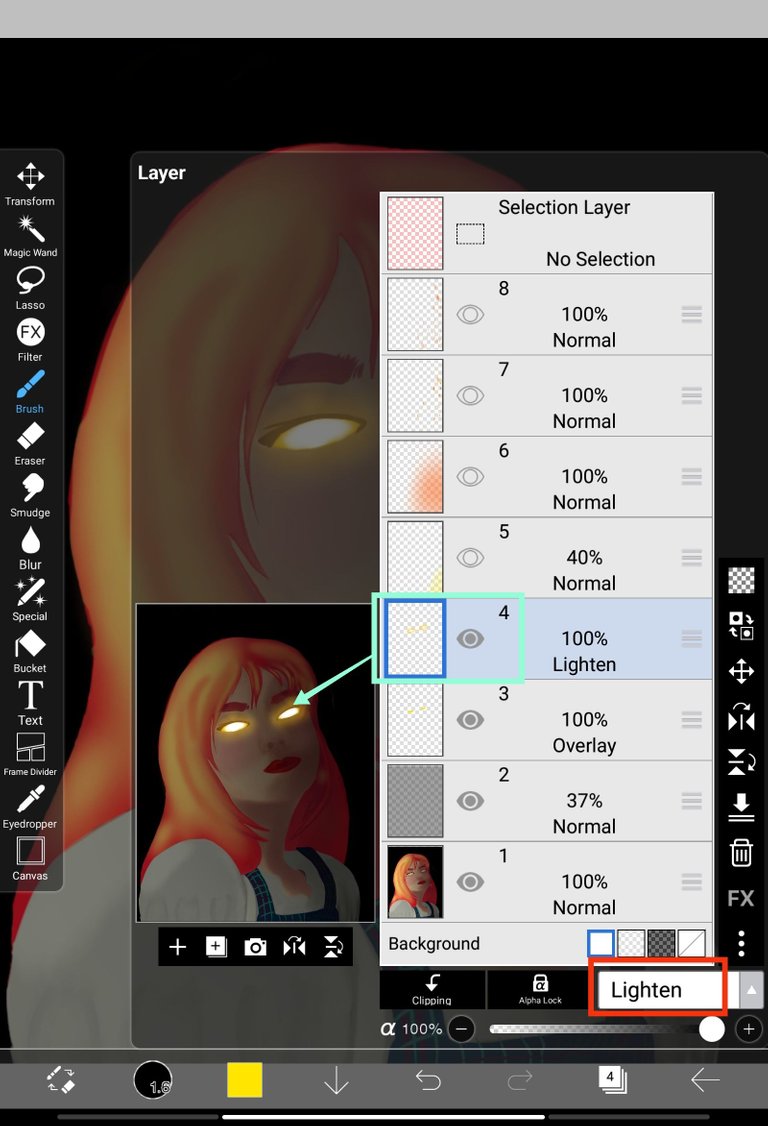
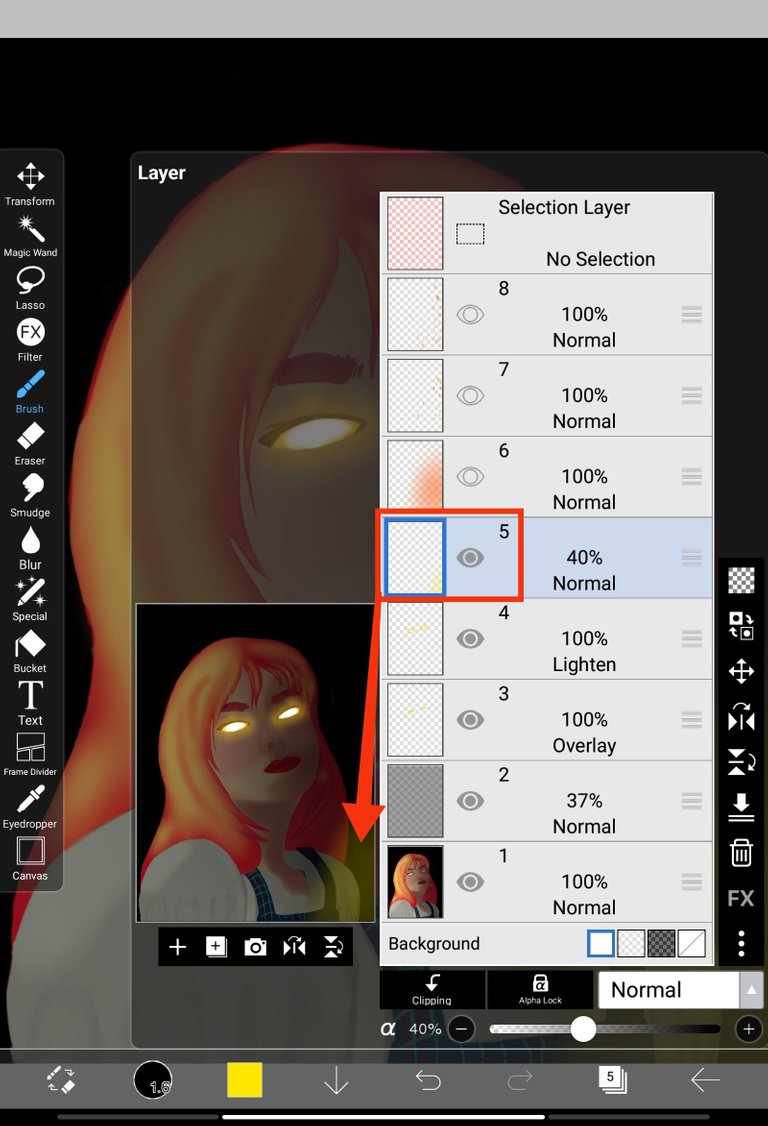
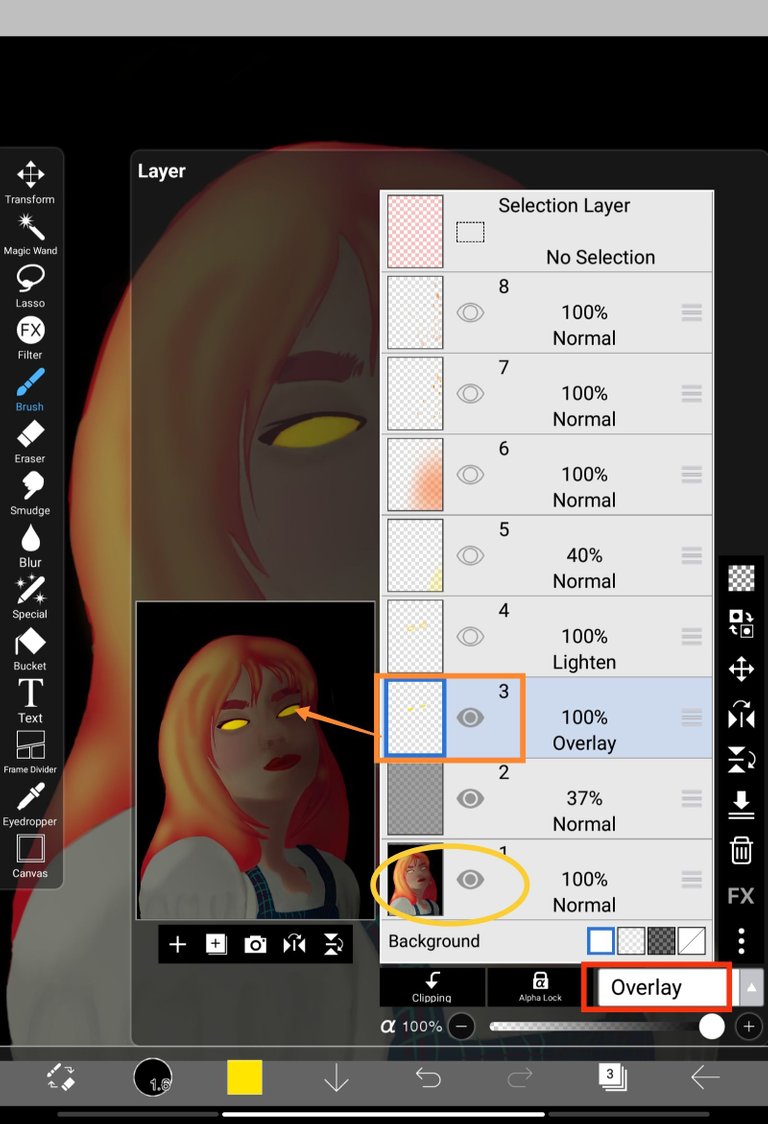
Next, Add a new layer. I colored her eyes again using the airbrush trapezoid and set the color to yellow, orange on the sidelines, and white in the middle. but unlike in the first process, the iris of her eyes will be wider and not a circle. Just like her eyes in the reference that I uploaded above. Then set the blending mode to "lighten". To lighten the color of her eyes and make them glow.
Now that I am done with her eyes, the next thing that I will do is color the cause of her power. I added another layer, and I used the airbrush trapezoid to color a little bit yellow on her side and set the layer transparency to 40% to make the color lighter.

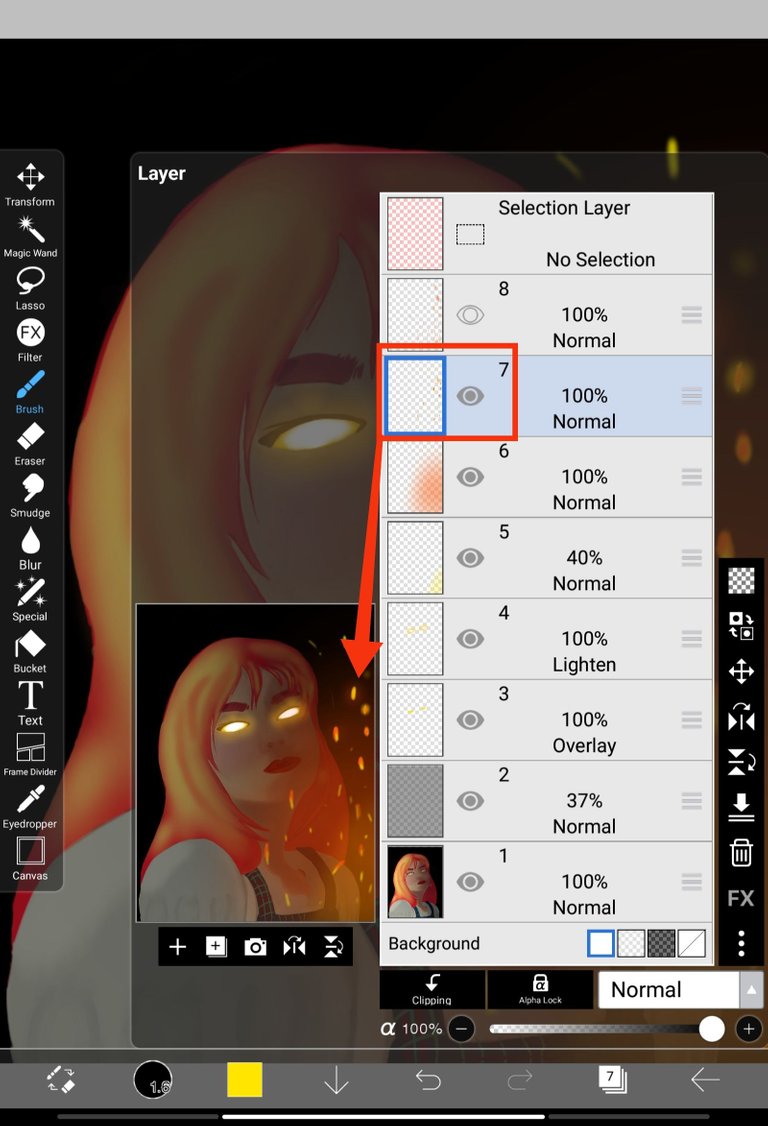
Then I add another layer, color her right side again using the same brush, and set the color to orange. I add another layer again to draw a burning coal. Using the Airbrush Trapezoid, I set the color to orange, and the next is yellow. I drew small dots and lines.
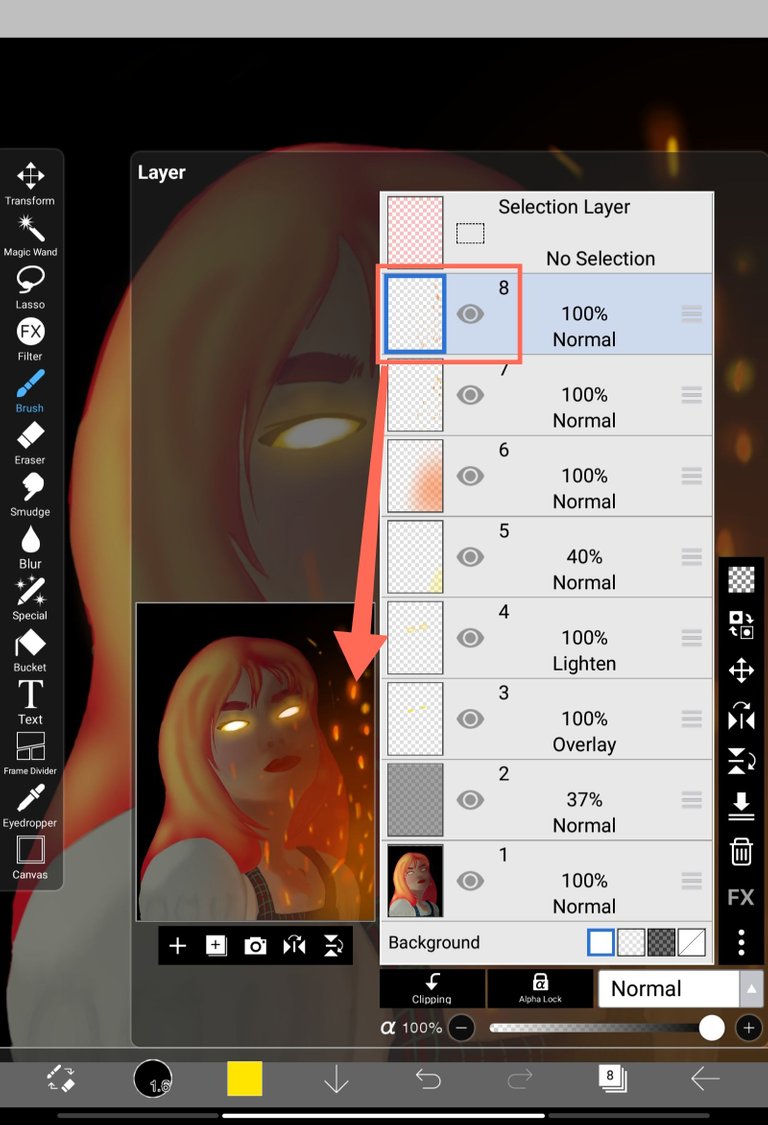

And for the last layer, I used the same airbrush and color orange to draw a circle on each sides of lines to make the color of the burning coal glow.
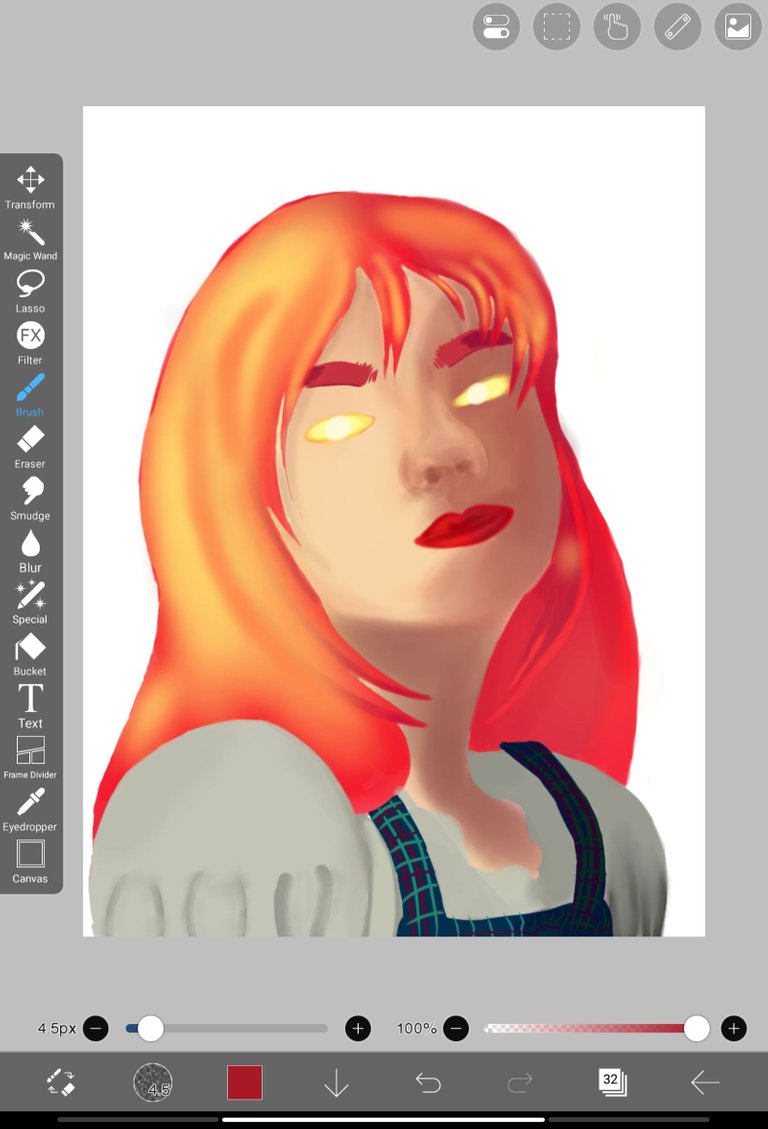
FINAL ART:
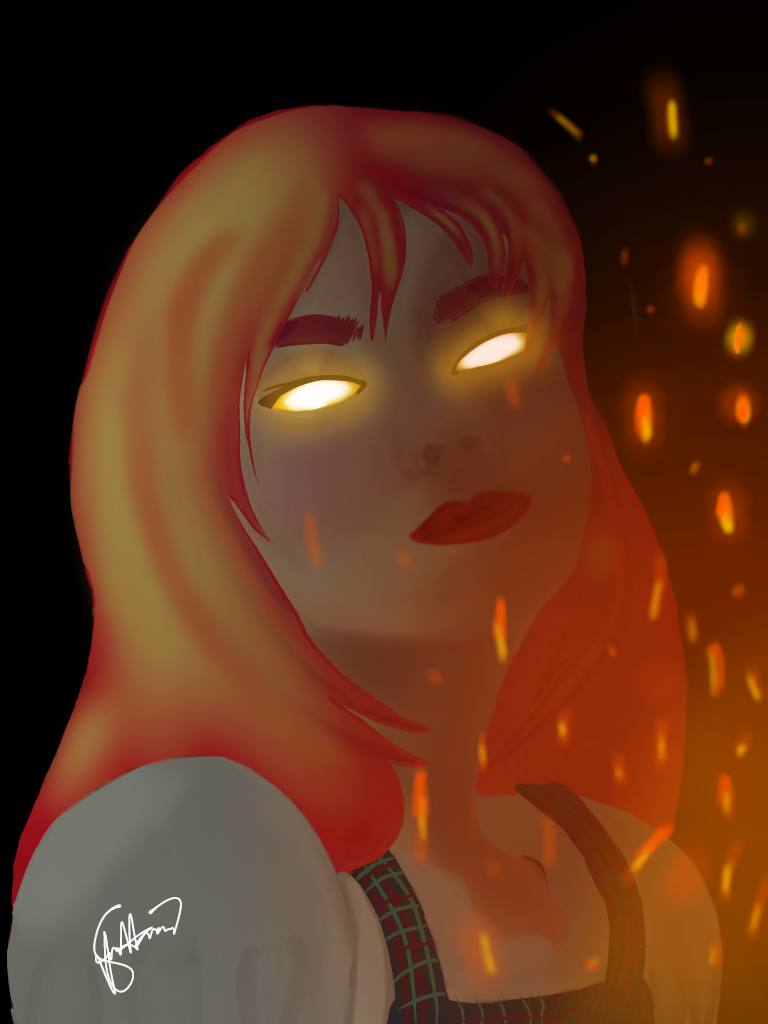
Yay! I am glad because I finished it. I didn't expect that the outcome of my art would be like this. I pushed myself to draw again because, In the past few days, I have always watched a lot of art videos on different social media platforms to learn more about digital art, and also because reading some hive blogs of some digital artists about their spl fan art inspired me to draw too.
And this is all for today! I hope you enjoyed reading.
THANKS FOR READING!
App: Ibispaint-X
Reference/Inspo: HERE
Published by: @xanreo | HIVE
Date: August 9, 2023
That's nice that you are joining now in art contest! It takes a lot of practice, but keep going~ There are a lot of good artists here on Hive, and might as well learn from them. 🙂 Good luck!
!PIZZA
Of course! I will participate again in the next contest. Thank you very much for the support always. 🥹❤️
yes! I really love their art and hoping that I can draw like them too in the future.
Thanks for the pizza ❤️❤️
$PIZZA slices delivered:
@jijisaurart(2/5) tipped @xanreo
Wow! THANK YOU VERY MUCH @ewkaw 🥹❤️
Niceeee!!! Sana all nakaka join na
Para makapag practice practice din po. Wala sana me balak ipost to pero sayang din since may progress na me. 🥹 join kana din master jude ❤️
Soonest
kelan si jude~ HAHAHAHAHA
On going pa hahaha
Yeeey! You're already making progress just by taking this step. Keep up the momentum, Jam! Can't wait to see your other artworks pa ✨
It's hard to draw pala talaga. 😫 I almost cried and gave up especially on the nose part! 🤣 Thanks C! This helps me motivate myself to draw again.
Gosh, it still amaze me seeing how an arts was created. Seeing how matrabaho it is, parang nakakatakoy simulan. But if the result is pretty naman, I say its worth it.
Galing galing, maigi at nag join ka. The end result is awesome, I me likey. Looking forward na sa next entry mo uwu
There's a lot of process kasi. A lot of layers needed para maperfect mo yung right shapes until you became satisfied na sa itsura. Yap! Nag give up na ako ng ilang beses pero now na naka ano ako ng isa, parang gusto ko ulit mag draw 😂
Thanks sa inpluwensya ni ate @jijisaurart tsaka ni @demotry. Tinuloy ko siyang ipub kahit wala akong balak sana. Haha 🥹 Sana makaya ko ulit yung sunod na drinadrawing ko😫
Yes naman, mas namo-motivate kana lalo, tuloy tuloy lang yan. Waitint kami sa other entry mo uwu
galing naman. nice nice.
Magaling kasi yung master ko magturo 😂
🤣
Thanks for sharing! - castleberry#6859

OMG! Thank you very much for the support 😍✨️