✨👁️✨Elegant Magic Eye Bracelet Inspired by "ALBAHOO FORESTER"✨👁️✨ Splinterlands Art Contest Week 287 ✨👁️✨Elegante Brazalete de Ojos Mágicos Inspirado en "ALBAHOO FORESTE✨👁️✨

Happy and blessed weekend I wish you all my fellow members of this amazing community of @jewelry, I hope this week has been of blessings, today I come to participate in @contest #287 of Splinterlands, I decided to make an elegant Bracelet inspired by the character of "ALBAHOO FORESTER" I wanted to accompany it with the Splinterlands logo, giving it a color combinations that represent this character.
ALBAHOO FORESTER: They lead a life of solitude and peace in the pine forests of the northern highlands, they do not value conquest and power, but the knowledge and wisdom of the elements.
They have no attack but are able to return incoming ranged attacks and heal creatures.
Their rangers have mastered the elemental magic of life. They use it to protect their own and the wetlands of their home.
Next I will be presenting the materials used for the elaboration of this elegant bracelet.
Materials
- Wooden loom
- Salmon colored beads #10, Green, White and Black #8
- Black polyester thread
- 2 crocodile endings
- 2 rings
- Chain clipping
2 alligator clips * 2 loops * Chain clipping - Needle #12
- Pliers
- Scissors
- Lighter or tinder
- Glue
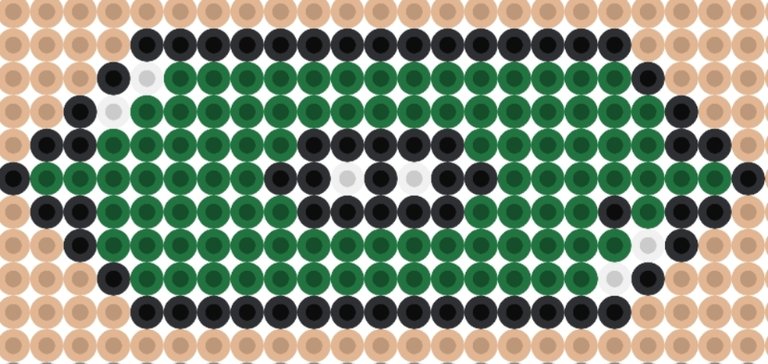
- Pattern or design
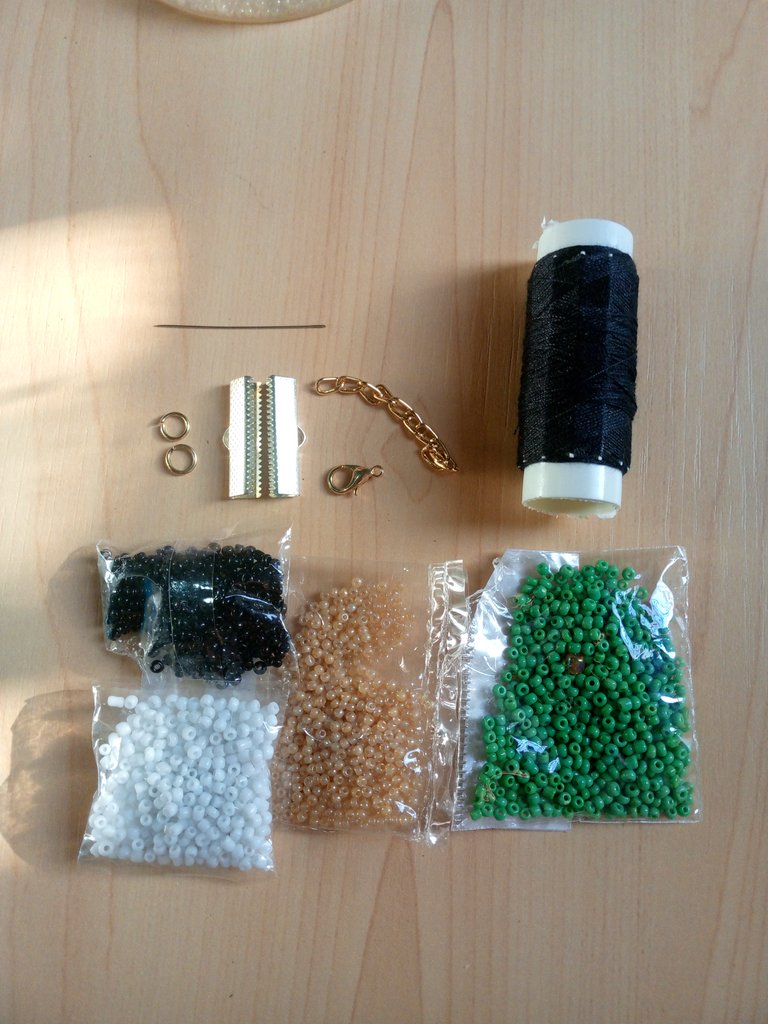

These were the materials and tools used.
Now I present to you the step by step for the elaboration of this elegant bracelet, it was a very complex process but with dedication everything is possible.
Step by step
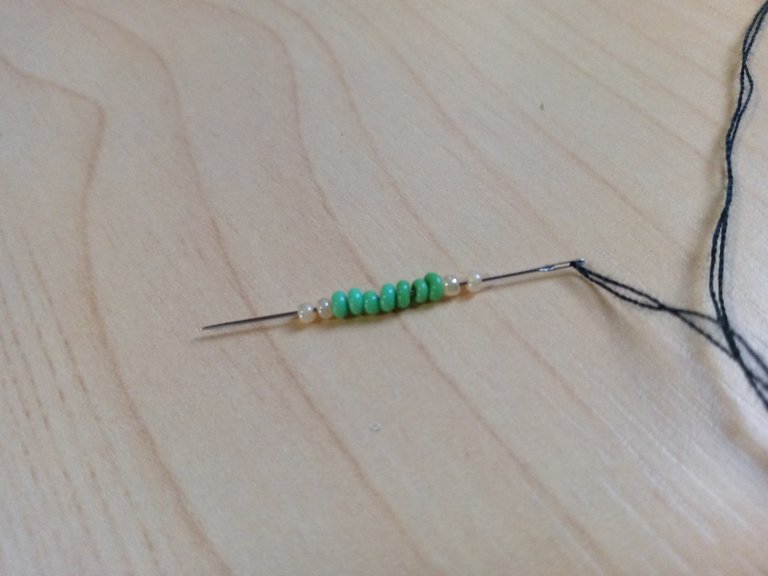
Step 1
We are going to start by placing 12 rows of thread on our loom, then we are going to thread our needle with approximately 3m of polyester thread.
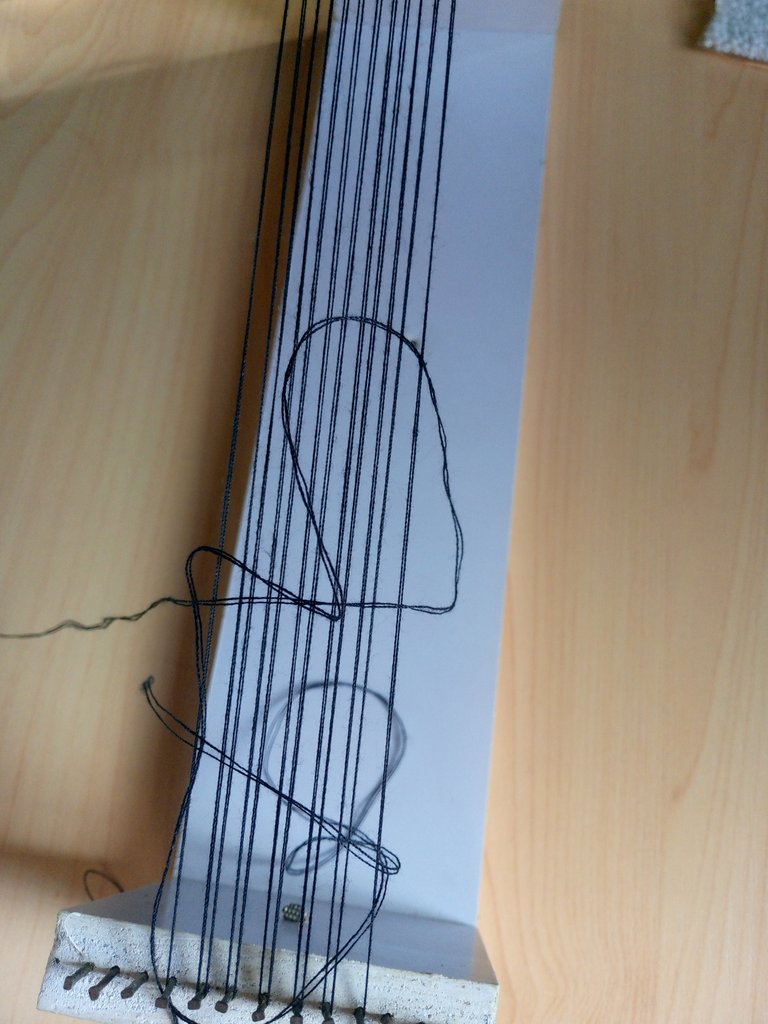
We are going to leave an excess of about 30 cm then we will tie a knot at the ends of the thread what we tie a knot.
Step 2
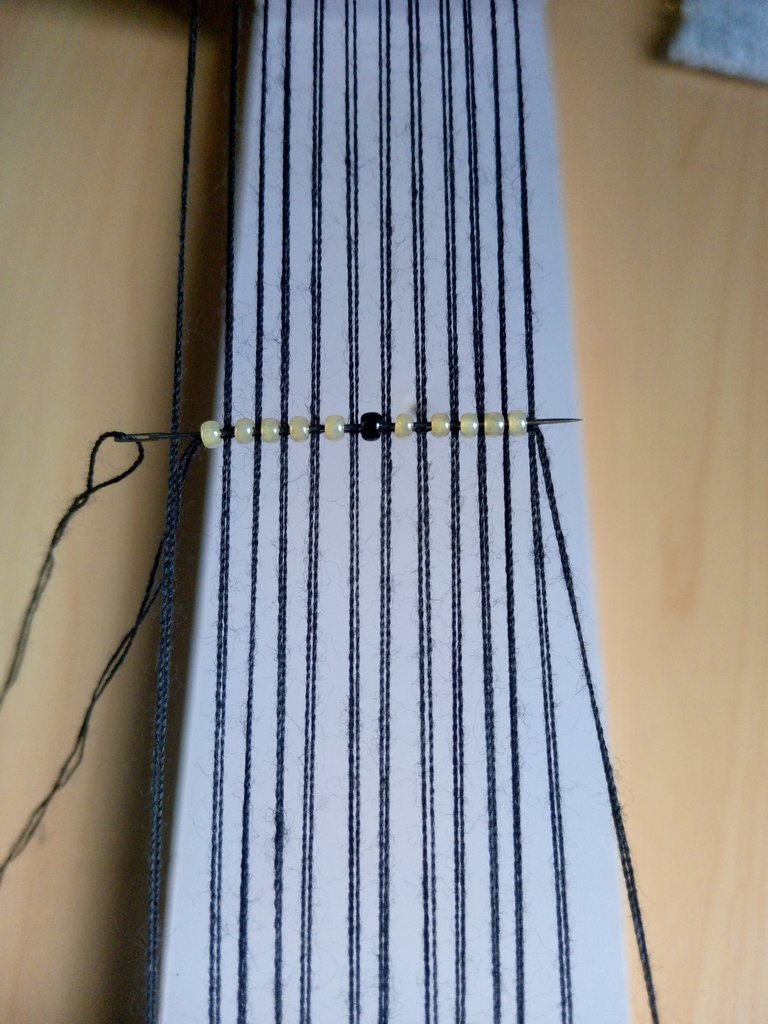
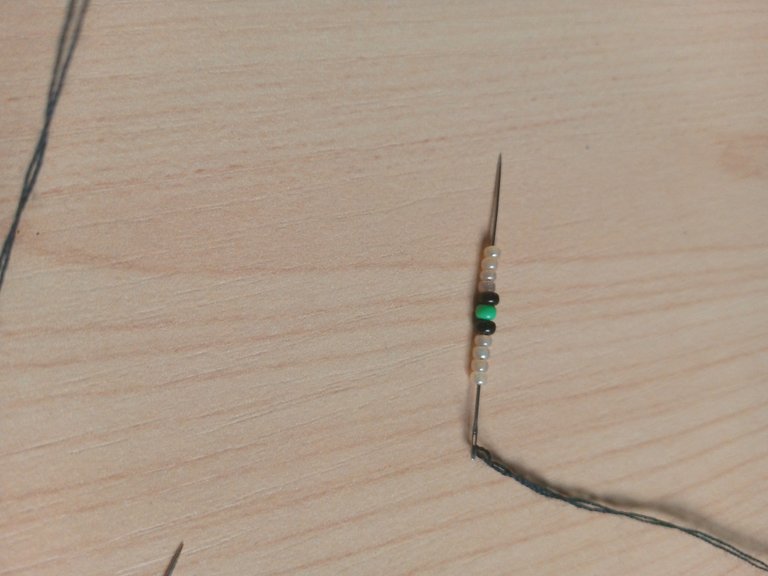
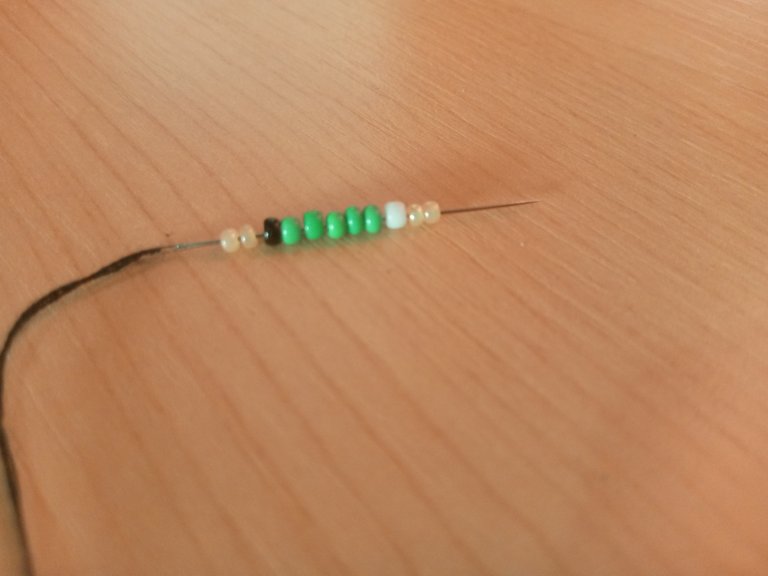
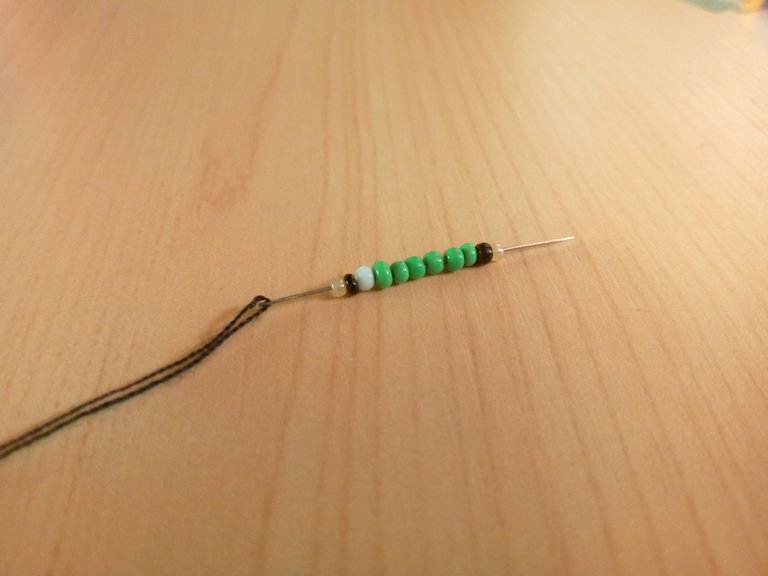
Let's start our design on the loom by taking 11 beads in total, five flesh colored beads, one black bead and again five flesh colored beads.

With the help of our finger we are going to position the beads on each of the threads of the loom, we are going to pass the needle through the top and then introduce the needle over the threads and inside each of the beads.

Step 3
We are going to take four flesh colored beads, one black bead, one green bead and again four flesh colored beads.
We are going to position the beads of our loom, now it will be easier because now the first row is fixed, then we are going to pass the needle through the top and introduce inside each bead.

This same procedure is what we are going to do in all the steps.
Step 4
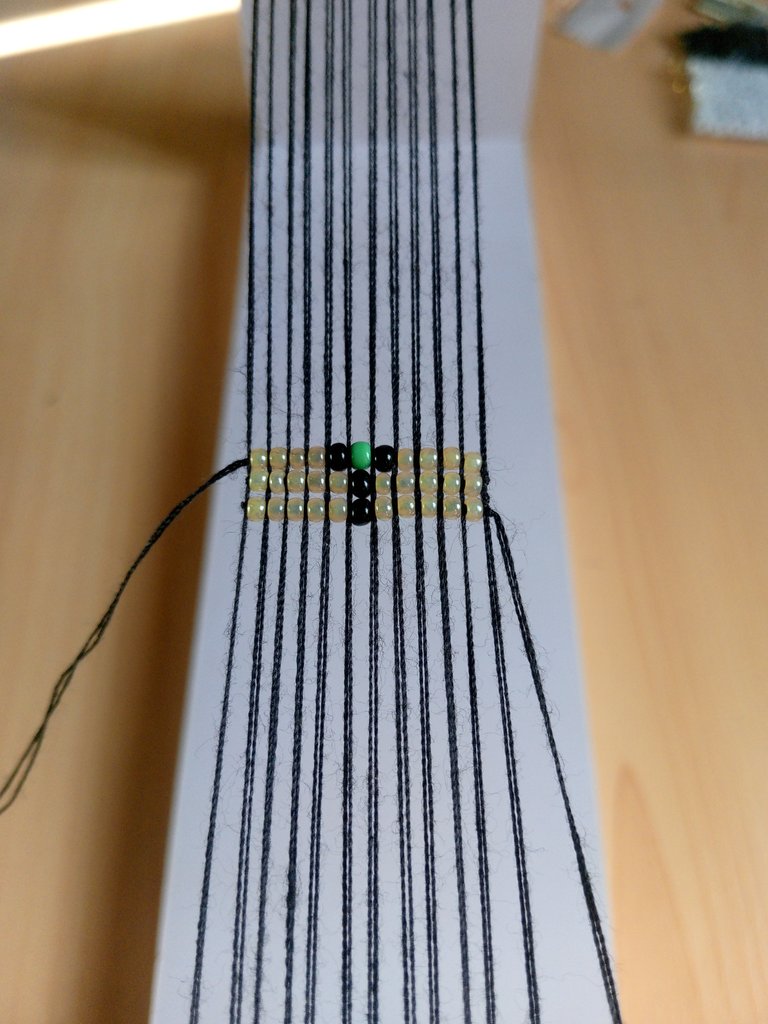
With the help of our needle we are going to take three flesh colored beads, two black beads, one green bead, again two black beads and three flesh colored beads.

Position the beads on the loom, pass the needle over the threads and insert the needle inside each of the beads.

Step 5
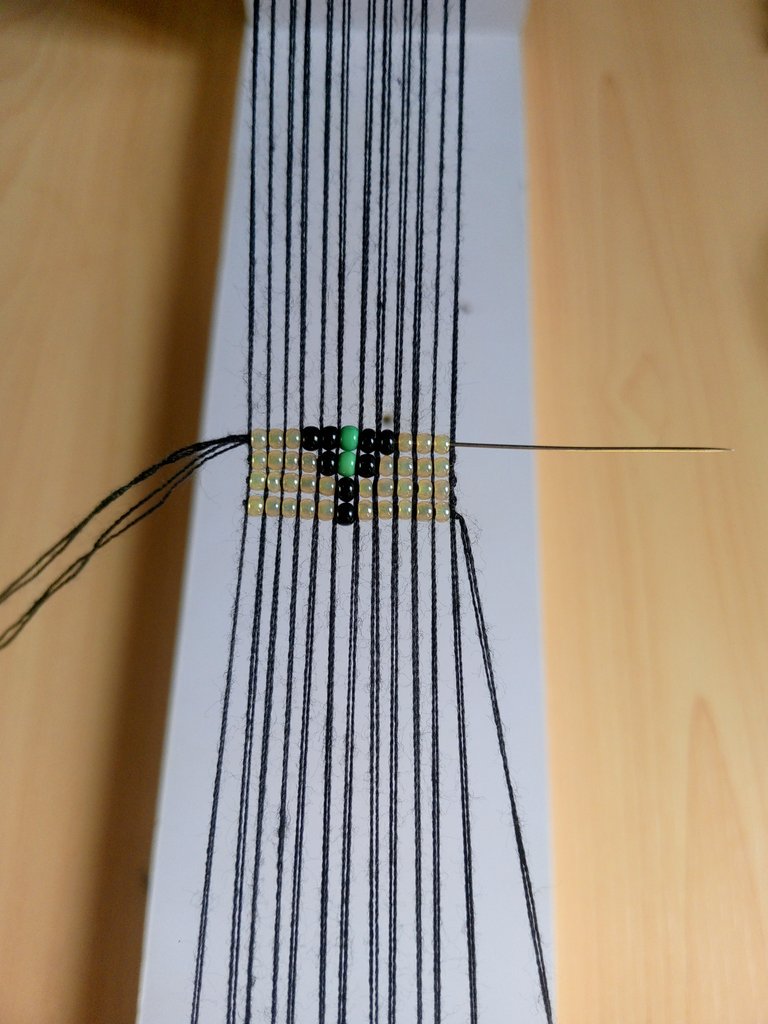
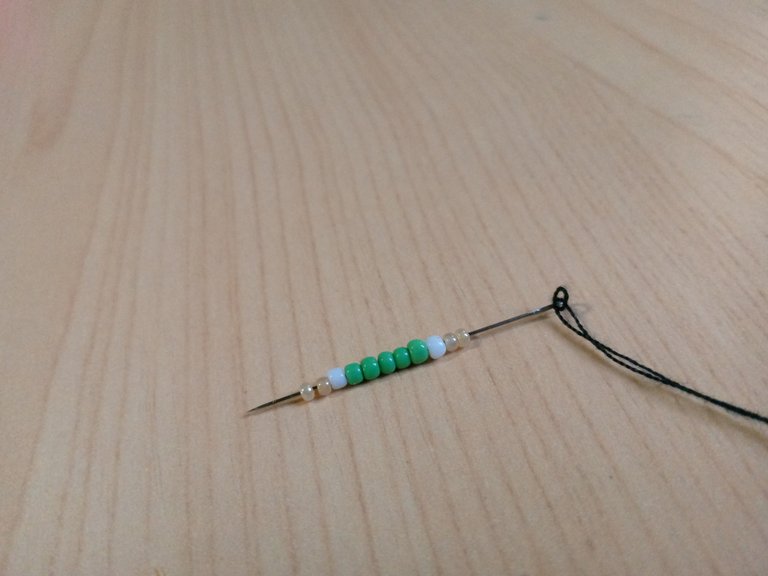
For this step we are going to take two flesh colored beads, one nagra, four green beads, one white bead, one black bead and again two flesh colored beads.

Positioning the beads, we are going to pass the needle over the threads and inside each one of them.

Step 6
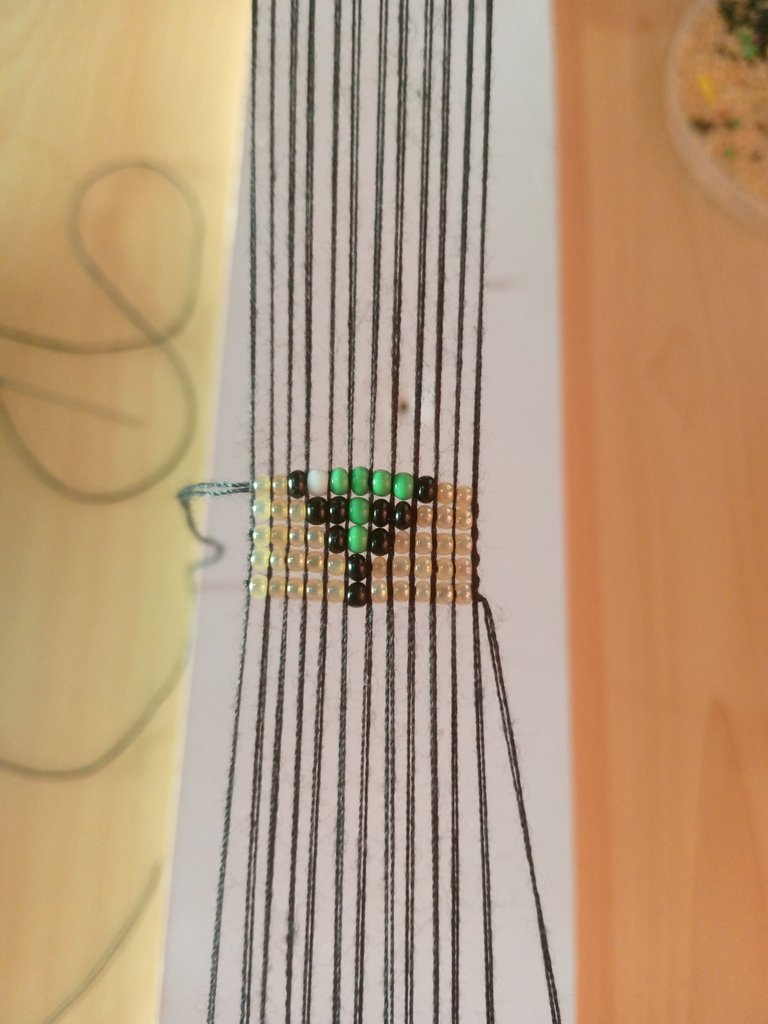
Next we take two flesh-colored beads, one black bead, five green beads, one of the white beads and again two flesh-colored beads.
We position the beads on the loom and pass our needle over all the threads and inside each bead.
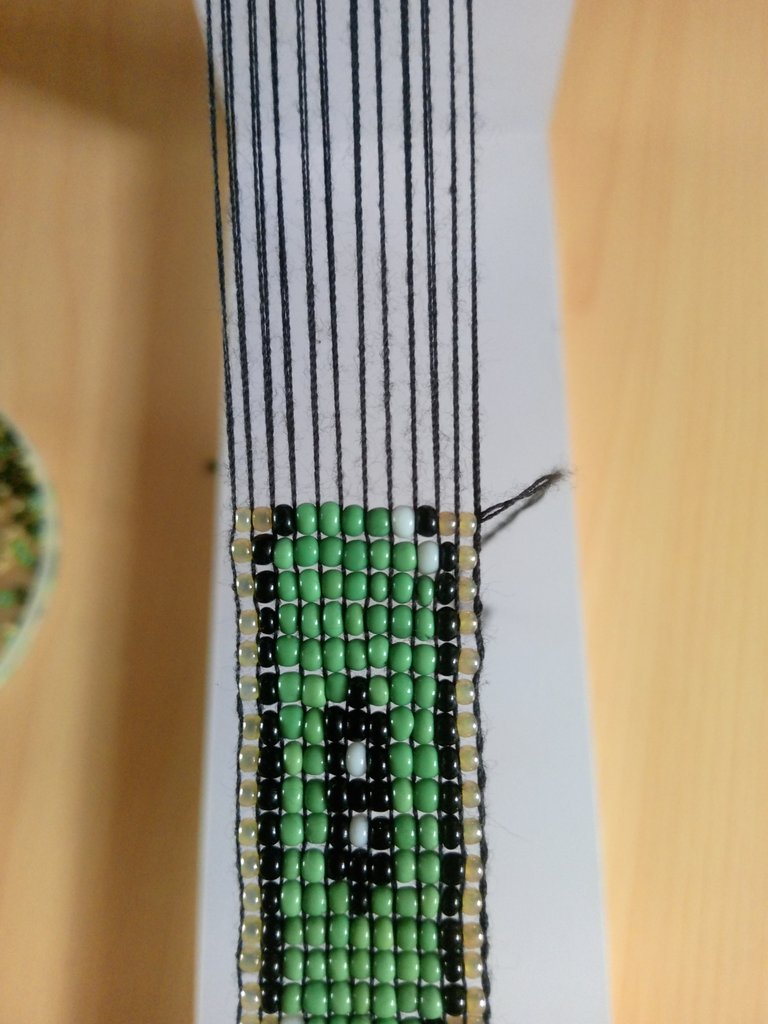
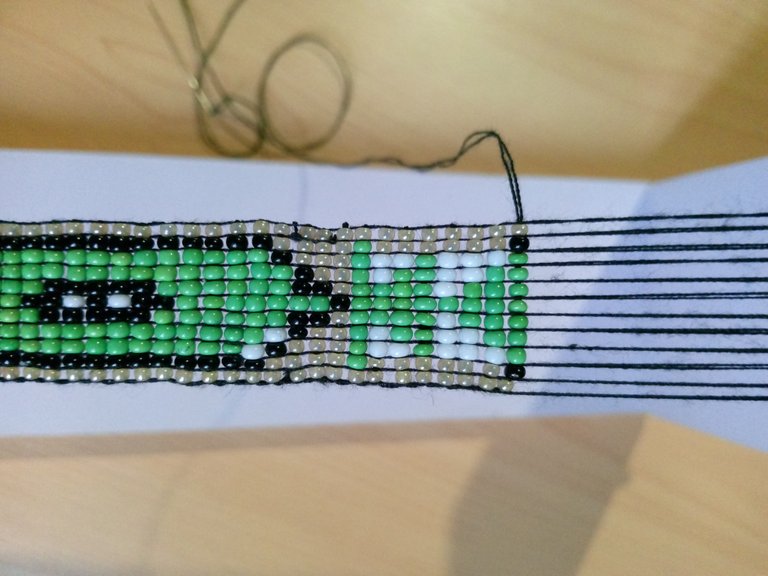
Step 7
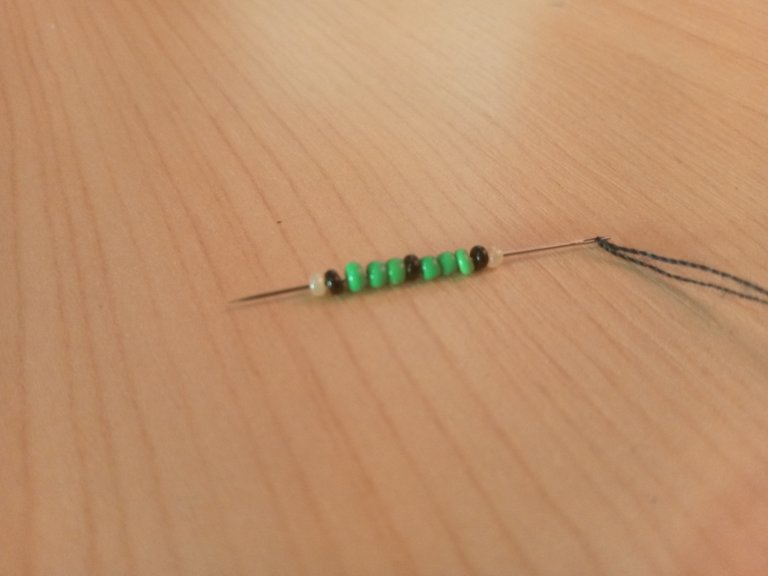
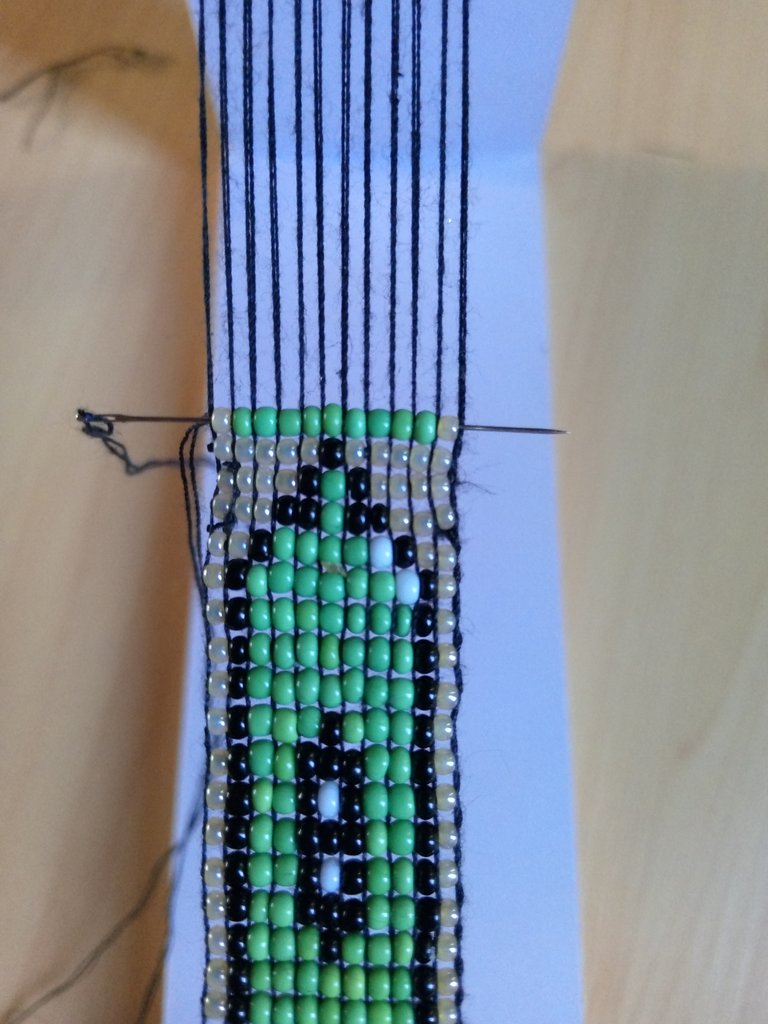
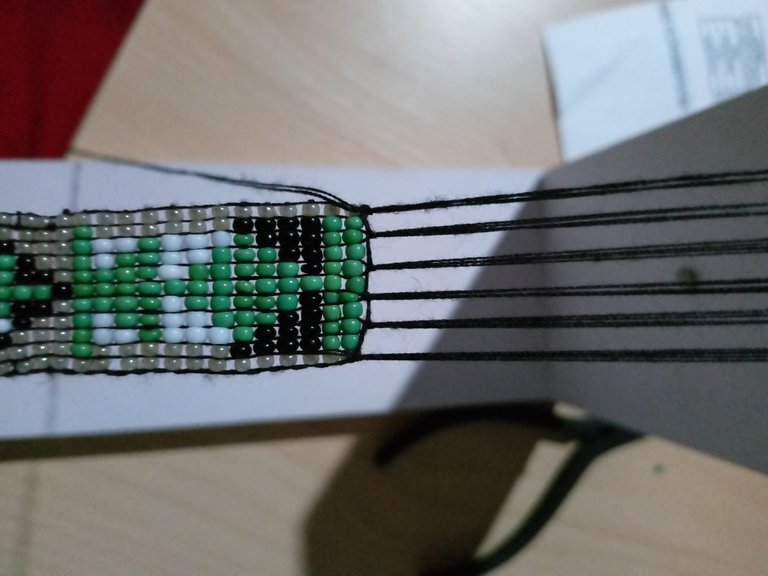
Keep in mind that we are always going to start with the flesh colored beads and place one bead, then one black bead, seven green beads, one black bead, and then one flesh colored bead again.

We are going to position the beads on our loom, now with more ease because it already has the size of the beads, then we pass the threads through the top and introduce them.
We are going to repeat this same step a couple of times, until we have this result.
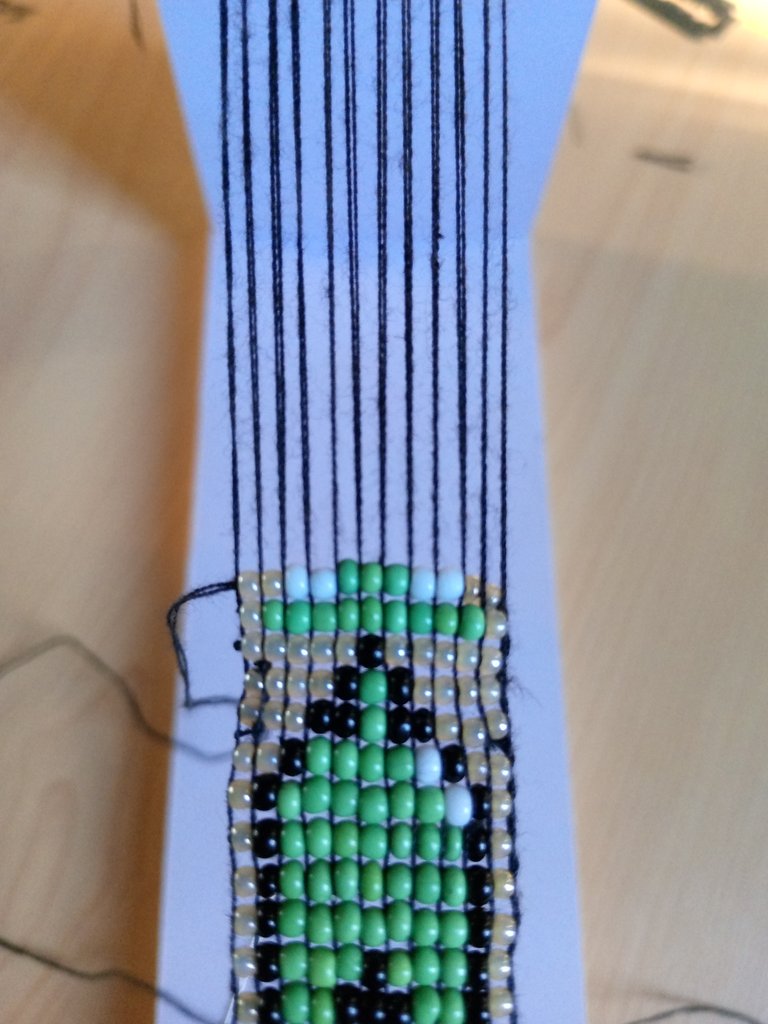
Step 8
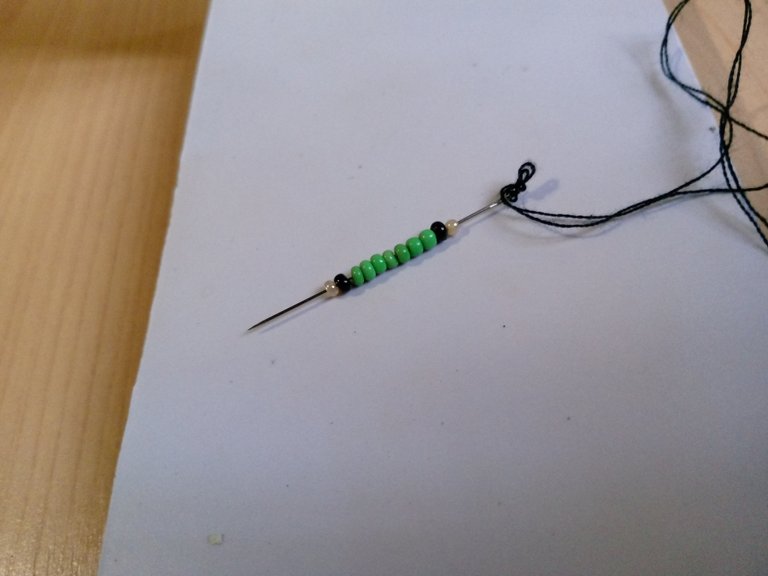
We will continue introducing the beads according to the pattern, we take one flesh colored bead, then one black bead, three green beads, one black bead, again three green beads, one black bead and one flesh colored bead.
Just like the previous ones, we position the beads on the loom, pass the needle over the threads and we are going to introduce it through each of the beads.

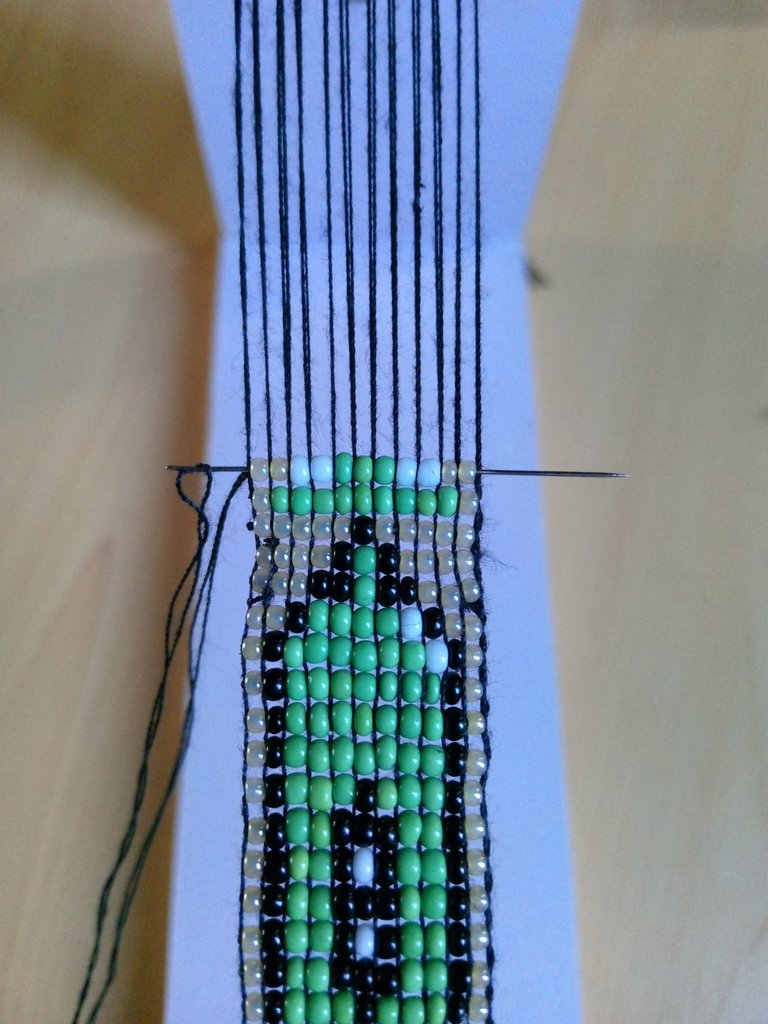
We are going to take again one flesh-colored bead, two green beads, three black beads, two green beads, one black bead and finally one flesh-colored bead.

We are going to position the beads on the loom, pass the needle over the threads and introduce the needle through each of the beads.
Now we take a flesh-colored bead, then a black one, two green ones, a black one, a white bead, a black one, two green ones, a black bead and finally a flesh-colored one.
We are going to position them on our loom and repeat the procedure of all the previous ones.

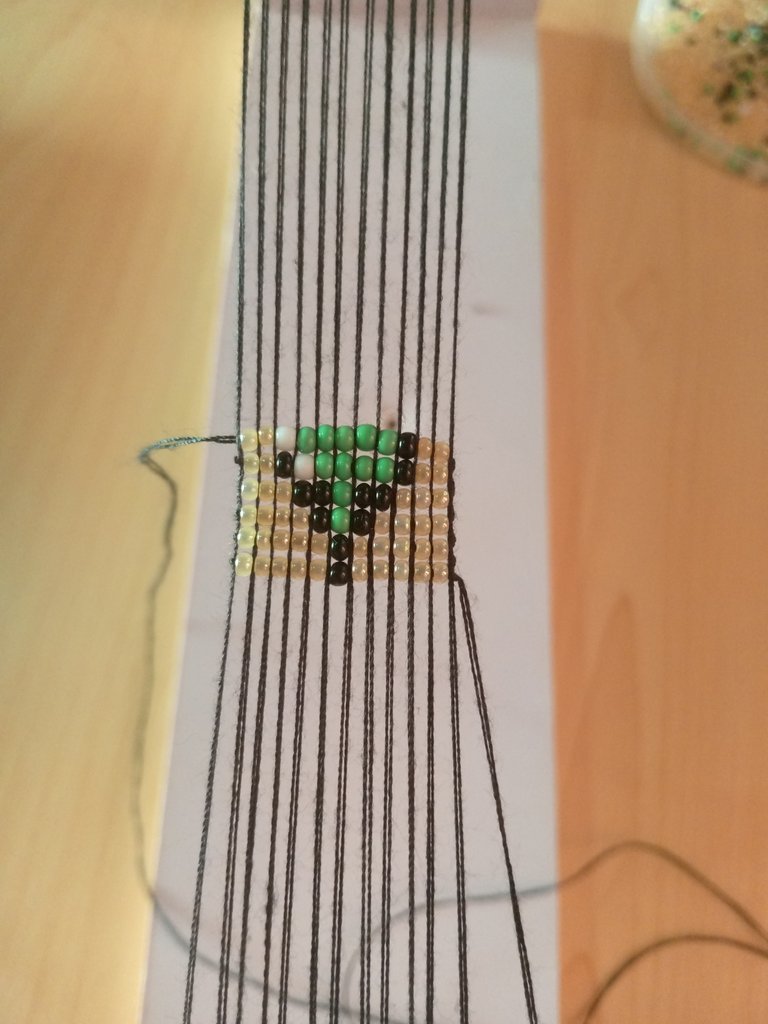
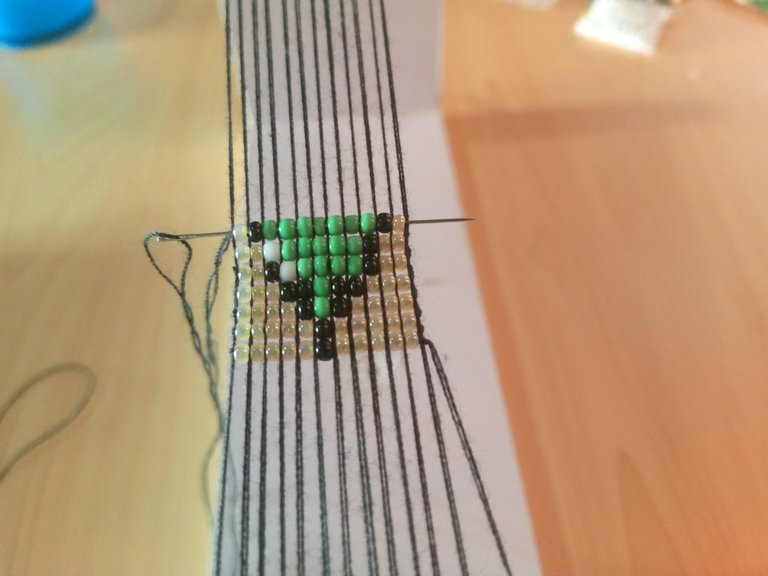
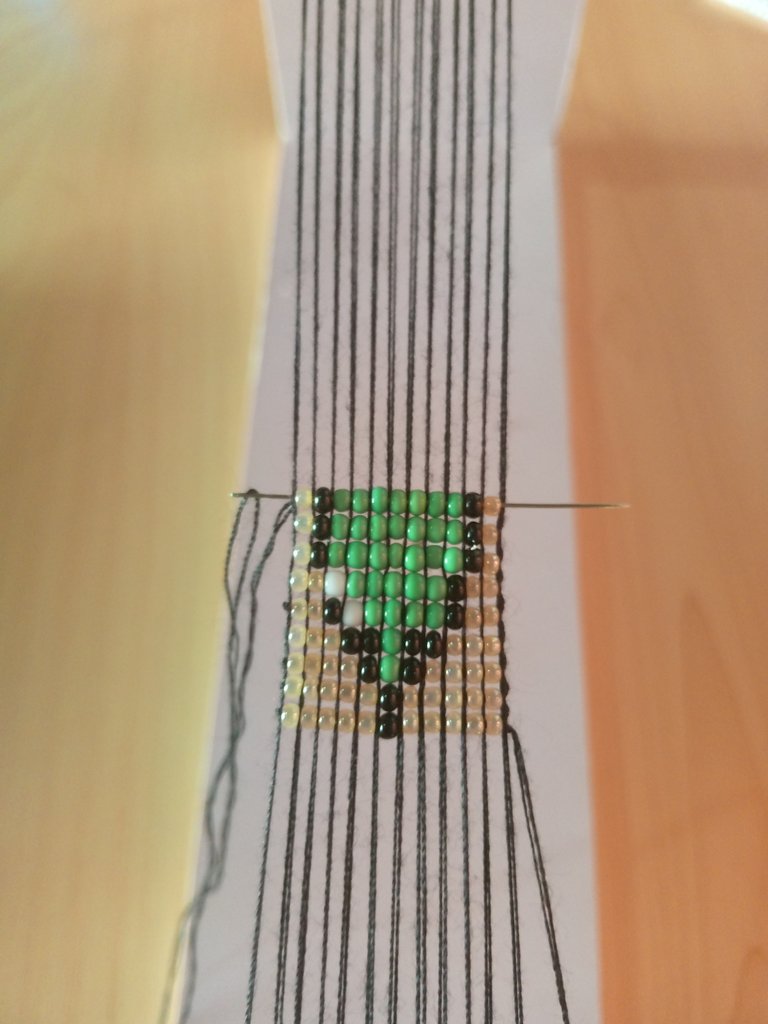
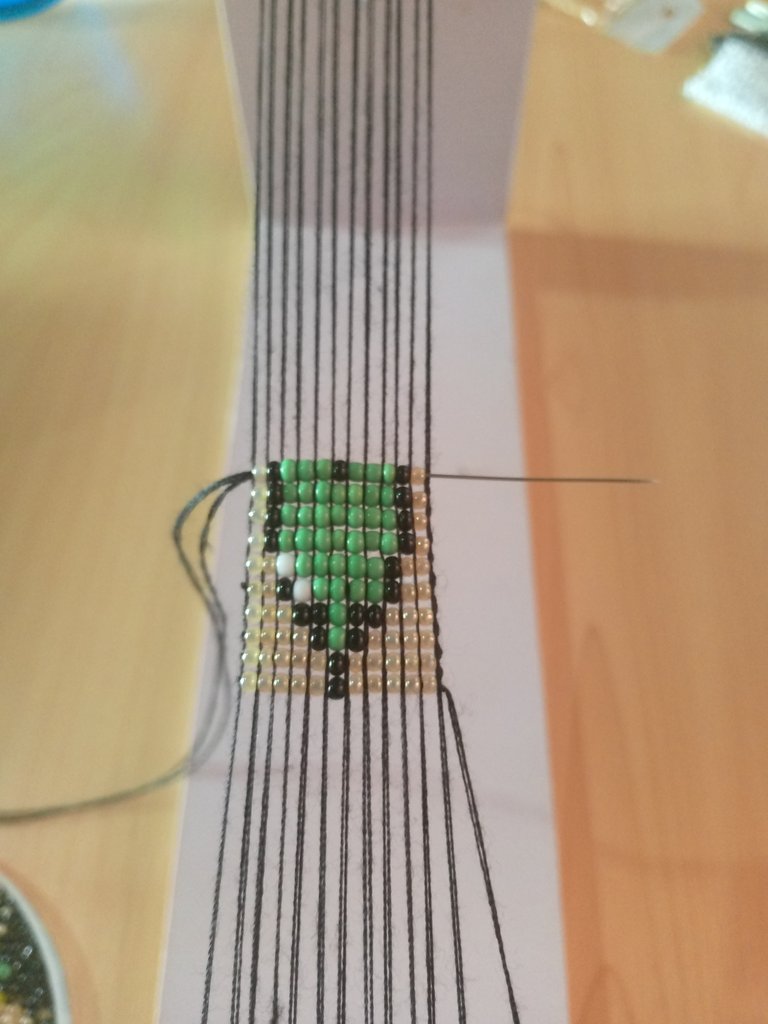
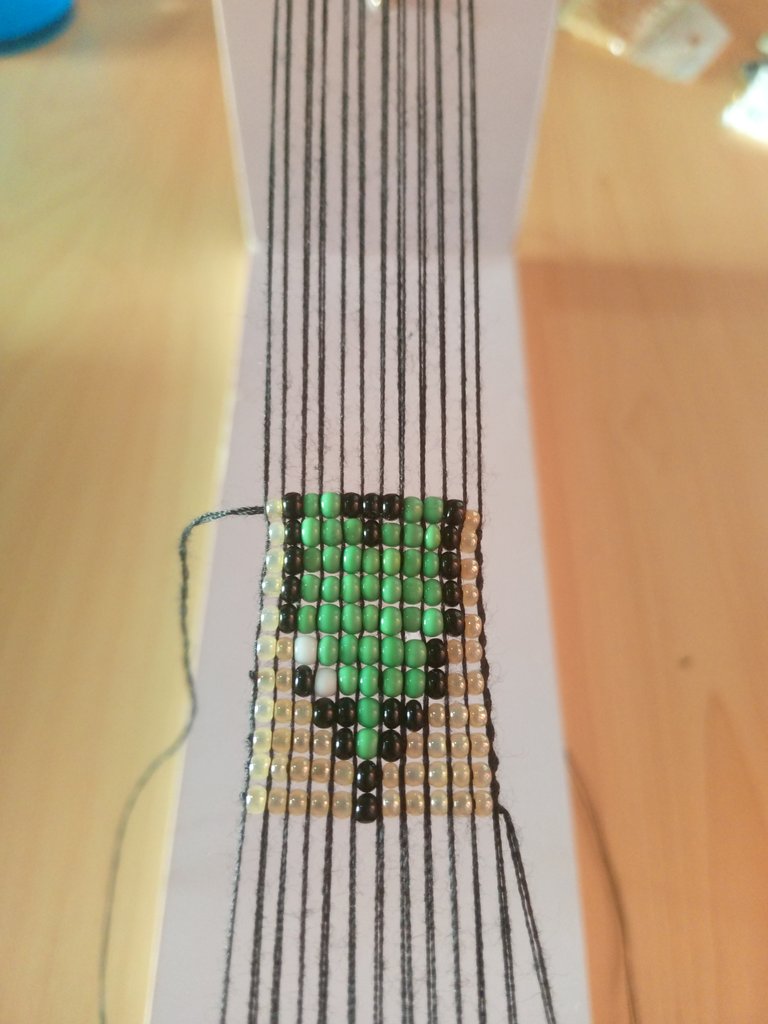
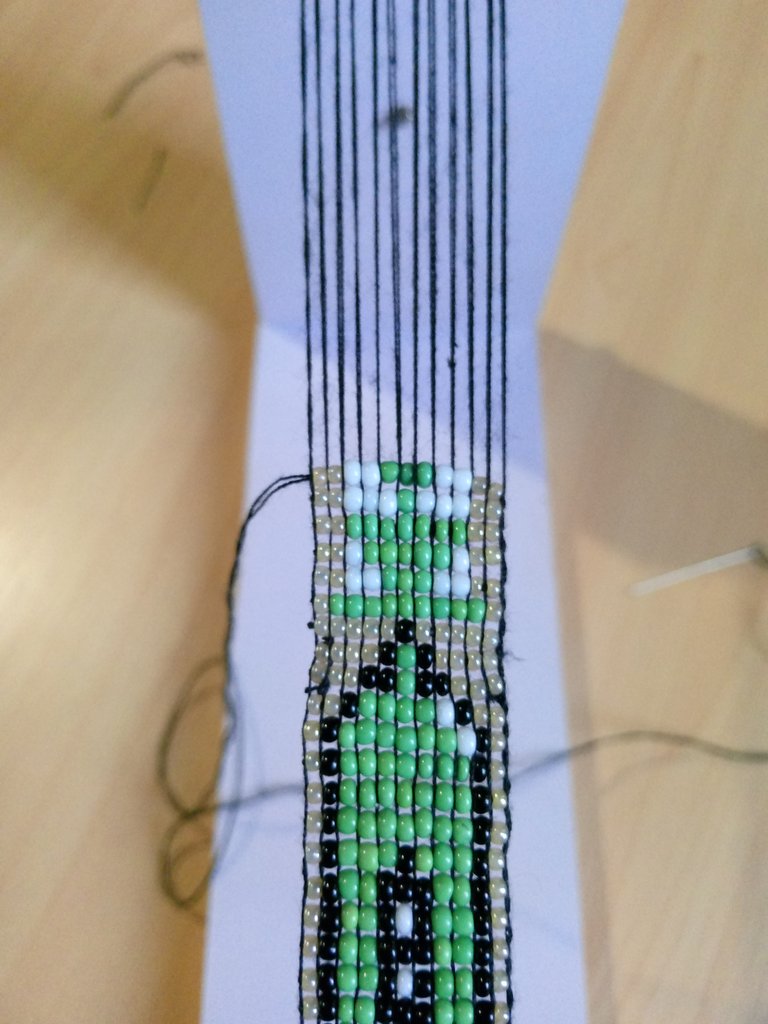
As we can see in the pattern, we will repeat this same process a couple of times until we have two white beads in the center.
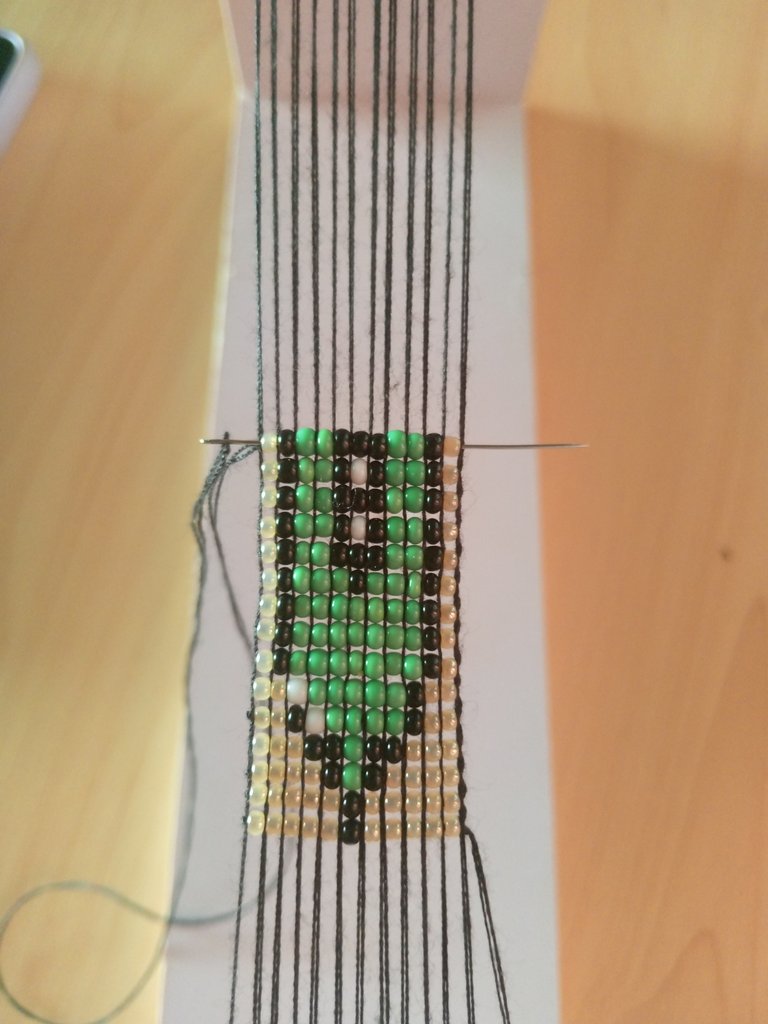
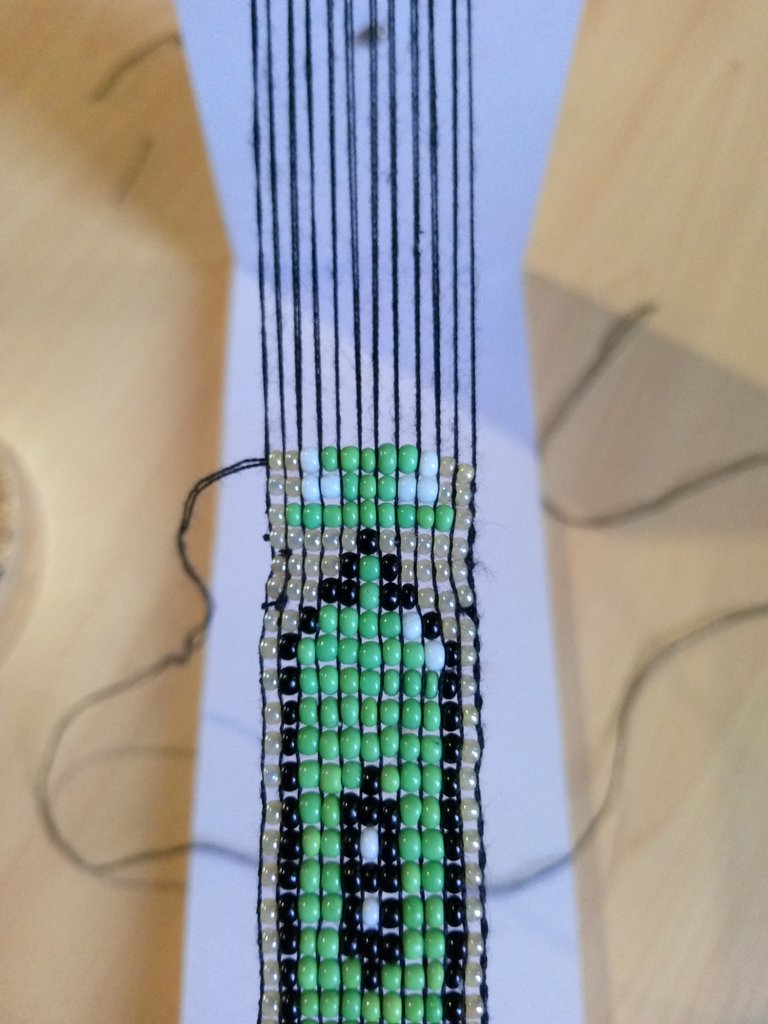
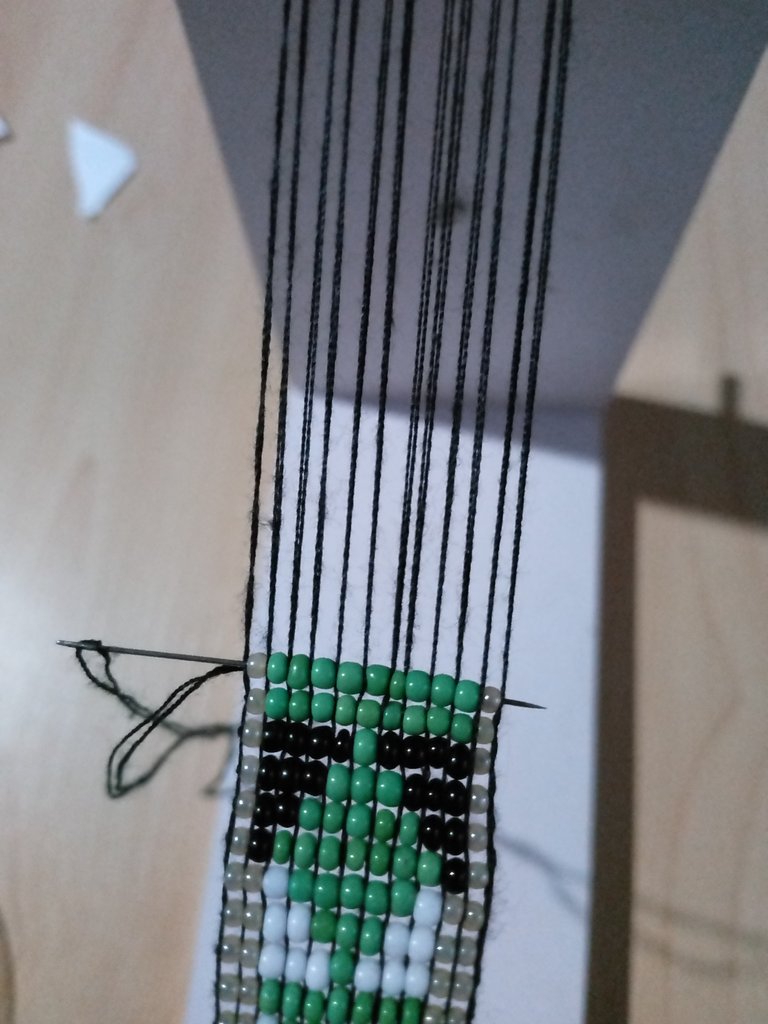
We will close our eye pupil by placing one flesh colored bead, one black bead, three green beads, one black bead and finally one flesh colored bead.
Step 9
We are going to take a flesh colored bead, a black bead, 7 green beads, again a black bead and finally a flesh colored bead.

We are going to position the beads on another loom, then we pass the needle with the thread through the top and introduce it through each of the beads.
We will repeat this same step twice, until we obtain the following result.

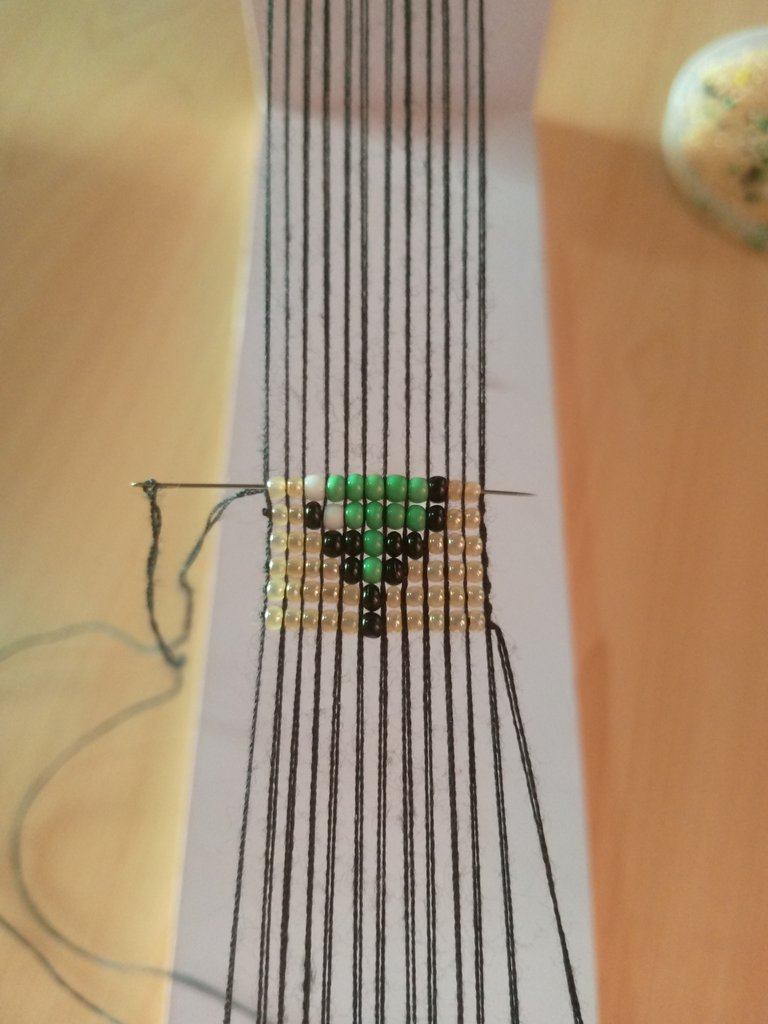
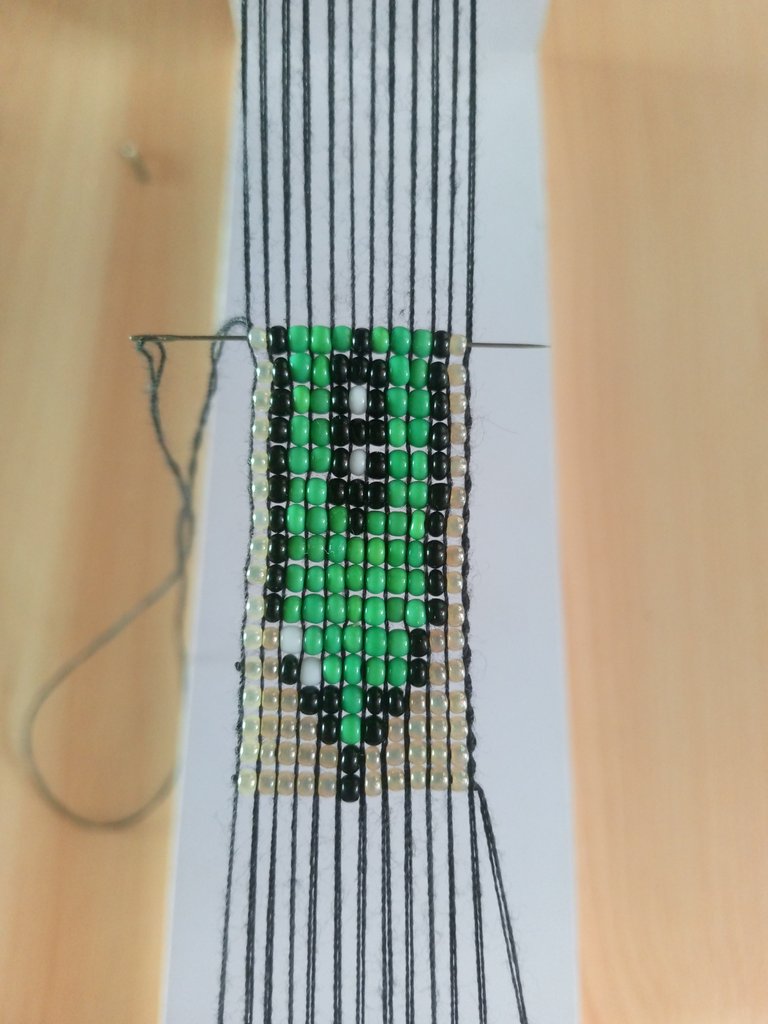
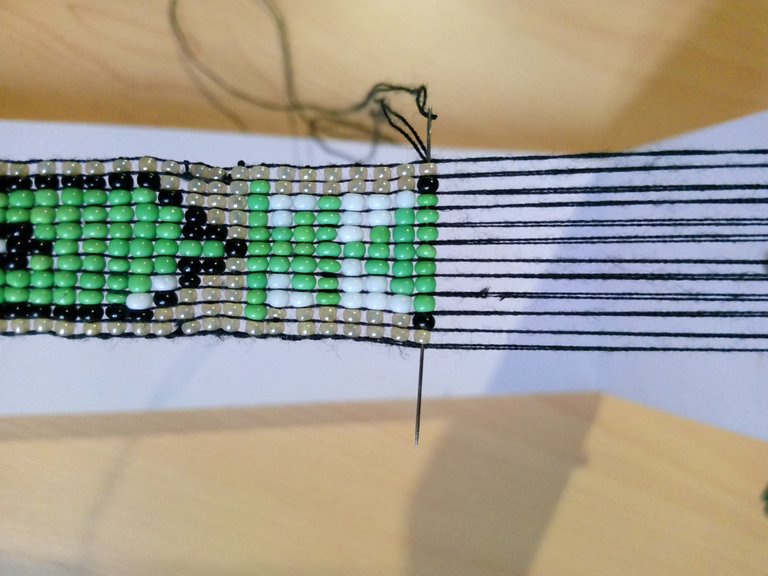
Step 10
We will take a flesh colored bead, then a black bead, now we will take a white bead, six green beads, one black bead and finally a flesh colored bead.
In the same way we position ourselves on each of the threads of the loom and pass the needle over and inside each of the beads.
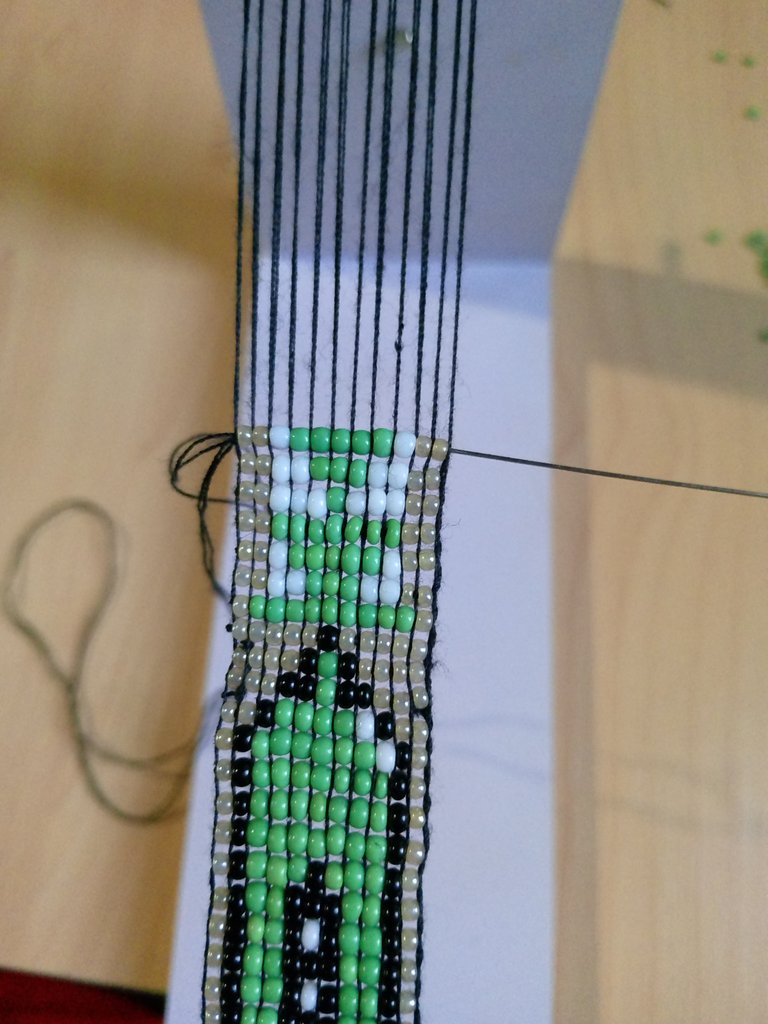
Step 11
Next we are going to take two flesh colored beads, one black bead, one white bead, four green beads, one black bead and two flesh colored beads, we will take them to our loom threads, pass the needle over and insert through each of the beads.

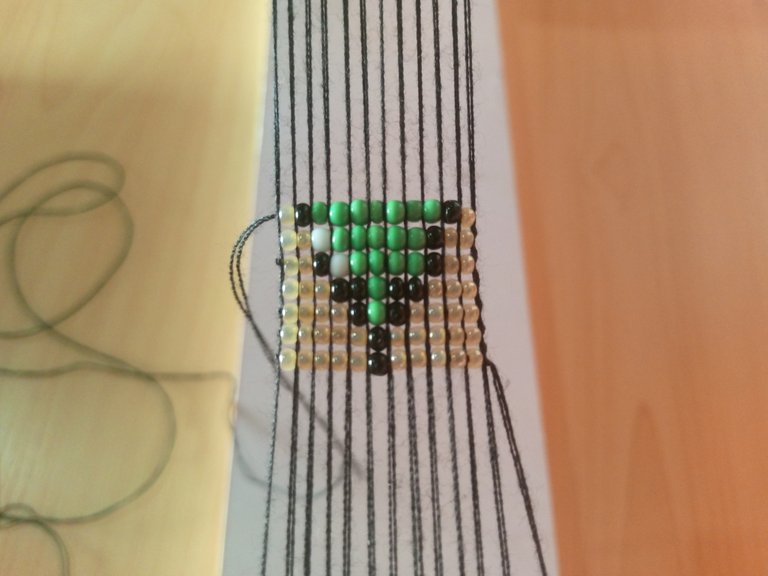
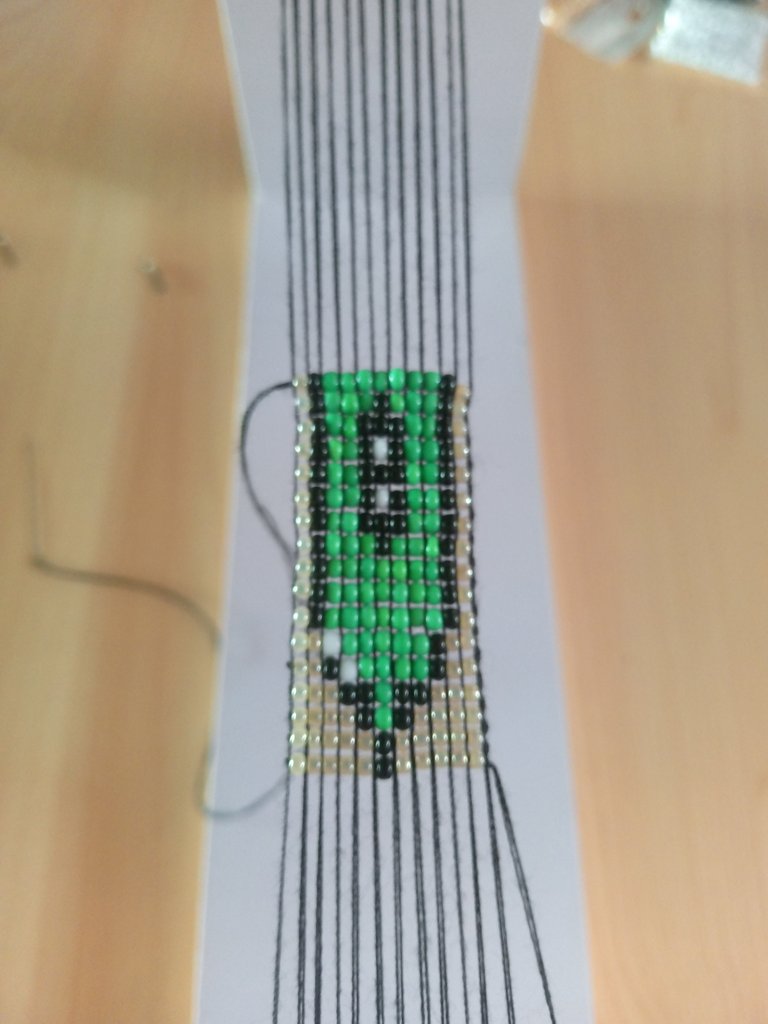
Step 12
For this step we are going to take three flesh colored beads, two black, green, again two black and three flesh colored beads.

In the same way we position it to our loom and pass our needle over all the threads and inside each of the beads.
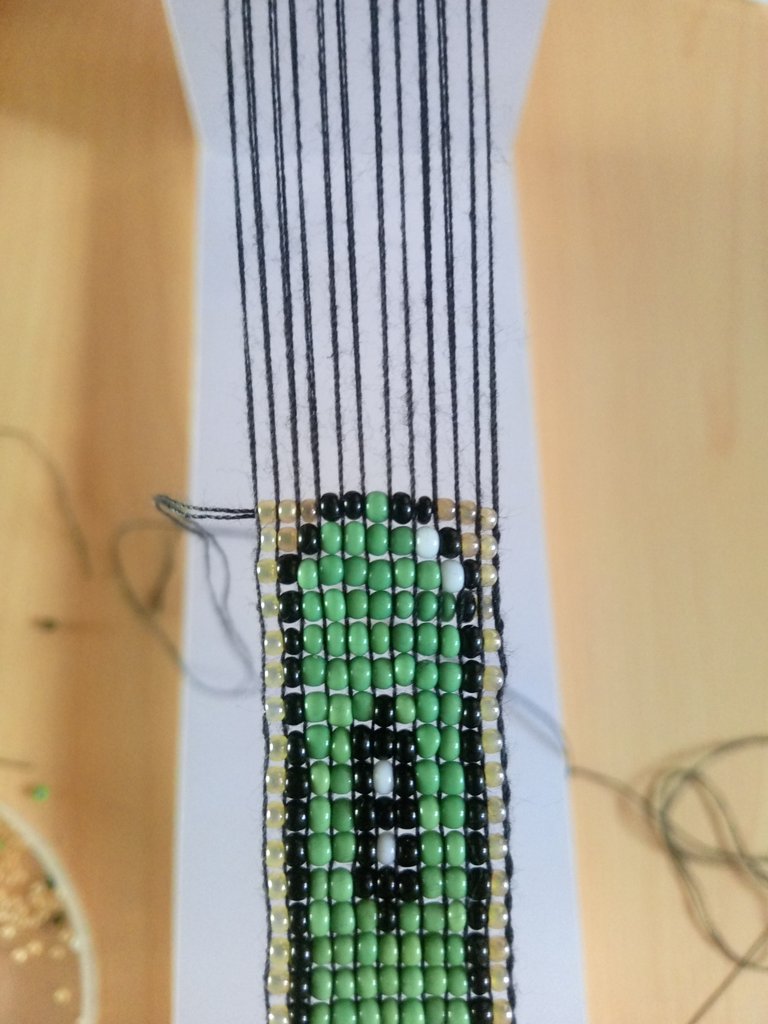

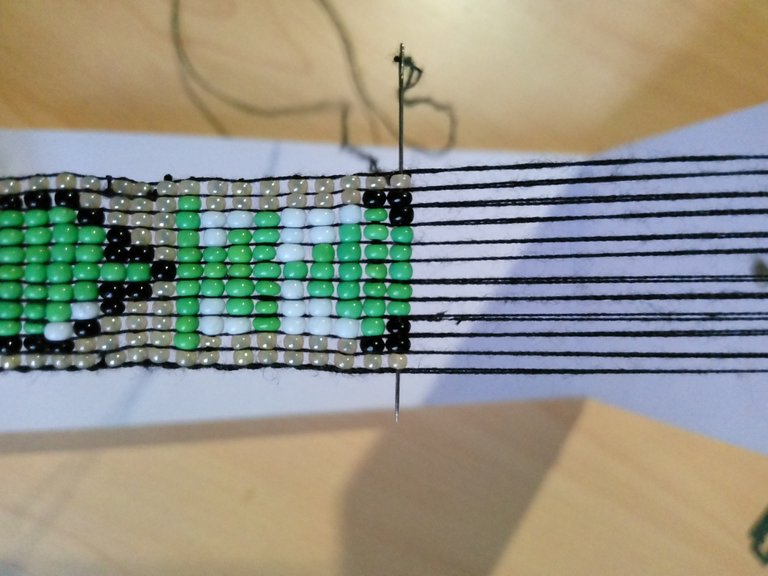
Step 13
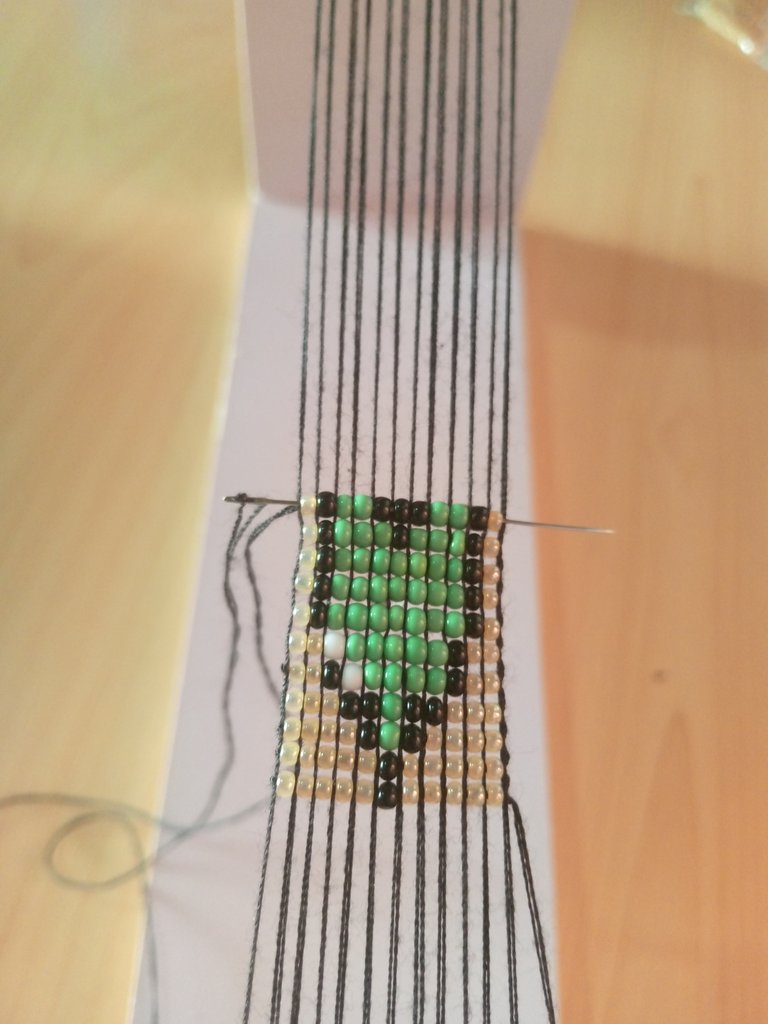
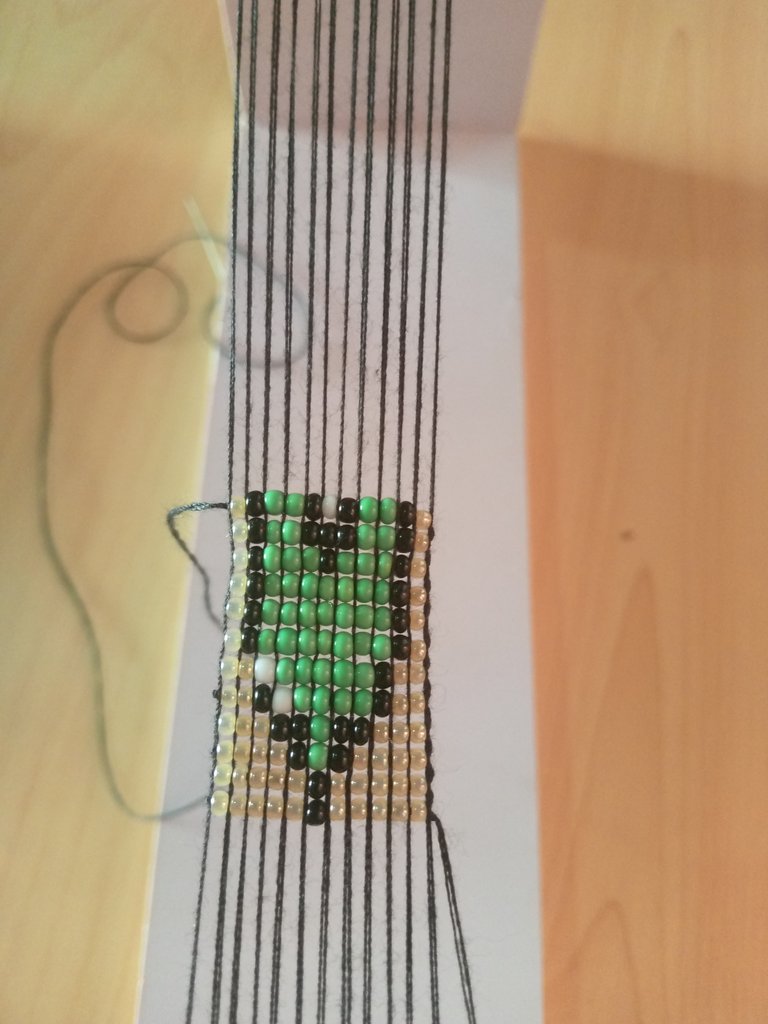
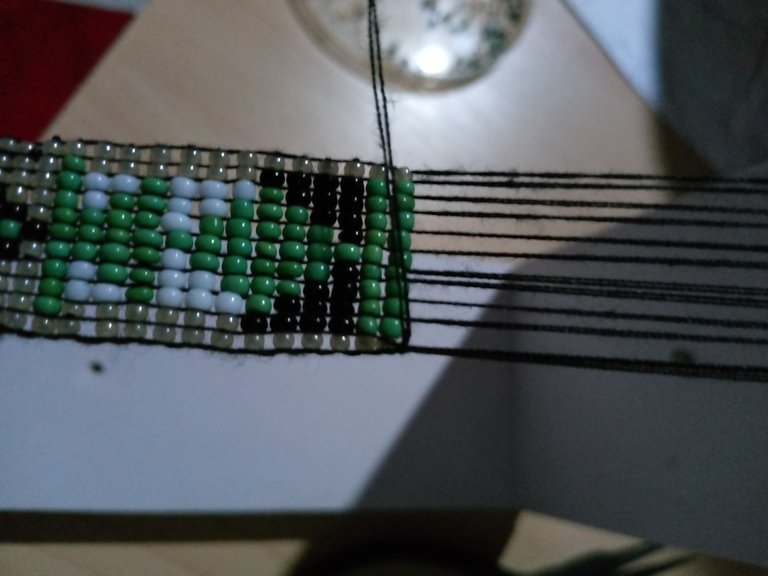
Now we will place four flesh colored beads, one black bead, one green bead, one black bead again and finally four flesh colored beads, we position the bead on our loom, bring our needle up over all the threads and insert through each of the beads.

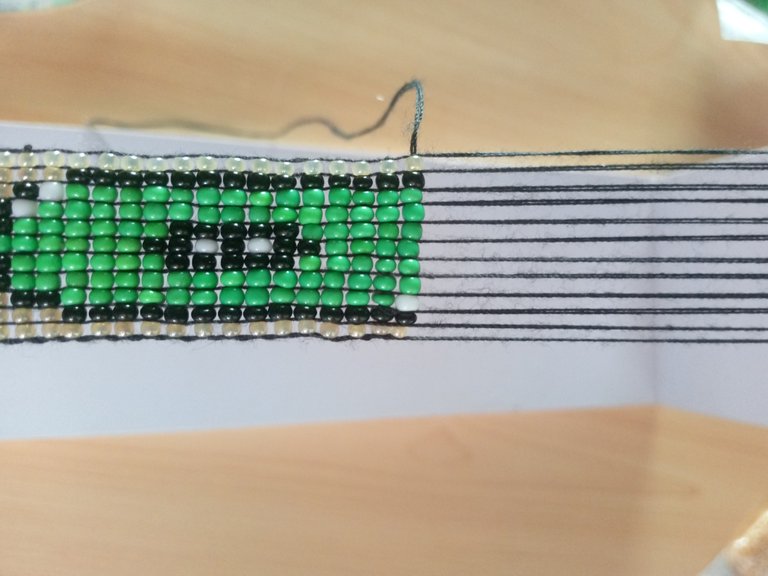
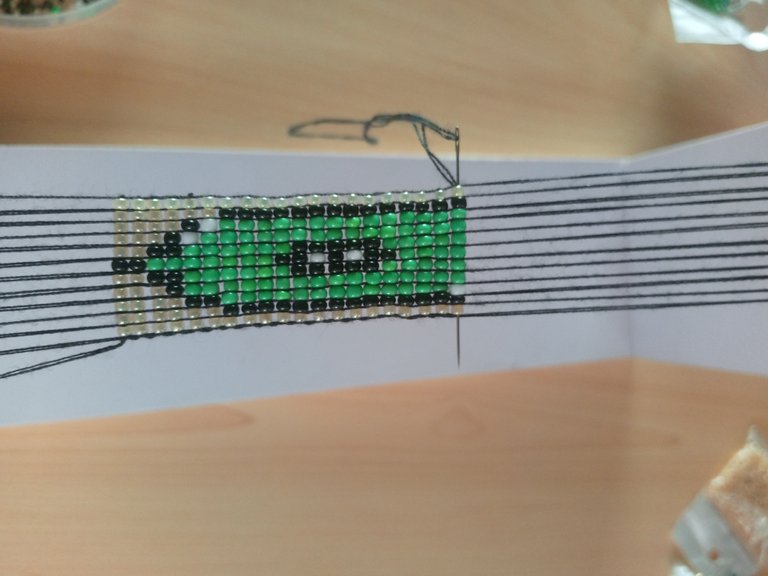
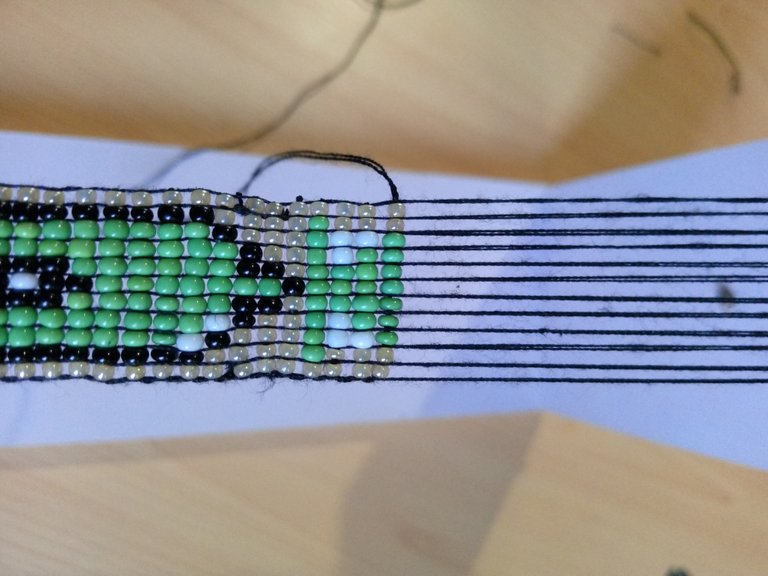
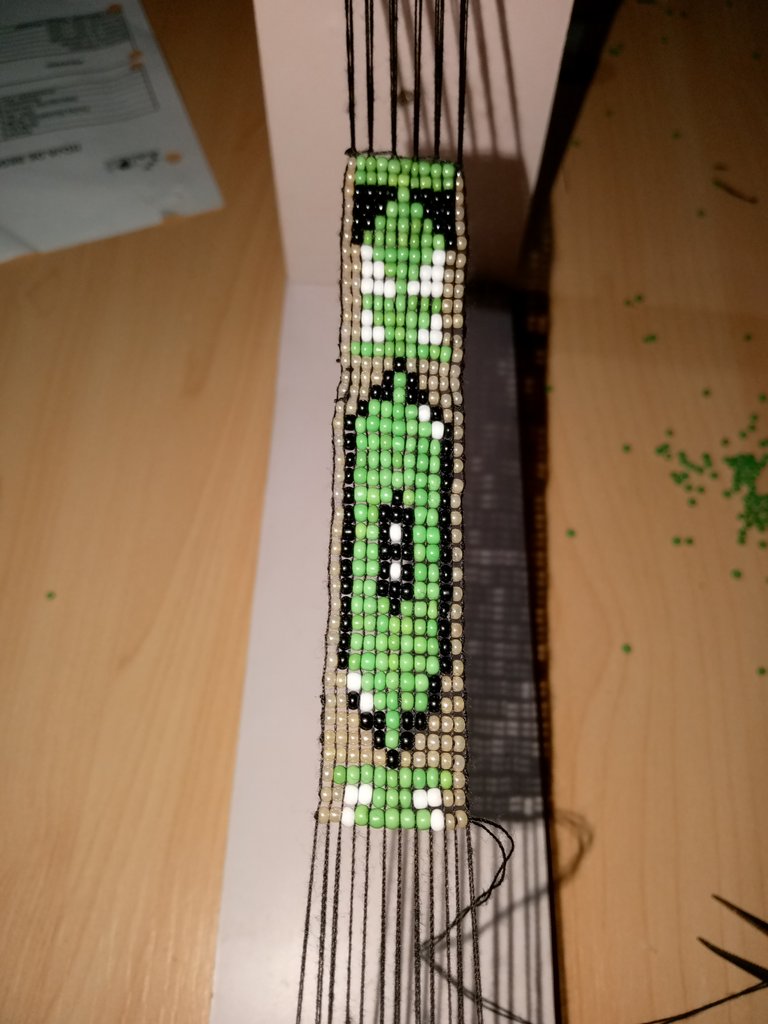
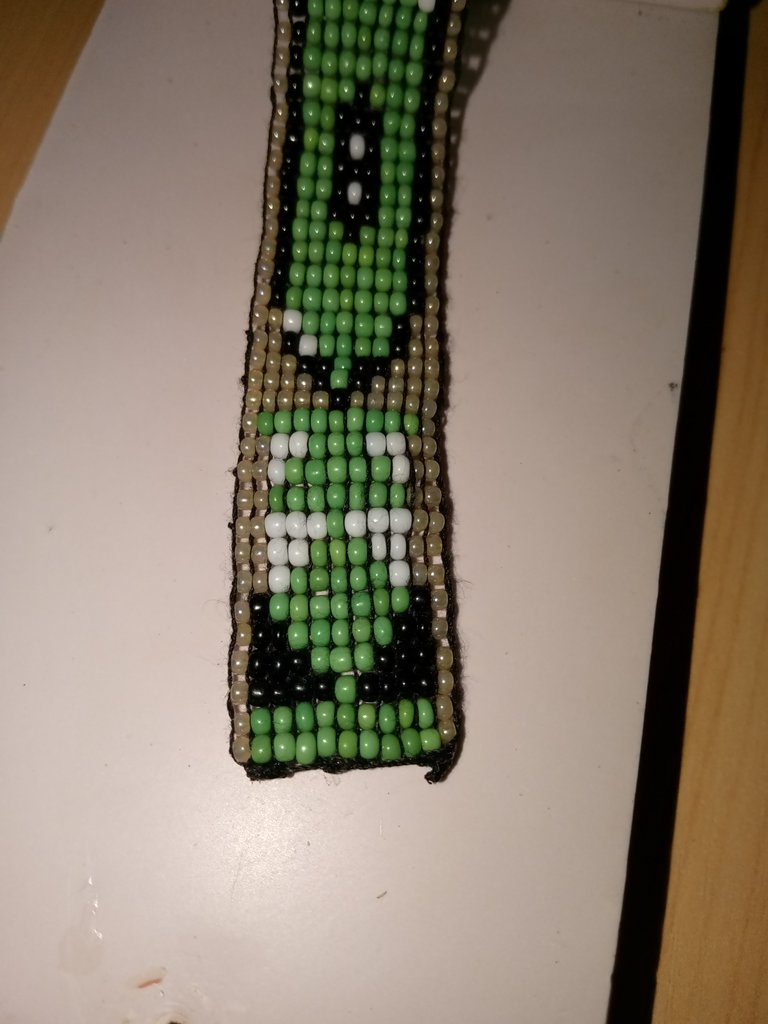
This way our magic eye inspired by the character "ALBAHOO FORESTER" is ready.

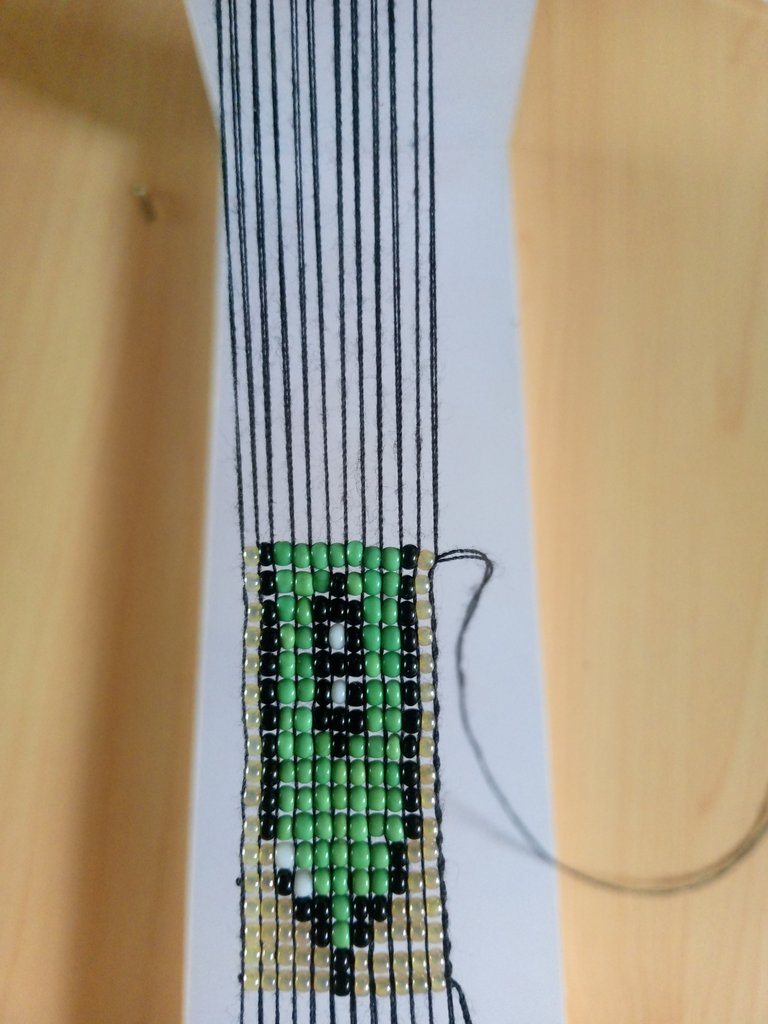
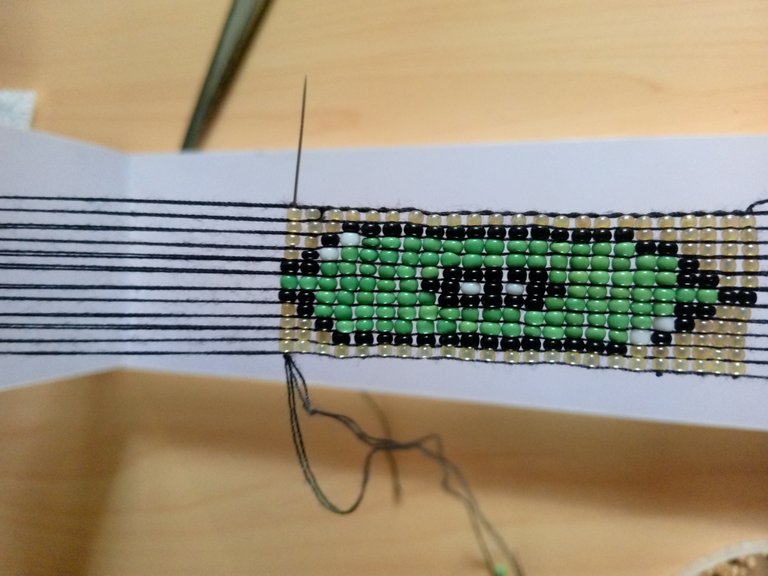
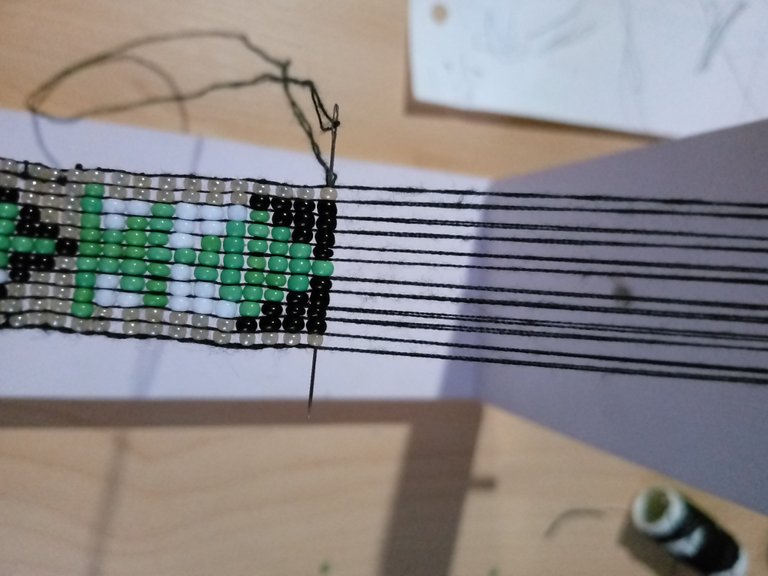
Step 14
Now we will make the fangs of the Splinterlands logo, let's combine it in the following way:
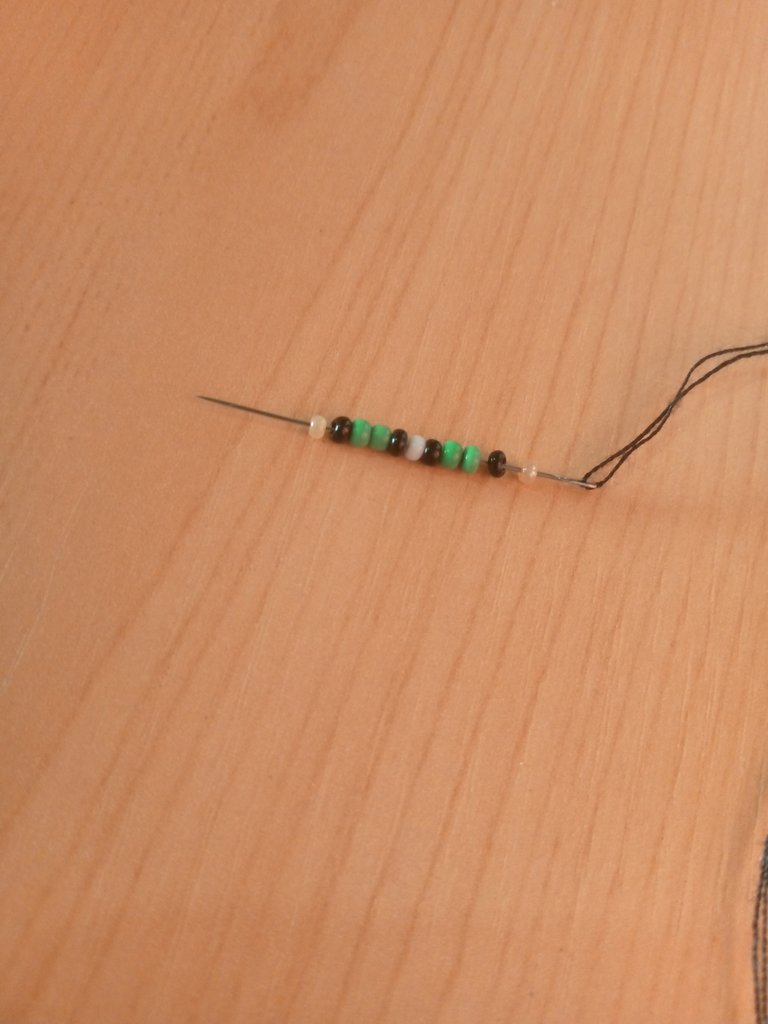
We are going to place a flesh colored bead, then nine green colored beads.

We are going to position them on our loom, passing the glove over all the threads and inside each of the beads.

Now we will take one flesh colored bead, two white, three green, two white again and finally two flesh colored beads.

We position it on our loom and we do the same procedure of all the previous ones.
Next we take two flesh-colored beads, one white bead, five green beads, one white bead and two flesh-colored beads.

We position them on our loom and pass our needle over the threads and pass the needle through all the beads.

Now we are going to place two flesh colored beads, seven green beads, again two flesh colored beads and repeat the procedure for all the previous ones.
Then we take two flesh-colored beads, three white beads, one green bead, three white beads and two flesh-colored beads.

In the same way we pass over the threads and inside each of the beads.

We take two flesh colored beads, two white, three green beads, two white again and finally two flesh colored beads and as we already know we do the same procedure of all the steps.


Next we take two flesh colored beads, one white, then five green beads, again one white and two flesh colored beads.
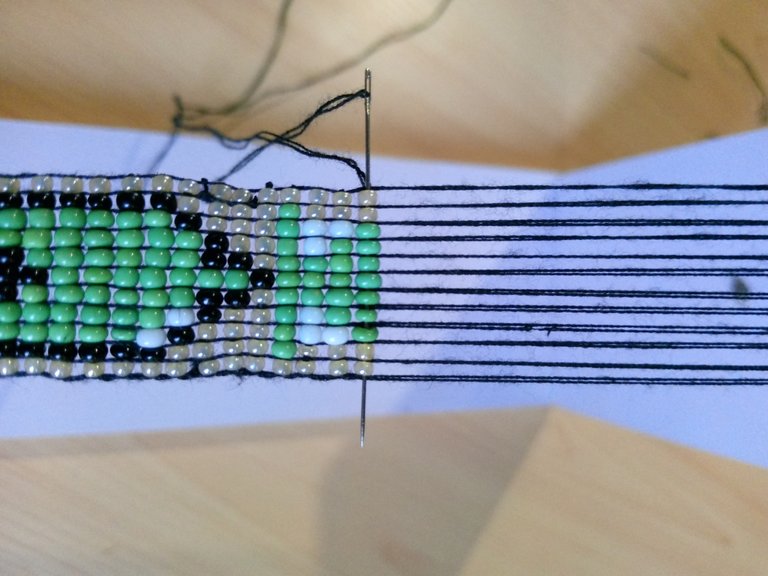
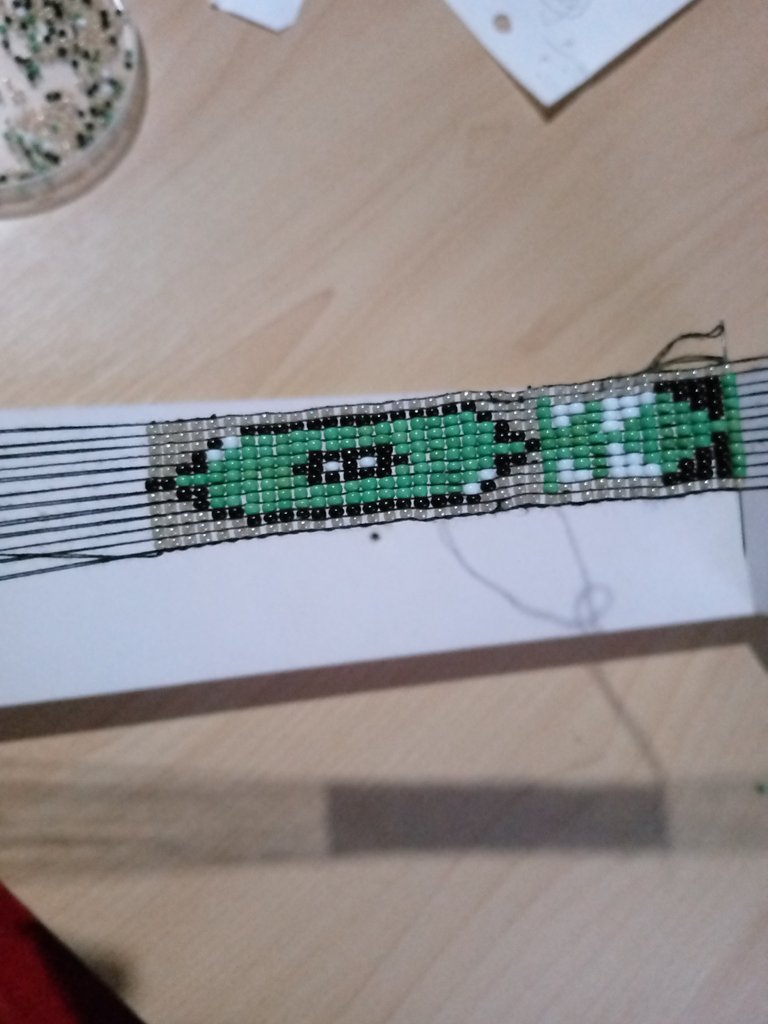
Step 15
For this step we are going to go closing our Splinterlands fangs, we place a flesh colored mustard then a black colored one, seven green colored ones, again a black one and finally a flesh colored one, we will repeat the step of all the previous ones.
Then we are going to position the beads according to the order of our pattern, this time we are going to increase the black beads by placing two, three and four beads, in the same way we are going to decrease the green beads from seven, five, three and one.


Step 16
To close one of the ends of our elegant bracelet we are going to insert in our needle one flesh colored bead, nine green beads and one flesh colored bead, we are going to repeat this process two more times.
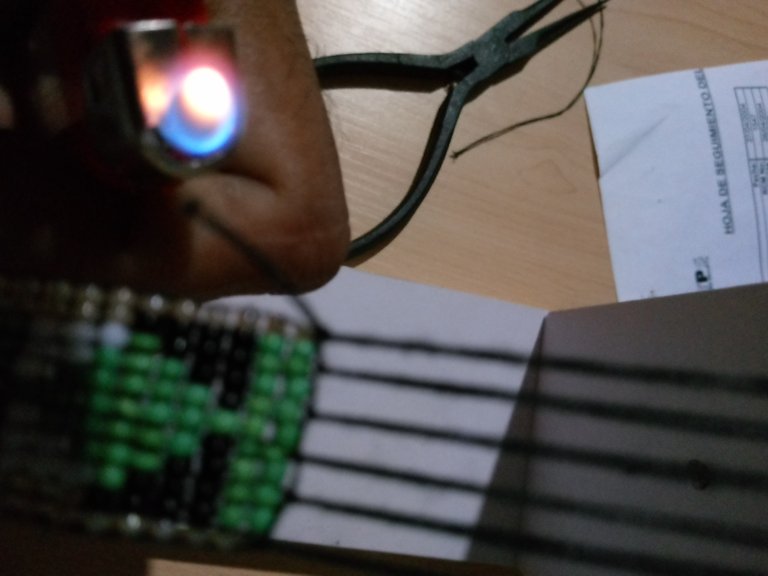
After this we are going to make simple knots in the ends of the threads, then with the help of a scissors we will cut the excess and with the lighter we will seal.

Step 17
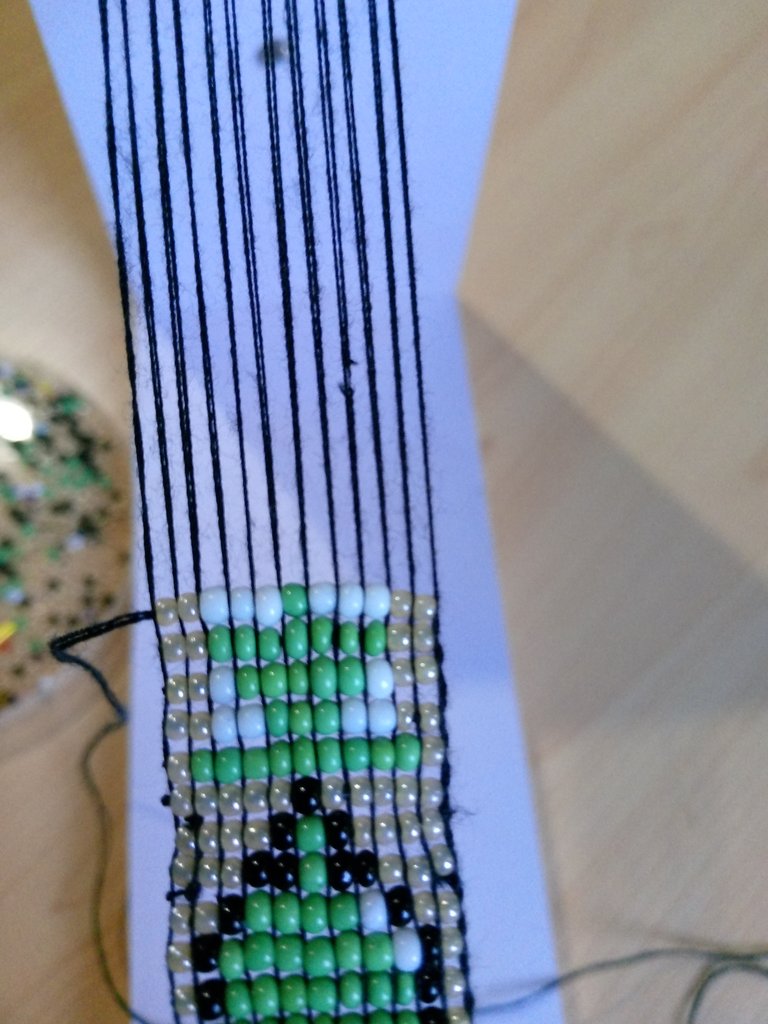
Now we will take the thread that we left at the beginning of our work and thread it on the needle, then we will perform the same procedure from step 14 onwards, so we will have our beautiful bracelet ready.

Step 18
With the help of our scissors we are going to cut all the threads from one end of the loom.
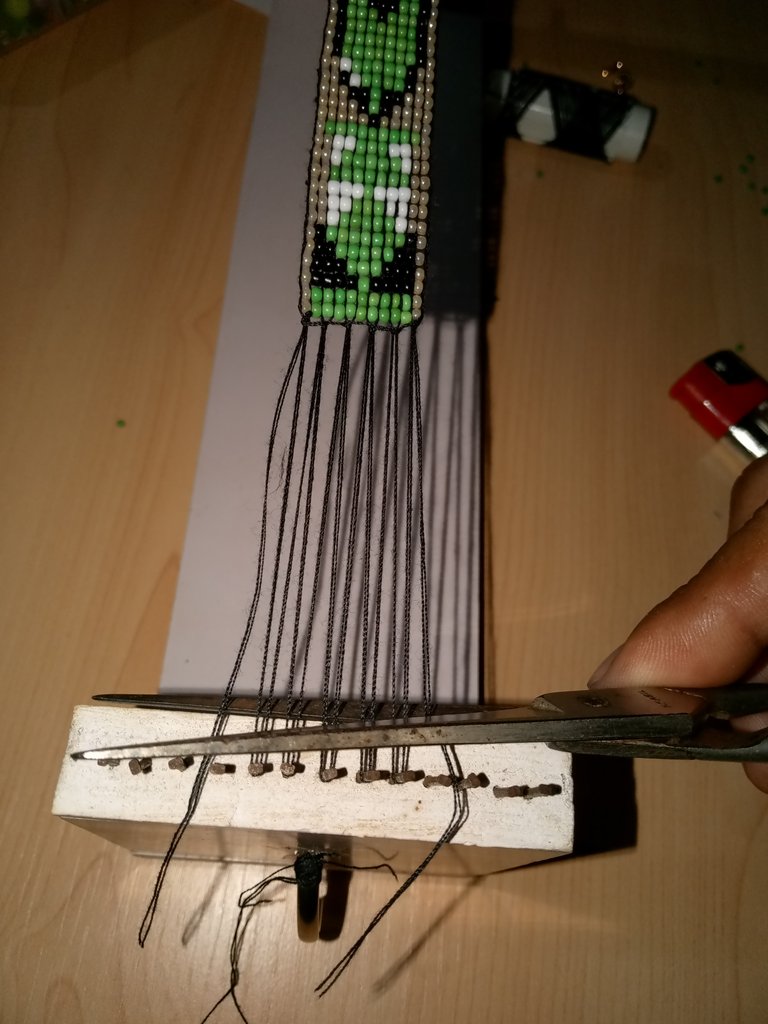
We will then join the threads together making simple knots to secure our work, then cut with the scissors and seal with our lighter.


Step 19
We are going to take our glue and very carefully a few drops to secure the beads, this we must do very carefully as the glue is very strong and contact with the hands can cause damage.
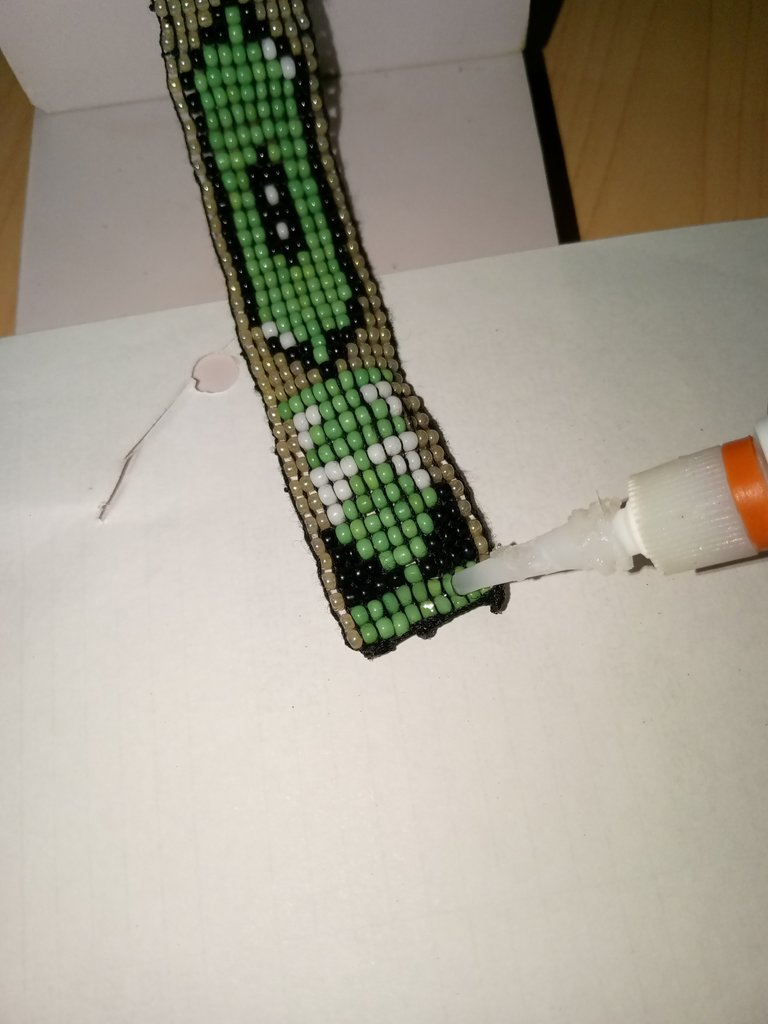
Quickly we will take our crocodile terminal and with the help of our pliers, we make pressure taking advantage of the glue so that it is well adjusted.
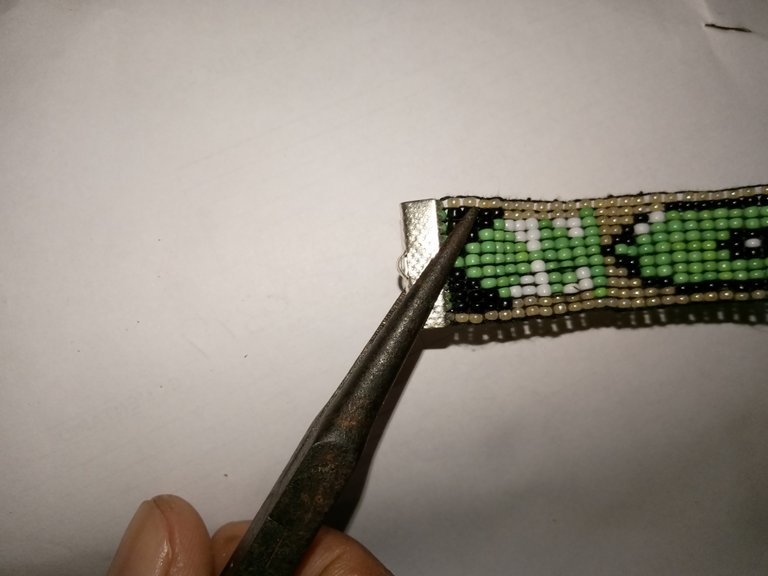
After waiting a few seconds for the glue to dry, we will take our ring and the locking ring, with the help of our pliers we place it on the terminal.

We are going to perform the same procedure on the other end of the loom threads.
We cut the threads with our scissors, we will make knots to secure the beads, cut with the scissors and seal with our lighter, then we apply the glue and place the alligator clip.
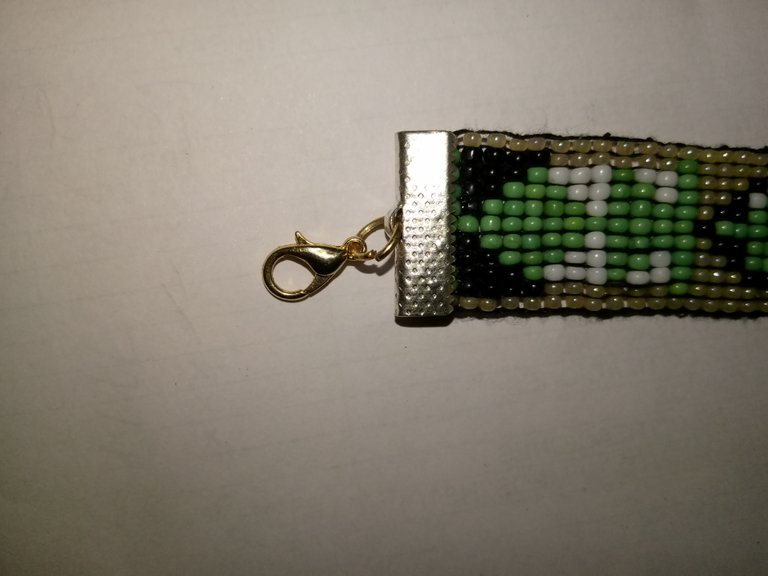
Now we take the other ring and the chain clipping and with the help of our pliers we will place it on the crocodile terminal and tighten it.

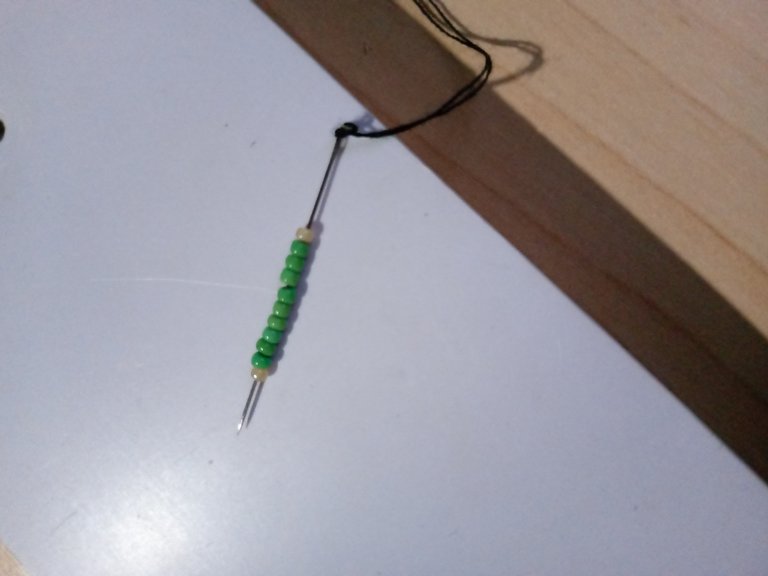
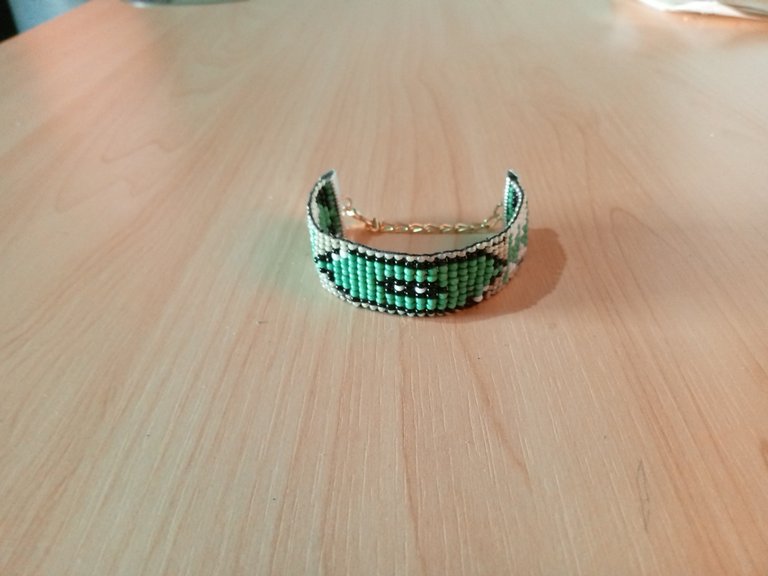
This way our elegant magic eye bracelet combined with the fangs of the Splinterlands logo would be ready, I made this elegant eye inspired by the character "ALBAHOO FORESTER".
I hope you liked this nice tutorial that I made with love and dedication for all of you. I wish you a happy weekend full of many blessings.
FINAL RESULT
The photos were taken from my phone tecno spark Go 2023.
The patterns were made from the application: Beads Creator.
Translator used: Deepl
Feliz y bendecido fin de semana te deseo a todos mis compañeros de este increíble comunidad de @jewelry, espero que esta semana haya sido de bendiciones, hoy vengo a participar en @concurso #287 de Splinterlands, he decidido realizar un elegante Brazalete inspirado en el personaje de "ALBAHOO FORESTER" lo quise acompañar con el logo de Splinterlands, dandole una combinaciones de colores que representan este personaje.
ALBAHOO FORESTER: Llevan una vida de soledad y paz en los bosques de pinos de las tierras altas del norte, estos no valoran la conquista y el poder, sino el conocimiento y la sabiduría de los elementos.
No dispone de ataque pero es capaz de devolver los ataques a distancia recibidos y curar a criaturas.
Sus guardabosques dominan la magia elemental de la vida. La emplean para proteger a los suyos y las tierras húmedas de su hogar.
A continuación les estare presentando los materiales utilizados para la elaboración de este elegante brazalete.
Materiales
- Telar de madera
- Mostacillas de Color salmon #10, Verdes, Blancas y Negras #8
- Hilo poliéster de color negro
- 2 Terminales de cocodrilo
- 2 Argollas
- Recorte de cadena
- Trancadero o seguro
- Aguja #12
- Alicate
- Tijeras
- Encendedor o yesquero
- Pegamento
- Patron o diseño
Estos fueron los materiales y herramientas utilizados.
Ahora les presentando el paso a paso realizado para la elaboración de este elegante brazalete, fue un proceso muy complejo pero con dedicación todo se puede.
Paso a Paso
Paso 1
Vamos a comenzar colocando 12 filas de hilo en nuestro telar, luego vamos a enhebrar nuestra aguja con aproximado de 3m de hilo poliéster.
Vamos a dejar un sobrante de unos 30 cm luego haremos un nudo en los extremos del hilo qué hacemos un nudo.
Paso 2
Vamos a comenzar nuestro diseño en el telar tomando 11 mostacillas en total, cinco de color carne, una negra y nuevamente cinco mostacillas de color carne.
Con la ayuda de nuestro dedo vamos a posicionar las mostacillas en cada uno de los hilos del telar, vamos a pasar la aguja por la parte de arriba para luego introducir por encima de los hilos y por dentro de cada una de las mostacillas.
Paso 3
Vamos a tomar cuatro mostacillas color carne, una de color negro, una de color verde y nuevamente cuatro mostacillas color carne.
Vamos a posicionar la la mostacilla de nuestro telar, ahora en adelante será más fácil porque ahora está la primera fila fijada, luego vamos a pasar la aguja por la parte de arriba e introducimos por dentro de cada mostacilla
Este mismo procedimiento es el que vamos a realizar en todos los pasos.
Paso 4
Con ayuda de nuestra aguja vamos a tomar tres mostacillas de color carne, dos de color negro, uno de color verde, nuevamente dos de color negro y tres mostacillas de color carne.
Posicionamos la mostacillas en el telar, pasamos la aguja por encima de los hilos introducimos por dentro de cada una de las mostacillas.
Paso 5
Para este paso vamos a tomar dos mostacillas de color carne, una nagra, cuatro verdes, otra mostacilla blanca, una negra y nuevamente dos de color carne.
Posicionando la mostacilla vamos a pasar la aguja por encima de los hilos y por dentro de cada una de ellas.
Paso 6
Seguidamente tomamos dos mostacillas de color carne, una negra, cinco verdes, una de las blancas y nuevamente dos de color carne.
Posicionamos la mostacillas en el telar y pasamos nuestra aguja por encima de todos los hilos y por dentro de cada mostacilla.
Paso 7
Tomanremos en cuenta que siempre vamos a comenzar con las mostacillas de color carne y colocaremos una, luego una negra, siete de color verde, una negra y nuevamente una de color carne.
Vamos a posicionar las mostacillas en nuestro telar, ahora con más facilidad porque ya tiene la medida de la mostacillas, luego pasamos los hilos por la parte de arriba e introducimos en ellas.
Vamos a repetir este mismo paso un par de veces, hasta tener este resultado.
Paso 8
Seguiremos introduciendo las mostacilla segun el patrón, tomamos una mostacilla color carne, luego una negra, tres de color verde, una negra, nuevamente tres de color verde, una negra y una mostacilla de color carne.
Igual que las anteriores, posicionamos las mostacillas en el telar, pasamos la aguja por encima de los hilos y la vamos a introducir por cada una de las mostacillas.
Vamos a tomar nuevamente una mostacilla de color carne, dos mostacillas verdes, tres de color negro, nuevamente dos de color verde, una negra y por último una mostacilla de color carne.
Vamos a posicionar la mostacilla en el telar, pasamos la aguja por encima de los hilos e introducimos por cada una de las mostacillas
Ahora tomamos una mostacilla color carne, seguidamente una negra dos de color verde, una negra, una mostacilla blanca, otra negra, dos de color verde, una mostacilla negra y por último una de color carne.
Vamos a posicionarlas en nuestro telar y repetimos el procedimiento de todas las anteriores.
Como podemos apreciar en el patrón, repetiremos este mismo proceso un par de veces hasta tener dos mostacillas blancas en el centro.
Cerraremos nuestra pupila del ojo colocando una mostacilla de color carne, una de color negro, tres mostacillas verdes, una negra y por último una mostacilla color carne.
Paso 9
Vamos a tomar una mostacilla de color carne, una mostacilla negra, 7 mostacillas de color verde, nuevamente una negra y por último una de color carne.
Vamos a posicionar la mostacillas en otro telar, luego pasamos la aguja con el hilo por la parte de arriba e introducimos por cada una de las mostacillas.
Repetiremos este mismo paso dos veces, hasta obtener el siguiente resultado.
Paso 10
Vamos a tomar una mostacilla de color carne, luego una negra, ahora tomaremos una mostacilla blanca, seis mostacillas de color verde, una de color negro y por último una mostacilla color carne.
De igual manera nos posicionamos en cada uno de los hilos del telar y pasamos la aguja por encima y por dentro de cada una de las mostacillas.
Paso 11
Seguidamente vamos a tomar dos mostacilla color carne, uno de color negro, una mostacilla blanca, cuatro verdes, una negra y dos mostacillas color carne, las llevaremos a nuestros hilos del telar, pasamos la aguja por encima e introducimos por cada uno de las mostacillas.
Paso 12
Para este paso vamos a tomar tres mostacillas color carne, dos de color negro, verde, nuevamente dos de color negro y tres mostacillas color carne.
De igual manera la posicionamos a nuestro telar y pasamos nuestra aguja por encima de todos los hilos y por dentro de cada una de las mostacillas.
Paso 13
Ahora colocaremos cuatro mostacillas color carne, una mostacilla negra, una de color verde, nuevamente una negra y por último cuatro mostacillas color carne, posicionamos la mostacilla en nuestro telar, subimos nuestra aguja por encima de todos los hilos e introducimos por cada una de las mostacillas.
De esta manera estaría listo nuestro ojo mágico inspirado en el personaje "ALBAHOO FORESTER"
Paso 14
Ahora realizaremos los colmillos del logo de Splinterlands, vamos a combinarlo de la siguiente manera:
Vamos a colocar una mostacilla color carne, luego nueve mostacillas de color verde
Vamos a posicionarlas a nuestro telar, pasando la guagua por encima de todos los hilos y por dentro de cada una de las mostacillas.
Ahora tomaremos una mostacilla color carne, dos de color blanco, tres de color verde, nuevamente dos blancas y por último dos de color carne
La posicionamos en nuestro telar y hacemos el mismo procedimiento de todas las anteriores.
Seguidamente tomaremos dos mostacillas color carne, una blanca, cinco mostacillas de color verde, nuevamente una blanca y dos de color carne.
Las posicionamos a nuestro telar y pasamos nuestra aguja por encima de los hilos y pasamos la aguja por dentro de todas las mostacillas.
Ahora vamos a colocar dos mostacillas color carne, siete mostacillas verdes, nuevamente dos de color carne y repetiremos el procedimiento de todas las anteriores.
Luego tomamos dos mostacillas color carne, tres blancas, una verde nuevamente tres blancas y dos de color carne.
De igual manera pasamos por encima los hilos y por dentro de cada una de las mostacillas.
Tomamos dos mostacillas color carne, dos blancas, tres de color verde, nuevamente dos blancas y por último dos de color carne y como ya sabemos hacemos el mismo procedimiento de todos los pasos.
Seguidamente tomamos dos mostacillas color carne, una blanca, luego cinco de color verde, nuevamente una blanca y dos mostacillas color carne.
Paso 15
Para este paso vamos a ir cerrando nuestros colmillos de Splinterlands, colocamos una mostacilla color carne luego una color negro, siete de color verde, nuevamente una negra y por último una de color carne, repetiremos el paso de todas las anteriores.
Luego vamos a ir posicionando las mostacillas según el orden de nuestro patrón, esta vez vamos a ir aumentando la mostacilla de color negro colocando dos, tres y cuatro mostacillas, de la misma manera vamos a ir disminuyendo las de color verde desde siete, cinco, tres y una.
Paso 16
Para cerrar uno de los extremos de nuestro elegante brazalete vamos a introducir en nuestra aguja una mostacilla de color carne, nueve de color verde y una mostacilla de color carne, vamos a repetir este proceso dos veces mas.
Después de esto vamos a realizar nudos simples en los extremos de los hilos, luego con la ayuda de una tijera cortaremos el excedente y con El encendedor sellaremos.
Paso 17
Ahora tomaremos el hilo que dejamos al comienzo de nuestro trabajo y lo enhebramos en la aguja, luego vamos a realizar el mismo procedimiento desde el paso 14 en adelante, para así tener listo nuestro hermoso brazalete.
Paso 18
Con la ayuda de nuestra tijera vamos a cortar todos los hilos de un extremo del telar
Luego uniremos los hilos haciendo nudos simples para asegurar nuestro trabajo, luego cortamos con la tijera y sellaremos con nuestro encendedor.
Paso 19
Vamos a tomar nuestro pegamento y con mucho cuidado algunas gotas para asegurar la mostacillas, esto lo debemos hacer con mucho cuidado ya que el pegamento es muy fuerte y al tener contacto con las manos puede ocasionar daño.
Rápidamente tomaremos nuestro terminal de cocodrilo y con la ayuda de nuestro alicate, hacemos preseion aprovechando el pegamento para que quede bien ajustado.
Después de esperar algunos segundos para que el pegamento seque, tomaremos nuestra argolla y el seguro o trancadero, con la ayuda de nuestro alicate lo colocamos en el terminal.
Vamos a realizar el mismo procedimiento en el otro extremo de los hilos del telar.
Cortamos los hilos con nuestra tijera, haremos nudos para asegurar la mostacillas, cortamos con la tijera y sellamos con nuestro encendedor, luego aplicamos el pegamento y colocamos el terminal de cocodrilo.
Ahora tomamos la otra argolla y el recorte de cadena y con la ayuda de nuestro alicate colocaremos en el terminal de cocodrilo y apretamos.
De esta manera estaría listo nuestro elegante brazalete de ojo mágico combinado con los colmillos del logo de Splinterlands, este elegante ojo lo hice inspirado en el personaje "ALBAHOO FORESTER".
Espero haya sido de su agrado este bonito tutorial que he realizado con mucho cariño y dedicación para todos ustedes. Les deseo un feliz fin de semana lleno de muchas bendiciones.
RESULTADO FINAL
Las fotos las tome de mi teléfono tecno spark Go 2023.
Los patrones lo he realizado desde la aplicación: Beads Creator
Traductor Utilizado: Deepl
Las imágenes son editadas desde aplicación canva.
Wow que belloooo.. dame unas clases jajaa
Jeje muchas gracias, cuando tengas tiempo, siempre estaré a la orden jeje
Excelente trabajo muy bonita quedó tu pulsera
Muchas gracias, bendiciones
Wao. Muy muy linda la pulsera. Trabajar con telar siempre será una excelente opción para lograr acabados tan bonitos. Lo haces muy bien. Tu paso a paso 👍🏻 comprensible y muy detallado. Gracias por compartir 😊
Muchas gracias, siempre tratando de dar lo mejor para todos ustedes, bendiciones
Wow
Quedo espectacular. ❤️🥰👀
Muchas gracias amiga.
Gran trabajo 😍 y un excelente resultado ☺️... felicidades @afrofat1
Muchas gracias, bendiciones
¡Enhorabuena!
✅ Has hecho un buen trabajo, por lo cual tu publicación ha sido valorada y ha recibido el apoyo de parte de CHESS BROTHERS ♔ 💪
♟ Te invitamos a usar nuestra etiqueta #chessbrothers y a que aprendas más sobre nosotros.
♟♟ También puedes contactarnos en nuestro servidor de Discord y promocionar allí tus publicaciones.
♟♟♟ Considera unirte a nuestro trail de curación para que trabajemos en equipo y recibas recompensas automáticamente.
♞♟ Echa un vistazo a nuestra cuenta @chessbrotherspro para que te informes sobre el proceso de curación llevado a diario por nuestro equipo.
🥇 Si quieres obtener ganancias con tu delegacion de HP y apoyar a nuestro proyecto, te invitamos a unirte al plan Master Investor. Aquí puedes aprender cómo hacerlo.
Cordialmente
El equipo de CHESS BROTHERS
So elegant and beautiful
Congratulations @afrofat1! You have completed the following achievement on the Hive blockchain And have been rewarded with New badge(s)
Your next target is to reach 500 replies.
You can view your badges on your board and compare yourself to others in the Ranking
If you no longer want to receive notifications, reply to this comment with the word
STOPCheck out our last posts: