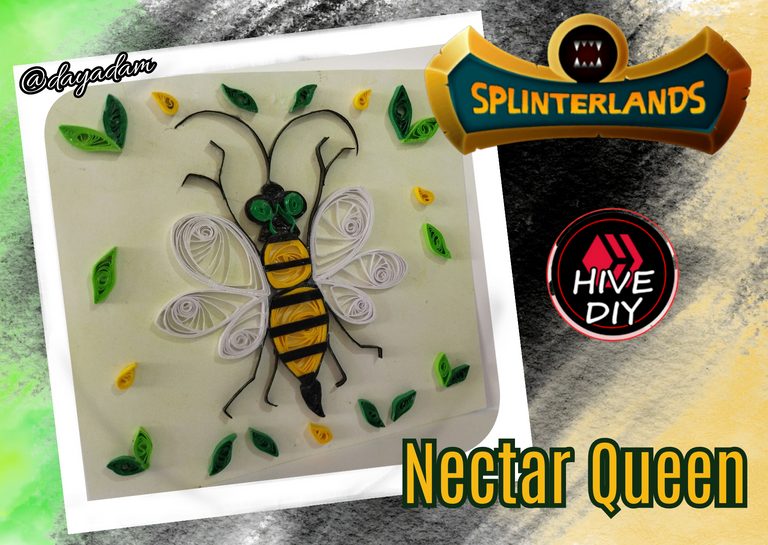
Nectar Queen Quilling Technique / Splinterlands Art Contest Week 252 [Eng/Esp]
Hello everyone... 🐝
Hello to my dear Hivers and the beloved community of artists HiveDIY, as always very pleased and excited to be here again, showing you my work made with love and especially for you.
Greetings to the Splinterland community, and everyone who lives there, I am pleased to be here to participate for the second time in the Splinterlands Art Contest Week 252.
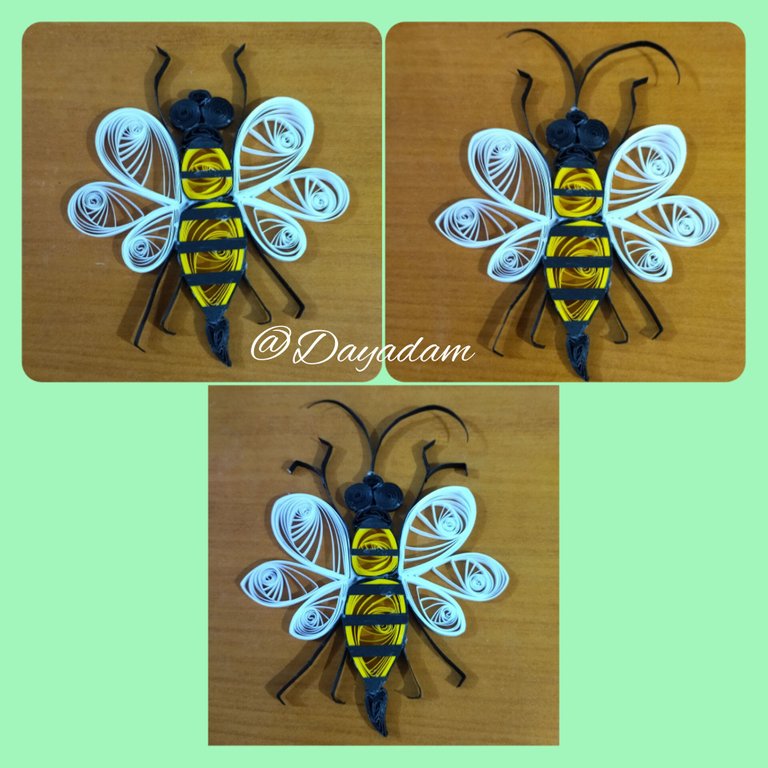
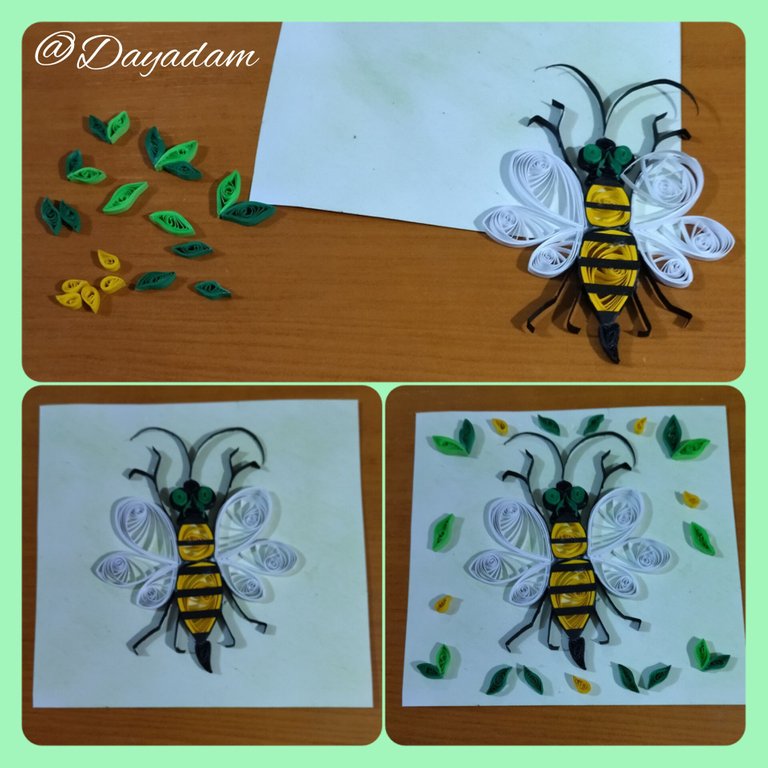
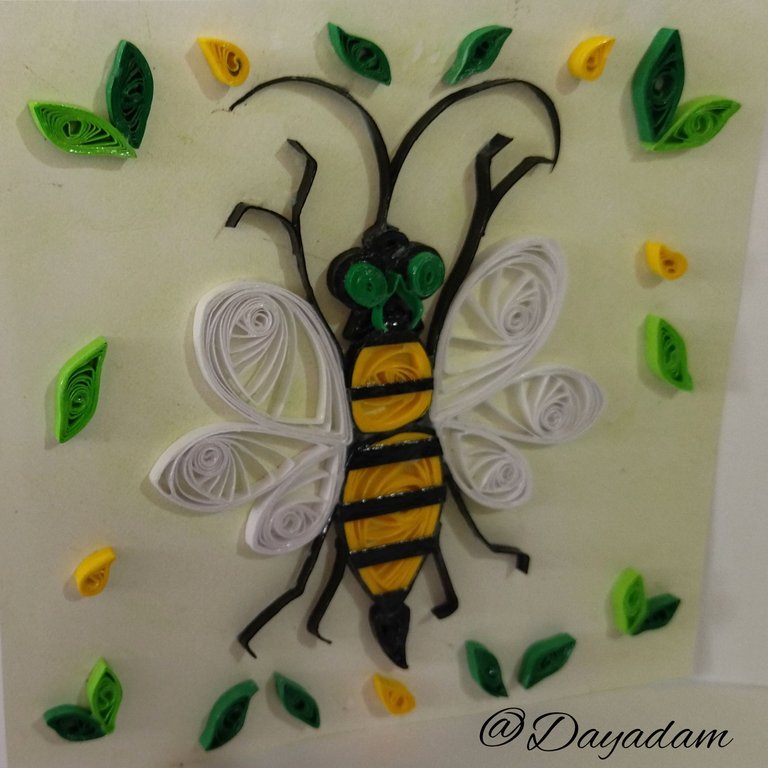
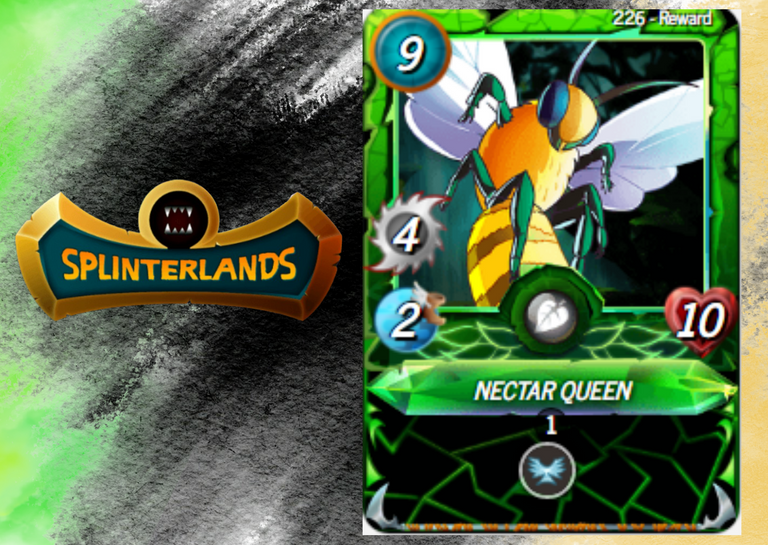
Today I bring you a fan-art, which is inspired by the "Nectar Queen" card, and I made it using the quilling technique. I have made several little bees and when I saw this one I couldn't resist. I am not a Splinterland player, but for a long time I have loved to see the entries in the contest and I also like to go to the page of the game to admire the great amount of existing cards which recreate a magical world of colors, shapes, figures, but also fantasy, mysticism and much more...
This work is something a little different from what I usually do, but I had a lot of fun doing it, because when I was inspired by a letter with a character that caught my attention, it put my creativity to fly, in future publications I hope that creativity will go much further.
Hoping you like my humble work, without further ado, I leave you my creative process.
Let's get started:😃

Hola a todos... 🐝
Hola a mis queridos Hivers y a la querida comunidad de artistas HiveDIY, como siempre muy complacida y emocionada de encontrarme por acá nuevamente, mostrándole mi trabajo hecho con mucho amor y especialmente para ustedes.
Un saludo para la comunidad de Splinterland, y todos los que hacen vida por allí, me gratifica estar por acá para participar por segunda vez en el Splinterlands Art Contest Week 252.
Hoy les traigo un fan-art, el cual está inspirado en la carta de "Nectar Queen", y elabore en la técnica de quilling. He realizado varias abejitas y al observar esta no pude resistirme. No soy jugadora de Splinterland, pero desde hace mucho me ha encantado ver las participaciones en el concurso y así mismo me gusta usualmente meterme en la página del juego para admirar la gran cantidad de cartas existentes las cuales recrean un mágico mundo de colores, formas, figuras, pero a su vez fantasía, misticismo y muchísimo más…
Este trabajo es algo un poco diferente a lo que suelo realizar, pero me divirtió mucho llevarlo a cabo, porque al inspirarme en una carta con un personaje que me llamo la atención, puso mi creatividad a volar, en próximas publicaciones espero que esa creatividad vaya mucho más allá.
Esperando les guste mi humilde trabajo, sin más preámbulos, les dejo mi proceso creativo.
Comencemos:😃

• Trozo de cartulina blanca.
• Cintas de quilling de diversas medidas de ancho amarillo, verde claro y oscuro, negro, blanco.
• Aguja para quilling-
• Regla con diversas medidas de circunferencia.
• Pega blanca extra fuerte (de carpintería).
• Tijera.
• Pincel.
• Lápiz.
• Color verde.
• Sacapuntas.
•Hisopo o cute.
- Piece of white cardboard.
- Quilling ribbons of different widths: yellow, light and dark green, black, white.
- Quilling needle.
- Ruler with different circumference measurements.
- Extra strong white glue (carpentry glue).
- Scissors.
- Paintbrush.
- Pencil.
- Green color.
- Pencil sharpener.
-Hyssop or cute.

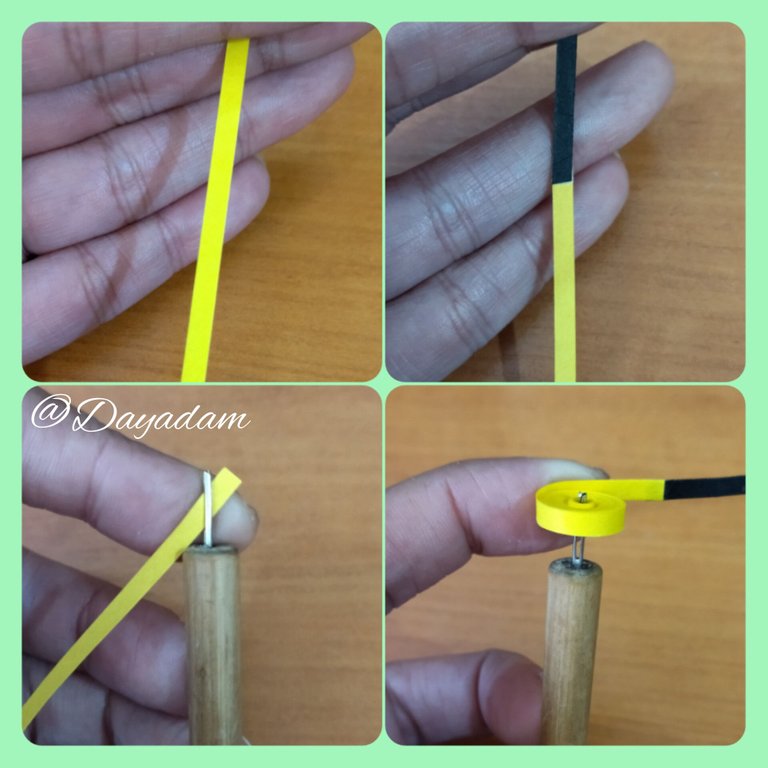
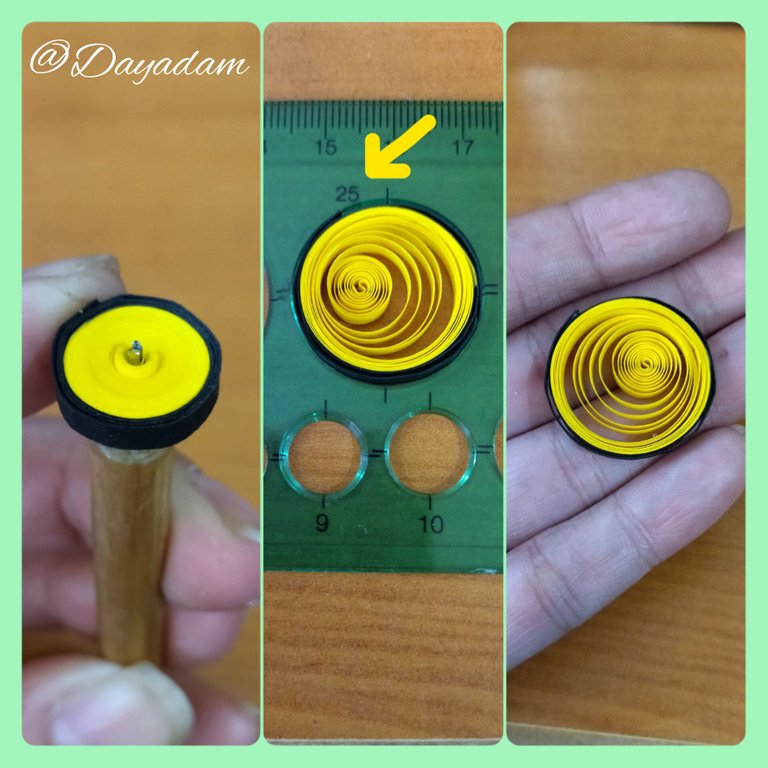
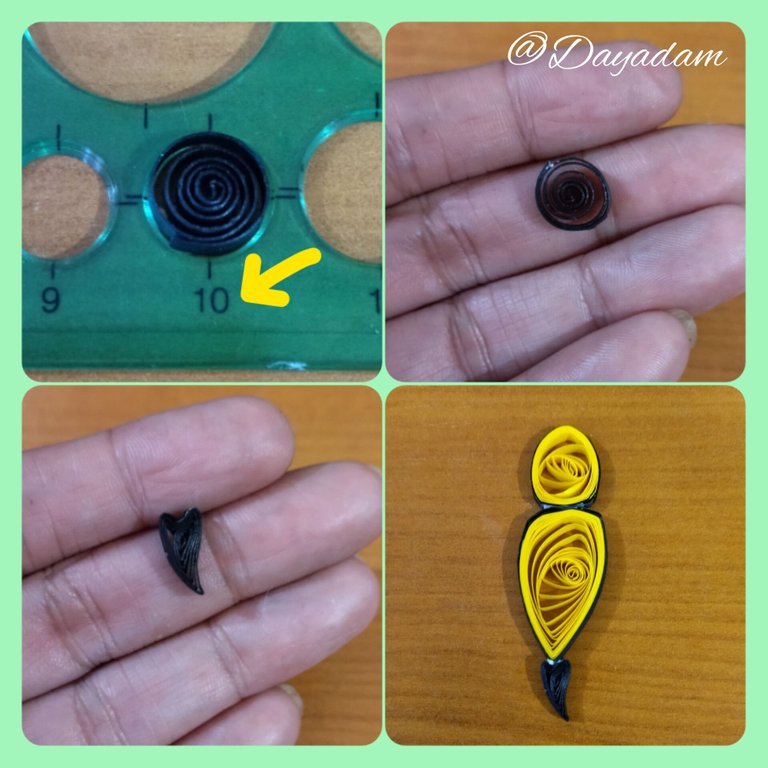
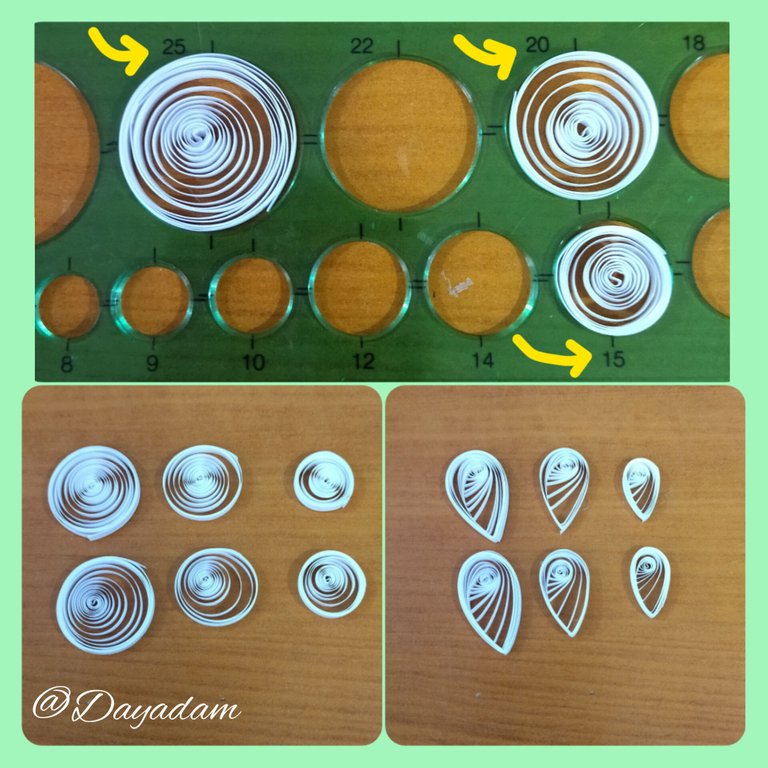
- We are going to start by taking yellow quilling tape 3mm wide x 100cms long, we are going to join it with a small piece of black tape, we roll up starting with the yellow part with the quilling needle until we finish with the tape, we take out the needle and we will measure in the circle number 25 of the ruler with different circumference measures, we take out the ruler and seal with extra strong white carpentry glue.
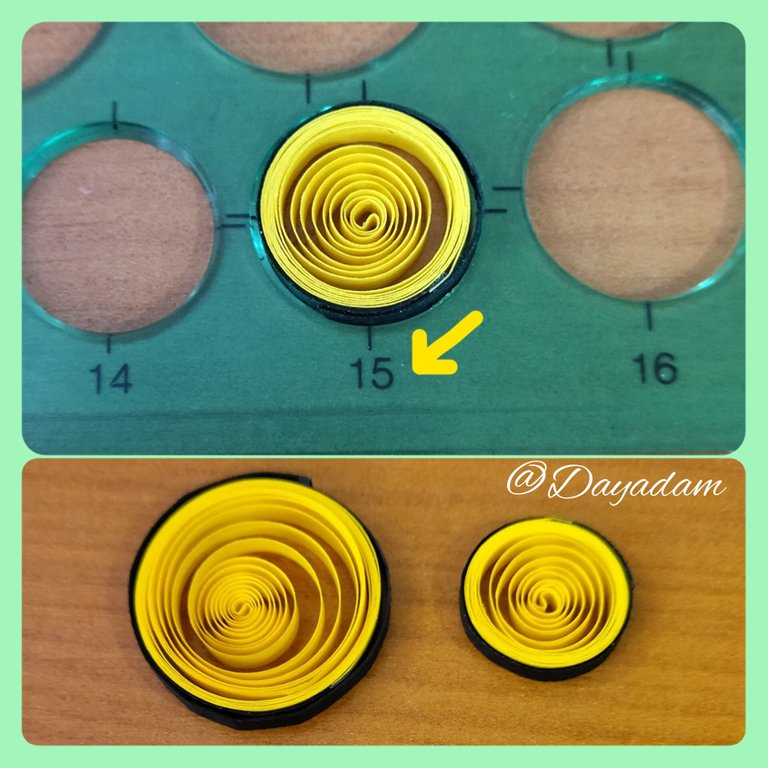
- Under the same parameters we will make another circle with yellow tape 3mm x 50cms long and a piece of black tape, this time we will measure in the circle number 15.
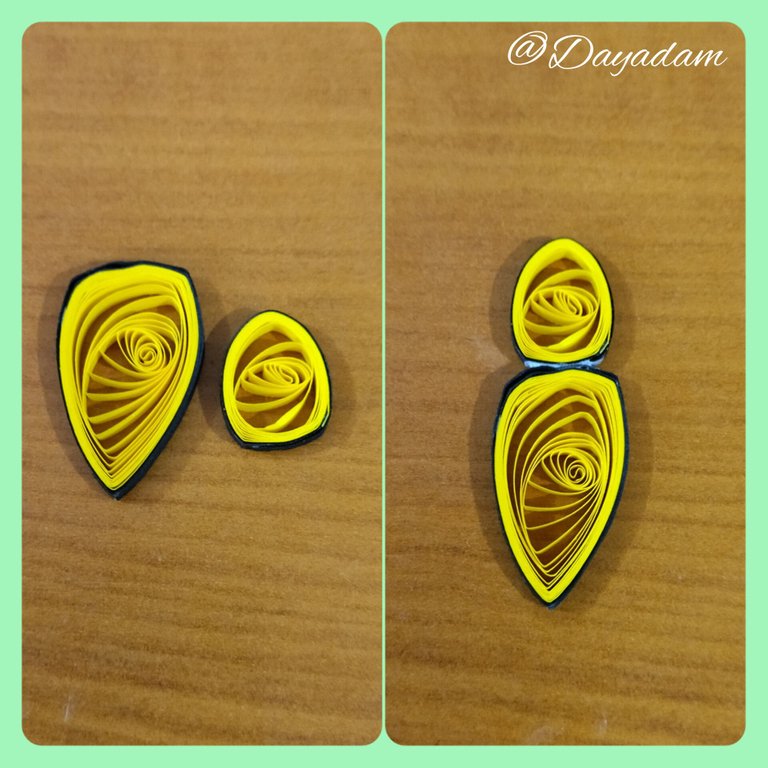
- We will mold these pieces and join them with a touch of glue to begin to form the body of the bee, you can see the shapes in the images.

• Vamos a comenzar tomando cinta para quilling color amarillo de 3mm de ancho x 100cms de largo, lo vamos a unir con un pequeño trozo de cinta negra, enrollamos empezando con la parte amarilla con la aguja para quilling hasta finalizar con la cinta, sacamos de la aguja y mediremos en el círculo número 25 de la regla con diversas medidas de circunferencia, sacamos de la regla sellamos con pega blanca extra fuerte de carpintería.
• Bajo los mismos parámetros anteriores haremos otro circulo con cinta amarilla de 3mm x 50cms de largo y un trozo de cinta negra, esta vez mediremos en el círculo número 15.
• Vamos a ir moldeando estas piezas, y las uniremos con un toque de pega para comenzar a formar el cuerpo de la abeja, pueden observar las formas en las imágenes.
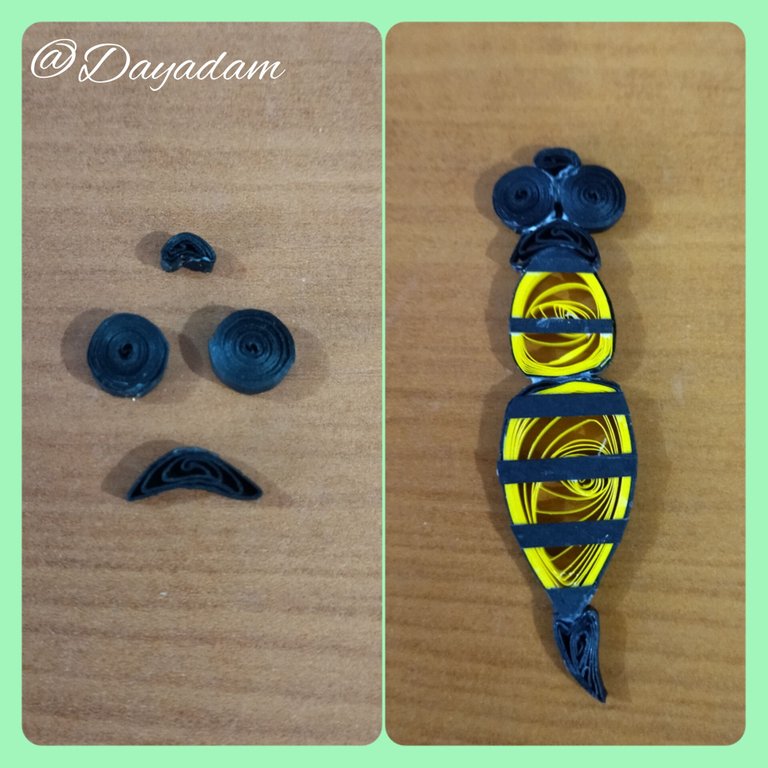
- With a piece of 3mm black ribbon we will make another circle in the measure number 10 of the ruler which will be the sting of the bee, we will mold it and glue it to the body.
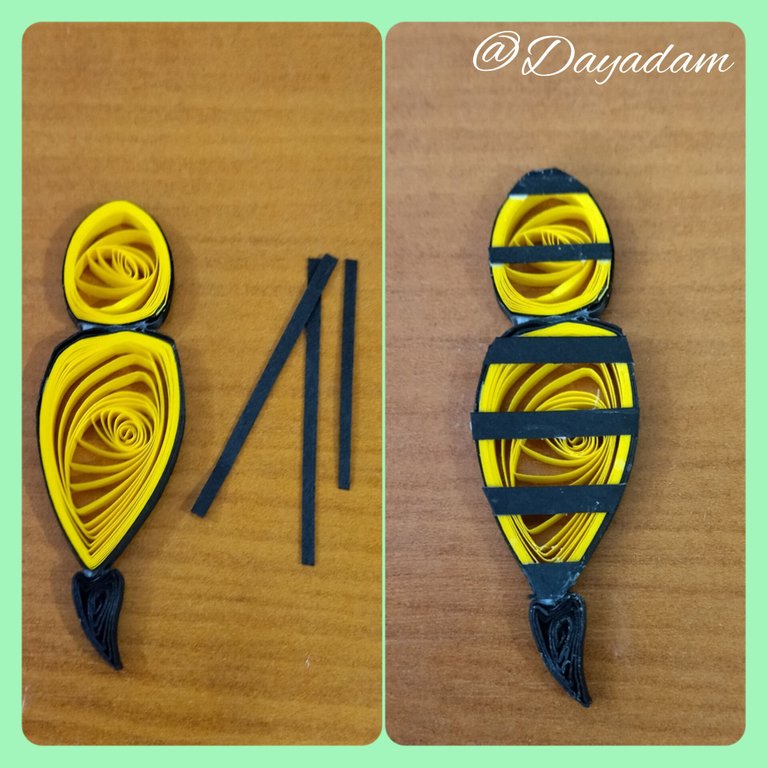
- Now we will glue on the body small pieces of black ribbon 3mm wide to simulate the stripes of the bee.
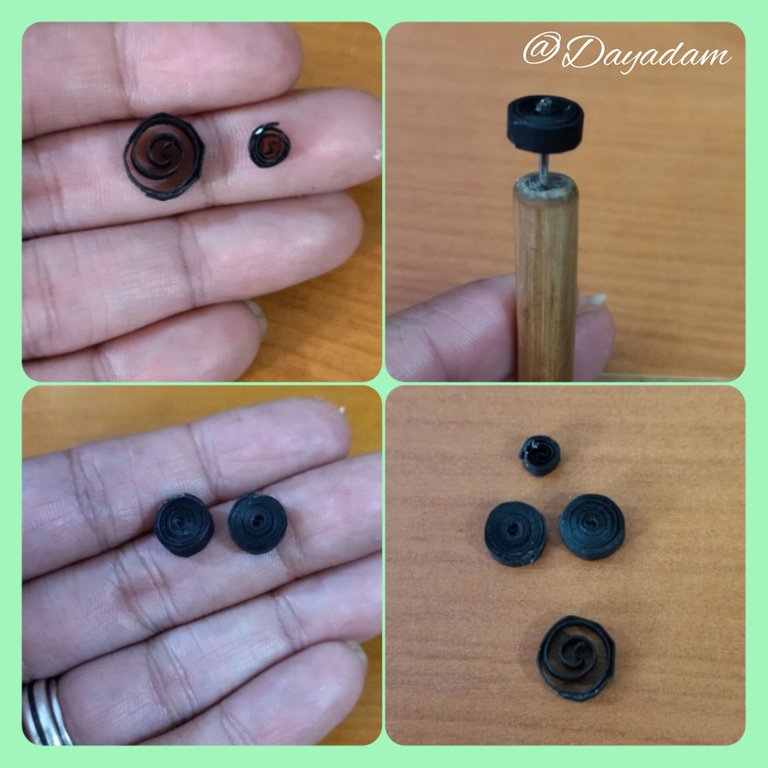
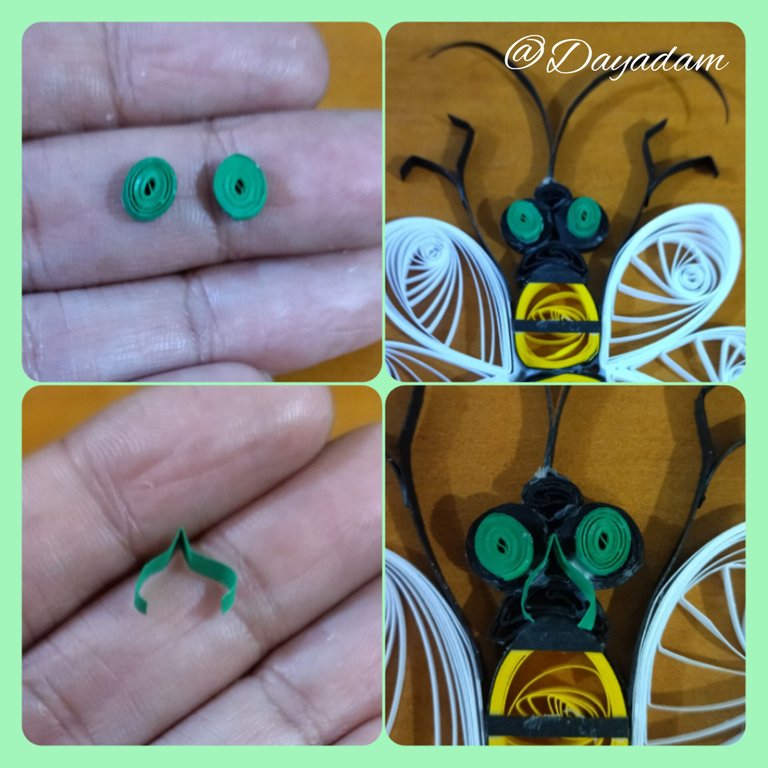
- We will make 2 fairly loose circles with black tape of 2 sizes, one should be smaller than the other, they will be part of the bee's face.
- For the eyes we will make 2 closed circles with black tape.
• Con un trozo de cinta negra de 3mm realizaremos otro circulo en la medida número 10 de la regla el cual será el aguijón de la abeja, lo moldearemos y pegaremos al cuerpo.
• Ahora pegaremos en el cuerpo pequeños trozos de cinta negra de 3mm de ancho para simular las rayas de la abeja.
• Realizaremos 2 círculos bastante sueltos con cinta negra de 2 tamaños, uno debe ser más pequeño que el otro, serán parte de la cara de la abeja.
• Para los ojos realizaremos 2 círculos cerrados con cinta negra.
- We will mold the pieces we made and form the face of the bee, we will glue them to the body with extra strong white glue.
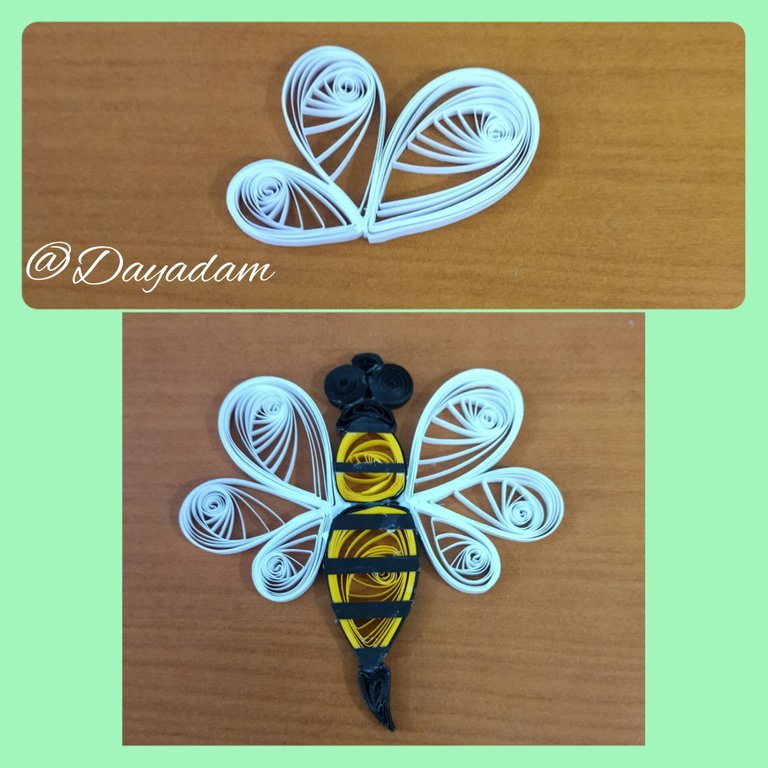
- Let's make the wings by taking 3mm wide white tape with which we will make three open circles of different sizes. We will need 3 for each wing, we will mold these circles in the shape of a leaf, we will join the 3 together and glue them to the body of the bee.
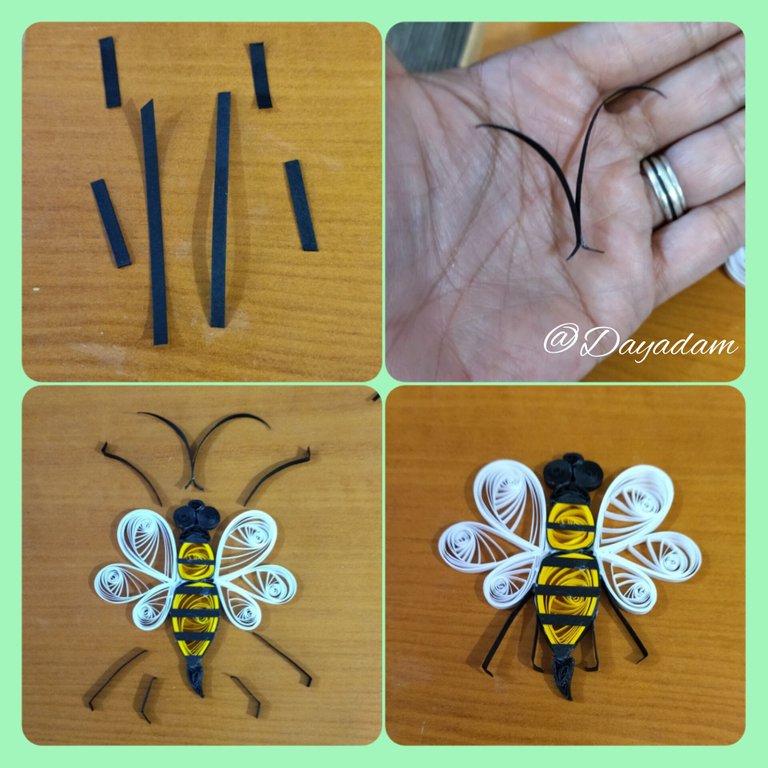
- Now we will make the legs and antennae of the bee, with 3mm wide tape, we will take some pieces which we will mold to our liking, making folds, shapes and we will glue them in different parts of the body. As I glue the pieces of tape, I will add more details to my liking. You can also see in the pictures that in the process I wanted to make the wings a little more pointed.
• Las piezas que realizamos las moldearemos y formaremos la cara de la abeja, las pegaremos al cuerpo con pega blanca extra fuerte.
• Realicemos las alas tomando cinta blanca de 3mm de ancho con las cuales haremos tres círculos abiertos de diferentes tamaños. Necesitaremos 3 para cada ala, estos círculos los moldearemos en forma de hoja, los uniremos los 3 y pegaremos al cuerpo de la abeja.
• Ahora realizaremos las patas y antenas de la abeja, con cinta de 3mm de ancho, tomaremos algunos trozos los cuales moldearemos a nuestro gusto, realizando dobleces, formas y pegaremos en diversas partes del cuerpo. A medida que voy pegando los trozos de cintas, voy añadiendo más detalles a mi gusto. También podrán observar en las fotografías que en el proceso quise hacerles una forma un poco más puntiaguda a las alas.
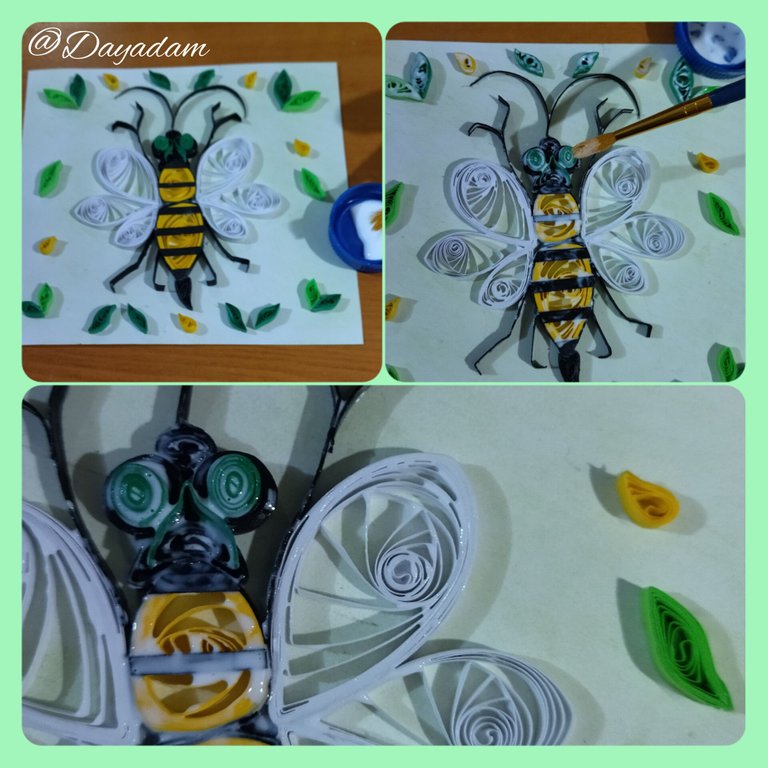
- I made two small closed circles, formed a kind of ovals, and placed them in the bee's eyes, and also placed a small piece of green tape on the bee's face to show a kind of fangs.
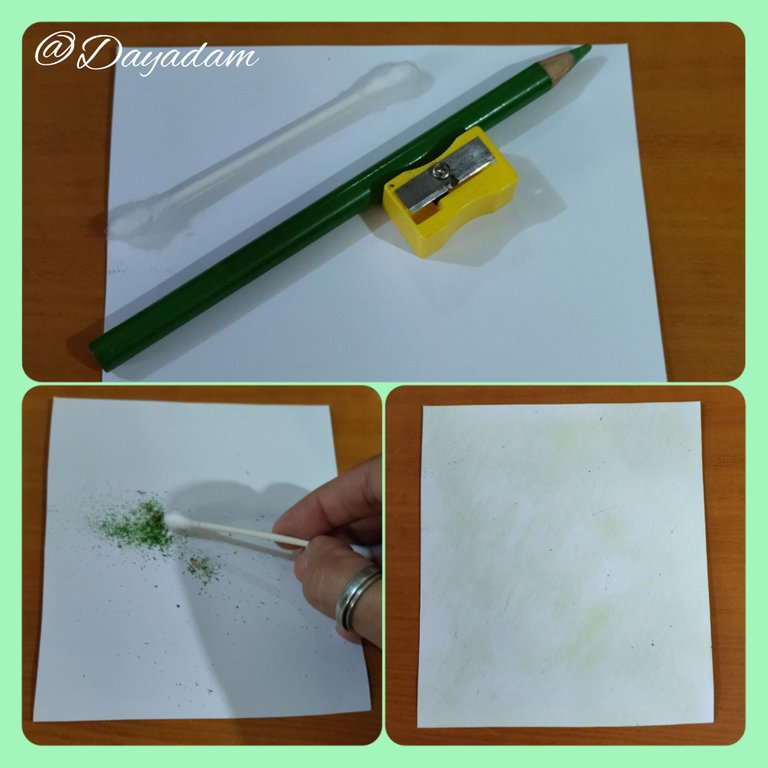
- I took a piece of white cardboard, a light green color, pencil sharpener and Q-tip, with some of the colored tip, I gave a little color to the cardboard to highlight the wings of the bee that are white.
- Now I took 3mm wide ribbons of various shades of green, and other yellow, with them I made leaves of various sizes, I joined some leaves to decorate, others I glued alone.
• Elabore dos pequeños círculos cerrados, forme una especie de óvalos, y los coloque en los ojos de la abeja, así como también coloque un trocito de cinta verde en la cara de la abeja para hacer ver una especie de colmillos.
• Tomé un trozo de cartulina blanca, un color verde claro, sacapuntas e hisopo, con restos de punta del color, le di un poco de color a la cartulina para que resalten las alas de la abeja que son color blanco.
• Ahora tome cintas de 3mm de ancho de diversas tonalidades verdes, y otras amarillas, con ellas hice hojas de varios tamaños, uní algunas hojas para decorar, otras las pegare solas.
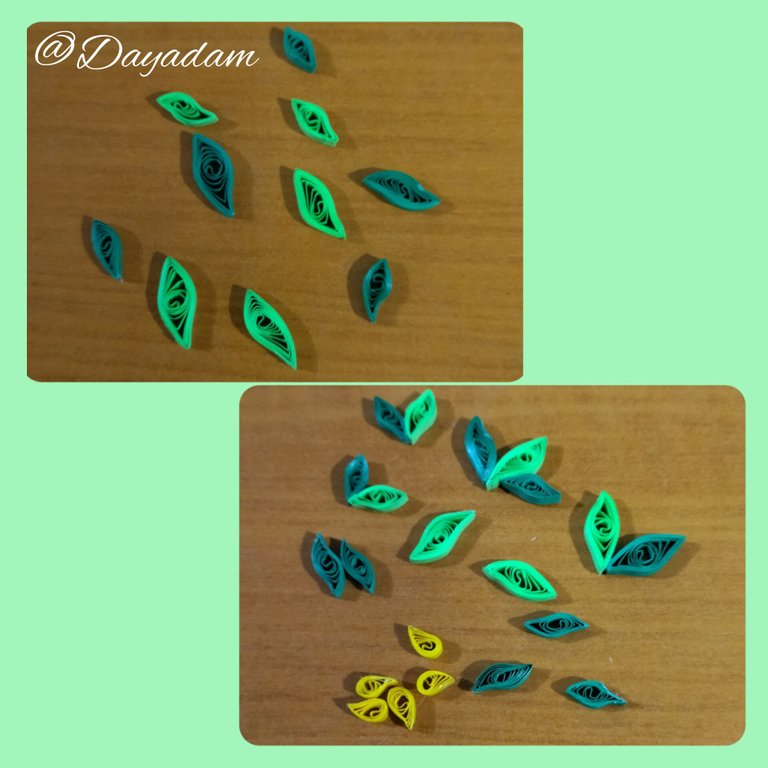
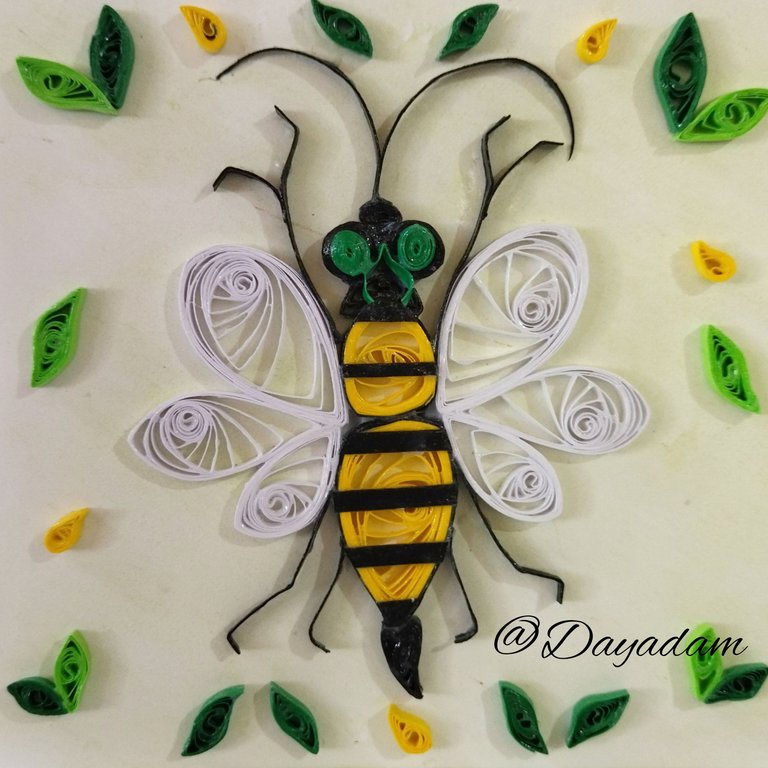
- Ready the pieces, glue the bee to the cardboard base, and place the leaves around it to decorate.
- Finally, to give it a little protection and shine, apply to the bee and the leaves a touch of extra strong white glue and let it dry very well.
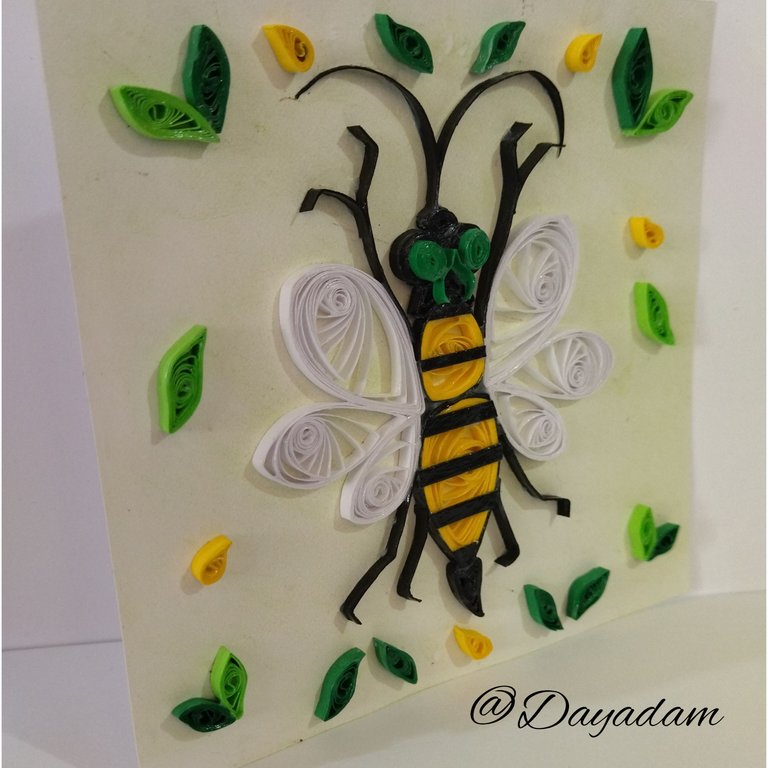
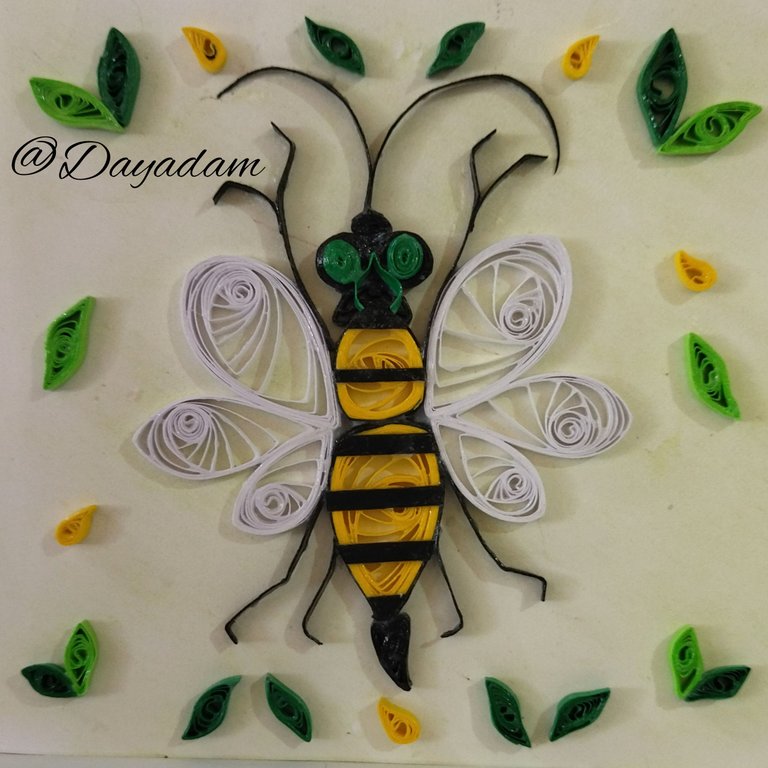
This way this decorated figure inspired by the Splinterland card from "Nectar Queen 🐝" is ready.
• Listas las piezas pegue la abeja a la base de cartulina, y coloque las hojas alrededor para decorar.
• Por ultimo para darle un poco de protección y brillo le aplique a la abeja y a las hojas un toque de pega blanca extra fuerte y deje secar muy bien.
De esta manera esta lista esta figura decorada e inspirada en la carta de Splinterland, "Nectar Queen 🐝".


What did you think, did you like it?
I hope you did, I hope you liked my explanation, procedure and photos, I made them with love for you.
"Let out that muse that inspires you, and let your imagination fly".
Thank you all, see you next time. 🐝
¿Que les pareció, les gustó?
Espero que sí, que les haya gustado mi explicación, procedimiento y fotos, los hice con mucho cariño por y para ustedes.
"Deja salir esa musa que te inspira, y deja volar tu imaginación".
Gracias a todos, nos vemos en la próxima. 🐝
Todas las fotos usadas en este post son de mi autoría y han sido sacadas en mi celular personal un Redmi 9T y editadas Canva Fuente Carta Nectar Queen Banner y separador hecho por mí en Canva Traducido con la ayuda de DeepL

Has sido votado por
PROYECTO ENLACE
'Conectando Ideas y Comunidades'
PROYECTO ENLACE es un proyecto de curación de habla hispana enfocado en recompensar contenido de calidad y apoyar autores en su proceso de crecimiento en HIVE.
Creemos y apostamos por el futuro de esta gran plataforma, y estamos muy emocionados de poder hacerla crecer junto a esta comunidad. Así que te invitamos a publicar en nuestra COMUNIDAD y estar atento a todas las actividades que tenemos preparadas y que estaremos publicando en breve.
¿QUIERES AUTOMATIZAR TUS GANANCIAS DE CURACIÓN? SE PARTE DEL PROYECTO ENLACE APOYANDO A NUESTRO TRAIL EN HIVE.VOTE INGRESA AQUÍ PARA CONOCER LOS DETALLES.
¿QUIERES INVERTIR ENLACE? DESCUBRE COMO HACERLO Y GENERAR INGRESOS DE FORMA SEMANAL MEDIANTE TU DELEGACIÓN DE HP AQUÍ TE EXPLICAMOS COMO.
Te invitamos a participar en nuestro servidor de Discord: https://discord.gg/3S9y7BbWfS
Atentamente
EQUIPO ENLACE 2023
Gracias por el apoyo @enlace 🐝
The details is this is just outstanding
Thank you so much for the support and your words. successes @diyhub 🐝
Muy bonito trabajo amiga como siempre con una terminación impecable , gracias por deleitarnos con él ❤️
!diy
Muchísimas gracias a ti amiga @lileisabel, por tus bellas palabras y por pasar. Un abrasote para ti... 🐝
You can query your personal balance by
!DIYSTATSQué genial y bello amiga! Impresionante cómo nos inspira Splinterlands y sus infinitos personajes. Amé tu diseño, me recordé en mis tiempos mozos cuando hice una mariquita, duré días haciéndola, estaba intentando aprender, y llegó mi jefe, la agarro para verla y se desbarató, jajajaja no le puse mucho pegamento. Amé tu estilo. Suerte en el concurso.
Ainssss que bella @equipodelta, mil gracias por tus palabras, me alegra mucho que te gustara.
Ahora si salí de dudas, como nunca había intentado cosas así en este estilo estaba dudosa, no había quedado muy conforme, porque lo sentí algo simple como para el nivel de los grandiosos concursantes que participan con entradas espectaculares en Splinterland.
Me honra recibir tus palabras, me llenan de mas confianza, espero que vengan esas musas inspirativas para seguir haciendo cositas así para el concurso, hay cartas hermosas, asombrosas y como dices son innumerables las cartas y personajes...
Ay Dios lo que te paso con la mariquita me ha pasado, no eres la única jajaja.
Gracias por tus deseos, suerte para ti también, tu FanArtDigital te quedo espectacular. Mi hija después de casi un año realizo también una entrada para el concurso aprovechando su vacaciones en la universidad.
Abrazos bella... ❤️
https://leofinance.io/threads/dayadam/re-leothreads-2lvpxk9me
The rewards earned on this comment will go directly to the people ( dayadam ) sharing the post on LeoThreads,LikeTu,dBuzz.
Thanks @poshthreads 🐝
¡Está bello! ¡Me gustaría batallar con esta Nectar Queen en el juego! ¡Excelente! !PIZZA !PGM !CTP
BUY AND STAKE THE PGM TO SEND A LOT OF TOKENS!
The tokens that the command sends are: 0.1 PGM-0.1 LVL-0.1 THGAMING-0.05 DEC-15 SBT-1 STARBITS-[0.00000001 BTC (SWAP.BTC) only if you have 2500 PGM in stake or more ]
5000 PGM IN STAKE = 2x rewards!
Discord
Support the curation account @ pgm-curator with a delegation 10 HP - 50 HP - 100 HP - 500 HP - 1000 HP
Get potential votes from @ pgm-curator by paying in PGM, here is a guide
I'm a bot, if you want a hand ask @ zottone444
Ainsss gracias amigo @cpol, me alegra que te haya gustado. Me complace que digas eso. Aunque no se jugar, es impresionante la cantidad de cartas que hay, hermosas y coloridas, dignas de admirar y recrear. Aunque no ha sido gran cosa lo que he hecho, espero poco a poco compartir cosas mejores. Un abrazo mi amigo, y agradecida que estés acá. Saludos @cpol 🐝⚡️
!HUG
!MEME
!LOLZ
lolztoken.com
A hardened criminal.
Credit: marshmellowman
@cpol, I sent you an $LOLZ on behalf of dayadam
(1/1)
ENTER @WIN.HIVE'S DAILY DRAW AND WIN HIVE!
Credit: osmi
Earn Crypto for your Memes @ HiveMe.me!
¡No, pero como dices eso! ¡Mucho trabajo llevan tus manualidades! ¡Son super lindas y bien hechas! ¡A mí me gustan muchísimo! !PIZZA !PGM !CTP
BUY AND STAKE THE PGM TO SEND A LOT OF TOKENS!
The tokens that the command sends are: 0.1 PGM-0.1 LVL-0.1 THGAMING-0.05 DEC-15 SBT-1 STARBITS-[0.00000001 BTC (SWAP.BTC) only if you have 2500 PGM in stake or more ]
5000 PGM IN STAKE = 2x rewards!
Discord
Support the curation account @ pgm-curator with a delegation 10 HP - 50 HP - 100 HP - 500 HP - 1000 HP
Get potential votes from @ pgm-curator by paying in PGM, here is a guide
I'm a bot, if you want a hand ask @ zottone444
Que lindo. Gracias amigo @cpol ❤️
!LUV
@cpol, @dayadam(1/1) sent LUV. | connect | community | HiveWiki | NFT | <>< daily
! help(no space) to get help on Hive. InfoI sent 1.0 HUG on behalf of @dayadam.
(3/3)
$PIZZA slices delivered:
cpol tipped dayadam (x2)
rosmiapure tipped dayadam
@dayadam(2/5) tipped @rosmiapure
Wuo! Esto me impresiono mucho y que bueno que te sumes al reto de arte de splinterlands. Te deseo mucha suerte.
!PIZZA !LUV
@dayadam, @rosmiapure(1/4) sent LUV. | connect | community | HiveWiki | NFT | <>< daily
! help(no space) to get help on Hive. InfoMuchísimas gracias por tus palabras y deseos, que linda, honor que me haces observando que eres jugadora de splinterland. Espero ofrecerles mas trabajos como este en la técnica que me encanta utilizar, inspirados en esas maravillosas cartas.
Bienvenida a mi humilde blog. Saludos @rosmiapure. Bello día para ti...
!PIZZA
!MEME
Credit: yintercept
Earn Crypto for your Memes @ HiveMe.me!
Que cosa más bella has realizado, te quedó hermosa y súper súper diferente. Hace dos semanas hice un dibujo de esta carta.. te deseo muchos éxitos 🫶🫶
Ainsss amigo @fixie, gracias por tus palabras y deseos, me alegro que te gustara aunque no fue la gran cosa.
Y se que la hiciste, de donde crees que me enamore de la carta jajajja, he revisado y visto bellezas que puedo trabajar, lo que hay es que darle rienda suelta a esa musa.
Saluditos querido artista ❤️
Muchas gracias por el apoyo @mayvileros 🐝
Hola amiga, increíble esta gran manualidad que nos compartes, cada detalle y pieza de esa abeja están Perfectos y se nota que lleva tiempo, paciencia, dedicación para así poder lograr todo eso, además me gusta la idea de hacer tu propia figuras a base de ese juego de hive y darle ese toque de originalidad a la misma. Además colocarla en ese fondo y agregarle eso detalles adicionales, permite que desde lejos sea lo máximo, muchas felicidades amiga.
Cariño de verdad te agradezco un mundo las palabras que me regalas hacia mi trabajo, encantada de leerlas, me gratifican mucho. Que bueno que te haya gustado este trabajo, y bueno me decidí después de algun tiempo a probar algo diferente y aplicarlo a este concurso de esta manera original que nadie lo ha echo, me llena de emoción, espero seguir, inspirarme y traerles mas cosas a este estilo.
Saluditos @davidpena21 🐝
Muy lindo como todo lo que haces! Gracias por compartir tu trabajo.
Saludos.
Muchisimas gracias amiga. Honor que me haces, ya que tu trabajo es hermoso. Saludos @elmundodebetty 🐝
Wow this is really creative , awesome. I love how did the the whole insects stuff, what motivated you towards this wonderful piece of art?
🐝
Que esperas para unirte a nuestro trail de curación y formar parte del "proyecto CAPYBARAEXCHANGE", tu casa de cambio, rapida, confiable y segura
Thanks for sharing! - castleberry#6859

Me encanto esa abejita, no conozco el juego pero creo que es una bonita forma de homenajear al personaje de la carta y a las abejas en si ya que son los seres mas importantes que hay en la Tierra. Esta llamativa y alegre para colgarla en la pared de la sala del hogar ❤️
Hermoso trabajo amiga @dayadam felicitaciones 🐝🌹🌷🌺🪷🪻🌻🏵️💮🌼🌸💐☘️
Montón de piecitas chiquititas que tiene esta figura. Es una representación genial de la figura original. El arte en quilling es genial y eres una maestra en esto. Felicitaciones por tu trabajo y éxitos en el concurso.
Gracias por tus palabras y deseos @gaboamc2393. Me alegra mucho que te haya gustado tomando en cuenta que haces trabajos espectaculares para el concurso ☺️
Éxitos...
Click on the badge to view your board.
Thank you to our sponsors. Please consider supporting them.
Check out our last posts:
Click on the badge to view your board.
Thank you to our sponsors. Please consider supporting them.
Check out our last posts: