[ES/EN] 👊Winning with 💥"inspire", 💥"flank" and 💥"shield" in ✅"Healed Out"

Fuente / Source
Estas imágenes han sido mezcladas por mí / These images have been mixed by me.

Saludos a toda la comunidad de #Splinterlands, espero que estén todos muy bien.
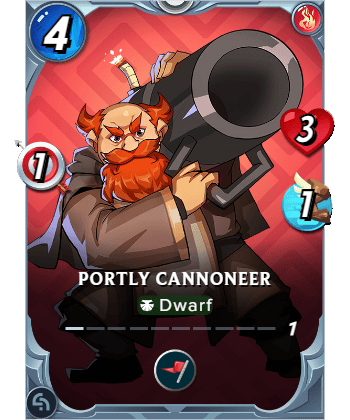
Hoy he ganado gracias a la habilidad "inspire" de "Portly Cannoneer".
Use un team "Fire" y me enfrente a un team "Earth" jugado por "samchie"; es una batalla de "mana 33"
y solo sin los monstruos de los elementos "Death" y "Drake" disponibles.
Greetings to the entire #Splinterlands community, I hope you're all doing well.
Today I won thanks to the "inspire" ability of "Portly Cannoneer".
I used a "Fire" team and faced an "Earth" team played by "samchie"; it was a "mana 33" battle, and I only had the "Death" and "Drake" monsters available.


✅Ruleset: "Healed Out"
Esta regla de batalla establece que no se podrán usar habilidades de curación o sanación de monstruos o invocadores.
Las habilidades como "Heal", "Tank Heal" y "Triage" quedan desactivadas.
This battle rule states that healing abilities for monsters or summoners cannot be used.
Abilities such as "Heal," "Tank Heal," and "Triage" are disabled.
✅Uso team "Fire" con ataque "melee" y "ranged"
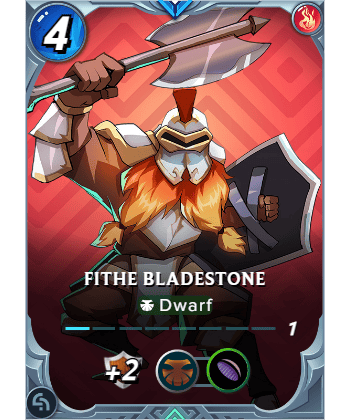
Mi arconte es "Fithe Bladestone" que otorgará +2 "armor" a todos mis monstruos y la habilidad "void" a cada uno de mis
criaturas que compartan el linaje "Dwarf".
Mi tanque es "Drybone Megalodon", un tiburón con gran poder "melee"; su habilidad "flank" le permite otorgar "reach"
a mi segundo monstruo que ahora podrá atacar al tanque enemigo desde su ubicación.
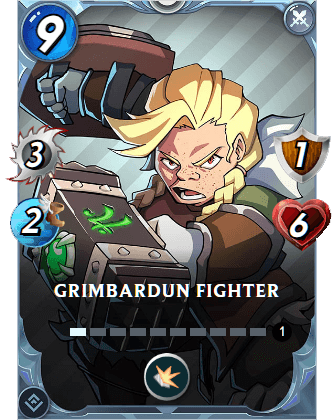
En la segunda posición está "Grimbardun Fighter", un caballero neutral con buen poder "melee" que será muy resistente
a los ataques físicos gracias a su habilidad "shield".
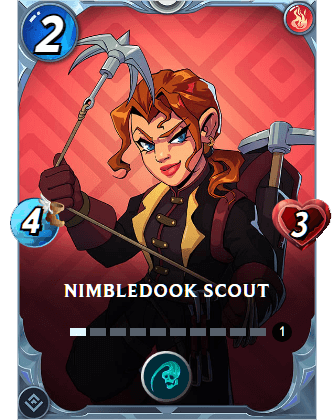
Mi tercer monstruo es "Nimbledook Scout", sin poder alguno, pero su habilidad "backfire" le permite hacer 2 puntos
de daño si el enemigo falla su ataque.
I use a "Fire" team with "melee" and "ranged" attacks
My archon is "Fithe Bladestone," which grants +2 "armor" to all my monsters and the "void" ability to each of my creatures that share the "Dwarf" lineage.
My tank is "Drybone Megalodon," a shark with great "melee" power; its "flank" ability allows it to grant "reach" to my second monster, which can now attack the enemy tank from its location.
In the second position is "Grimbardun Fighter," a neutral knight with good "melee" power that will be very resistant to physical attacks thanks to its "shield" ability.
My third monster is "Nimbledook Scout," with no special power, but its "backfire" ability allows it to deal 2 points of damage if the enemy misses their attack.
|
|
|
|
|

✅Ubico 2 oportunistas y un "inspire" atrás.
Aquí tengo a "Surly Drunk", un oportunista dorado que buscará cazar a los enemigos con menor salud.
Casi al final está "Portly Cannoneer", un arquero sin mucho poder pero que será capaz de aumentar el ataque "melee" de sus
amigos en +1 porque tiene "inspire".
Y mi último monstruo es "Torch Vizier", un oportunista de fuego que atacará al enemigo más débil.
I place 2 opportunists and an "inspire" in the back.
Here I have "Surly Drunk," a golden opportunist that will hunt down enemies with the lowest health.
Almost at the back is "Portly Cannoneer," an archer without much power but who will be able to increase the melee attack of his friends by +1 because he has "inspire."
And my last monster is "Torch Vizier," a fire opportunist that will attack the weakest enemy.
|
|
|
|


✅Me enfrento a un team "Earth" con full ataque "melee".
Su arconte es "Underboss Fabino" que aumentará el poder "melee" a 2 monstruos o envenenará a uno.
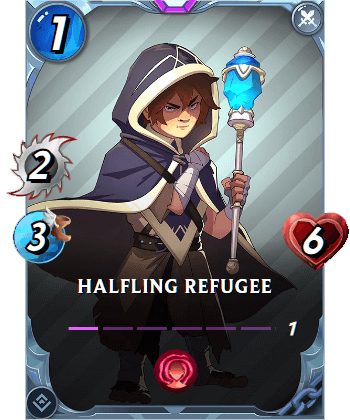
En la primera posición tiene a "Halfling Refugee", un épico neutral con buena salud a un costo mana 1, pero no será
muy activo porque su habilidad "weary" no se lo permite.
En la segunda posición tiene a "Endless Ape" que goza de excelente salud y ganará 1 punto más de vida cuando algún monstruo muere en la arena.
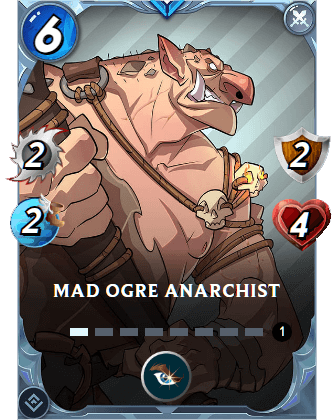
Su tercer monstruo es "Mad Ogre Anarchist", un oportunista neutral que buscará aniquilar al más débil de los míos.
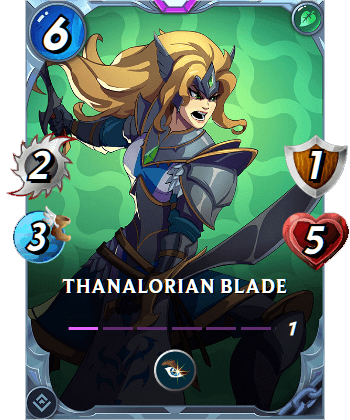
Casi al final tiene a "Thanalorian Blade", un oportunista de tierra que cazará a mi monstruo con menor salud.
Y su último monstruo es "Vengeful Monk", otro oportunista neutral que atacará a mi unidad que esté más próxima a morir.
I'm facing an Earth team with a full melee attack.
Their archon is Underboss Fabino, who will boost the melee power of two monsters or poison one.
In the first slot is Halfling Refugee, a neutral epic with good health at a mana cost of 1, but it won't be very active because its weary ability prevents it.
In the second slot is Endless Ape, which has excellent health and gains 1 more hit point when a monster dies in the arena.
Their third monster is Mad Ogre Anarchist, a neutral opportunist who will try to annihilate the weakest of my monsters.
Near the back is Thanalorian Blade, an Earth opportunist who will hunt down my lowest-health monster.
And his last monster is "Vengeful Monk", another neutral opportunist who will attack my unit that is closest to dying.
|
|
|
|
|
|
|


✅Ronda 1
"Torch Vizier" es el monstruo más rápido y su ataque logra destruir la armadura de "Mad Ogre Anarchist".
Luego "Vengeful Monk" se lanza contra mi "Surly Drunk" y lo fulmina con un certero ataque, convirtiéndose en la
primera víctima de esta batalla.
Después "Grimbardun Fighter" no tiene piedad con "Halfling Refugee" y lo saca de la arena usando su gran poder.
Round 1
"Torch Vizier" is the fastest monster, and its attack manages to destroy "Mad Ogre Anarchist's" armor.
Then "Vengeful Monk" charges at my "Surly Drunk" and strikes it down with a precise attack, making it the first victim of this battle.
Afterward, "Grimbardun Fighter" shows no mercy to "Halfling Refugee" and knocks it out of the arena using its immense power.

✅Ronda 2
"Torch Vizier" sigue en racha y esta vez somete a "Mad Ogre Anarchist" al inicio de esta ronda.
"Thanalorian Blade" se lanza contra "Nimbledook Scout", pero su ataque falla, entonces, se activa su habilidad "backfire"
que provoca 2 puntos de daño al enemigo.
Round 2
"Torch Vizier" continues his winning streak and this time defeats "Mad Ogre Anarchist" at the start of this round.
"Thanalorian Blade" charges at "Nimbledook Scout," but his attack misses. Then, his "backfire" ability activates, dealing 2 points of damage to the enemy.

✅Ronda 3
"Thanalorian Blade" no perdona y logra aniquilar a "Nimbledook Scout" gracias a un potente ataque.
Ahora "Grimbardun Fighter" entra en acción y destruye a "Endless Ape" quien gozaba de gran salud gracias
a su habilidad "scavenger".
Round 3
"Thanalorian Blade" shows no mercy and manages to annihilate "Nimbledook Scout" with a powerful attack.
Now "Grimbardun Fighter" enters the fray and destroys "Endless Ape," who was enjoying high health thanks to its "scavenger" ability.

✅Ronda 4
"Torch Vizier" es muy eficaz y ahora elimina a "Vengeful Monk" acabando con todos los enemigos de la línea de fondo.
Solo queda en pie "Thanalorian Blade", pero es capaz de someter a "Drybone Megalodon" al final.
Ahora "Grimbardun Fighter" llega a la primera posición, pero su ataque falla el blanco.
Round 4
"Torch Vizier" is very effective and now eliminates "Vengeful Monk," taking out all the enemies in the backline.
Only "Thanalorian Blade" remains, but it manages to subdue "Drybone Megalodon" at the end.
Now "Grimbardun Fighter" reaches the first position, but its attack misses its target.

✅Ronda 5
"Grimbardun Fighter" se encarga de darnos la victoria en esta batalla usando su poder "melee" para acabar con
"Thanalorian Blade" el último enemigo.
Round 5
"Grimbardun Fighter" secures our victory in this battle, using his melee power to finish off
"Thanalorian Blade," the final enemy.

✅¿Funciono mi estrategia? ¿Qué intentaré diferente la próxima vez?
Mi estrategia dio resultados, "Portly Cannoneer" fue muy útil al aumentar el ataque "melee" de sus amigos en +1,
"Grimbardun Fighter" y "Torch Vizier" se vieron favorecidos y lograron hacer mucho daño a los enemigos.
Mi arconte "Fithe Bladestone" estuvo genial otorgando +2 "armor" a todos mis monstruos para que resistieran los ataques
físicos de enemigos.
La próxima vez usaré un team "Earth", mi arconte será "Kaylia Silverleaf" porque reducirá el ataque mágico de enemigos en -1 y
otorgará "execute" a todos mis elfos.
Mi tanque será "Ulundin Overseer" porque goza de excelente salud y buena armadura, su habilidad "flank" le permite otorgar
"reach" a "Lioceros" que ahora podrá atacar desde la segunda posición, su habilidad "thorns" le permitirá hacer 2 puntos
de daño cuando reciba ataques de enemigos con poder "melee".
Mi tercer monstruo será "Thanalorian Blade" porque es un oportunista que buscará someter a los enemigos más débiles
y como es un elfo ganará "execute".
Casi al final ubicaré a "Halaran Huntress" porque su habilidad "charge" le permite atacar desde cualquier ubicación
al tanque enemigo.
Y mi último monstruo será "Blackmoor Wild Elf" porque se mantendrá oculto hasta que alcance la primera posición, además
ganará "execute" por ser otro elfo.
Strategy work? What will you try differently next time?
My strategy worked. "Portly Cannoneer" was very useful, increasing the melee attack of its allies by +1.
"Grimbardun Fighter" and "Torch Vizier" benefited greatly and were able to deal significant damage to the enemies.
My archon, "Fithe Bladestone," was fantastic, granting +2 armor to all my monsters so they could withstand physical attacks from enemies.
Next time, I'll use an Earth team. My archon will be "Kaylia Silverleaf" because she will reduce the magic attack of enemies by -1 and grant "Execute" to all my elves.
My tank will be "Ulundin Overseer" because he has excellent health and good armor. His "Flank" ability allows him to grant "Reach" to "Lioceros," who can now attack from the second position. His "Thorns" ability will allow him to deal 2 points of damage when he is attacked by melee enemies.
My third monster will be "Thanalorian Blade" because it's an opportunist that will try to subdue weaker enemies, and since it's an elf, it will gain "Execute."
I'll place "Halaran Huntress" near the end because its "Charge" ability allows it to attack the enemy tank from any location.
And my last monster will be "Blackmoor Wild Elf" because it will remain hidden until it reaches the first position, and it will also gain "Execute" for being another elf.
https://youtube.com/shorts/tB1Y3PXZOKE Si aún no juegas "Splinterlands", puedes registrarte con mi enlace. If you don't play "Splinterlands" yet, you can sign up with my link.
La traducción se hizo con / The translation was done with: Posted Using INLEO

https://translate.google.com/?hl=es
https://x.com/elcholitosanto/status/2012970460409888978
https://www.reddit.com/r/Splinterlands/comments/1qgi025/winning_with_inspire_flank_and_shield_in_healed/
This post has been shared on Reddit by @elcholitosanto through the HivePosh initiative.
Thanks for sharing! - @cieliss

Congratulations @elcholitosanto! You have completed the following achievement on the Hive blockchain And have been rewarded with New badge(s)
Your next target is to reach 4000 replies.
You can view your badges on your board and compare yourself to others in the Ranking
If you no longer want to receive notifications, reply to this comment with the word
STOP