[ES/EN] 👊Winning with the 🔥"execute" skill in ✅"Maneuvers"

Fuente / Source
Estas imágenes han sido mezcladas por mí / These images have been mixed by me.

Saludos a toda la comunidad de #Splinterlands, espero que estén todos muy bien.
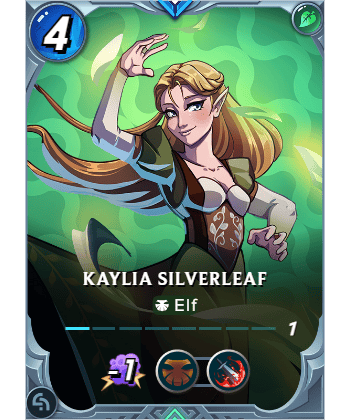
Hoy pude ganar gracias a la habilidad "execute" que mi arconte "Kaylia Silverleaf" otorgó a mis elfos.
Uso un team "Earth" y me enfrento a un team "Earth" también jugado por "joao10barros388".
Es una batalla de "mana 43" y solo sin los monstruos de los elementos "Life" y "Death" disponibles.
Greetings to the entire #Splinterlands community, I hope you're all doing well.
Today I was able to win thanks to the "execute" ability that my archon, "Kaylia Silverleaf," granted to my elves.
I'm using an "Earth" team and facing off against another "Earth" team played by "joao10barros388".
It's a "mana 43" battle, and I'm playing alone without the "Life" and "Death" element monsters available.


✅Ruleset: "Maneuvers"
Las unidades con ataques "melee" ganan "reach". Se recomienda usar una unidad con gran poder de ataque para poder
hacer mucho daño al tanque enemigo.
Units with melee attacks gain range. It is recommended to use a unit with high attack power to deal significant damage to the enemy tank.
✅Uso un team con ataque mixto
Mi arconte es "Kaylia Silverleaf" que reducirá el ataque mágico de enemigos en -1 y otorgará "execute" a todos los
monstruos que compartan el linaje "Elf".
Mi tanque es "Endless Ape" con excelente salud, será capaz de aumentar su salud máxima en +1 gracias a su habilidad
"scavenger".
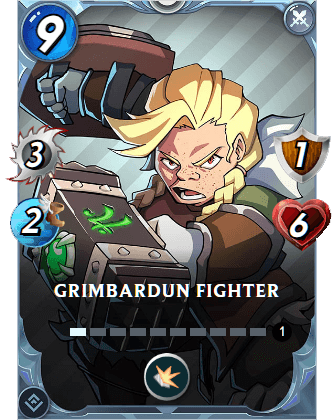
Mi segundo monstruo es "Grimbardun Fighter", un caballero neutral que goza de buen poder "melee" y hará mucho daño
al tanque enemigo, además, será muy resistente a los ataques físicos porque tiene "shield".
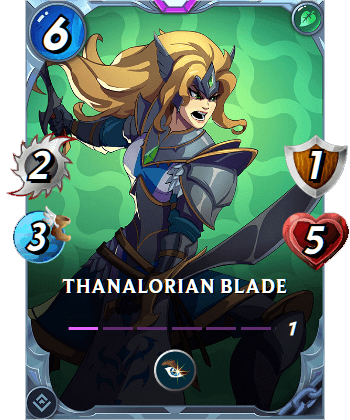
Mi tercer monstruo es "Thanalorian Blade", un oportunista de tierra que atacará al enemigo más débil y ganará
"execute" por ser un elfo.
I use a mixed attack team
My archon is "Kaylia Silverleaf," who will reduce the magic attack of enemies by -1 and grant "Execute" to all monsters that share the "Elf" lineage.
My tank is "Endless Ape," with excellent health. He will be able to increase his maximum health by +1 thanks to his "Scavenger" ability.
My second monster is "Grimbardun Fighter," a neutral knight with good melee power who will deal significant damage to the enemy tank. He will also be very resistant to physical attacks because he has "Shield."
My third monster is "Thanalorian Blade," an earth opportunist who will attack the weakest enemy and gain "Execute" because he is an elf.
|
|
|
|
|

✅Ubico un oportunista, un arquero y una hechicera
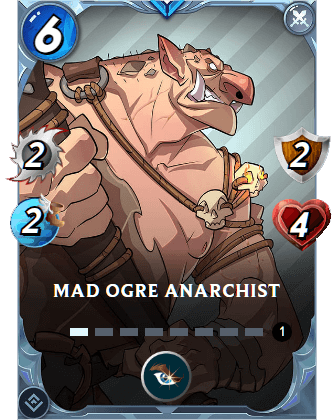
Aquí tengo a "Mad Ogre Anarchist", un oportunista neutral que buscará atacar al enemigo con menor salud.
Casi al final está "Ash Archer", un arquero que atacará al tanque enemigo y como es otro elfo ganará "execute".
Y mi último monstruo es "Blackmoor Wild Elf" que se mantendrá oculto hasta que llegue a la primera posición y
recibirá la habilidad "execute" por ser del linaje "Elf"
I place an opportunist, an archer, and a sorceress
Here I have "Mad Ogre Anarchist," a neutral opportunist who will attack the enemy with the lowest health.
Near the end is "Ash Archer," an archer who will attack the enemy tank, and since he's another elf, he'll gain "execute."
And my last monster is "Blackmoor Wild Elf," who will remain hidden until he reaches the first position and
will receive the "execute" ability for being of the "Elf" lineage.
|
|
|
|


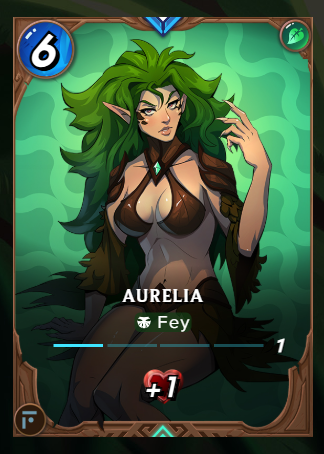
✅Me enfrento a un team con ataque mixto
Su arconte es "Aurelia", una dorada de "nivel 2" que aumenta la salud de sus monstruos en +1.
Su tanque es "Lioceros" con "thorns", será capaz de hacer 2 puntos de daño al enemigo cuando reciba un ataque "melee",
goza de buena salud y regular armadura.
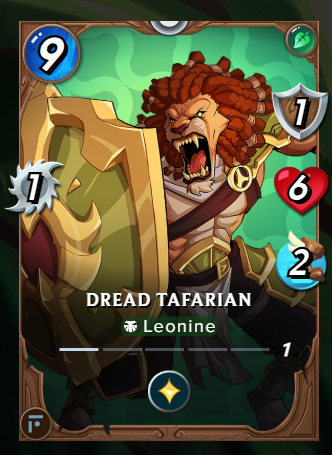
En la segunda posición tiene a "Dread Tafarian", un dorado de "nivel 3" que sera capaz de recuperar su salud porque goza
de "heal" y su excelente salud le permite resistir varias rondas.
Su tercer monstruo es "Virid Venomancer", otro dorado de "nivel 3" que será capaz de otorgar "shield" a su amigo que
se encuentre al frente de él gracias a su habilidad "shield ward".
En medio tiene a "Ironwing Juggernaut", una unidad dorada de "nivel 3" que será capaz de atacar desde cualquier ubicación
porque tiene "charge", pero no será muy activo porque su habilidad "weary" no se lo permite.
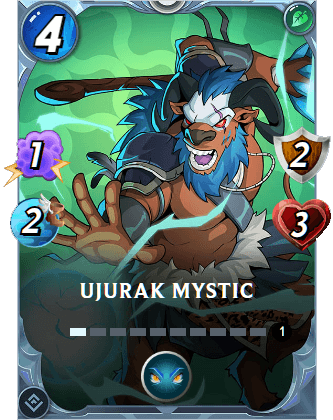
Casi al final tiene a "Ujurak Mystic", un hechicero cuya habilidad "lookout" le permite reducir el daño en -1
a sus amigos más cercanos de ataques de "sneak", "snipe", oportunistas y emboscadores.
Y su último monstruo es "Husk of the Hunter", un dorado de "nivel 3" que atacará a mi último monstruo y reducirá
el ataque "ranged" en -1 de mis monstruos gracias a su habilidad "headwinds"
I'm facing a team with a mixed attack
Their archon is "Aurelia," a level 2 Gold Saint who increases her monsters' health by +1.
Their tank is "Lioceros" with Thorns, capable of dealing 2 damage to the enemy when hit by a melee attack.
He has good health and decent armor.
In the second position is "Dread Tafarian," a level 3 Gold Saint who can recover his health thanks to Heal, and his excellent health allows him to withstand several rounds.
Their third monster is "Virid Venomancer," another level 3 Gold Saint who can grant Shield to the ally in front of him thanks to his Shield Ward ability.
In the middle is "Ironwing Juggernaut," a level 3 Gold Saint who can attack from any position because of Charge, but he won't be very active due to his Weary ability. Near the end, he has "Ujurak Mystic," a sorcerer whose "lookout" ability allows him to reduce the damage taken by -1 to his closest allies from "sneak," "snipe," opportunist, and ambush attacks.
And his last monster is "Husk of the Hunter," a level 3 golden monster that will attack my last monster and reduce the ranged attack of my monsters by -1 thanks to its "headwinds" ability.
|
|
|
|
|
|
|
|


✅Ronda 1
"Thanalorian Blade" es el monstruo más veloz y se lanza contra "Virid Venomancer" porque es el enemigo más débil.
Luego "Husk of the Hunter" logra abatir a "Ash Archer" gracias a su gran flecha.
El enemigo logra conseguir ventaja numérica, pero todavía es temprano para rendirse.
Round 1
"Thanalorian Blade" is the fastest monster and attacks "Virid Venomancer" because it is the weakest enemy.
Then "Husk of the Hunter" manages to take down "Ash Archer" with its powerful arrow.
The enemy has gained a numerical advantage, but it's still too early to give up.

✅Ronda 2
"Thanalorian Blade" se encarga de abatir a "Virid Venomancer" y es enviado al cementerio de monstruos.
Después "Blackmoor Wild Elf" activa "execute" y acaba con los puntos de vida de "Lioceros".
Round 2
"Thanalorian Blade" defeats "Virid Venomancer," sending it to the monster graveyard.
Then "Blackmoor Wild Elf" activates "execute," reducing "Lioceros'" hit points to zero.

✅Ronda 3
"Thanalorian Blade" sigue en racha y esta vez somete a "Ujurak Mystic" usando la habilidad "execute".
Mientras tanto "Dread Tafarian" no tiene piedad con "Endless Ape" y lo saca de la arena con un certero ataque.
Round 3
"Thanalorian Blade" continues his winning streak and this time subdues "Ujurak Mystic" using the "execute" ability.
Meanwhile, "Dread Tafarian" shows no mercy to "Endless Ape" and knocks him out of the arena with a precise attack.

✅Ronda 4
"Blackmoor Wild Elf" aprovecha que "Dread Tafarian" se encuentra muy débil y lo ejecuta.
El enemigo aún tiene poder de fuego y "Husk of the Hunter" usa su gran flecha para aniquilar a "Mad Ogre Anarchist".
Round 4
"Blackmoor Wild Elf" takes advantage of "Dread Tafarian's" weakened state and executes him.
The enemy still has firepower, and "Husk of the Hunter" uses his great arrow to annihilate "Mad Ogre Anarchist."

✅Ronda 5
"Blackmoor Wild Elf" sigue imparable y esta vez ejecuta a "Ironwing Juggernaut".
Solo queda en pie "Husk of the Hunter", pero sin chances de ganar.
Round 5
"Blackmoor Wild Elf" continues his unstoppable run and this time takes down "Ironwing Juggernaut."
Only "Husk of the Hunter" remains, but with no chance of winning.

✅Ronda 6
"Grimbardun Fighter" se encarga de darnos la victoria gracias a su potente ataque.
Round 6
"Grimbardun Fighter" secures the victory for us with its powerful attack.

✅¿Funciono mi estrategia? ¿Qué intentaré diferente la próxima vez?
Mi estrategia dio resultados, "Endless Ape" fue un gran tanque que logró convertirse en una gran pared para enemigos y
su habilidad "scavenger" le permitió ganar salud para resistir por más tiempo.
Mi arconte "Kaylia Silverleaf" fue muy útil al otorgar "execute" a todos mis elfos, que lograron hacer mucho daño a
los enemigos con menor salud.
Luego "Thanalorian Blade" logró hacer mucho daño a la línea de fondo enemiga gracias a su habilidad "opportunity".
Y "Blackmoor Wild Elf" fue muy eficiente al doblegar a los enemigos que alcanzan la primera posición.
La próxima vez usaré un team "Death", mi arconte será "Thalgrimore" porque reducirá la salud de enemigos en -1.
Mi tanque será "Ulundin Overseer" porque goza de excelente salud y buena armadura.
Mi segundo monstruo será "Helheim Demon", un demonio volador que será muy ágil para los ataques físicos y morirá
recibiendo todos los ataques porque goza de la habilidad "taunt".
Mi tercer monstruo será "Arachne Weaver" porque se encargará de sanar a todos sus amigos usando su habilidad
"corrupted healing".
Casi al final ubicare a "Sorrow Harvester", un elfo que reducirá la salud máxima de enemigos en -1 porque tiene "weaken".
Y mi último monstruo será "Meriput Slinger" porque tiene una gran flecha y hará mucho daño al tanque enemigo, además
será capaz de reducir la velocidad de su objetivo gracias a la habilidad "impede".
Strategy work? What will you try differently next time?
My strategy worked. "Endless Ape" was a great tank, effectively becoming a wall for enemies, and
its "scavenger" ability allowed it to gain health and survive longer.
My archon, "Kaylia Silverleaf," was very useful, granting "execute" to all my elves, who dealt significant damage to
the lowest-health enemies.
Then, "Thanalorian Blade" dealt considerable damage to the enemy backline thanks to its "opportunity" ability.
And "Blackmoor Wild Elf" was very efficient at taking down enemies who reached the first position.
Next time, I'll use a "Death" team. My archon will be "Thalgrimmore" because it reduces enemy health by 1.
My tank will be "Ulundin Overseer" because it has excellent health and good armor.
My second monster will be "Helheim Demon," a flying demon that will be very agile with physical attacks and will die
receiving all attacks because it has the "taunt" ability.
My third monster will be "Arachne Weaver" because it will heal all its allies using its "corrupted healing" ability.
Near the end, I'll place "Sorrow Harvester," an elf that will reduce the maximum health of enemies by -1 because it has "weaken."
And my last monster will be "Meriput Slinger" because it has a great arrow and will do a lot of damage to the enemy tank; it will also be able to reduce the speed of its target thanks to the "impede" ability.
Si aún no juegas "Splinterlands", puedes registrarte con mi enlace. If you don't play "Splinterlands" yet, you can sign up with my link.
La traducción se hizo con / The translation was done with: Posted Using INLEO

https://translate.google.com/?hl=es
https://x.com/elcholitosanto/status/2007783256306106722
https://www.reddit.com/r/Splinterlands/comments/1q3o94d/winning_with_the_execute_skill_in_maneuvers/
This post has been shared on Reddit by @elcholitosanto through the HivePosh initiative.
Delegate Tokens and HP to Fallen Angels to earn weekly rewards!
Delegate | Join to the guild
Thanks for sharing! - @clove71
