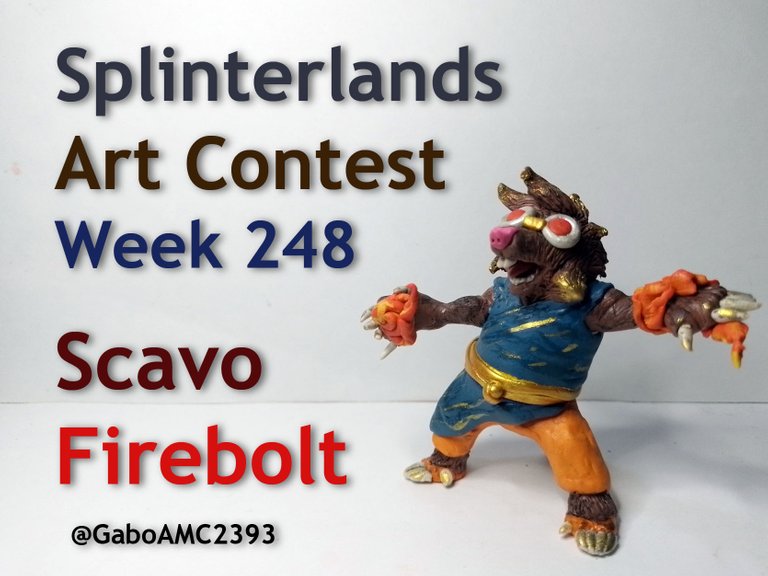
Splinterlands Art Contest Week 248: Scavo Firebolt
Submission 247 was my first entry in the splinterlands art contest. The truth is that I was delighted with the artwork that was shared throughout the week that this edition was active and I felt motivated to continue sharing my art with you, with the intention of bringing works that were at the height of the creations of these artists.
You can read more about the contest by following this link:
https://peakd.com/hive-13323/@splinterlands/splinterlands-art-contest-week-248
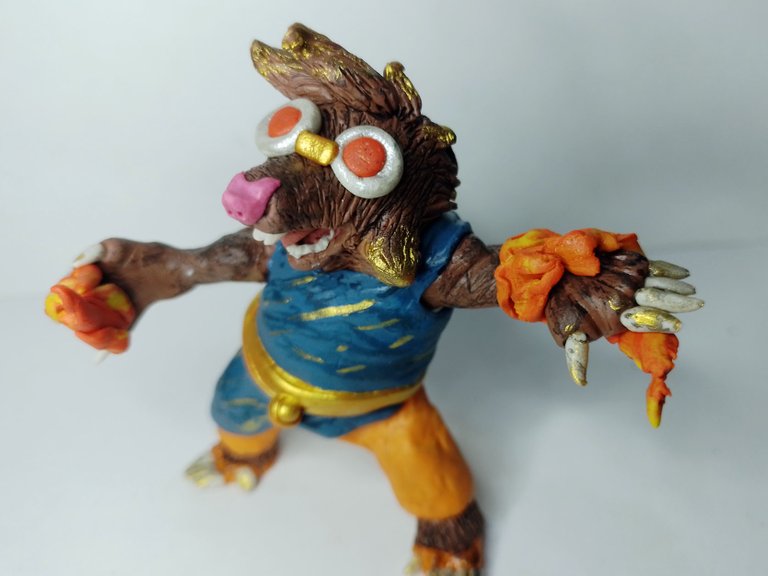
Well, in this issue number 248 I decided to make a figurine inspired by a very interesting card, at least in terms of design, Scavo Firebolt.
He is a mole, with a very interesting costume and powers, so I thought it would be interesting to make a sculpture inspired by this character, with an original style of his own.
Join me in the creation of this figurine.
La entrega 247 fue mi primera participación en el concurso de arte de splinterlands. La verdad quedé encantado con las obras de arte que compartieron a lo largo de la semana que estuvo activa esa edición y me sentí motivado a continuar compartiendo mi arte con ustedes, con la intención de traer obras que estuviesen a la altura de las creaciones de estos artistas.
Puedes leer mas sobre el concurso siguiendo este enlace:
https://peakd.com/hive-13323/@splinterlands/splinterlands-art-contest-week-248
Pues bien, en esta edición número 248 me animé a hacer una figurita inspirada en una carta bastante interesante, al menos en cuanto al diseño, Scavo Firebolt.
Es un topo, con un traje y poderes bastante interesantes así que me pareció interesante hacer una escultura inspirada en este personaje, con un estilo propio y original.
Acompáñenme a la creación de esta figurita.
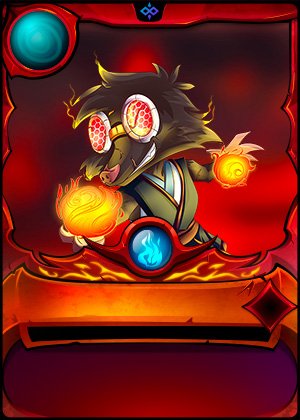
Link to the card / Enlace a la carta:
https://next.splinterlands.com/card-detail/400/regular/7
Step by step
The materials I used to make this sculpture were the following: wire, paper, tape, plasticine, glue and paints; I also used tools such as tweezers, needles and brushes.
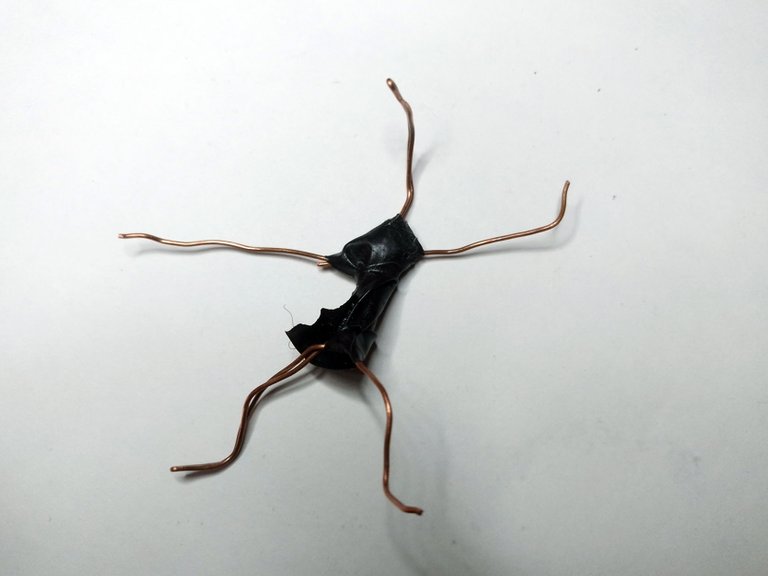
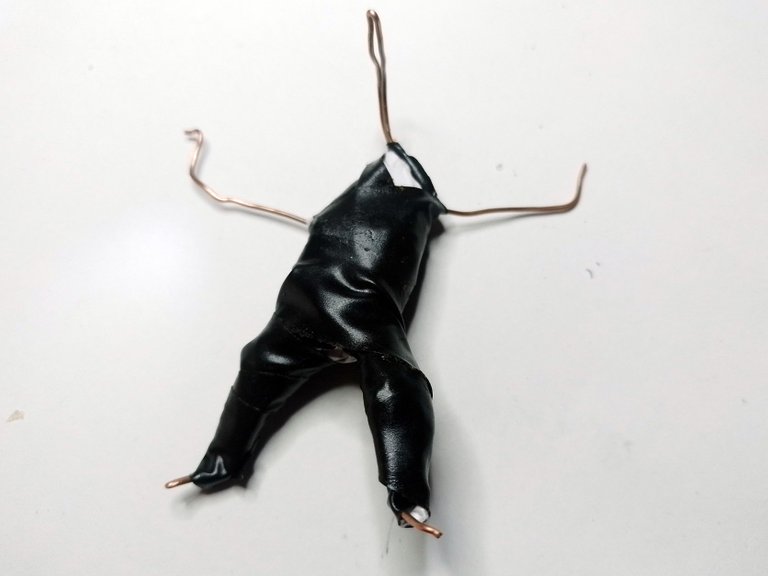
Look at the pictures below, where you can see how I used the wire, paper and tweezers to create a base for my figurine.
The skeleton is wire, but the paper and tape I used to cover this wire skeleton.
Paso a paso
Los materiales que utilicé para hacer esta escultura fueron los siguientes: alambre, papel, cinta, plastilina, pegamento y pinturas; además, usé herramientas como pinzas, agujas y pinceles.
Fíjense en las imágenes de abajo, donde se aprecia cómo usé el alambre, el papel y la pinza para crear una base para mi figurita.
El esqueleto es de alambre, pero el papel y la cinta la use para cubrir este esqueleto de alambre.
 |  |
|---|
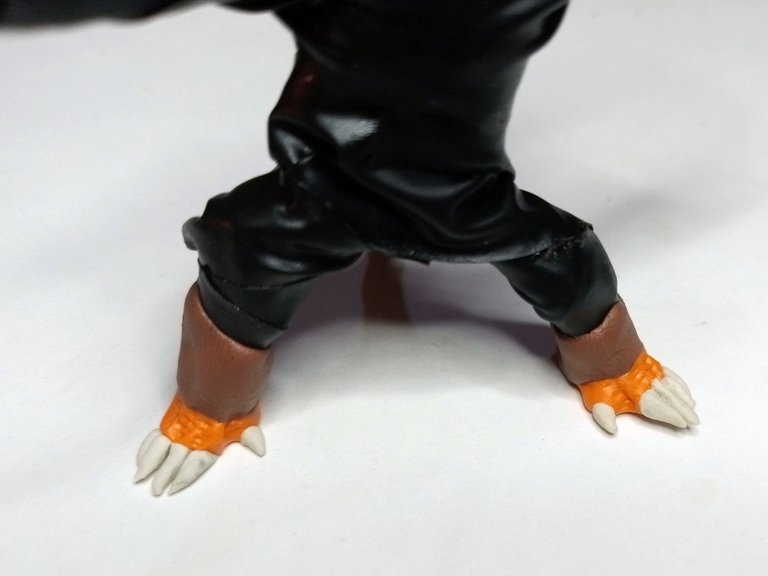
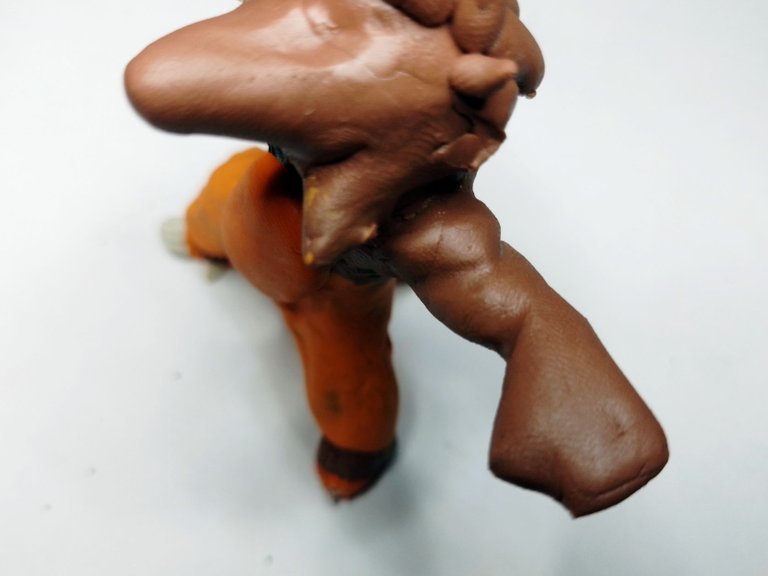
Being a mole, I made the tail to the skeleton at the back, as long as the legs themselves. The idea is that this tail would act as a support to keep the figurine standing.
Al ser un topo, le hice la cola al esqueleto en la parte trasera, tan larga como las propias piernas. La idea es que esta cola actuase como soporte para mantener en pie a la figurita.
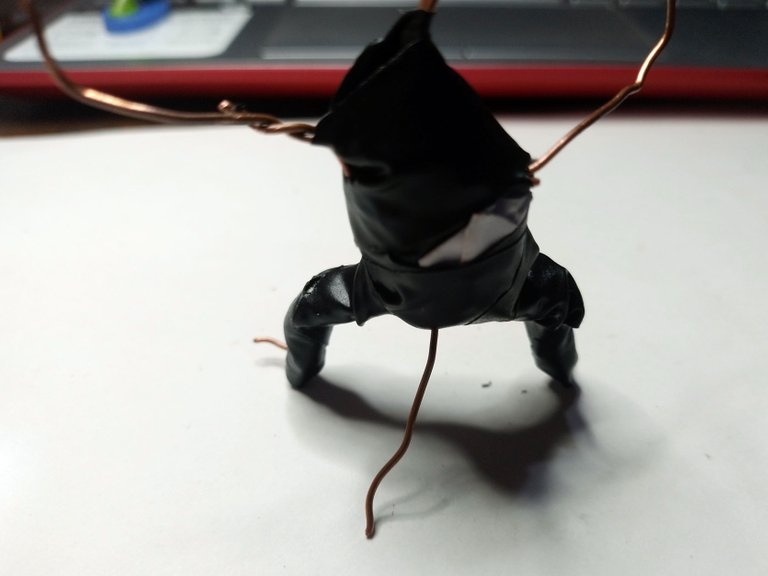
Well, once the skeleton/support of the figure was ready, I started to cover it with plasticine.
I don't always start with the feet, it will depend a lot on the figure I'm making; however, this time I started molding with the feet, so I covered the lower part of the skeleton with brown plasticine for the fur and orange for the mole's feet.
Likewise, I used white plasticine for the figure's claws.
Bien, una vez listo el esqueleto/soporte de la figura, comencé a cubrirlo con plastilina.
No siempre empiezo por los pies, va a depender mucho de la figura que esté haciendo; sin embargo, en esta ocasión comencé a moldear por los pies, así que cubrí la parte inferior del esqueleto con plastilina marrón para el pelaje y naranja para los pies del topo.
De igual manera, usé plastilina blanca para las garras de la figura.
 |  |
|---|
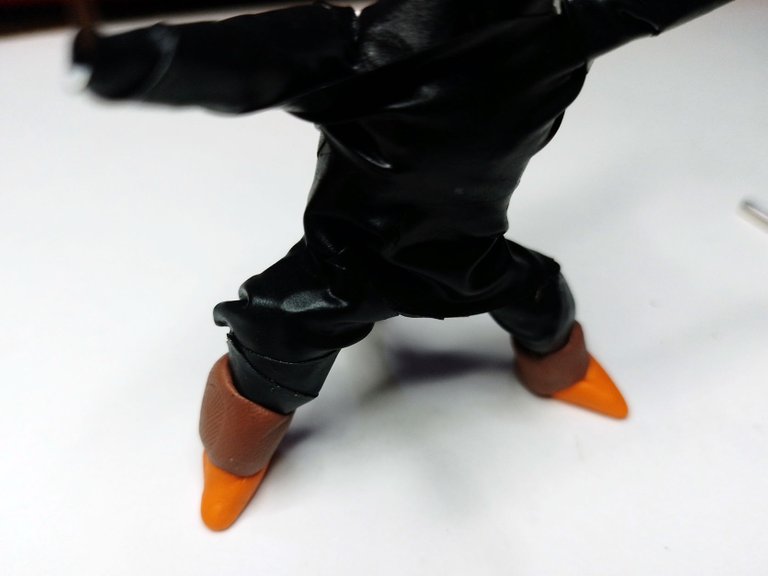
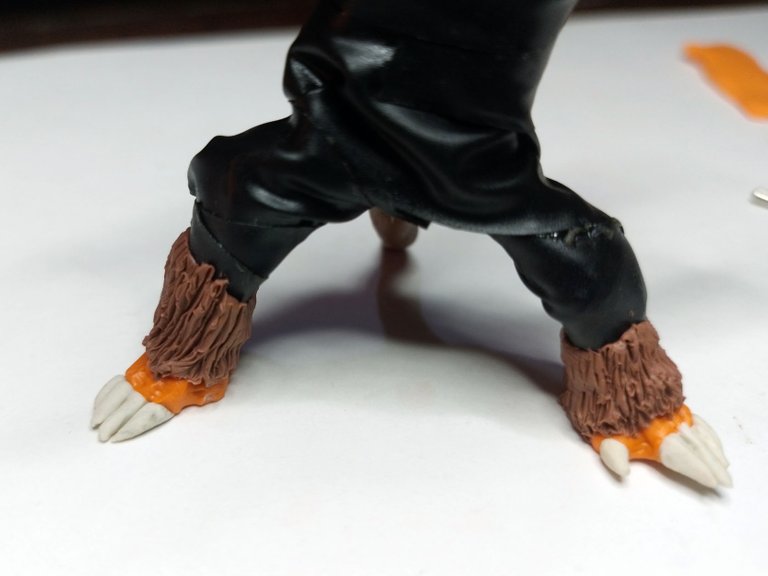
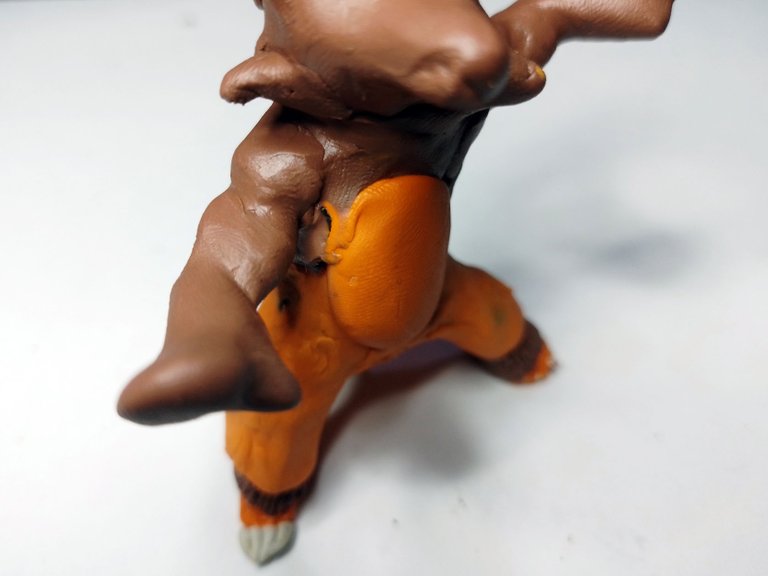
With the help of a fine needle, I made some lines in the brown plasticine, to give a fur-like appearance.
Then I covered the upper part of the legs with orange plasticine, for the character's pants.
Con la ayuda de una aguja fina, hice unas líneas en la plastilina marrón, para dar una apariencia similar a la del pelaje.
Luego de esto cubrí la parte superior de las piernas con plastilina naranja, para el pantalón del personaje.
 |  |
|---|
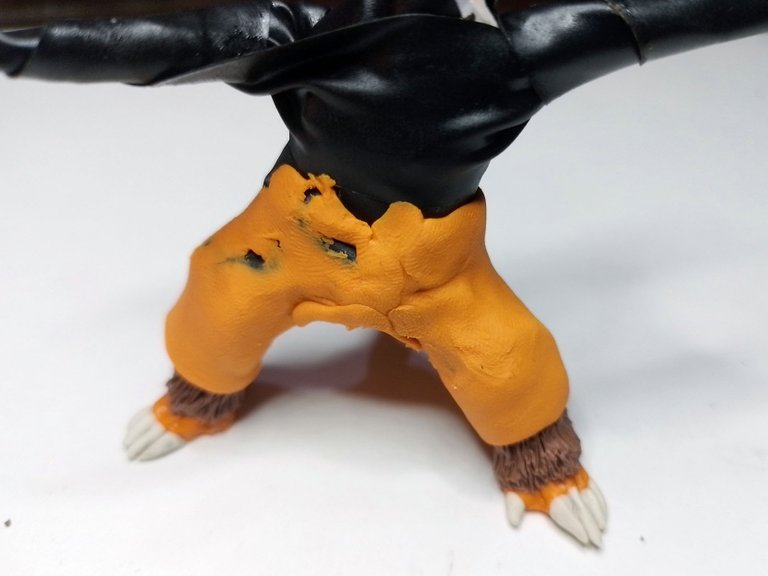
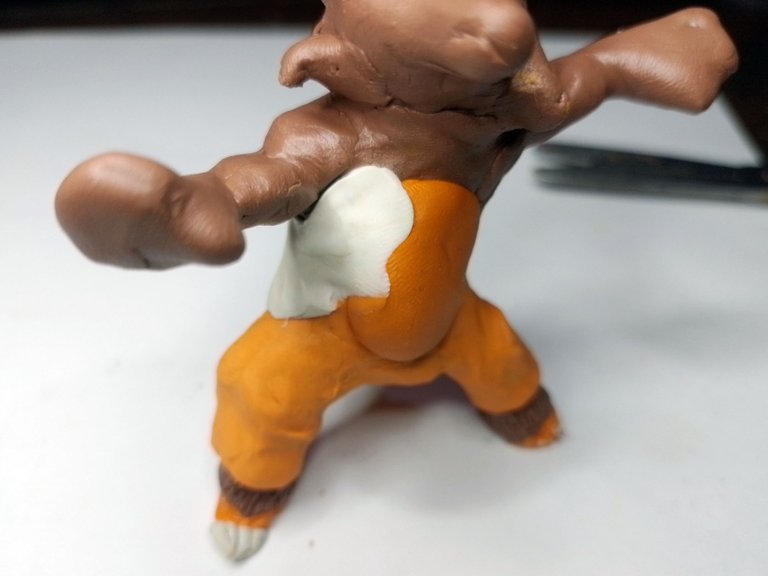
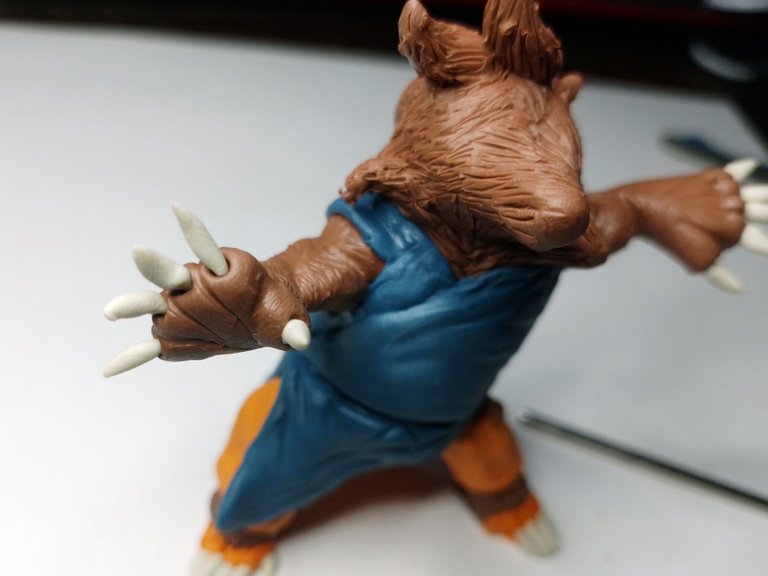
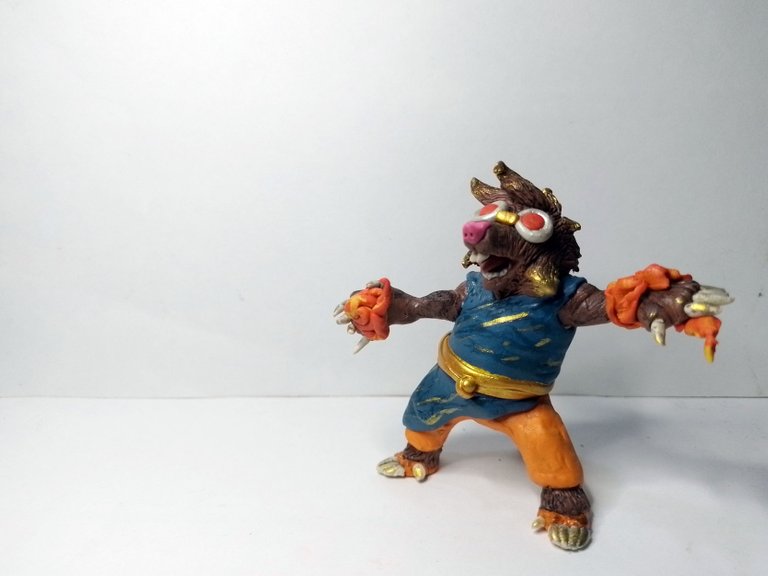
The character on the card has a costume similar to that of a martial artist or a monk. In this case, they are fire warriors, so I made it with an active pose, that is, attacking.
With this pose well defined, I continued with the elaboration process, in this case of the arms.
El personaje de la carta tiene un traje parecido al de un artista marcial o el de un monje. En este caso, son guerreros de fuego, así que lo hice con una posición activa, es decir, de ataque.
Con esta pose bien definida, continué con el proceso de elaboración, en este caso de los brazos.
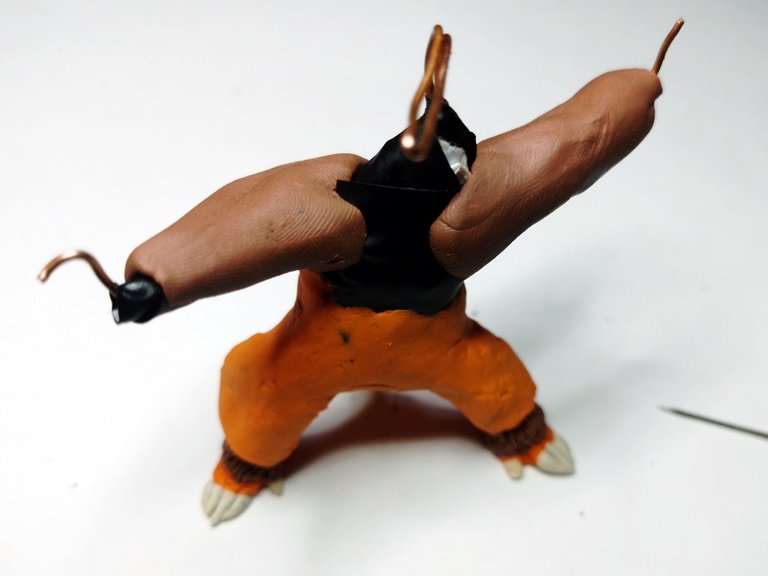
At this point I made a parenthesis, because I had to create the head to give a good proportion to the shoulders and neck.
Notice in the image below how I started by creating the base shape of a mole's head, trying to place it in the right place with respect to the arms.
Then I continued adding other pieces of clay around the neck and on top of the head.
En este punto hice un paréntesis, pues debía crear la cabeza para darle una buena proporción a los hombros y el cuello.
Fíjense en la imagen de abajo cómo comencé creando la forma base de la cabeza de un topo, tratando de colocarla en el lugar adecuado con respecto a los brazos.
Luego continué agregando otras piezas de plastilina alrededor del cuello y encima de la cabeza.
 |  |
|---|
The plasticine pieces that I placed on top of the head are just the ones that I will use to give the characteristic shape of the hair.
Las piezas de plastilina que coloqué encima de la cabeza no son más que las que utilizaré para dar la forma tan característica del cabello.
 |  |
|---|
After defining well the shapes and proportions of the mole's head, I continued shaping the arms, shoulders, triceps and forearms.
He is a warrior, so he must have good musculature.
Después de definir bien las formas y proporciones de la cabeza del topo, continué moldeando los brazos, tanto hombros como triceps y antebrazos.
Es un guerrero, así que debe tener buena musculatura.
 |  |
|---|
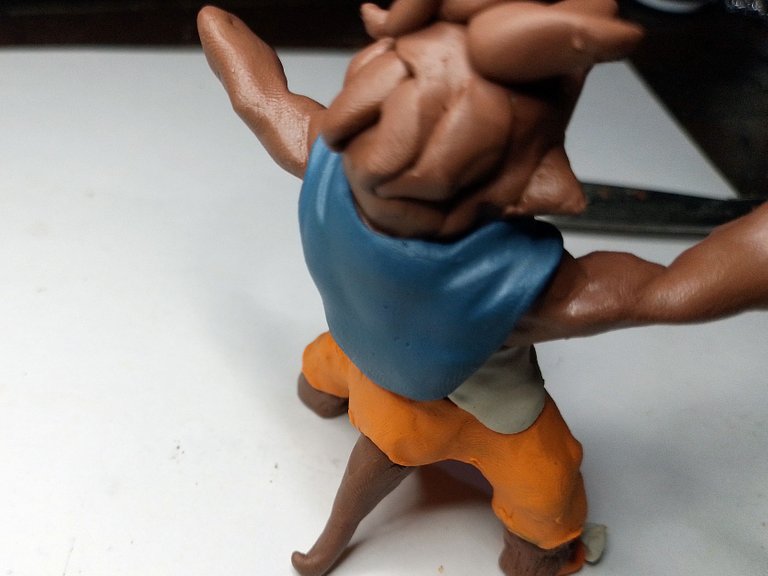
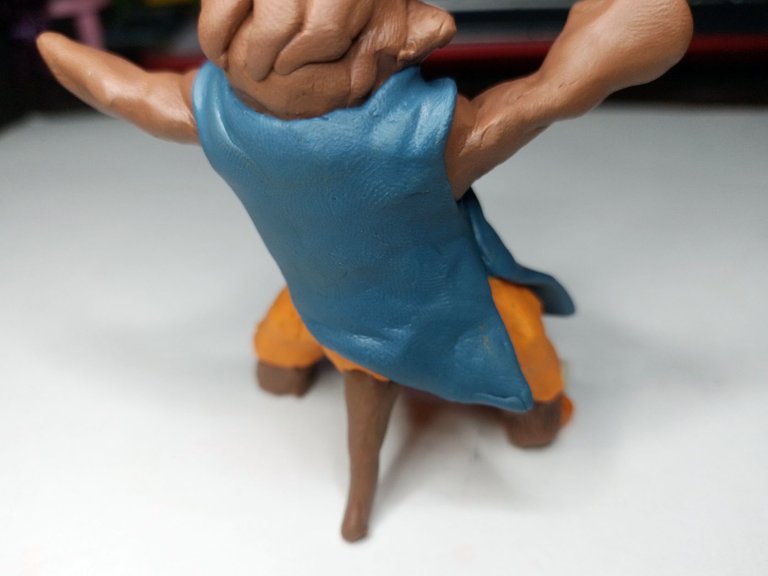
For the clothes I used white plasticine as a base, as it would be like the first clothes underneath, then I began to cover the rest of the torso with blue plasticine, which I molded to give that characteristic appearance that has this type of costume similar to a kimono.
Para la ropa usé plastilina blanca como base, pues sería como la primera ropa que tiene debajo, luego comencé a cubrir el resto del torso con plastilina azul, la cual moldeé para dar esa apariencia tan característica que tiene este tipo de trajes similares a un kimono.
 |  |
|---|
 |  |
|---|
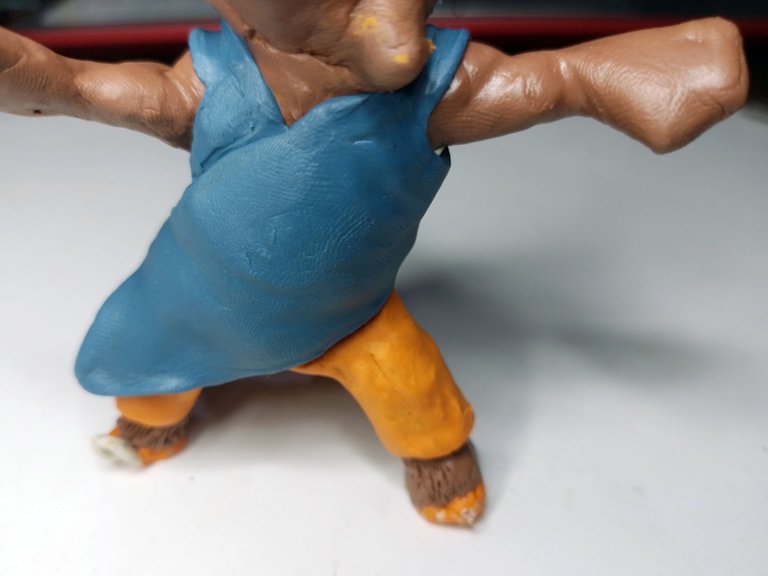
With the costume ready, I used the needle to make lines along the arms and legs, to give a similar finish to the fur.
It is very important to follow an order when making the lines of the fur, as it can look bad if done in a disorderly way, so it is better to follow a pattern.
Con el trajesito listo, usé la aguja para hacer líneas a lo largo de los brazos y piernas, para dar un acabado similar al del pelaje.
Es muy importante seguir un orden cuando se hacen las líneas del pelaje, pues puede quedar mal si se hacen de manera desordenada, así que mejor es seguir un patrón.

Note that I also opened small holes in the hands, to place the claws so characteristic of the mole.
I made claw by claw, so you have to be careful not to knock down the others when you are making them one by one.
Fíjense que también abrí pequeños agujetos en las manos, para colocar las garras tan características del topo.
Hice garra por garra, así que hay que tener cuidado de no tumbar las otras cuando se estan haciendo una por una.
 |  |
|---|
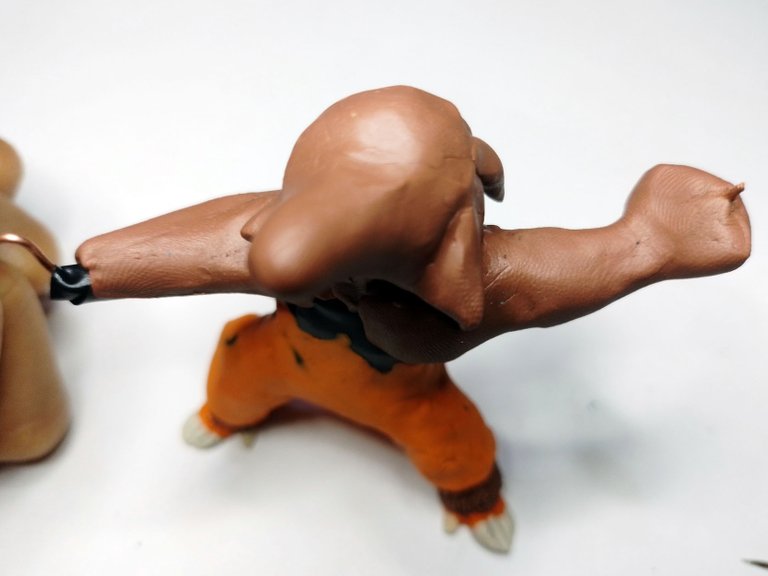
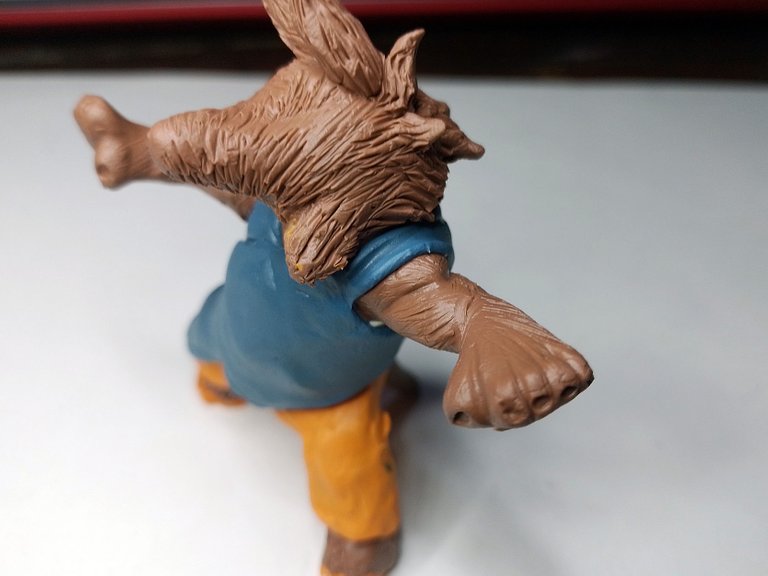
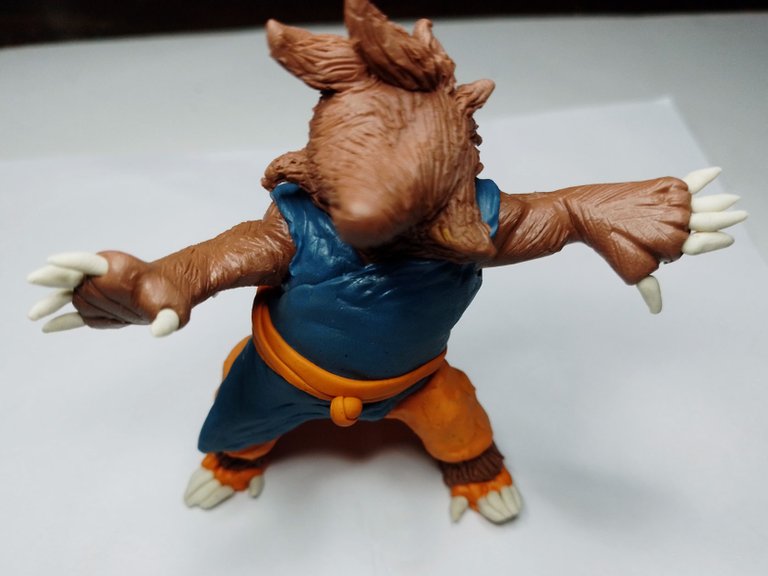
For the body, I tried to give it a robust appearance, because I wanted to make a different character from the one on the card, but keeping its main and similar features.
Therefore, with the thick part of a knitting needle, or a similar tool, I made these undulations that can be seen on the character's kimono.
On the other hand, I also placed a "ribbon" of plasticine around the waist. With this I basically finished the base body of the character.
Para el cuerpo, traté de darle una apariencia robusta, pues quería hacer un personaje distinto al de la carta, pero conservando sus rasgos parecidos y principales.
Por eso, con la parte gruesa de una aguja de tejer, o una herramienta parecida, hice estas ondulaciones que se ven en el kimono del personaje.
Por otra parte, también coloqué una "cinta" de plastilina alrededor de la cintura. Con esto básicamente termine el cuerpo base del personaje.
 |  |
|---|
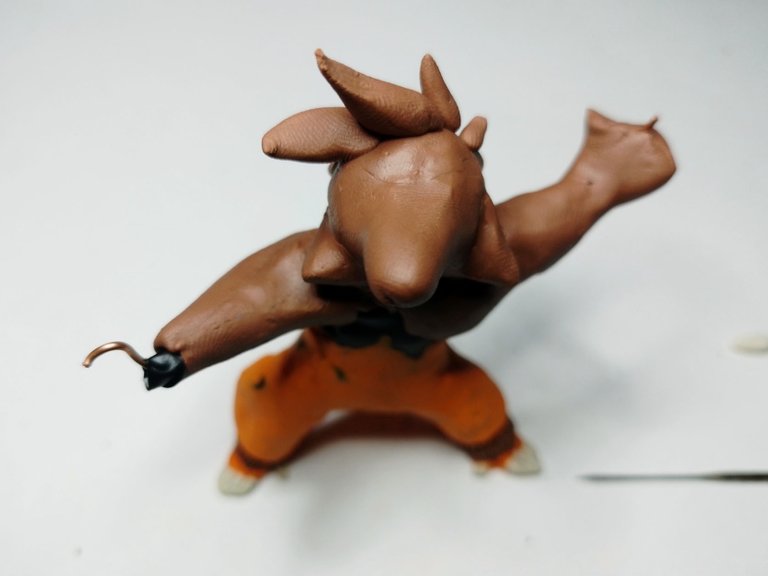
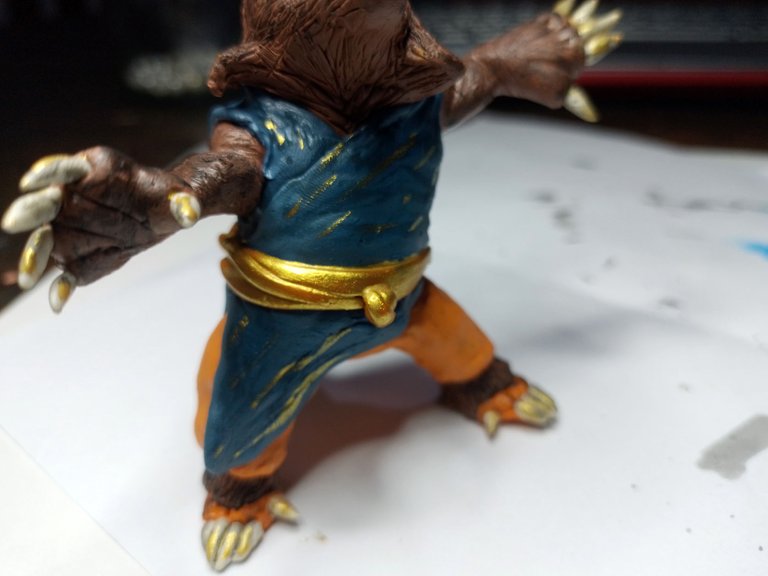
For the final details, I used gold paint.
With this I painted not only the belt of the character, but also the claws and the kimono itself, making small diagonal lines on it.
Below you can see a picture of how the figure was looking at this point.
Para los detalles finales, usé la pintura dorada.
Con esta no solo pinté el cinturón del personaje, sino también las garras y el propio kimono, haciendo pequeñas líneas diagonales sobre este.
A continuación pueden ver una foto de cómo estaba quedando la figura en este punto.
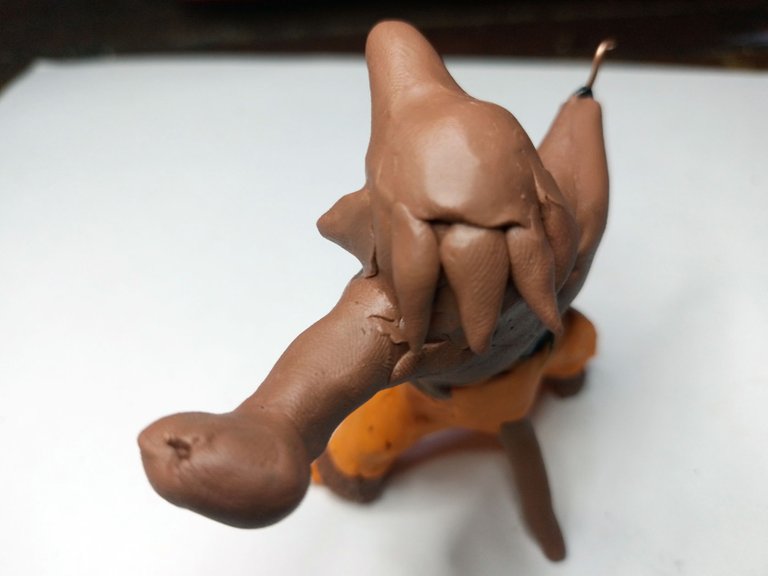
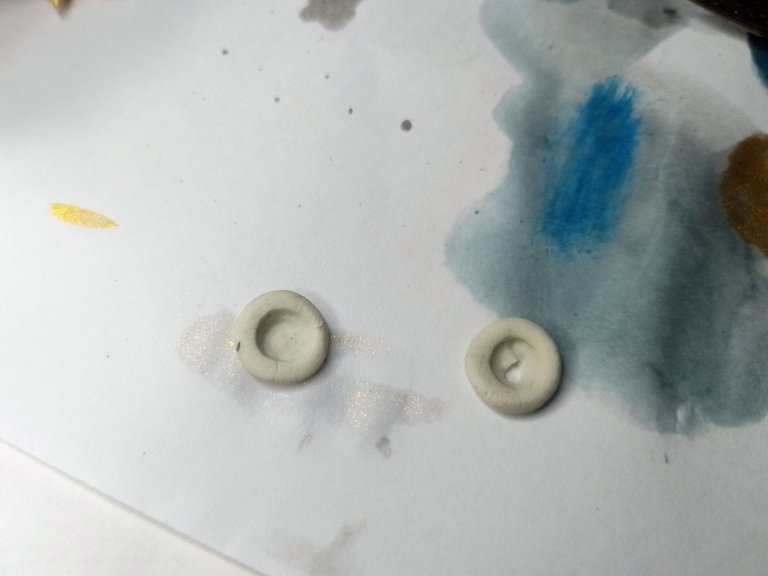
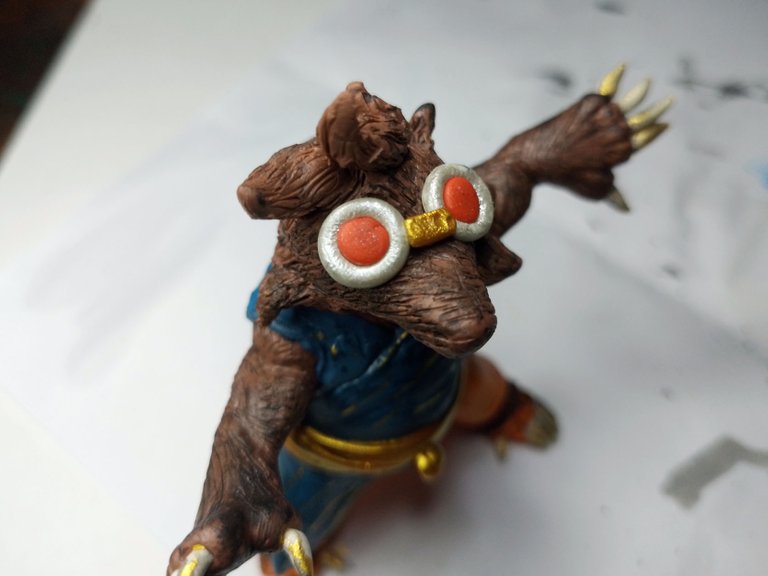
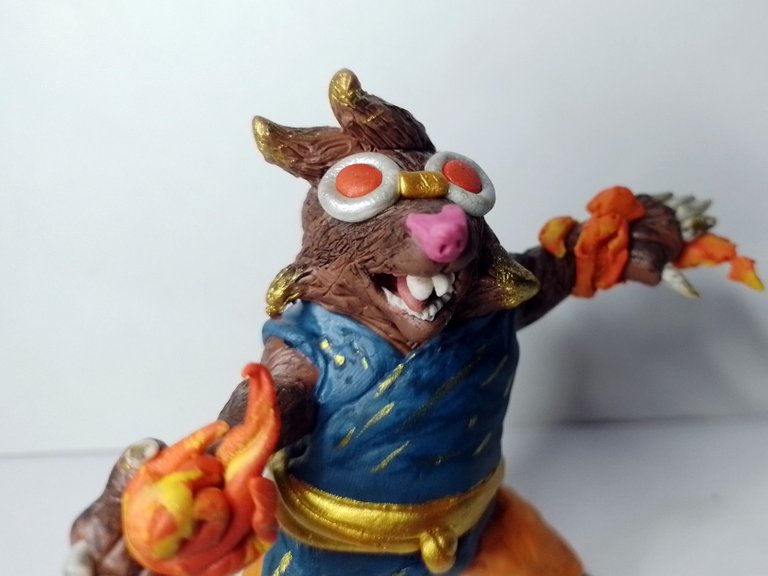
Something important that I wanted to make very similar, were those particular glasses that the character had on the letter.
First I made two circles of white plasticine, then two red and flat spheres with plasticine.
I joined the two pieces together and put them in place, using glue. I used gold paint to create the gold piece that joins the two glasses and also attached it with glue.
Algo importante que quería hacer muy parecido, eran esos lentes tan particulares que tenía el personaje en la carta.
Hice primeramente dos círculos de plastilina blanca, luego dos esferas rojas y planas con plastilina.
Uní ambas piezas y las coloqué en su lugar, valiéndome del pegamento. Usé pintura dorada para crear la pieza dorada que une los dos anteojos y también la fijé con pegamento.
 |  |
|---|
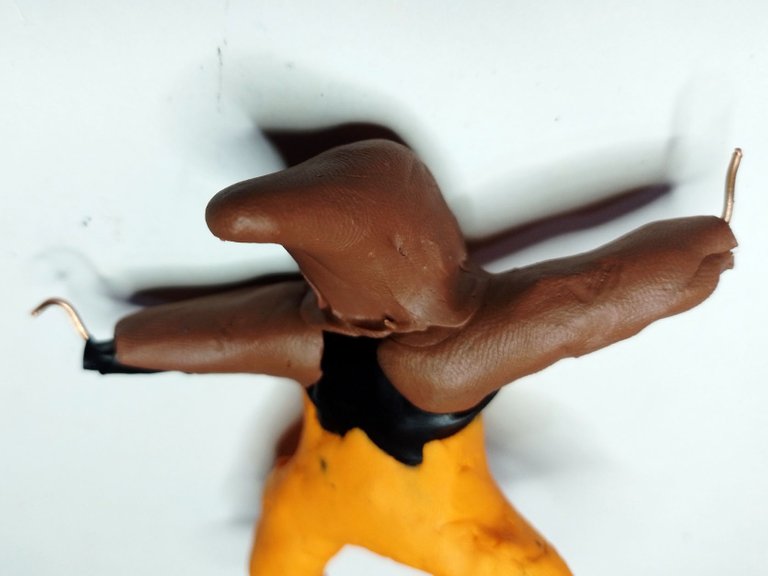
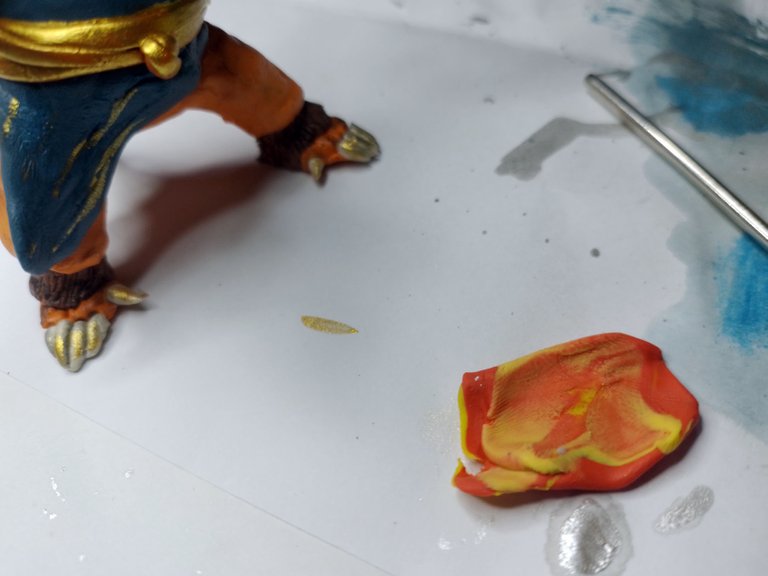
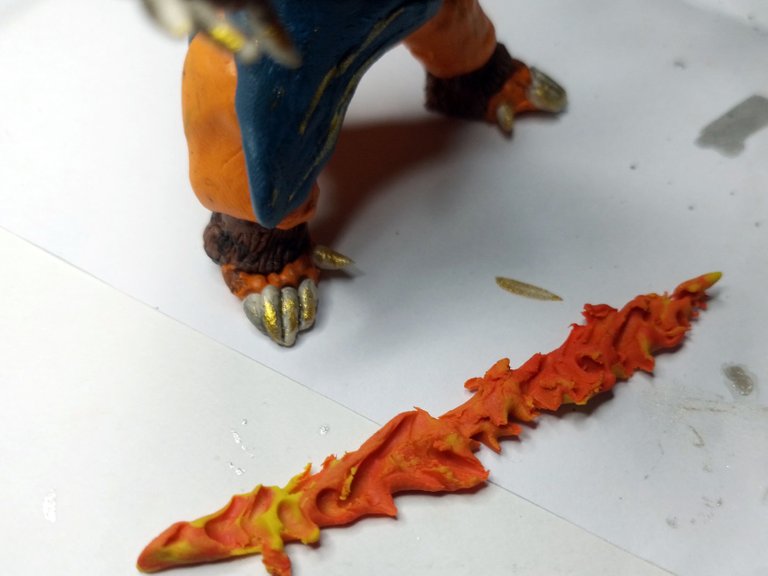
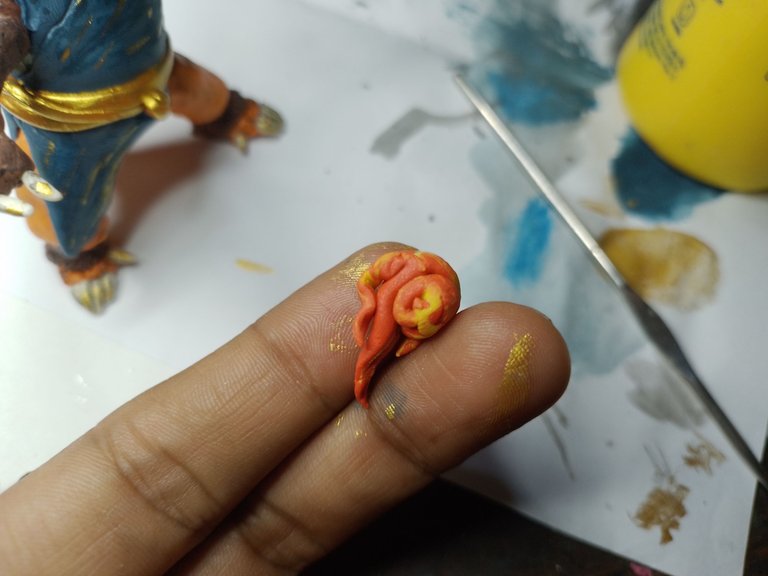
Being a fire character, obviously I had to add these fire shapes either on her hands or arms.
I made it using red, yellow and orange clay.
Al ser un personaje de fuego, evidentemente debía agregarle estas formas de fuego ya sea en sus manos o brazos.
La hice usando plastilina roja, amarilla y naranja.
 |  |
|---|
The rounded and circular shape was placed in the right hand, while the other elongated shape was rolled up in the left arm.
La forma redondeada y circular la coloqué en la mano derecha, mientras que la otra forma alargada, la coloque enrollada en el brazo izquierdo.
 |  |
|---|
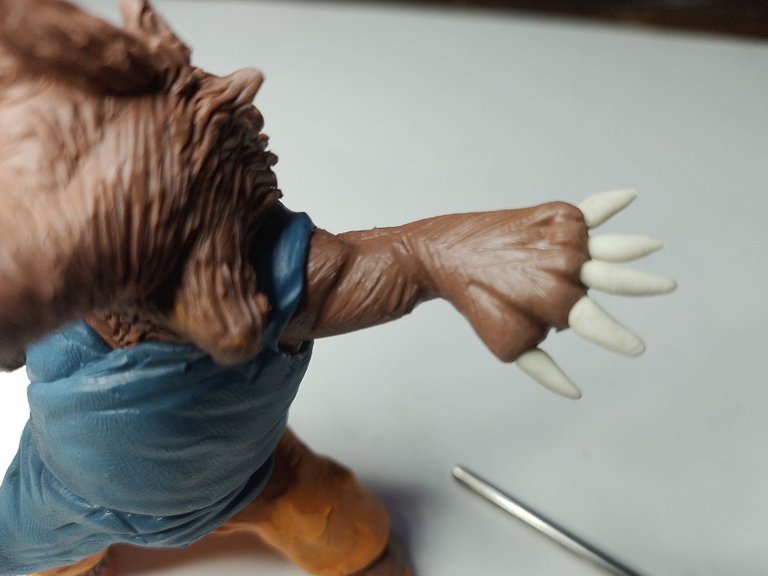
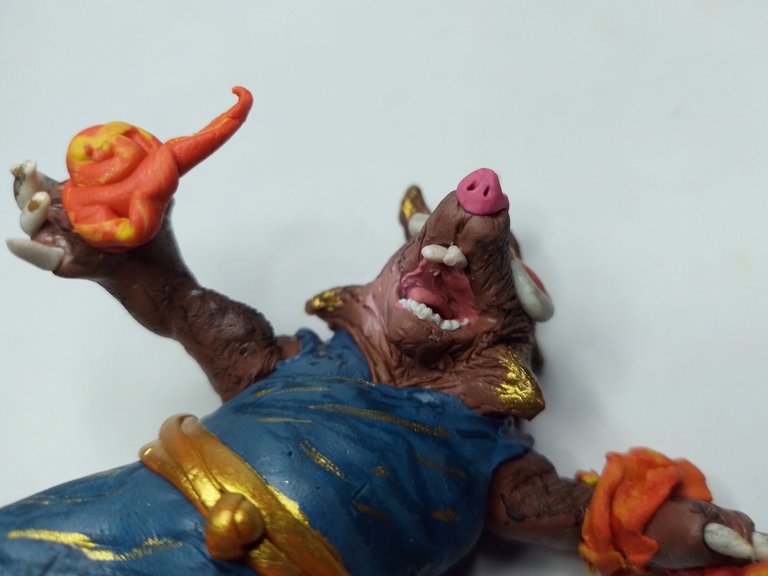
One thing I wanted to do at the end was to open the character's mouth and give him a sort of a very crazy grin, as if he was the craziest pyromaniac who wouldn't last in attacking the legions of chaos.
I tried to make it as realistic as possible, so that was one of the things I spent the most time on.
Algo que quise hacer al final fue abrirle la boca al personaje y darle una suerte de sonrisa muy loca, como si fuese el piromaníaco más loco que no durará en atacar a las legiones del caos.
Traté de hacerlo lo más realista posible, así que fue en una de las cosas en las que más invertí tiempo.
 |  |
|---|
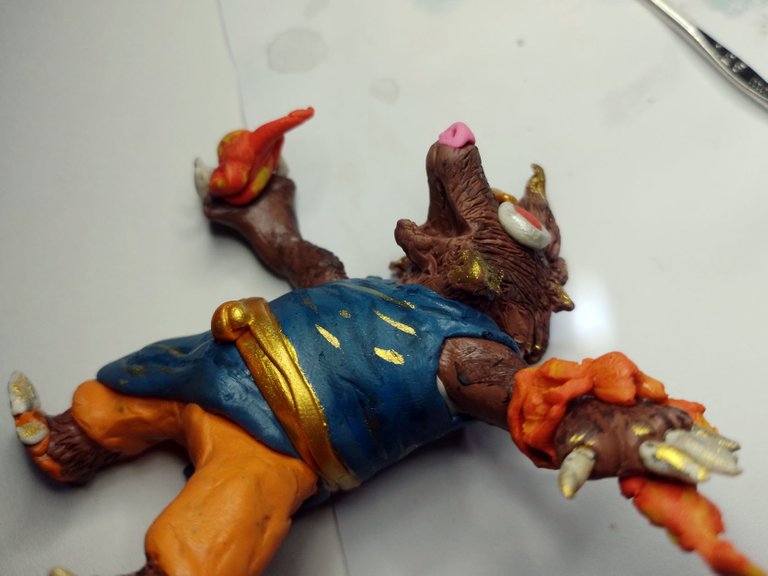
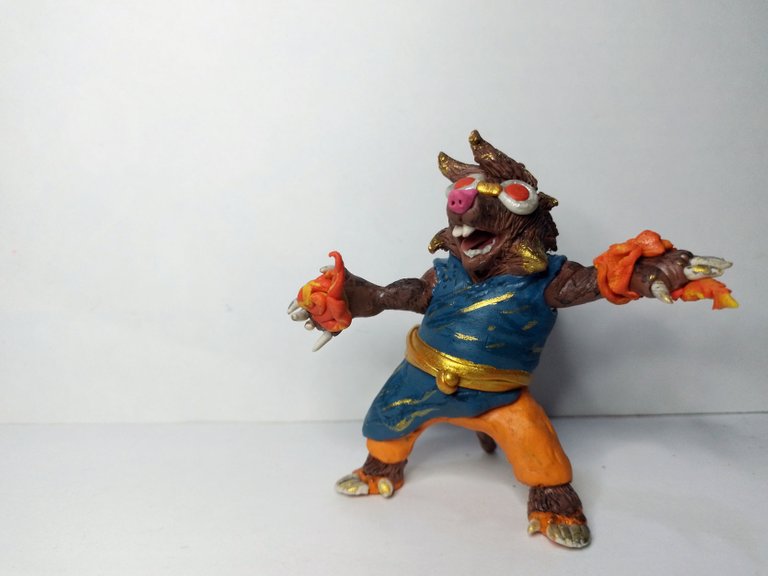
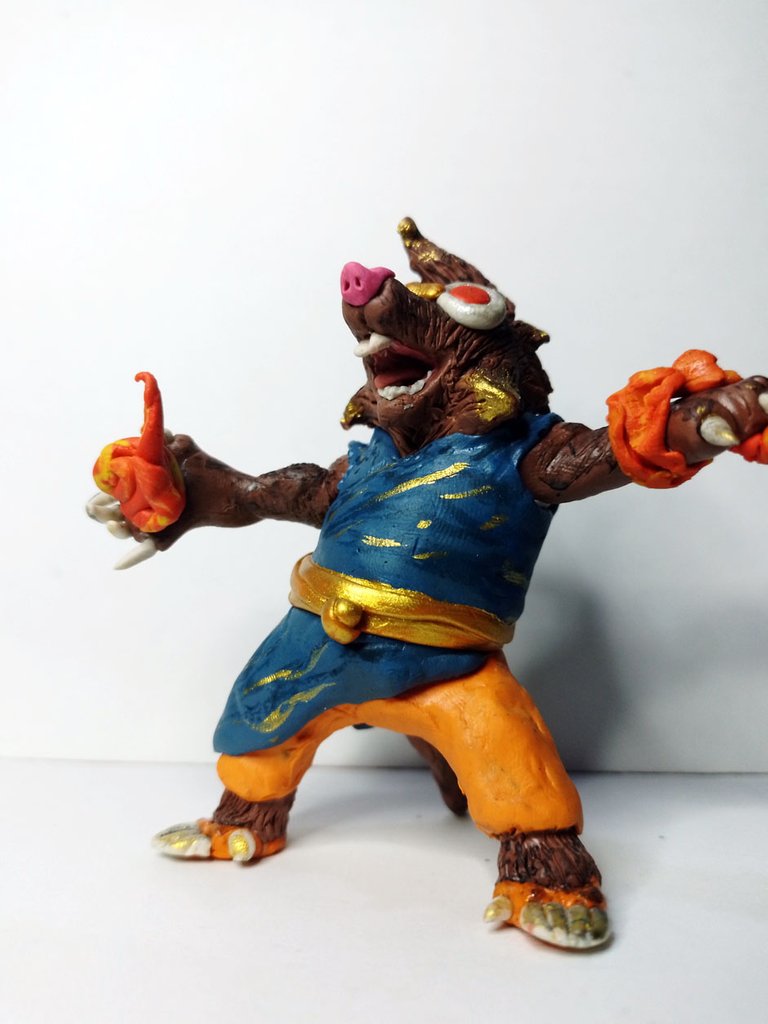
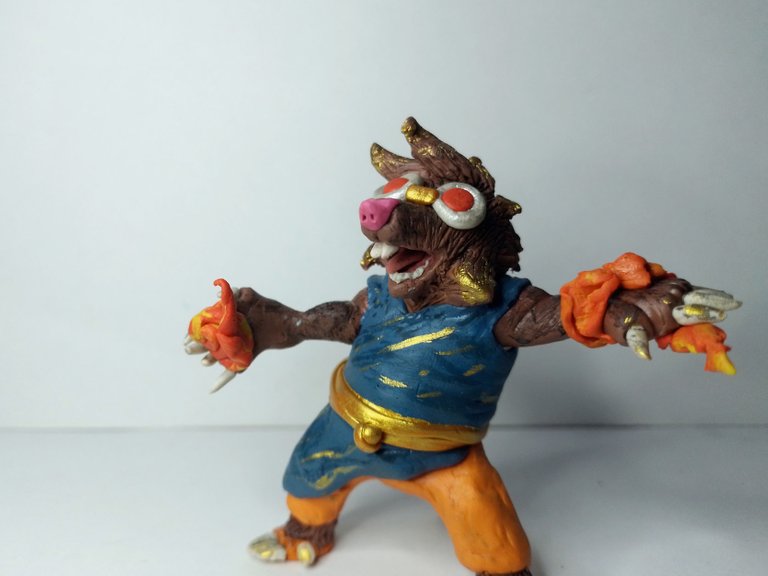
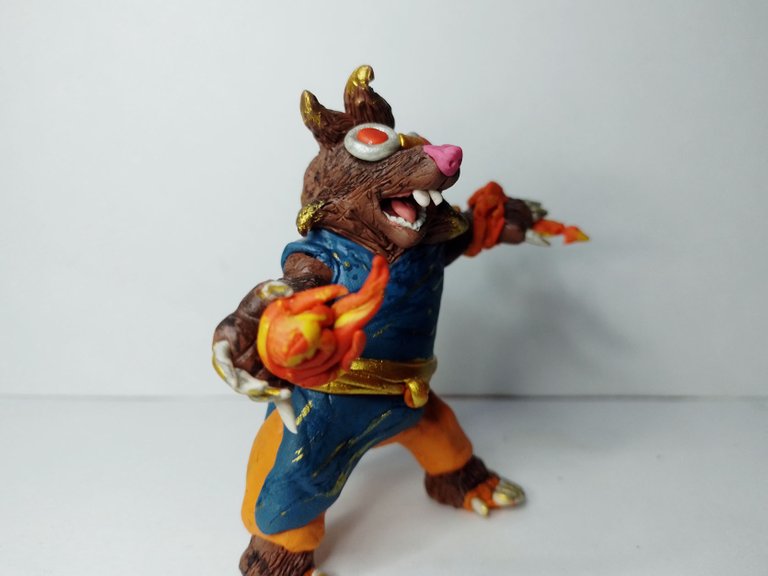
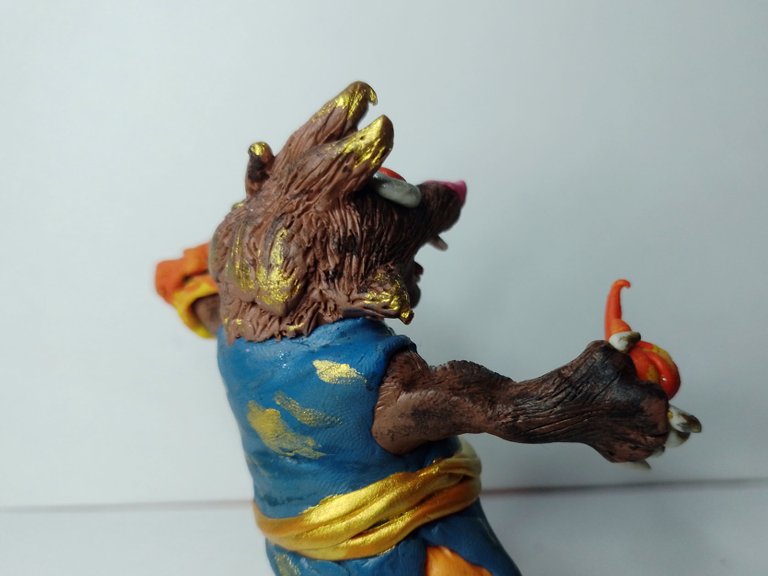
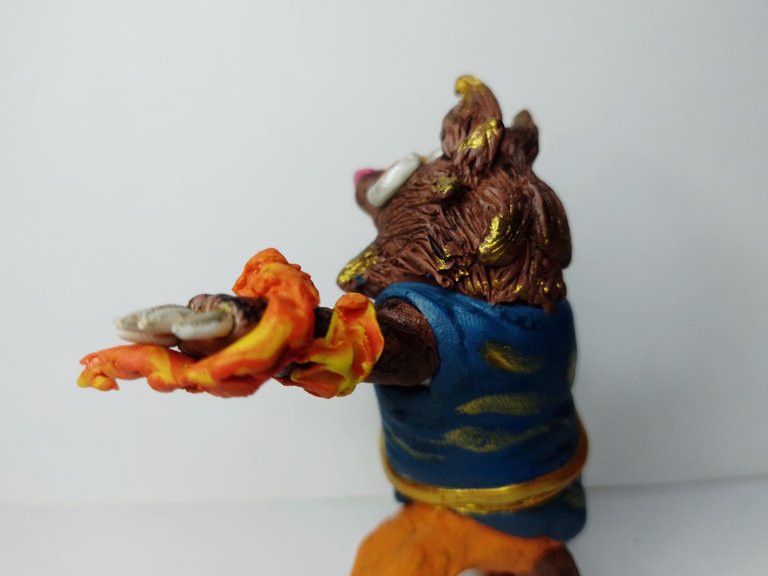
Thus, the figure was finished. Here is a series of photographs of the final result:
De esta manera, la figura quedó terminada. A continuación les dejo una serie de fotografías del resultado final:
Well friends, this has been all for now about my participation in this weekly contest.
I hope you liked my representation in a sculpture of this Scavo Firebolt painter. I invite you to leave your opinions below in the comments, as always I will be happy to read them.
I appreciate you taking the time to read my post, with nothing more to add I'll say goodbye then...
See you next time!
Bien amigos, esto ha sido todo por ahora en cuanto a mi participación en este concurso semanal.
Espero que les haya gustado mi representación en una escultura de este pintorésco Scavo Firebolt. Los invito a dejar sus opiniones abajo en los comentarios, como siempre estaré encantado de leerlos.
Agradezco que se tomaran el tiempo de leer mi publicación, sin más que agregar me despido entonces...
¡Hasta la próxima!


Oh well, thanks for the support! I really appreciate it.
Bello ese topo. Me encantan los detalles pequeños como las garras y los dientes, son realmente diminutas piezas. Te quedó genial 😊👍🏻
!discovery 45
Si, imagínate el dolor de cabeza con el que terminaba a veces por tener que hacer cosas tan pequeñas. Menos mal ya tengo lupa, sino sufriría.
This post was shared and voted inside the discord by the curators team of discovery-it
Join our Community and follow our Curation Trail
Discovery-it is also a Witness, vote for us here
Delegate to us for passive income. Check our 80% fee-back Program
Has sido curado por @visualblock / You've been curated by @visualblock
Bienvenidas delegaciones / Delegations welcome
Encuentra nuestra comunidad aquí / Find our community here
Trail de Curación / Curation Trail
Vota por nuestro Testigo aliado - @hispapro / Vote for our allied Witness - @hispapro
Más información sobre el testigo aquí / More information about the witness here
vaya! esta increible. Al principio miro la base de los muñecos y es increible como pasas de eso a una gran obra. Felicidades!
Bueo es que así es todo. Fíjate por ejemplo una casa, empieza por el terreno, después por las columnas, luego obra gris. En ese punto aunque esté relativamente lista una casa se sigue viendo fea, es cuando se termina que queda genial jejeje
Solo cuando algo se termina es que vemos su verdadera belleza
Figuritas!!!! amo las figuritas
Querido Gabo, qué estupendo trabajo el recrear de forma física los personajes de Splinterlands a tu estilo, es sencillamente genial!
Si, la idea es crearlas a mi estilo y hacer algo genial sin dejar de lado la base en la que me inspiré.
Graaaaacias por venir a comentar, siempre son bonitos tus comentarios.
very talented,and good dedication for perfect sculpting..good jobs bro !
As the creator of the work I think it is not perfect and it lacks many details, but I liked the result. If I had more free time I could do it better but these days you never have time to spare hehehehe but you do what you can. Thanks for commenting my friend.
I, as a person who cannot make sculpture, am very impressed with your skills. And what else do you say that this is not optimal and I can't imagine if the manufacturing time was longer. This can definitely be a masterpiece, I really appreciate your talent and dedication, best regards
Un maravilloso trabajo como el que acostumbras regalarnos con tus esculturas, querido artista. Felicidades, quedo espectacular. La mejor de las suertes en el concurso ✨
!PIZZA
!HUG
!LUV
I sent 1.0 HUG on behalf of @dayadam.
(3/3)
@gaboamc2393, @dayadam(1/1) sent you LUV. | discord | community | HiveWiki | NFT | <>< daily
! help(no space) to get help on Hive. InfoGracias, trate de hacerla lo mejor posible a pesar de las circunstancias y el tiempo. Quedó horrible el topo, pero genial la escultura jajaja
$PIZZA slices delivered:
@dayadam(2/5) tipped @gaboamc2393
https://leofinance.io/threads/dayadam/re-leothreads-gjjnr9ps
The rewards earned on this comment will go directly to the people ( dayadam ) sharing the post on LeoThreads,LikeTu,dBuzz.
Wonderful sculpture, great work. Congratulations. Best of luck in the contest
awesome sculpture, looks so realistic ^^
Oh great! Thanks for comment!
WOW amigo!! Tu trabajo es increíble. La escultura quedó perfecta, los detalles son increíbles, la pose y la expresión del personaje como si estuviera loco es muy buena.
Jajaja esa es la ieea, tratar de darle una cara de piromaníaco que quemaría el mundo si pudiera jajaja
Jaja me gusta mucho, lograste dar con la expresión exacta.
Esta increíble! Gran trabajo y que detallado post, me encanta su expresión alocada y sus dientesitos, es malvado y loco, pero que adorable quiero abrazarlo jajaja
Si, provoca hacerse un peluche. Me recordaste una escena de antman 1, cuando scott lang le regala a su hija un peluche horrible y ella dice "es horroroso, me encanta...!"
Gracias por unirte a nuestra iniciativa de Celf radio y la curación en vivo "Espacio de apertura"
Do you know you can win a Chaos Legion pack and many other things just by following some simple steps ?? Check out our Latest Daily Showcase and Participate our latest Giveaway. Thanks
I'm going to read that you mention. Thank you very much for the support! It encourages me to keep creating my art and sharing it with the community.
Thanks for sharing! - castleberry#6859

Thanks to you for the contest! It's a great opportunity to continue to create cool artwork and fill huve beautiful and cool art.
Wow, genial
No sabia lo de la cinta, pero es interesante ya que le da una estructura mas fuerte y evita que se gaste mas material
Muy detallado la figura, la exprecion de la boca, la lengua, los dientes.
dan bastante fluidez
me sorprende que sea plastilina
la verdad se poco de manualidades, pero recuerdo una vez que cuando intente pintar una figura hecha de plastilina, se deshiso el acabado de surcos de pliegues y a los pocos dias se derritio muy feo
Puede que tocaba diluir la pintura de agua o hecharle algun quimico adicional a la plastilina al amazar, no lo se.
Un amigo me dijo que para ello comprara mejor una macilla llamada porcelanitron.
que es una plastilina quimica que se solidifica
con la que hacen figurillas y llaveros con alguna gema de piedra en la mitad redonda.
pero estaba re- cara y no lo intente.
Eso si, mi amigo compro la masa aquella y los kits de elementos para hacer detalles como hojas y demas moldes.
De eso no volvi a intentar, XD
y ahora duele, porque quisiera hacer mis OC (personajes en figuras pequeñas), ja, ja, ja.
buen detalle de trabajo.
Pues no es necesario tener tantas cosas para comenzar. Yo llevo años haciendo figuritas y mis herramientas son una aguja de tejer y palillos de madera. A veces esos objetos de hacer moldes y "herramientas especiañizadas" son lujos.
Si aprendes a hacer las cosas con tus manos ya podrás usar cualquier cosa para moldear.
Tengo una serie de tutoriales quebpuedes seguir porbsi deseas aprener:
https://peakd.com/created/lwgabo
Casi todos son con plastilina, pero fíjate que la plastilina es aceitosa y solo hay que dejar que se seque un par de dias antes de pintarla. Siempre será blanda, pero al menos no se derretirá si haces esto. Igual depende de la plastilina. Ahora el porcelanicron es masa flexible, no es químico ni nada, de hecho es a base de de agua y también se puede mezclar con plastilina.
Amigooo waooo que creatividad tan hermosa con todos sus detalles de este Topo fue genial te felicito mucha paciencia, creatividad y motivación estuviste grandioso y le pusiste cariño.
Feliz día bendiciones.
Bueno a las cosas hay que ponerles cariño parabque salgan bien. La idea es que queden lo mejor que se pueda.
Feliz día y bendiciones para usted también.
Así es amigo hay que ponerle corazón pero eres un artista haciendo esto te felicito
Amén gracias de igual manera bendiciones para ti. Exitos.
Congratulations @gaboamc2393! You have completed the following achievement on the Hive blockchain And have been rewarded with New badge(s)
Your next target is to reach 5500 comments.
You can view your badges on your board and compare yourself to others in the Ranking
If you no longer want to receive notifications, reply to this comment with the word
STOPCheck out our last posts: